Showing posts with label The Open Sea. Show all posts

Tuesday, July 29, 2014

Pals Paper Arts Sketch Challenge PPA213

I totally missed this Pals Paper Arts Challenge (PPA213) this week, so this is going to be an uber quick post.  There's something about the timing on their challenges, that I keep missing.  It must be the East Coast time slot.  Oh well, I'll get it right next time.

Here's the sketch that got my interest up:

Here's My Card:
This is another Masculine Birthday card made with Maritime Designer Series Paper and the Open Sea stamp set.  If you like this Maritime DSP there's still time to get in on the Designer Series Paper Buy 3 Get The Fourth for Free - this special promo ends on July 31st. 


I'm so sad that the Perfectly Penned stamp set was retired this year.  It's one of my faves for masculine cards.  An alternative to this set is Sassy Salutations
The Happy Birthday sentiment in the Sassy Salutations stamp set isn't as large in this stamp set, however it's still got a heavy masculine quality to it.  The other bonus is the additional great sentiment stamps in this set, such as Feel Better and Congratulations. 
Supplies:
Stamp Sets:  The Open Sea, Perfectly Penned (retired)
Ink:  Night of Navy, Real Red, Coastal Cabana
Designer Series Paper:  Maritime
Cardstock:  Whisper White, Night of Navy, Read Red
Accessories:   2 1/2" Circle Punch, 3" Circle Framelit, 1 1/4" and 1 3/8" Square Punches, Adhesive and Dimensionals.

Happy Stampin!
Penny Tokens

Thursday, July 17, 2014

Nautical Birthday Card


We're still basking in the sunshine here on the West Coast, and while it's been a tad hotter than is comfortable, no one, and I mean no one, is complaining.  It finally feels like summer has arrived. 
Today I want to share a masculine birthday card that began as an"idea forming", while I was making my Nautical Get Well card earlier in the week. 

How does one get an "idea forming"?  Well, to begin with, I was really inspired by the Maritime Designer Series Paper I was working with and wanted to make something else with it. The designs are beautiful.  

About the same time, I saw a card post featuring the Paper Pals Arts Colour Challenge PPA211 and I really liked the bold statement it made.  Although it was too late to participate in the challenge, I never let that hold me back, after all it's the idea that counts.

Finally, an idea started to come together in my mind, around combining the colour challenge, the Maritime DSP and a "wow easel card" design I'd made some time ago.  Once I could visualize how it would all come together I thought this will make a great card.  And guess what?  It did!


So let's begin with the Colour Challenge:
The bold combination of Night of Navy, Daffodil Delight and Whisper White really got my wheels turning.  

Since the piece of Maritime Designer Series paper I was working with was a mixture of Night of Navy and Whisper White, I was already two thirds of the way towards making my card.  All I had to do was add the Daffodil Delight into the mix and that was definitely a no-brainer.

Here's My Card:

If this isn't Nautical, then I don't know what is!  Here's the front view of my card.  It's a little difficult to see the side panels and folds of the easel, but you will in the next picture. 


I think this is such a manly card but imagine making it for a guy who loves the ocean or sailing. Even better!  For me, I love the colour match-up and the simple lines of the card. In this side view you get a better idea of how the side folds work. Here are a few more pictures showing some of the detail. 

Here's a view of the inside of the card.  Again plain and simple.  And what a bonus, there's lots of room to write on.
I used my Stampin' Up! Trimmer to cut and score this card.  The card base is Daffodil Delight and measures 4 1/4 x 11.  The card base can't be folded until all the score lines and cuts have been made.  Once that's done then the card will basically fold in on itself - so be patient.

I know the stamp set Perfect Punches is long retired, but I'll never get enough of this "happy birthday" sentiment.  I enjoy using it because it goes with almost all my masculine card themes.  It's kind of bold and "manly" script and it's got those non-feminine (in my mind) swirls going on.
Don't you love this ship's wheel?  Looks complicated to make right?  Actually its very simple to make.  Using the Word Window punch cut out eight spokes. Switch to a Crop-a-dile or whatever eyelet setting tool(s) you have to add the eyelet to the end of the spoke. Once you've got them all made, you simply arrange the spokes evenly around the circle. I found it easier to get them evenly spaced using the "clock method" and my grid paper first.  The clock method is simply lining up in this order:  12:00 o'clock, 6:00 o'clock then at 9:00 o'clock and 3:00 o"clock.  Then fill in the gaps at 1:00, 5:00, 7:00 and 11:00.  I used glue dots to adhere them to the back of the Night of Navy circle.  Although you can't see it I covered up all the spokes on the back with another circle. 

Supplies Used:
Stamps:  The Open Sea, Perfect Punches (retired)
Ink:  Night of Navy
Card Stock:  Night of Navy, Whisper White, Daffodil Delight
Designer Paper:  Maritime DSP 
Accessories:  Circle Framelits, Large Oval Punch, Word Window Punch, Silver Elastic cord, 8 silver medium sized eyelets, Crop-a-dile, Trimmer, Dimensionals, Adhesive.

 I hope you enjoyed my card and will leave me a comment.  

Happy Stamping! 
Penny Tokens

Tuesday, June 11, 2013

Stampin On Tuesday Masculine Card Class

With a number of male birthdays coming up and Father's Day just around the corner, I decided to kick off the first of my Stampin' on Tuesday Card Classes with some Masculine Cards.  

I don't know about you, but masculine cards have always been the most difficult ones for me to make, and I always have to put my thinking cap on when making them.  For this set, I wanted something that would be exciting and fun to make.

To begin with, I don't have a lot of masculine or graphic themed stamps.  I need to change that, don't you think?  And, I've made lots of shirt and tie related cards in the past, so it's high time to find something new and modern!

With that in mind, I set out to design four simple cards with a minimal amount of stamping, modern colours and design elements and appeal for men.  I also wanted a variety of cards that would work for any occasion such as Father's Day, Birthday, Retirement, Graduation, Thinking of You, and Encouragement.  Tall order you say?  I checked out card shops locally and did some searching on the internet and with a little help here's what I came up with, I hope you enjoy them:

Card Number One: Striped Masculine Card


If you're like me you probably have lots of scrap card stock kicking around, so here's a great way to use up those those bits and pieces.  

This simple card starts with a standard  5 1/2" x 4 1/4" base in Crumb Cake,  followed by a 5 1/4" x 4" layer of Whisper White.  Add 1/4" inch stripes in Basic Black, Marina Mist, Cherry Cobbler and Crumb Cake. Very the length of the strips in conjunction with the size of the sentiment stamp you use.  You can also change up the direction of the card and have the fold at the top and your stripes layered horizontally for a different look.  I stamped this big bold birthday sentiment from the "You're Amazing" Stamp set in basic black ink.  I think it adds a very masculine look to this card front.
Card Number Two:  Washi Tape Birthday Card

Have you used Washi Tape yet?  Well this next card features the Washi Tape from the Epic Day - This and That Collection.  This was my first experiment with it and I'm in love!

What fun!  There are three spools in each of Stampin' Ups! Washi Tape  collections and they are 3/8", 1/2", 5/8" in width.  Each spool has 5 yards of tape.  

These beautiful translucent tapes have a lot of flexibility to them.  They're light weight and can be easily be removed or repositioned without damaging the card stock or leaving marks behind.  Note:  Washi tape is not the same composition as adhesive tape (think Magic tape), so they aren't strong enough to permanent bind objects together, they are more for decorative purposes.  

I got inspiration for my card when I recently attended Deb Smart's New Catalogue Open House.    Here is what her card looked like:
Deb's card uses the Gingham Washi Tape Collection and Serene Silhouettes Stamp set.


I've used all three of the Washi Tapes in the Epic Day set and created a grid pattern. You can create whatever pattern that appeals to you when making this card.  The card base is in Crumb Cake and the first layer is Calypso Coral Card stock measuring 5 1/4" x 4".  The Whisper White layer is 5" x 3 3/4". The sentiment is stamped with the Pretty Petites and That's the Ticket stamp sets on Whisper White card stock.  I used the new Petite Curly Label punch for the happy birthday sentiment and the Ticket Duo Builder punch for the basic gray layer and the happy birthday ticket image.  Note: To create the ticket layers I fussy cut around the Calypso Coral stamped image.
If you stamp on Washi tape you create a whole new look.  For this card I used Basic Gray classic ink, and the image from The Open Sea.  I also spritzed the card face with Calypso Coral, Basic Gray and Crumb Cake re-inkers for a splotched appearance.  Tip:  Leave some extra drying time for the stamping on the Washi Tape as the ink does not dry as quickly as it does on card stock, and you wouldn't want to smudge it.
Card Number Three:  Colour Swipe All Occasion

My next card uses a direct to paper technique where you literally take your ink pad and swipe it across your card stock. Thus the name "Colour Swiping". 

I'd actually forgotten about this method of stamping but my interest was rekindled by Julie Davidse's blog post titled "Feeling Blue".  

I liked Julie's great card with its free flowing design and blend of colours, and decided this technique would work perfectly for the card I had in mind.  Here's my card:  

I used Soft Sky one of the new Subtles Collection colours along with Basic Gray and Midnight Muse cardstocks and inks for my card.  The Labels Collection framelit dies were used to cut the stacked sentiment and backing labels. Three 3/8" Silver Mini brads were added for some interest.
The sentiment stampwhich I feel is very versatile and could be used for almost any occasion such as "Retirement, Congratulations, Graduation or Encouragement is from a very special stamp set that Stampin' Up! distributed to demonstrators who attended the 2012 SU Convention in Salt Lake City.  It is aptly titled "I Am....".  This years new catalogue has many sentiments that would also be perfect for this style of card.

To finish off this card I wanted to add movement and a sense of going somewhere.  To achieve this I chose to add a strip to simulate a tire tread.  I did this by embossing a  1" strip of silver duct tape and glued it behind the sentiment labels layers.  I also added three 3/8" mini silver brads to draw the eye across the card face.  I don't know if anyone else gets my theme for this card, but for me it was "mission accomplished".


Card Number Four:  Open Sea Double Flip Card

The last card in my Masculine card class is one of those WOW cards that I wish you could see in 3-D because it's really very special.  I cased it exactly the way it was shown and I have to give full credit for the design and execution of this card to Tammi White of "Stampin' With Tami".

The card base is in Crumb Cake and is cut 7 1/2" x 4 1/4".  I used the 2nd and 3rd label dies from the Label Collection die cuts produced by Stampin' Up!.  The beautiful stamped images are from one of my all time favourite sets, The Open Sea.  I hope you enjoy this card.  
This is the front view of the flip card.  When it is completely open the ship will face the back of the card.

This view shows the inside view of the flip.  Pretty cool eh?  I just loved doing this fast and easy card. 


These two views show a little of the stamping detail.  Ink colours were Midnight Muse, Soft Suede and Crumb Cake.  Cardstock was Midnight Muse, Soft Suede and Ivory Naturals.
The Open Sea


Wednesday, June 27, 2012

Masculine Card Birthday Card


I don't know why, but summertime seems to be the time of  year when I need masculine cards the most, and I never seem to have enought on hand.

This year I'm trying to stay ahead of the demand and want to share some of the quick masculine cards I've created.

POCKET CARD:
This first card is a two-pocket birthday card but it would also make a wonderful graduation, retirement or congratulations card for a boy/man. 

An 8 1/2 x 11 sheet of designer series paper is used for the base.  To make the card you simply fold the DSP in half, then open and fold in half in the other direction. 

Now open up the paper and fold the top left corner of the paper over to the center fold and crease the outside edge.  Then turn the paper 90 degrees and repeat this procedure with the opposite corner.  Fold the DSP in half from the bottom then fold again at the center crease.  You will now have a front and an inside pocket.

Once the folds are completed then the front and inside of the card can be decorated with whatever embellishments you want to jazz up the card with to make it occasion appropriate. Nothing could be easier. 

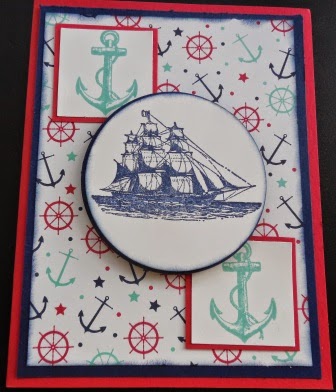
To dress up the front pocket, I cut and adhered a 5 x 4 piece of Cherry Cobber cardstock to the DSP.  Before gluing it down I embossed it using the Perfect Polka Dots Embossing folder.  Since I plan on tucking some scratch and win tickets in this pocket I've left it plain, but you could make a tag for this pocket too.  Before gluing the pocket down, I added a strip of Whisper White that I had punched out with the Scallop Border punch.  I stamped the globe from the Open Sea  stamp set in Midnight Muse on Whisper White card stock and punched out with the 2 1/2" Circle Punch and added a 2 3/4" Circle layer in Cherry Cobbler and a 3" Circle Originals Bigz Die cut layer in Midnight Muse.

For the inside pocket I made a simple pull-out tag for addingby layering Whisper White on Cherry Cobbler.  I stamped the beautiful sailing ship from the set The Open Sea with the new Midnight Muse In Colour and the Happy Birthday sentiment in Cherry Cobbler.  I also stamped the anchor from the On the Sea set on Whisper White and cut it out with the Oval Scallop Punch.  It was adhered on the left side of the card with dimensionals. 

TRI-FOLD CARD:

The second card I want to share with you is a simple tri-fold card.  Usually these are made with 12 x 12 card stock but I cut down the dimensions so I could use an 8 1/2 by 11 sheet of cardstock for the base.  Here are the instructions:
 
·         Start with an 8.5 x 11 sheet of cardstock and cut to 8 .5 x 5.5”
·         Score at 1 ¾, 3 ½ , 7’, and 8 ¾”
·         Cut lines horizontally at 1 ½” and 3 ½” from 1st and last score lines
·         Your finished card will measure 3 ½ x 5

I used "Comfort Cafe" DSP #126898 for the DSP and Midnight Muse, Raspberry Ripple and Summer Starfruit cardstock.  Images from the Open Sea stamp set are inked with Raspberry Ripple and Midnight Muse inks.


Additional Non-Stampin' Up Cards:

We recently celebrated our friend Steve's 60th birthday and I wanted to make a special card for him.  My husband asked me to use a non-Stampin' Up! stamp set because this particular set would appeal to Steve. 

So with that in mind I made the following cards for my husband to choose from.  What I want to emphasize here is that these cards are made with Stampin' Up cardstock and inks and could  very easily have been made with SU stamp sets too. 
Made with Pacific Point, Daffodil Delight, Wild Wasabi, Real Red. Basic Black and Whisper White cardstock.  Basic Black ink and Versamark were used to emboss the images and sentiments

View of the inside of the cards


Wednesday, May 25, 2011

Masculine Cards

Yesterday I held a Men's Card Class.  Not too many came but with the Canucks Hockey game playoffs happening and the day after a long weekend what can you expect.  Here's what they missed:


Monday, May 23, 2011

Making Masculine Cards Just Got Simpler


I often hear from my customers that they really struggle when it comes to making masculine cards.  This has been a real dilemma for me too.  Usually at this time of year I'm really struggling to come up with masculine cards for upcoming birthdays and Father's Day, but not this year!  I have to tell you I'm absolutely thrilled with the Open Sea and Sail Away stamp sets featured in Stampin' Ups! Summer Mini Catalogue.  These stamp sets along with the beautiful Nautical Expedition Designer Series Paper have made it super easy for me to design masculine cards for these occasions. 

On Tuesday night I'm hosting a "Men's Card Class" which features three cards made from these sets and the wonderful designer series paper. I think you'll agree these cards would work great for Father's Day or any other masculine occasion.  I'll be posting pictures of the individual cards and details following the class so come back and visit again soon.

Happy St. Patty's Day!

Rainbows, a Pot of Gold, Leprechauns green beer and shenanigans are all part of celebrating St. Patty's Day on March 17th. I have a sma...