Showing posts with label Late Night Stampers. Show all posts

Monday, May 4, 2015

A Special Birthday Card for My SIL

Today I'm dedicating my birthday card and wish to my very special sister-in-law, Mary Ann. 

Mary Ann would have been 74 today however sadly, she passed away 18 months ago following a long and courageous battle with lung cancer.

Mary Ann was a very determined and brave woman who faced death with a smile and her strong faith and conviction in God.  She declined heroic measures such as chemo and radiation preferring instead to take each day as it was given and enjoy the time she had left.  And she did. 

During the course of her illness I requested a "shower of cards" from my fellow Late Night Stampers and 33 stampers rose to the occasion.  Mary Ann soon began receiving cards from across Canada and the United States and even one from Austrailia.  

She cherished and loved each and every card she received. Not only did they put a smile on her face when she received them, but they gave her something to think about and focus on when she went through the harder times of her illness.  She told me she thought about where the cards came from and wondered about the senders who were kind enough to think of her even though they'd never meet. How kind you all were and I want to thank those caring stampers who were compassionate enough to take the time out of their busy lives to send a card of hope and caring.  I shall be forever in your debt and will kindly pass along my cards whenever there is a need.  

Happy Birthday Mary Ann.....................so wish you could still be here, but know that we're thinking of you in heaven!  Love and hugs!   


Happy Stamping!
Penny Tokens 

Thursday, February 13, 2014

Paper Players Colour Challenge #PP182

I've added a new badge to my side bar today that will link you to The Paper Players blog.  Look for this badge:

I've played along with a couple of their challenges in the past, and decided to revisit them this week when I saw this gorgeous colour combo challenge.  
Colour Challenge #182
The Paper Player's Design team is comprised of some very talented ladies so you'll want to check out their creations and visit their blogs.  One of the things I like about the The Paper Players challenges offer is the variety of their challenges. They're not just about sketches.  

Their challenges are posted on Sundays and run until Friday noon, and they annouce their winners each Saturday.  Here is their monthly schedule of challenges.  Hope you'll play along too.

Week One:     Theme Challenge with Pinterest Inspiration It'
Week Two:    Colour Challenge
Week Three:  Clean and Simple Challenge
Week Four:    Sketch Challenge
Week Five:     Tic Tac Toe

Here's my card for this week's Colour Challenge:

If this card looks similar to the one I did for the Paper Craft Crew Card Sketch #79 last week, you're right.  I really enjoyed that sketch and the way it came together so quickly, so I decided to reuse the sketch and the Starburst Sayings stamp set.

The colour combo of Crisp Cantaloupe, Midnight Muse and Gold works so well for this card.  Here are some more views:


The Starburst Sayings stamp set includes a variety of small, medium and large stamps that are perfect for celebrating many events and successes. Here I've stamped the images in Cranberry Crisp and Midnight Muse and added a small touch of gold.   

Starburst Saying Stamp Set 
This view shows the inside of the card.  

This is such a cheery card.  I like all the textures from the embossing folders, the dsp and the gold shimmer paper. Check out my supply list to see what I used. 

Supplies:
Cardstock & Designer Series Paper: 

  • Midnight Muse 8 1/2 x 5 1/2 for base and 2 x 3 1/2 for banner
  • Crisp Cantaloupe 4 x 5 1/4" for first layer
  • Very Vanilla 3 3/4 x 5 for the inside panel and a 4 x 4 piece to stamp the Starburst Sayings on
  • Gold Shimmer Paper
  • Venetian Romance DSP for the 2 x 3" Crisp Cantaloupe banner
Ink:  Crisp Cantaloupe and Midnight Muse 

Accessories:
  • Big Shot Machine, Modern Mosaic Embossing Folder, Stripes Embossing Folder, Starburst Framelits 
  • Two Gold Brads
  • Scissors, Dimensionals, Sponge Daubers, Trimmer 
Okay thanks for dropping by and checking out my post for today.  I'd love to hear your comments on my card.  

Tuesday, February 11, 2014

Sans and Stripes Photopolymer Stamp Set

If you like your ABCs there's a new photopolymer alphabet stamp set in town and it's sure to be a big hit!  

This new set is called the Sans and Stripes Photopolymer Stamp Set.  It's a fantastic value as it comes with 58 stamps for only $16.95.  This trendy must-have set offers bold and striped options that will look great on their own or used together!  This past week I saw some really cute cards that combined this set with the Pennant Banners and Banner Punch from the Sale-A-Bration catalogue..... think "happy birthday" on banners.  Oh so cute!


Sans And Stripes Photopolymer Stamp Set 136796 Price: $16.95
Stampin' Ups! photopolymer stamps offer a versatile all-clear stamping option. You'll find these photopolymer stamps to be of top-quality and they'll give a perfectly stamped image every time. You'll be sure to have tons of enjoyment with all these images and for such a low price!  Stamping doesn't get any better than that.

When Stampin' Up! first released Photopolymer stamps in 2013, they weren't sure if they would be a product that would continue, so they were offered on an "as available" basis.  Well I have some great news for you that's just been released about the longevity of these stamps.  Stampin' Up! is so happy with this product line that come June when the new catalogue is released, they will be included and there will be more options available for purchasing them, for instance, they will be coming out in the plastic DVD Cases so no more dilemmas about how to store them.  

Penny 

Stampin' Up! Promotions 
and Specials 

Weekly Deals - February 11 to 17th, 2014


Tuesday is here again, and it's time to check out what's available in Stampin' Ups! "Weekly Deals".  

I was excited to see another one of my favourite die cuts, the "Floral Frames" being offered this week.  This set coordinates with the Day Dream Medallions stamp set on page 115 of the Annual Catalogue.  If you haven't got this one in your framelit collection, now's a great opportunity because you'll be saving 25% off the regular price.  

It's also a great time to order the Artisan Label Punch which coordinates perfectly with the Label Love stamp set (available in French, English and Spanish). You can stamp with six pre-created sentiments or design one of your own with this fun 7-piece stamp set featured on page 33 of the Annual Catalogue.


If you're interested in any of this week's great sale items, you can purchase them at my on-line shop by clicking here. 

Oh, and don't forget, that purchases from Weekly Deals qualify during Sale-A-Bration too.  That's right, if you purchase $60.00 in Stampin' Up! products (before shipping and taxes) during the Sale-A-Bration time period, you're entitled to your choice of a FREE item from the Sale-a-bration catalogue.

If you have any questions, I'd be happy to help you out.  

Friday, January 17, 2014

Attend Stampin' Up 2014 Convention for FREE!!!

Stampin' Up! Leadership has recently ended in Houston Texas with some awesome never before offered news, and I'm super excited to be able to share some of it with you. 

The "biggest" announcement is that..... drum roll please ............ anyone who's signed up as a new Stampin' Up! Demo between July 2013 to June 2014 will have their registration fee for Convention 2014 WAIVED!   OMG that's incredible!  That's about a $300 US savings.

How awesome is that?  If you've read my past posts on Convention, you'll know that there's no greater thrill for a Stampin' Up! Demo than hitting that Convention floor in Salt Lake City and being with fellow stampers for 4-5 days of stamping heaven!   

Wow this announcement means that if you want the opportunity to be a hobby demo and earn 20% off your purchases or if you want to start up your own small business, by joining my team now you can also register to attend Convention in 2014 for FREE!! (transportation & accommodation is not included).  And, if you join during the upcoming Sale-a-bration Event you'll get even more savings and bonuses (Sale-a-bration starts January 28).  

Just call or email me to let me know if you're interested in this great offer and want to be part of my team and you can take advantage of this wonderful opportunity to go to Salt Lake City for Convention 2014.  

Even if you can't make it to Convention, there are so many great things about being a Stampin' Up! Demonstrator. I would love  to have you join my team. NOW IS THE TIME!! Contact me at 778-880-1296 or pennyhanuszak@telus.net.

Click her to learn more about the starter kit.

Friday, November 15, 2013

JOYFUL CHRISTMAS

Yesterday I shared this sneak peak of the second project I made at Cheryl LeFore's Friday Night Stamp Club.

Wanna know what it is?  Well I won't keep you in suspense any longer. This is the beautiful poinsettia  from the "Joyful Christmas" stamp set.  If you have a love for this Christmas icon, then this set is for you. 


Joyful Christmas in the Holiday Catalogue 


Our second project was a Pop n' Cut Gift Card Holder that comes together in a flash and is topped with this great poinsettia.  Here's a shot of the completed gift card:
I love the Joyful Christmas wishes sentiment on this card front, it's simply perfect.  
Supplies:
Stamp Set:  Joyful Christmas
Ink:  Crumb Cake, Stazon Black Ink
Reinkers:  Cherry Cobbler, Starfruit, Pear Pizzazz
Card stock:  Cherry Cobbler, Whisper White, Season of Style DSP Paper Stack, Window Sheets
Diecut:  Pop n' Cut Base
Punch:  Word Window 
Framelit:  Apothecary Accent Framelits
Miscellaneous:  Dimensionals, Crystal Effects, Dazzling Diamonds Glitter, Paint Brushes or empty Aqua Painter 

Cutting Directions for Gift Card Holder:

  1. Cut a piece of Cherry Cobbler card stock to 4 1/4 x 11 and place on the Pop n' Cut base.  Score this piece at 3 1/2", 5 1/2" and 7 1/2".
  2. Cut a piece of Whisper White card stock to 2 1/2 x 4" for the inside of the card, and a 2 1/4" x 3 1/4" piece for the sentiment "Joyful Christmas Wishes" which is stamped in Crumb Cake ink.  Cut out the sentiment piece with the Apothecary Accent Framelits, and layer on Polka Dot dsp.
  3. Cut a piece of the Crumb Cake/ Polka Dot paper from the Season of Style Paper Pack to 2 1/8" x 4 1/4" and attach this across the center of the card. 
  4. Stamp the poinsettia in Stazon Black Ink and then cut out with scissors. See instructions below for painting both the poinsettia and leaves on the acetate sheet.  
Inside verse stamped in Crumb Cake ink

Outside verse, stamped in Crumb Cake ink on Whisper White card stock and then cut out with Apothecary Accents framelit. 

The Pop N' Cuts card base is perfect for making gift cards, because when folded the end tabs help to keep the card closed and hide the gift card inside. Cut out the card stock with this die and then score at 3 1/2", 5 1/2" and 7 12".  Fold in a valley, mountain, valley fold style with the mountain in the middle.  This piece will be in the center or inside of the gift card holder. i Glue this part together with a thin strip of sticky strip on the outside bottom edge.  Cut out a section from the mountain part with the Word Window Punch. This is where the gift card will slide in.  Tip:  Before punching use your gift card to line up where you want to begin cutting so that the slot is even on both sides of this piece.  You'll have to make two cuts with the Word Window punch.
The Pop n' Cuts Die Cut Base is very versatile and can be used for making boxes, gift cards, and of course pop up cards.  

Painting the Poinsettia and Leaves: 
The poinsetta and three leaves were stamped on an acetate window sheet with Stazon Black ink. Let the ink completely dry before you begin painting. 

You'll need three small containers to mix the Crystal Effects with each of the reinker colours.  Simply mix a small amount of Crystal Effects with a couple of drops of re-inker until the desired colour is reached. Using a paint brush pick up some of the mixture and paint it on to the stamped image side of the window sheet. Use a dabbing motion as opposed to a stroking motion to fill in the flower or leaf images and make sure all the acetate in the design is
covered.  Try to stay in the lines and not overlap outside of the image. 

Once you've painted all the acetate images and you're happy with the paint coverage sprinkle Dazzling Diamonds Glitter over the wet surface.  Shake off any excess glitter and set aside to dry completely (this will take some time and don't try to dry with your heat gun or you'll warp the acetate).  

Once the images are completely dry, then cut them out with scissors.  
finally, attach the flower and leaves to the front of the gift card holder with dimensionals.  

Make sure when you're painting the images that the paint is thick enough and bold enough that you wdn't see any gaps through the acetate. When it's finished all you should see is the colour and glimmer of the glitter as per this closeup.

So here's one last look at the finished card.  Believe me the pictures just don't do the card justice.  In real life the colour is just dancing off the images.  


I hope you enjoyed these projects.  Leave me a comment if you like this one and the instructions.  You'll find it a very simple and fun technique and it really delivers that WOW factor that so many of us love!   I'm so happy Cheryl taught us how to make these. 


Here are a few more Joyful Christmas creations from other Stampin' Up! Demonstrators and Publications:

On Saturday, November 2, a variety of projects created by Stampin' Up! demonstrators Anne Granger and Susan Bruyn were posted on the Scrapbook and Cards Today on-line magazine, using the Joyful Christmas Stamp Set. They are in the Stampin' Up! Saturday section on the right hand panel of the on the Scrapbook & Cards Today blog.  Here's the link: http://www.scrapbookandcardstodaymag.typepad.com 
.  
Joyful Christmas Gift Bags


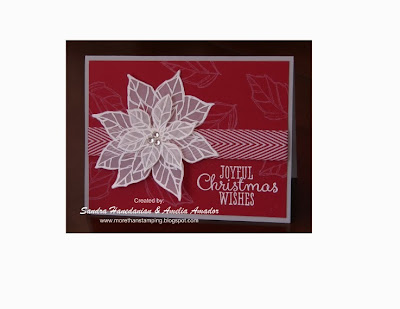
This beautiful gift card set by Sandra Hanedamian and Amelia Amador of www.morethanstamping.blogspot.com is called Bedazzled Poinsettia.


Friday, October 11, 2013

Pals Color Challenge #175

Fall has arrived and the Pals Paper Challenge design team has selected 3 of the most glorious fall colours for inspiration this week.  I just couldn't resist playing along, and I hope you'll be inspired to do so too!

Today is the beginning of our Thanks Giving Day celebrations in Canada so my choice of cards was easy.  And, since I was already busy putting together a Pinwheel card tutorial I thought perfect, I'll combine this challenge with that - even easier!  

Here's the pinwheel I made:


The card base for the pin wheel is Always Artichoke cut into two 2 1/4" x 2 1/4" squares.  See tutorial for assembly instructions. 

I needed some DSP to correspond but didn't have any so I decided to make my own.  I chose an 8 1/2 x 11"  sheet of So Saffron DSP to make a One Sheet Wonder background.  To begin I stamped the leaves from the Wonderfall stamp set randomly in So Saffron, Always Artichoke and Cajun Craze across the card stock.  I then inked up the tire track, small and large splotches and speckles stamps from Gorgeous Grunge in the same inks with a touch of Early Espresso and Cherry Cobbler thrown into the mix.  To finish my One Sheet Wonder I stamped the Off the Grid stamp in Versa Mark ink and embossed it with Gold Embossing Powder.  Voila my very own designer paper.  
This is the One Sheet Wonder with just the Wonderfall Stamp set images stamped on it.

Here is the finished One Sheet Wonder that has images from Gorgeous Grunge and Off the Grid stamped on it along with Wonderfall. 

For this card I cut a 6 x 1" strip of the One Sheet Wonder and worked it into the Pinwheel design.  I needed 4 of the dsp and 4 coordinating squares which I chose to cut out of Champagne Glitter paper.  I think it looks pretty good.  To finish the pinwheel I sponged the around the outside edges with Old Artichoke to give it an aged look and that worked too.  

The sentiment "Happy Thanks Giving" is from the Tags 4 You stamp set in the Holiday Catalogue.  I layered it onto a couple of Cajun Craze bracket labels that I cut in half and glued to the back of the sentiment label.  This piece was adhered with dimensionals to the pinwheel and a couple of basic rhinestones were added for bling. 


The card base is a piece of 8 1/2 x 5 1/2" Always Artichoke card stock that was scored and folded at the center.  Next came a 5 1/4 x 4" piece of the One Sheet Wonder dsp, topped with a 5 1/2" x 1 1/2" strip of So Saffron card stock that was dry embossed with the Honeycomb Embossing Folder.  I thought that added a bit to the outdoor theme.  And finally two 1/4" x 5 1/2" strips of Champagne Glimmer paper were added to this strip before it was adhered to the card front, for some added dazzle.


Although the inside of the card looks almost white in this picture, trust me it is from So Saffron card stock that's been dressed up with some additional stamping from the Gorgeous Grunge and Wonderfall Stamp sets.  The sentiment "Thinking of You" is from the retired All Year Cheer Stamp Set #II, which I simply cannot part with.

Tags 4 You Pinwheel Tutorial


In follow up to my workshop at the end of September, I wanted to give each of my new customers a card and a thank you for their orders.  Since the workshop was a Winter/Christmas theme I decided to make each of them a Christmas card that they can actually use.

As these gals are all relatively new to stamping I wanted to keep the card simple and yet fun, so decided on using a pin wheel tag base layered on some of the Seasons of Style Designer Paper and feature the "Have a Holly Jolly Christmas" sentiment from the Tags 4 You stamp set.  This is a very simple card and so a great design for a stamp a stack class or when you want to churn out a bunch of cards for your friends and relatives assembly line style.  Here's the "how to's"

Supply List:

Cardstock:  Cherry Cobbler for the card base, Gumball Green for the pinwheel base, Whisper White for the sentiment and inside of the card

Stamps:  Tags 4 You* from the Holiday catalogue, Small Snow flake stamps or some other Winter/Christmas themed stamp to decorate the inside of the card.

Designer Paper: Seasons of Style Designer Paper, Red Glimmer Paper

Ink:  Gumball Green and Cherry Cobbler

Accessories:  Chevron Embossing Folder, Basic Rhinestones, Bracket Punch*, Apothecary Framelits, Trimmer, Sponge Daubers, Dimensionals, Adhesive strips. 

Note:  The Tags 4 You and the Bracket punch can be purchased individually or as a bundle.  You save 15% off total cost before shipping and handling when you buy the bundle.   


For the Card Front:
  1. Cut Cherry Cobbler card stock to measure 8 1/2 x 5 1/2" for the base, score at the center and fold.
  2. Dry emboss the front panel of the card with the Chevron Embossing Folder
  3. Using your trimmer cut a strip of Season of Style DSP to measure 51/2 x 1 1/2" 
  4. Cut two 5/12" x 1/4" strips of Red Glimmer Paper
  5. Choose which side of the DSP you want facing up, I chose the stripes to contrast with the pinwheel.  On the reverse side lay down two strips of sticky strip - one on each long edge and attach the two 1/4" wide strips of Red Glimmer Paper.  TIP:  I line up the glimmer paper along a straight line on my grid paper, remove the sticky strip backing on one side of the DSP and position this piece over top of the glimmer paper adjusting to make sure the amount of glimmer paper showing is even and then adhere the strip.  I repeat this for the other side of the DSP.  
  6. Adhere the DSP/Glimmer paper strip to the front of the card about 5/8" from the bottom.  TIP: Because this piece needs to bear the weight of the pinwheel I adhere it with a couple of sticky strips along each edge.
  7. For the pinwheel, cut two 2 1/4 x 2 1/4 squares of Old Olive Card stock.  Lay one square over the other to achieve a Star of David pattern and adhere together.  TIP:  When I make the first pinwheel I always line up the points on grid paper so it's evenly spaced all around.  Once I've adhered the two pieces together, I draw an outline around it so I have a template.  The template acts as a guide for making more pinwheels.  This is really helpful when you're making a lot of these cards.
  8. Once the base for the pin wheel is assembled cut eight 1" by 1" squares using your paper trimmer.  TIP: Cut 1" by 6" strips of DSP and then cut these strips down to 1" squares.  When you're assembling the pinwheel alternate the patterns of the DSP to achieve a patchwork effect.
  9. See the pictures below for placement of these squares.  It's important that when you place the first square that you only glue down half of it.  When you place the last square on the pinwheel you'll need to lift up the first one and work the last square under it.  Once the last piece is glued down, then glue down the edge from the first square so it lays flat.  This step will make sense when you make your first pinwheel.
  10. Stamp the sentiment in Gumball Green on Whisper White card stock and cut out with the bracket punch.  Glue to the center of the pinwheel with dimensionals and add two basic rhinestones for a little more bling.
  11. Attach the pinwheel to the center of the strip with dimensionals.

For the inside of this card I cut out Whisper White card stock with the Apothecary Labels Framelits and then stamped some random snowflakes with Cherry Cobbler ink to add some interest.  You could paper pierce this piece to add more interest.

The inside of this card has a piece of Whisper White card stock but to 51/4 x 4" and again some random snowflakes stamped in Cherry Cobbler ink.

Here's a batch of the cards I completed.  Don't they look cheery and bright? This design can be used for any occasion just change up your paper and sentiments.

Making the Pinwheel:

Cut 2 squares measuring 2 1/4" x 2 1/4" from coordinating card stock.  For this example I am using Island Indigo.

Using grid paper, line up the two corners of your square so the points are resting on a line (top and bottom of square).  Adjust the sides of the square so they are in the middle of a grid line.  Draw a line around the square with a marker pen.

Once you've drawn the first square remove the square and this is what it should look like. 

Line up the second square so it intersects with the first one and again draw a line around it with a marker.

Save this drawing because this will become a template that you can use to line up your squares before gluing them together.

Cut strips of designer paper to measure 1" x 6".  Cut these strips into8 1" squares.  If you move the strip along between the inches, it is easier to cut them.  Don't use a 1" punch because you waste dsp. 

Lay out the squares so you have one of one pattern and then the next in the flip side of the DSP. This just makes it easier to grab the next square for gluing onto the grid.

Glue the first square to the top pointed piece of the pinwheel.  This is your starting piece.

Only put adhesive on the right hand side of the 1" square so you can lift it at the end. You'll see when we get to that picture why you do this.

Once you have the first square in place just continue around overlapping squares and reversing the patterns as you go.


Okay now you need to lift the left hand corner of the first square.

While the corner is lifted fit the last 1" square in place and glue down, then add adhesive to the left had corner of the first square and glue it down. 

When it's all finished your pinwheel will look like this.  Make sure all the squares are glued down so they don't catch and lift.  You're now ready to put whatever embellishment you choose in the center of the square so the construction part is covered. 


To construct the strip on the face of the card cut a piece of DSP from the same paper you chose for the pinwheel to 5 1/2" x 1 1/2".  Also cut two strips of card stock or glimmer paper 1/4" x 5 1/2".  These strips will be mounted on either side of the dsp strip before it's adhered to the card front.

Just put sticky strip on the back of the DSP piece long edges and then add the smaller card stock strips.  Make sure they measure the same when you look at the flip side - see next picture.


I added a snowflake to the front of this card so this picture just shows the Festive Flurry snowflake image cut out in Silver Glimmer paper being added to the front of the pinwheel. 

Here's the finished card with the embellishment added.  I used the Honeysuckle Embossing Folder to dress up the front of the card.  Kind of looks like ice crystals. 
This is the inside of the card.  Both stamp sets used are retired.

Here are some additional pinwheel samples.  You can make these ahead and just add them to your cards when you make them.  They're so much fun to make and so quick once your pieces are cut out.  This is a terrific way to use up scraps.  
 

The sentiment is from the Chalk Talk stamp set and is mounted on a Red Glimmer paper scallop circle.  Silver glimmer paper replaces 4 of the 1" squares to add some bling. 

This one features Red Glimmer Paper matched up with Cherry Cobbler card stock and Season of Style Designer Series of Paper.  The stamp is from the Tags 4 You stamp set.

Here's one for Thanks Giving that was made for the Pals Paper Challenge #175 this week.  I made the designer paper as part of a One Sheet Wonder using the Wonderfall Stamp set and Gorgeous Grunge.  The patterns are stamped in Always Artichoke, So Saffron, Cajun Craze and Early Espresso inks.  I added Champagne Glimmer Paper for some bling.  The sentiment is punched out with the Bracket punch and then I punched out two more bracket labels, cut them in half and fitted them to the back of the sentiment.  Easy peasy!

Here's one I made last year using the Ornaments Stamp set and Framelits.  It was mounted on a quilt base that was achieved with strips of dsp on adhesive sheets. 


And that's it for this tutorial and post.  Hope you enjoyed it.  I'd love to have your comments and if you make one using this tutorial please link back to me.  Appreciated.

Last Free Shipping of the Year - December 9, 10 11, 2024

Heads up, it's time for the last FREE SHIPPING promo of the year! From December 9–11, you can shop and save on all qualifying orders of...