Showing posts with label Petite Petals Punch. Show all posts

Wednesday, August 13, 2014

Paper Players Colour Challenge #208

This week I've played along with Colour Challenge #208 over at the Paper Players blog (PP208).  

This was such a hard challenge for me because I had a hard time with the colour mix, but I did eventually come up with a card.  

The challenge colours are Calypso Coral, Blushing Bride, Hello Honey and Basic Gray.  Alone, I like each of these colours, but together they just didn't work well for me, so it was a real stretch to get my mojo going. 

Another issue I had with this card was picking a sketch to work with.  I know, I know, there are so many great ones out there, what could be the holdup.  But holdup it was and sadly after I chose the wonderful sketch from the Paper Craft Crew PCCCS104, I wasn't able to finish my card in time to enter their challenge.  Even though I missed their linkup date, I did complete the card.


Here is My Card:
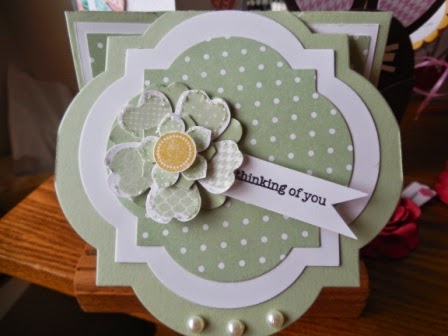
My card began with a standard A2 Basic Gray card base topped by a layer of Hello Honey card stock measuring 5 1/4" x 4".  I added a layer of Blushing Bride designer series paper from the All Abloom Designer Series Paper pack.  I stamped make splotches in Basic Gray and in Hello Honey ink with the spotted stamp from Gorgeous Grunch (retired). 

Instead of adding an actual banner such as the one in the sketch, I simply added a string of flowers. The three smallest flowers were made with the Itty Bitty Accents Punch Pack and punched from Basic Gray card stock. Basic Rhinestones are mounted in the centers.

The larger flowers were stamped with images from the Petite Petals stamp set in Basic Gray ink onto Hello Honey and Calypso Coral card stocks. These images were then punched out with the Petite Petals Punch. I used sponge daubers around the edges to add a little softness to the petals. I actually stamped two additional flowers and punched out their centers with the 1/4" circle punch and placed the Calypso Coral center on the Hello Honey flower and the reverse for the Calypso Coral flower. The flowers were adhered with large glue dots.

For the rest of the embellishments on the front of the card, I layered squares cut from Hello Honey, Basic Gray and Whisper White that were cut out using the Squares Collection framelit dies.

I wanted the bottom two layers to have a bit of texture so embossed the Hello Honey layer with the Fancy Fan embossing folder and the Basic Gray one with the Stripes embossing folder. The sentiment " You Can Never Have too Much Happy" is from the Yippee Skippee Stamp set, and is stamped in Calypso Coral.

The final two elements on the front of the card are the Calypso Coral flower perched on the edge of the squares. It has a basic rhinestone mounted in the center for some fun, and a Basic Gray circle that was punched out with a 1 1/4" circle punch and then distressed with a sponge dauber and Basic Gray ink and the spotted stamp from Gorgeous Grunge.


The "new" Itty Bitty Accents Punch Pack gives you 3 great little punches for only $$22.95
I used a masking technique for the inside layer of the card.  I cut a piece of post it note paper to measure 3 1/4" x 4 1/2" and centered it over the Whisper White liner piece which measured 3 3/4" x 5".  If you're using Post-It-Note paper for your mask, make sure to leave on the sticky part.  It will help secure the mask to the liner during the stamping process.

Once the mask was in place, I stamped three different floral images from the Petite Petals stamp set in Basic Gray, Hello Honey and Calypso Coral inks around the rim of the card liner. 

Before removing the mask I inked up a sponge dauber with Basic Gray ink and worked the dauber around the edge of the Post-It-Note paper.  Always start this process working in small circles from the inside of the Post-It-Note towards the edge.  When you remove the Post-it-Note you will have a smooth edge frame around your floral images. 
  
Supplies:
Stamp Sets:  Petite Petals, Remembering Your Birthday, Gorgeous Grunge (R)
Card Stock:  Hello Honey, Basic Gray, Calypso Coral, Blushing Bride
Designer Series Paper: All AbloomDesigner Series Paper Stack pg 185 IB&C
Accessories:  Paper Trimmer, Petite Petal Punch, Itty Bitty Punch Pack Two, Basic Rhinestones, Dimensionals, Square Collection Framelit dies, 1/4" circle punch, 1 1/4" Circle Punch, Sponge Dauber Fancy Fan and Stripes Embossing Folders,Big Shot Machine, Post-it-Note 4 x 6 pad.

Happy Stamping!
Penny Tokens


Friday, May 16, 2014

Double Gate Fold Card Tutorial


You may have seen cards like this on Pinterest or Split Coast stampers recently.  It's called a Double Gate Fold card.  

I copied my card after watching the excellent video by Dee Slater's  of Create With Dee.  Dee is so creative and always does a great job of explaining the mechanics of her cards.  I liked this card so much I couldn't wait for the video to be over so I could make one myself. 

Using this design, I made two cards, one for Mother's Day and the other for a Birthday.  Both are super cute and really give that WOW factor when they come out of the envelope.  Thanks Dee!

Here's My Cards:
This is how the Double Gate Fold card looks coming out of the envelope.  What a beautiful card front.  I absolutely love, love, love it!  It's so feminine and girly-girl that it simply puts a smile on your face.

I used Pistachio Pudding cardstock and matching InColour 2013-2014 designer series paper with Whisper White cardstock.  The Flower Shop and Petite Petals stamp sets and coordinating punches make it easy to assemble this lovely flower. 


When the card is closed on the inside it looks like this.  You can almost feel the anticipation building while the recipient takes off the belly band and opens the card. Sorry for the bad lighting on this photo.

Okay, the suspense is over.  Here's the inside view of my card.  The hinged part of the gate fold top is achieved using the Window Frames Collection framelits and Big Shot Machine and the carryover of the card front design is perfect.  For the inside flower I stamped the base flower and added a single punched Pistachio Pudding flower using the Petite Petals punch.  The Daffodil Delight center is mounted with a dimensional.  


Supplies:
Cardstock:   Pistachio Pudding, Whisper White
Stamp Sets:  Flower Shop,

DSP:  InColour 2013-2014 Designer Series Paper in Pistachio Pudding

Ink:  Pistachio Pudding, Daffodil Delight, Staz On Black Ink
Accessories:  Simply Scored Scoring Tool, Paper Trimmer, Big Shot Machine, Pansy Punch, Petite Petals Punch, 1/2" Circle Punch Dimensionals, Adhesive, Window Frames Collection Framelits, Pansy Punch, 


Here's my birthday version.  I added a few more flowers on the front of this card and some additional basic pearls on the flower centers.  When I finished the card I wasn't too crazy about my sentiment choice, so I later swapped it out for the "happy birthday" banner from the Itty Bitty Banners stamp set.  Much better!


HOW IT'S MADE:
  1. Using Simply Scored score at 2 1/8" turn the card stock 180 degrees and score again at 2 1/8".
  2. Now turn the piece and score at 4 1/4".  This score line will become the hinge part of the card.
  3. Line up one of the 2 1/8" score lines in trimmer and trim to 4 1/4" line.  Then turn and trim on the 4 1/4" line 2 1/8".  Remove and set aside trimmed off piece for flower petals (see step 12).  Repeat on other side.
  4. Set up your magnetic plate or platform in the Big Shot machine and using the 2nd from largest Window Frame Die place it over the square flap at the top of the card.  Adjust so the bottom of the die is just beneath the 4 1/4" score line.  (if you're above the line and you pass through Big Shot you'll cut off the flap.  If you're too far below the score line, the card flap won't close properly).  
  5. Place the acrylic plate from the Big Shot over top of the cardstock and die, so it's lined up just to the hinge line and run through the Big Shot.  
  6. Trim off the two excess pieces of card stock on either side of the window frame shape with scissors once the die has been removed.  
  7. For the front and inside of the card you'll need to cut two Whisper White and two DSP patterned window frames using the next two smaller dies (refer to the picture).  Layer these die cuts with adhesive and attach to the front and the inside front panel. 
  8. Cut two pieces of Whisper White card stock for the front panels to measure 1 7/8" x 4" and attach to the gate fold panels.
  9. Cut two pieces of DSP for front panels to measure 1 5/8" x 3 3/4" and adhere over the front panels.
  10. Cut a Whisper White panel for the inside of the card to measure 4 x 4.  Stamp the panel with a sentiment of your choice and one of the flowers (see picture above for tip on the flower assembly).
  11. For Belly Band cut a 9 1/2" by 1 12" piece of cardstock to match the card base and then cut a 9 1/2" x 1 1/4" piece of DSP and glue to the cardstock piece.  Once the belly band is assembled wrap it around the card so one piece overlaps the other and secure together with sticky strip.  Make a flower and attach over top of the seam.  This band should slide easily off the card - don't make it too tight.
  12. To assemble the flowers for the card front, inside flap and belly band:  
    • Stamp 3 Flower Shop gingham flowers and punch out with the Pansy Punch. 
    • Stamp 3 Petite Petals flowers and punch out with the Petite Petals Punch
    • On scraps of Whisper White card stock stamp randomly stamp 3 of the gingham flowers with Daffodil ink and punch out just the center of the flower with the 1/2" circle punch.  Note: because you only want the centers, you don't need to stamp the entire flower.
    • Punch out 3 plain cardstock flowers with the Pansy Punch and 3 with the Petite Petals punch (use the two pieces of cardstock removed from the top of the card for these flowers)
    • Using glue dots stack from the base up a plain card stock Pansy flower, a Gingham Flower, a plain card stock Petite Petal Flower and a stamped Petite Petal flower.  Mount a Daffodil Delight center piece with a dimensional.  Attach flowers with sticky strip to the front, he inside cover and belly band.  Note:  I wanted a little glimmer on my flowers to give them some added pop, so I outlined all the petals with Dazzling Details #124117 pg. 166.
  13. Stamp a sentiment of your choice on Whisper White card stock and cut out like a banner.  Attach with glue dots beneath the petals.
Okay you should now be able to create your own Double Gate Fold card.  Remember to watch Dee Slater's video so you can see how she placed the Window Die, it's much easier to understand visually than my trying to explain it in steps 4,5 and 6 above. 

I'd love to hear from you if you made this card or simply a comment on the two that I've made.  It's always exciting to hear back from someone who actually used my instructions, as to whether they were understandable and helpful.   Have a great stamping day and thanks for visiting my blog!
Penny

Friday, April 18, 2014

Million & One Flower Shop - CASE

I've been a big fan of Dawn Griffith for several years now and always make a point of checking out what's new on her blog.  Last week I came across a card she made called "A Million And One Flowers".  I liked it so much, I just had to drop everything and CASE it in it's entirety.  I think you'll agree its FABULOUS!
Million & One Stamp Set sentiment............how bold and beautiful is that?

Here's My Card: 
Sample One:  This is the first card I made CASing Dawn's design.  For this one I changed the rhinestones to Basic Pearls, and it gave the card a real "wow" look.
Sample Two:  For this card, I used Basic Rhinestones the same as in Dawn's post.  They look beautiful.  For this card I changed up the Petite Petals flowers by using two different stamp designs, however, I prefer the polka dot petal design in Sample One.
Supplies:

Stamp Sets:  
Flower Shop #130942, Petite Petals #133155 and A Million & One #126377
Flower Shop Stamp Set:  Clear Mount # 130942 $21.95 or Wood Mount #130939 $29.95 Six beautiful floral stamps that coordinate with the Pansy Punch.  
Petite Petals Stamp Set:  Clear Mount # 133155 $11.95 or Wood Mount #133152 $15.95. One beautiful flower, six gorgeous designs--it's the stamp set that keeps on giving! Includes 6 stamps. Coordinates with the Petite Petals Punch. This limited-time set is only available from January 3 through May 31, 2014, so order yours today! Available in both wood- and clear-mount.  Bundle the Petite Petals Stamp Set and the Petite Petals Punch and save 15%: Wood #134821 $24.50 or Clear Mount #134822 $21.25.


Million & One Stamp Set:  Clear Mount #126377 Price: $15.95 or Wood Mount #126375 $20.95 You don't need to say thanks in a million ways if you are sincere about just one. The two sentiments in this set are as sincere as they come. Coordinates with the Simply Fabulous Simply Sent Kit.
 Ink:  Sahara Sand Classic Ink, Staz On Black

DSP:  Sweet Sorbet (Sale-a-bration Designer Series Paper, now retired)

Cardstock:  Whisper White and Sahara Sand 

Accessories: 
Pansy Punch #130698, Petite Petals Punch #133322, Basic Rhinestones #129324, Adhesive and Dimensionals #104430.
Pansy Punch #130698 $21.95
Petite Petals Punch 133322 $12.95  pg33 Occasions Catalogue coordinates with the Petite Petals Stamp Set. Bundle and save 15% off the purchase of the stamp set and punch until May 31, 2014.
Assembly:
Sahara Sand Card stock:  
Cut the base at 4 1/4" x 11".  Place long side of card stock in trimmer to 5 1/2" mark and then move cutter blade down to 2" mark.  Remove card stock, put short side back in trimmer and line up at 2 1/4" then move cutter blade down to 5 1/2". Remove cardstock from trimmer and score across center at 5 1/2".

DSP:  
Cut two 2 " x 5 1/4" pieces from the Sahara Sand DSP paper (looks like fish scales) . Adhere these pieces to the front and inside panel on the front of the card. In sample one I sponged around the DSP with Sahara Sand ink and a sponge dauber.  This technique gives a nice vintage feel to the card.

Whisper White Card stock:  
Cut a piece of Whisper White to measure 5 1/4" x 4".  This is the inside panel of the card.  Stamp "Fabulous is What You Are" sentiment from the One In a Million stamp set in Staz On Black ink.  Adhere panel to the inside of the card.  Adhere Basic Rhinestones to the swirls on the sentiment.

On a scrap piece of Whisper White card stock stamp 4 quilt patterned flowers from the Flower Shop stamp set in Sahara Sand classic ink.  Punch out these flowers with the Pansy Punch. Now, stamp 5 flowers from the Petite Petals Stamp Set in Sahara Sand ink and punch them out with the Petite Petals punch.  Adhere the small flowers to the centers of the larger flowers with dimensionals, and finish them off with a basic rhinestone in the center.

Starting at left edge of the card adhere the flowers with dimensionals along the width of the front panel. Make sure that your dimensionals are low enough on the flower that they don't show on the reverse of the panel.  Attach the fifth Petite Petal flower to the inside of the front panel with a dimensional. 


That's it, you're done and now you have this amazing WOW card!  Thanks Dawn Griffith

Here are some other cards I've made using this design: 

This card features a Daffodil Delight card base.  The polka dot DSP is from the Watercolor Wonder Designer Series Paper in the Occasions catalogue.  The flowers are inked in Crisp Cataloupe and Daffodil Delight.  The sentiment "Celebrate Today is from the Perfectly Penned stamp set. I used Basic Rhinestones for the flower centers and on the curlycews in the sentiment.

In this photo you can see the finishing on the inside of the card.
In this closeup of the card front you can see the sponged detail around the flowers and how it sets off the flowers.  


For this version of the card I used Melon Mambo ink, card stock and Designer Paper.  This card is stunning and bright.  I used Basic Pearls for the details and again the sentiment is from the Perfectly Penned set.  All of the sentiments were stamped in Staz On Black Ink.  


The inside view of the Melon Mambo card.  I love it! So bright and cheery.  Who wouldn't want to receive this card for their special day!

 
Perfectly Penned stamp set

Okay now for something completely different.  This card uses the same framework but I wanted something cute and funny for an anniversary and I think I succeeded. 
 
It looks like these little owls are practically flying off the page, but no fear they are holding on tight with dimensionals.  The sentiment is from the Sale-a-bration stamp set called See Ya Later.  It's retired now, which is really too bad because it's such a great sentiment set.  The sentiment on this card reads "once in a lifetime you meet SOMEONE who changes everything". 


This sweet little owl is constructed with the Owl Builder Punch.  His body is punched out of Baked Brown Sugar in-colour card stock and he has a Real Red vest on.  I had some googlie eyes left over from Halloween and decided to use them for all the owls. The Owl Builder punch not only punches out the owl body but also includes 3 different sized circles for layering the eyes, the heart and the cute little vest.  This is a great punch to have in your collection because it can be used for so much more than "just an owl". 

 
This is a view of the inside front panel of the card.  Hope you get the humour in this.  The striped paper is in Coastal Cabana and is from the Fresh Prints DSP pack in the Occasions Catalogue. 
Here's the full view of the inside of this card.
 Here's a last look at four of the five cards I've made so far with this card design.  This was a lot of fun.  Hope you enjoy this post.  I'd love to hear your comments so let me know if you like them or not.

 Penny

Saturday, February 22, 2014

PRODUCTS ON BACKORDER

February 20, 2014
Everyone's in love with the new Fringe Scissors and Petite Petals Punch by Stampin' Up!. Who knew theses two products would be so popular!  

Well that's the good news, the bad news is that so many were bought in the past month, that Stampin' Up! has run out of stock and this means these products are on backorder until they can renew their supply. Stampin' Up! is currently working with their suppliers to determine how quickly additional stock can be made available.  

You can still order them, but I just wanted to let you know they're currently out of stock, so you won't be disappointed.  I'll let you know when they are back in stock.


Petite Petals Punch Item #133322  Price: $15.95  Coordinates with the Petite Petals Stamp Set.  Punched image size: 7/8" diameter.
Petite Petals Item #133155 Price $14.895

Fringe Scissors Item#133325 Price: $13.50  Make fringe trim in seconds without tediously making each individual cut. Cut fringe or grass trim with a few snips. Makes quick work of confetti, too.

Zany Birthday FMS#628

Well another week has flown by and there's a promise of Spring between the rain drops.  I'm thrilled to see all the cherry trees sta...