Showing posts with label Dee Slater. Show all posts

Wednesday, February 14, 2018

WWC157 - Heidi's "All About Occasions" Challenge

Hi stampers Happy Valentines Day!  Welcome to this week's Watercooler Wednesday challenge #WWC157.  Heidi Weaver is our host and our theme this week is "All About Occasions".    


We hope you'll join us  by linking up your special "Occasions" project by 5:00pm Mountain Time, Monday February 19th, 2018 to our Linsky.  Who knows, you might be our next Watercooler Rockstar.

Here's My Project:
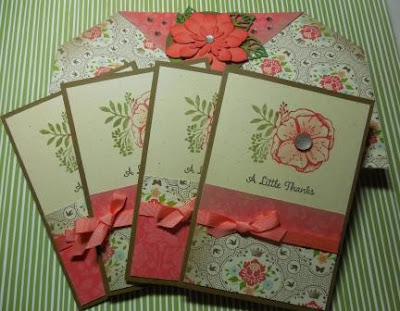
Today I want to share my Thank You Note Clutch Purse project.  This cute little clutch purse and accompanying note cards could be made for just about any "Occasion" you can think of.  Mine was made as a gift for a sweet gal friend for Valentine's Day. 


The clutch is made from a single 12 x 12 sheet of double-sided designer series paper.  No special skills or tools are needed to make this clutch, other than the ability to fold the square of paper into the clutch design.  Mine was made with retired paper stock because I'm still trying to use up what's in my stash.

The clutch holds four note cards and envelopes inside, and has a magnetic clasp to keep it closed.  Here is a link to an original tutorial and video by Dee Slater on Split Coast Stampers that clearly shows how to make this special little gift card clutch purse.   


Supplies:

Stamp Sets: Amazing You and One Big Meaning

Ink: Watermelon Wonder, Old Olive and Soft Suede

Card Stock: Ivory Fleck (R), and Soft Suede

DSP:  Stampin Up (R) - from my stash and Ivory Envelope Paper
Accessories:
Big Shot, Paper Trimmer, So Succulent and Stylish Stems Thinlets (R), Stitched Shapes 2" Circle Thinlets, 2 Small Magnets Watermelon Wonder Grosgrain Ribbon,
Faceted Gems, Basic Rhinestones, Dimensionals, Tom Bow Glue, Sticky Strip.

Note Cards:
I made my own note cards, but I've seen some beautiful sets completed with the Stampin' Up! premade note cards and envelopes that are in the Annual Catalogue.  Great value here as you get 20 note cards in Whisper White or Very Vanilla card stocks with matching envelopes and the card stock is a little thicker on the note cards so make for perfect backings.
1.  Base is 7" x 5" scored at 3 1/2"
2.  1st layer - 3 1/4" x 4 3/4" Ivory Fleck card stock.  Before adhering to the note card front stamp the floral image from Amazing you in Watermelon Wonder and Old Olive.  Stamp the sentiment "A Little Thanks" from One Big Meaning in Soft Suede ink just below the floral image. Add a Faceted Gem to the flower center.
3.  2nd layer - 3 1/4" x 3/4" strip of DSP adhere below the sentiment.
4.  3rd layer - 1 1/2" x 3 1/4" strip of DSP flip so reverse side is showing.
5.  Cut a strip of ribbon and attach over the seam created by 2nd and 3rd layer and glue ribbon ends to the back of Ivory Fleck layer.  Tie a small bow in the front with another piece of ribbon and trim ends. 
6.  For the inside of the note card cut a 3 1/4" x 4 3/4"piece of Ivory Fleck card stock and adhere.  It could be stamped with another floral image but I chose to leave my black for messaging. 

7.  Two cards and envelopes fit into each of the panels on the inside of the clutch.  They tuck in rather neatly and will  stay in place.


The Clutch:
I made the clutch following the instructions in Dee Slater's video.  I changed up the way the flaps hold shut though.  I attached two small magnets under the flaps with glue dots.  I started on one side positioning the magnet underneath the flap then flipped the clutch over and let the magnet attach itself and then added the glue dot and pressed the flap down.  These are really secure and hold the clutch shut.  You could also do a belly band or tie ribbon around the clutch if you're looking for alternate methods to close it.  

The Flower Embellishment:

I created the floral embellishment with bits and pieces of cardstock I had on hand and two of my favourite die sets - So Succulent and Stylish Stems, both retired.  
I always like to ink around the edges of my flower and leaf pieces as it seems to add more depth.  For this arrangement I layered the four flower pieces together with glue dots, and attached the assembled flower to a 2" stitched circle piece that I cut from Soft Suede card stock.  Next I added the leaves with glue dots.  The circular piece was attached to the flap with sticky strip.  A few random rhinestones were added to the flap on either side of the flower.  

And that's all there is to creating this note holder.  It's a fun and very quick to assemble project and I thoroughly enjoyed making it.  So much so, that I'm  planning to do a class on how to make these, for Mother's Day so if you're in my area and interested let me know.  

I hope you enjoyed this project as well as the ones created by the rest of the Watercooler Wednesday Design Team this week.  I'd love to hear what you think of it so leave me a comment before you go.  Your feedback is really helpful.  

Happy Stamping!
Penny Tokens Stampin' Spot 

Friday, May 16, 2014

Double Gate Fold Card Tutorial


You may have seen cards like this on Pinterest or Split Coast stampers recently.  It's called a Double Gate Fold card.  

I copied my card after watching the excellent video by Dee Slater's  of Create With Dee.  Dee is so creative and always does a great job of explaining the mechanics of her cards.  I liked this card so much I couldn't wait for the video to be over so I could make one myself. 

Using this design, I made two cards, one for Mother's Day and the other for a Birthday.  Both are super cute and really give that WOW factor when they come out of the envelope.  Thanks Dee!

Here's My Cards:
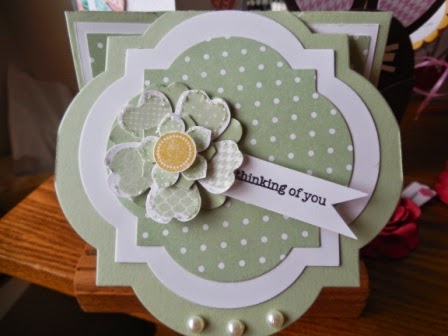
This is how the Double Gate Fold card looks coming out of the envelope.  What a beautiful card front.  I absolutely love, love, love it!  It's so feminine and girly-girl that it simply puts a smile on your face.

I used Pistachio Pudding cardstock and matching InColour 2013-2014 designer series paper with Whisper White cardstock.  The Flower Shop and Petite Petals stamp sets and coordinating punches make it easy to assemble this lovely flower. 


When the card is closed on the inside it looks like this.  You can almost feel the anticipation building while the recipient takes off the belly band and opens the card. Sorry for the bad lighting on this photo.

Okay, the suspense is over.  Here's the inside view of my card.  The hinged part of the gate fold top is achieved using the Window Frames Collection framelits and Big Shot Machine and the carryover of the card front design is perfect.  For the inside flower I stamped the base flower and added a single punched Pistachio Pudding flower using the Petite Petals punch.  The Daffodil Delight center is mounted with a dimensional.  


Supplies:
Cardstock:   Pistachio Pudding, Whisper White
Stamp Sets:  Flower Shop,

DSP:  InColour 2013-2014 Designer Series Paper in Pistachio Pudding

Ink:  Pistachio Pudding, Daffodil Delight, Staz On Black Ink
Accessories:  Simply Scored Scoring Tool, Paper Trimmer, Big Shot Machine, Pansy Punch, Petite Petals Punch, 1/2" Circle Punch Dimensionals, Adhesive, Window Frames Collection Framelits, Pansy Punch, 


Here's my birthday version.  I added a few more flowers on the front of this card and some additional basic pearls on the flower centers.  When I finished the card I wasn't too crazy about my sentiment choice, so I later swapped it out for the "happy birthday" banner from the Itty Bitty Banners stamp set.  Much better!


HOW IT'S MADE:
  1. Using Simply Scored score at 2 1/8" turn the card stock 180 degrees and score again at 2 1/8".
  2. Now turn the piece and score at 4 1/4".  This score line will become the hinge part of the card.
  3. Line up one of the 2 1/8" score lines in trimmer and trim to 4 1/4" line.  Then turn and trim on the 4 1/4" line 2 1/8".  Remove and set aside trimmed off piece for flower petals (see step 12).  Repeat on other side.
  4. Set up your magnetic plate or platform in the Big Shot machine and using the 2nd from largest Window Frame Die place it over the square flap at the top of the card.  Adjust so the bottom of the die is just beneath the 4 1/4" score line.  (if you're above the line and you pass through Big Shot you'll cut off the flap.  If you're too far below the score line, the card flap won't close properly).  
  5. Place the acrylic plate from the Big Shot over top of the cardstock and die, so it's lined up just to the hinge line and run through the Big Shot.  
  6. Trim off the two excess pieces of card stock on either side of the window frame shape with scissors once the die has been removed.  
  7. For the front and inside of the card you'll need to cut two Whisper White and two DSP patterned window frames using the next two smaller dies (refer to the picture).  Layer these die cuts with adhesive and attach to the front and the inside front panel. 
  8. Cut two pieces of Whisper White card stock for the front panels to measure 1 7/8" x 4" and attach to the gate fold panels.
  9. Cut two pieces of DSP for front panels to measure 1 5/8" x 3 3/4" and adhere over the front panels.
  10. Cut a Whisper White panel for the inside of the card to measure 4 x 4.  Stamp the panel with a sentiment of your choice and one of the flowers (see picture above for tip on the flower assembly).
  11. For Belly Band cut a 9 1/2" by 1 12" piece of cardstock to match the card base and then cut a 9 1/2" x 1 1/4" piece of DSP and glue to the cardstock piece.  Once the belly band is assembled wrap it around the card so one piece overlaps the other and secure together with sticky strip.  Make a flower and attach over top of the seam.  This band should slide easily off the card - don't make it too tight.
  12. To assemble the flowers for the card front, inside flap and belly band:  
    • Stamp 3 Flower Shop gingham flowers and punch out with the Pansy Punch. 
    • Stamp 3 Petite Petals flowers and punch out with the Petite Petals Punch
    • On scraps of Whisper White card stock stamp randomly stamp 3 of the gingham flowers with Daffodil ink and punch out just the center of the flower with the 1/2" circle punch.  Note: because you only want the centers, you don't need to stamp the entire flower.
    • Punch out 3 plain cardstock flowers with the Pansy Punch and 3 with the Petite Petals punch (use the two pieces of cardstock removed from the top of the card for these flowers)
    • Using glue dots stack from the base up a plain card stock Pansy flower, a Gingham Flower, a plain card stock Petite Petal Flower and a stamped Petite Petal flower.  Mount a Daffodil Delight center piece with a dimensional.  Attach flowers with sticky strip to the front, he inside cover and belly band.  Note:  I wanted a little glimmer on my flowers to give them some added pop, so I outlined all the petals with Dazzling Details #124117 pg. 166.
  13. Stamp a sentiment of your choice on Whisper White card stock and cut out like a banner.  Attach with glue dots beneath the petals.
Okay you should now be able to create your own Double Gate Fold card.  Remember to watch Dee Slater's video so you can see how she placed the Window Die, it's much easier to understand visually than my trying to explain it in steps 4,5 and 6 above. 

I'd love to hear from you if you made this card or simply a comment on the two that I've made.  It's always exciting to hear back from someone who actually used my instructions, as to whether they were understandable and helpful.   Have a great stamping day and thanks for visiting my blog!
Penny

NOVEMBER HOSTESS CODE

Happy November everyone!  I've just returned from vacation and here it is already the 6th of November, the leaves have turned, the elect...