
Supplies:
Stamp Set: Cheerful Tags #135065 pg. 5 Holiday Catalogue
Classic Ink: Real Red, Blushing Bride
Cardstock: Real Red, Whisper White, Blushing Bride, Basic Black
Thinlet: Gift Card Envelope and Trims Thinlets Dies
Diecut: Gift Bow Bigz L Die #129977 pg 223 Annual Catalogue
Punches: 1/4" and 3/4" circle punches, Window Word Punch
Embossing: Perfect Polka Dots embossing folder #117335 pg 226 Annual Catalogue
Accessories: Sponge Dauber, Dimensionals, White Pompom, Hot Glue Gun and 2-way Glue Pen Glue Dots, Big Shot Machine, Trimmer, Scissors and Bone Folder.
Here's How I Made It:

1. Cut two pieces of Real Red card stock to 6"x6" for the gift card and 3 1/2" x 4 1/2" for the Santa Hat.
2. Cut the 6" x 6" piece or Real Red card stock with the Gift Card Envelope Die. Score on the edges to form envelope. Use glue dots to seal envelop sides. Set aside.
 |
| Gift Card Envelope and Trims Thinlits Die #135854 |
3. Use the 3 1/2" x 4 1/2" piece of Real Red card stock for the hat and mark the top center of the card stock at 1 7/8". Using a ruler draw a line from the top mark to the right and left side forming a triangle. Trim off the side pieces with scissors to form the triangle. NOTE: You can also use the large pennant from the Perfect Pennants BIGZ L (retired) die if you have it. Sculpt the top of the hat with a bone folder to curl the point towards Santa's face. Glue a white pompom on to the tip with the glue gun.
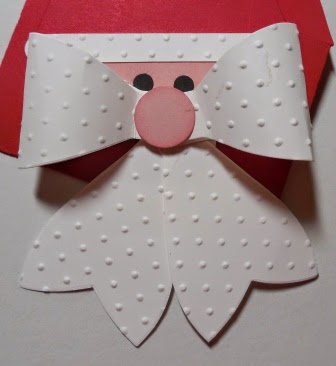
4. Cut a 1" x 3" piece of Blushing Bride for the face. Punch out the nose with the 3/4" circle punch from a scrap of Blushing Bride card stock. Sponge edges of circle with Blushing Bride ink and set aside.
5. For the beard and mustache cut a 3 1/2" x 4 1/4" (beard) and two 2" x 4 1/2" (mustache) pieces of Whisper White card. Place these pieces on the Gift Bow Bigz L Die and run through the Big Shot Machine. Emboss these cut pieces with the Perfect Polka Dots Embossing Folder to give them some texture. Assemble the bow using glue dots.
 |
| Gift Bow Bigz L Die cuts two sizes of bows - #129977 pg 233 of the annual catalogue. |
 |
| The Window Word Punch is a versatile tool to have in your punch toolbox. #119857 |
 |
| This is the backside view of the gift envelope once the Santa face is attached. |

9. Attach the Santa face on an angle to the front of the envelope with glue dots or tape runner. I just added the adhesive to the back of the face and the bottom of the hat. Glue it down well so the face doesn't fall off.

10. Cut a card insert measuring 2 1/3" x 3 3/4" to tuck inside the gift holder envelope. I stamped "Holiday Cheer" from the Cheerful Tags set in Real Red ink for my greeting. Add the gift card and you're done! Easy Peasy!
 |
| Cheerful Tags 7 piece Photopolymer Stamp set coordinates with the Note Tag Punch. |

Merry Christmas and Happy Stamping
Penny Tokens


No comments:
Post a Comment