Showing posts with label Christmas Blog Hop. Show all posts

Wednesday, December 6, 2017

Creative Circle Design Team's December Blog Hop


Welcome to the Creative Circle Design Team's December Blog Hop.  If you're new to the crafting world or not familiar with the acronym, CCDT stands for "Creative Circle Design Team". This is a group of Stampin' Up! demonstrators from around the world who love creating using electronic cutters for their designs as well as Stampin' Up! products and who love to participate in blog hops.  

We hop on the first Thursday of each month and every 3rd month Liz Holloway, the leader of our group provides a pattern and challenge to create something using her 3D SVG and Silhouette formats.

The teams' challenge this month ties in with Christmas and is to create a Church of our choice using Liz's pattern but it must include some type of holder for cards, a mini album, candies or even home decor.


Here is My Project:
For anyone who lives in or who has been through the Sumas Washington area you may be familiar with an old landmark church on the way to Mount Baker that was turned into a pub in its later years called the "Holy Smoke".  This was the inspiration for my church design.  My holder is for Christmas cards.  Enjoy!
In this picture you can see the drawer which opens on the backside of the church open and holding the cards.

Supplies:
Stamp Sets: Hearts Come Home

Inks: In Colour 2017-18 Markers (Lemon Lime Twist, Berry Burst, Tranquil Tide, Powder Pink, Fresh Fig),Momento Tuxedo Black, Versa Mark 
Card Stock: Whisper White, Basic Black,White Glimmer Paper
Accessories: Big Shot, Paper Trimmer, Liberty Bell, Dimensionals, Sticky Strip, 1 3/4 Circle Punch, Gold Thread. Stitched Shapes Die Cuts, Detailed Gate Thinlets Die, Sponge, Tom Bow Glue


Details:
I won't be providing measurements for any of the church assembly since it's all covered in Liz Holloway's design package.  But, the following are some of the things I added to my design for the challenge portion of it.  

I made a small box half box to fit inside the church and hold two battery operated candles.  The Church fits over top of the lid of the box and the box holds the church in place.
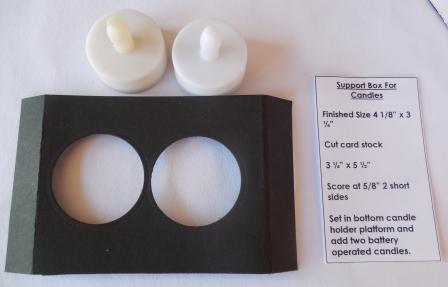
This is the insert for the support box for the church and holds the candles in place.
In this photo you can see how the church fits over top of the support box.  I actually attached the support box to the center of the drawer platform I made and it very effectively holds the church in place. 

In this photo you can see the base of the church is now mounted to the drawer.  It works similar to an easel card box.  The drawer is located at the back of the church and has a little bead pull to open it.  The drawer will hold four cards and envelopes.
Here you can see the cards inside the box and the drawer pull on the outside.  the platflorm is covered with glimmer paper so it looks like snow. 
When I was decorating my church, I opted to add three windows to the back of the church which was quite plain. 
This view shows the church off the platform.  I created a fancy door and scroll work on the sides and back of the church using the Detailed Gate thinlet die.  I cut one full gate from Basic Black card stock and then cut it down to three pieces of gridwork and the door portion.  I really liked the addition of these pieces to the overall look of the church. 


This is a closeup of the door.  It is cut from the top center of the Detailed Gate.  I mounted it on Whisper White card stock and cut around the design to form the door.  This was added with dimensionals to the front of the church.  The wavy lines you see on the church panels were made with the Seaside Embossing folder.  I wanted to give the appearance of wood siding on the church.
I absolutely love this Detailed Gate and the fact that it's not just for Halloween.  This beautiful die is from the Holiday Occasions catalogue and is only available until January 2nd, 2017.  It is product # 144669.
Here is my night view of the church.  The candles are on and you can see the lights flickering through those cute little vellum windows.  Unfortunately I don't have a closeup of the windows but them were assembled with the SVG cut outs and the vellum was coloured with this years In Colour Markers to give a pretty glow.

I found the degree of difficulty with this SVG design high but achievable and it was a fun project to tackle. I hope you've enjoyed my post and will check out the other design team artists to see their incredible projects.


Happy Stamping!
Penny Tokens Stampin' Spot  

Thursday, November 17, 2016

November Wacky Watercooler Blog Hop - Celebrates Christmas

This is the last blog hop of the season at the Wacky Watercooler, so I hope you will enjoy the delightful projects our Design Team has in store for you. We have 10 members participating in this hop  and each member is contributing three wonderful Christmas themed projects to get you in the mood to stamp and create.  So grab a cup of your favourite beverage and relax for a while and enjoy! 

The Wacky Watercooler Blog Hop works on a circular basis so you can start at the beginning or in the middle or at the end, and still work your way through all the participants just by clicking on the "next symbol" at the end of my post.  If you've arrived here from the wonderful Marsha Reed's blog

Project One:  Simple Gift Card Holders

I like to give gift cards at Christmas since it's sometimes difficult to get together with my friends and family who live far away.  So I need a cute gift card  holder that is both easy and economical to mail and very quick to make. I discovered this pattern which I've CASED on Lynn Ellis' blog earlier this summer, and decided to recreate it for you here.  The beauty of this pattern is it can be used for any season and can be as plain or dressed up as you want it.  And finally, these gift card holders are perfect for selling at craft fairs and usually sell off very quickly.


Simple Gift Card Holder Instructions:
Supplies:
Stamps: Merry Mice

Card Stock:  Cherry Cobbler, Basic Black, Very Vanilla, Watercolour Paper
DSP:  This Christmas DSP
Ink:  Archival Basic Black or Cherry Cobbler 
Markers:  Chocolate Chip, Pink Pirouette, Crushed Curry, Garden Green, Cherry Cobbler, Crumb Cake
Accessories: Big Shot, Trimmer, 1 3/8" 1 3/4" and 2" circle punches, Dimensionals, Tear and Tape, Basic Rhinestones, Snowflake Embellishments (R)


1.  Cut 1 piece of Cherry Cobbler card stock 5 x 8 and score at 5 ½” and 2” and round the top corners
2.  Cut 1 piece of Cherry Cobbler card stock 8 x 1 ¼” for belly band.  Gently wrap the band around the holder and adhere the two ends with tear and tape.  You can decorate the band as much or as little as you like. 
3.  Cut 1 piece of DSP 2 3/8 x 4 7/8 round bottom corners and adhere to the front of the top panel.
4.  Cut 1 piece of DSP 1 7/8 x 4 7/8 round top corners and adhere to the front of the  bottom panel
5.  Use Tear Tape on the inside of the bottom front panel to create the holder for the gift card.  Simply place the tape along the bottom at the crease line and up the two sides of the panel.  Remove strips and press the panel against the inside of the holder.
6.  Stamp a sentiment on the inside of the front panel so that it shows when the gift card holder is opened up. 
One of the reasons I love the "This Christmas Designer Series Paper" DSP selections is this snow flake design.  The black images on the Very Vanilla paper are outstanding. 
I used an old snowflake punch I had to create a negative image and then punched it out with the 1 3/8" circle punch.  It was mounted on a 1 3/4" circle of Very Vanilla card stock, which in turn was mounted on a Basic Black circle.  The center jewel is from last year's stash and is called Winter Wonderland Embellishments.
Isn't this little mouse super cute?  I coloured his outfit with an aqua painter and ink from a variety of ink pads including:  Crumb Cake, Chocolate Chip, Garden Green, Crushed Curry and Pirouette Pink.
The little belly bands only have DSP on the front panel which measures 1" by 
3 3/4". 
Project Two:  Gingerbread Rectangular Pop Up Card

I'm a great fan of Pop Up Box Cards.  These cards are so much fun to make and the recipients are always excited to receive them.  For my second project I chose a Gingerbread Man theme.
This little pop up box card is so adorable, that I couldn't stop smiling the whole time I was making it.  There is very little stamping involved in this card as most of the line images come from the Candy Cane Lane DSP. So, although I'm not a huge fan of fussy cutting I didn't really mind for this project.

I love the way the Red Glimmer Paper added so much life to this project!  Got to love it.  I added a little bow on the candy cane.  It was punched out with the Cooking Cutter Builder Punch. 

The sentiment "Wishing You a Sweet Season" is stamped in Early Espresso ink.  I used a Red.
The Candy Cane House is from the Candy Cane Lane DSP.  I added basic rhinestones to the small candies to give it some bling.  I fussy cut the house and then adhered it to a piece of Crumb Cake and then cut it out again leaving about a 1/16th" border all around the house.  This gave it a bit more stability.

Supplies:
Stamp Set: Candy Cane Christmas

Card Stock:  Real Red and Crumb Cake
DSP:  Candy Cane Lane, Red Glimmer Paper 
Ink:  Crumb Cake and Early Espresso
Accessories:  Circles Framelits, Big Shot, Basic Rhinestones, Trimmer, Fine Tip Scissors, Dimensionals, Tom Bow Glue, Acetate strips, Red Sharpie Marker  

Assembly:
Since I've made the rectangle box card previously I'm not including the instructions here, but you can get by clicking on this link WWC78.  Although I'm not giving you the full instructions here are two additional pieces of information that will help you when you make one of these cards. 

Tip One:
1.  I didn't have 12 x 12 piece of Real Red card stock for this project so I had to get inventive.  I cut a 4" x 11" piece of Real Red card stock and scored it according to the instructions.  Then I cut a 1" x 4" piece of Real Red card stock and scored it at 1/2".  I used this piece to extend the 4 x 11" piece.  


Cut a strip 1" x 4" and score at 1/2"  Clip away the top box as per the picture.Add the additional strip to the end of your box.  I used Tear N' Tape to give it some additional stability when I stuck the pieces together.  


Once the piece is adhered you'll never even see it.  Voila an instant solution when you don't have the right size card stock.  

Tip Two:
The original instructions in WWC78 do not include the scoring measurements for the two support pieces of the box card. You need to score at 5/8" on both ends of the support piece.  
 
Project Three: Reindeer Games

For my third project I decided to make a card using the Reindeer from the Cookie Cutter Christmas stamp set.  You just have to smile when you see that cute little face. It's too bad my photography wasn't better, because this card is a real stunner!  The silver foil and silver embossing are so rich looking.
It's difficult to see in the picture, but the three Reindeer were actually stamped in Versa Mark Ink directly on the card stock and then heat embossed with Silver Embossing Powder.  A fourth reindeer was stamped on a separate piece of paper and I used the Cookie Cutter Builder Punch to punch it out. 
I stamped the sentiment "Sending a little Christmas magic your way" from the Christmas Magic stamp set.   The little stars are from a retired stamp set. 

Supplies:
Stamp Sets:  Cookie Cutter Christmas, Christmas Magic
Ink:  Versa Mark and Momento Tuxedo Black
Card Stock:  Whisper White, Basic Black, Silver Foil
Accessories:  Big Shot, Trimmer, Heat Gun, Silver Embossing Powder, Dimensionals, Tom Bow Glue, Cookie Cutter Builder Punch

I hope you've enjoyed your tour of my projects and that I've provided some stamping inspiration and excitement for you.  I'd love to have some feedback and would enjoy reading any comments you might have.  Out of my three projects which was your favourite and do you think you'll make your own versions of these projects?

Well, time to move on to the talented Heidi Weaver.  Heidi's outdone herself this hop and is giving you some extras so be sure to check out her post.  Just click on her name or the NEXT button below and you'll go directly to her post.


Start of Hop - Wacky Watercooler
Happy Stamping!!!
Penny Tokens Stampin' Spot


Atlantic Hearts Sketch Challenge #572:

April has sure been living up to its reputation for rain showers but it's been really on the cold side which isn't normal for this t...