Wednesday, August 31, 2016

Z- Fold Birthday Wishes - WWC83 Penny's Tic Tac Toe Challenge


Welcome to the last Wednesday of August. Hope you've had a good month and are looking forward to everything September has to bring. 

I’m very excited to be hosting this week’s Watercooler Wednesday Challenge #WWC83. My theme for this challenge is a Tic Tac Toe project. Whoo Hoo!  Are you ready?  This is going to be fun, and I hope you'll join me and the Watercooler Wednesday Design Team by trying your hand at this challenge. 

The fun thing about using the Tic Tac Toe outline is that you're not restricted to a sketch or image and you get to choose a variety of different elements to build your design. So put on your thinking caps because you'll begin today's challenge by selecting three elements in a row, either horizontally, diagonally, or vertically, and use those elements on a project. You can use other products as well, but you must use the three in the row you choose.  What fun!

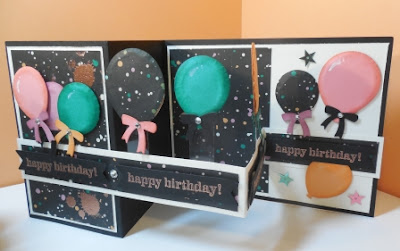
Here's My Z-Fold Birthday Card:


"Z Fold Cards are a very popular trend in card making right now.  You see them all over Pinterest and other sites. There are several variations on the Z Fold, but whichever one you choose, you're guaranteed to make a great card that's quick and easy to assemble.  For today's card I'm CASEing Dawn Griffith's Z Fold Pop Up Card with Balloon Bouquet Punch because I simply couldn't wait to try out her balloon pop up idea.

Supplies:
Stamps:  Gorgeous Grunge, Boys Will Be Boys (R), Party Pants (R), Stylized Birthday
Inks:  Emerald Envy, Peek A Boo Peach, Flirty Flamingo, Sweet Sugar Plum, Versa Mark, Momento Tuxedo Black
Card Stock: Basic Black, Very Vanilla, Emerald Envy, Flirty Flamingo, Peek A Boo Peach
DSP:  Playful Palette 6 x 6 Designer Series Paper Pack
Accessories:  Big Shot, Trimmer, Heat Gun, Copper Embossing Powder, Balloon Bouquet Punch, Balloon Framelit Dies,  Bunches of Banners Framelit Dies, Basic Rhinestones, Glue Dots, Window Sheet Strips, Sequins, Dimensionals

Directions:
1.  For the card base cut a 4 1/4 x 11" piece of Basic Black card stock and score it at 5 1/2 and 2 3/4".

2.  For the Z Fold band cut a 1" x 11" piece of Basic Black card stock and score it at 5 1/2" and 2 3/4".  This band when folded should fit completely across the front of the card starting at the left edge and running the width of the card to the far right side.  Mine is adhered about 3/4" from the bottom.  I attached the left edge first, only applying glue on the DSP and then placing the strip across the adhesive.  Make sure this strip is straight and then adhere putting adhesive on the back of the 2 3/4" part and holding it down to the card.  Watch Dawn's video to see placement. Note:  Before attaching the band to the card complete step #6 and finish the band with step #9.
Here you can see the Z fold Banner stretching from the left hand to right hand side of the card.  Because the Playful Palette DSP was 6 x 6 I cut it into 1" strips to extend across the Z fold. See note in Step #6.
3. Cut a 2 1/2" x 4" piece of Very Vanilla for the front panel. Adhere.


4. Cut a 5 1/4' x 4" piece of Very Vanilla for the inside panel. Adhere.
 

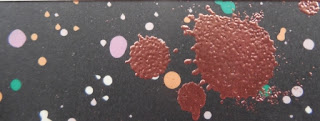
5. Cut two pieces of DSP 2 3/8 x 3 7/8". Using Versa Mark ink, randomly stamp the small splotch from Gorgeous Grunge on the DSP and heat set with Copper Embossing Powder. Adhere these DSP pieces to the front and inside Very Vanilla panels.


6. Cut a strip of DSP 1/2" x 5 1/4", and 2 pieces 1/2" x 2 1/2". Using adhesive attach these strips to the Z fold band. Leave even strip of Very Vanilla showing around the edges. Note: If you are using 12 x 12 DSP you can cut this strip to measure 1/2" by 11 and then just score at 5 1/2 and 2 3/4".

7. Punch large and small balloon shapes from DSP and card stock with the Balloon Bouquet Punch as follows:  1 large and 1 small Flirty Flamingo, 3 small Emerald Envy, 2 large and 1 small DSP, 1 small Sweet Sugar Plum, 2 large and 1 small Peek A Boo Peach.  


I used a stylus and a foam mat to round the edges of my balloon and I distressed the edges with a sponge dauber and the corresponding ink. You can see the balloon technique by clicking here. I stamped the words "Cake Time" from the retired SAB set "Party Pants" on the Peek a Boo Peach large Balloon.

8. Using the Small Bow Framelit from Balloon Framelit Dies set cut out 10 bows in a variety of the card stock colours (see card) once the balloons are attached to the window strips and card add the bows with mini glue dots and basic rhinestones. Note: The glue dot will over lap the bow, so before attaching to the bow roll the glue dot a bit with your fingers to make it fit.

This wonderful little Framelit Die set coordinates with the Celebrate Today stamp set.  Never be without a perfect bow with this framelit!
9. Stamp the "happy birthday" sentiment from Boys Will Be Boys (R) stamp set three times in Versa Mark ink on 2 3/4" x 1" strips of basic black card stock. Emboss each strip with Copper Embossing Powder and cut into banners using the straight banner from "Bunch of Banners" Framelits. Attach these banners with 2 dimensionals per banner to the center of the DSP strip on the Z Fold Band. Attach two banners to the 5" strip centering between left and right sides, then attach the remaining two banners to the center and end of the band. Note: These banners can be attached after the Z Fold Band is adhered to the card front, see step #2. I put a large rhinestone between the first two banners for a bit more sparkle.


Bunch of Banners Framelit die coordinates with the Birthday Banners and Banners for You photopolymer stamp sets.  
10. Attach the balloons with strips of window sheet cut 1/4" by 3 inches. Use large Glue Dots to attach the window sheet strips to the center Z fold band.
In this view you can see the window strip attached with the large glue dot.

Attach the balloons next using large glue dots and dimensionals. The front of the balloons are puffed out (see #7). The center balloons were finished with an additional flat balloon face on the back side so you can't see the glue dots and window strip when the balloon is opened and shut. 

In this view you can see the backs of the balloons are covered with the extra balloon images I cut out because they are visible if the card is turned around.  I also finished off the Peek A Boo Peach balloon with an extra green bow to hide the glue dot. 
11. I finished the inside panel with a few balloons and some sequins.

Because there wasn't any room for writing a greeting on the inside panel once it was decorated, I added a piece of Very Vanilla card stock to the back of the card and stamped "Happy Birthday" with the Stylized Happy Birthday stamp in Momento Tuxedo Black Ink. 
Well I think that just about does it for today's card challenge. I'll leave you with just a few more shots of this fun card. If you try out my tutorial let me know if it was easy to follow. Thanks for dropping by and make sure you visit all the other Watercooler Wednesday Design Artists to see their fabulous Tic Tac Toe creations.


Happy Stamping!
Penny Token's Stamping Spot


Ending on August 31st, 2016:
  • August Hostess code EZGKEM73
  • July Bonus Promo - Last chance to redeem coupons
  • Thoughtful Blooms Photopolymer Stamp set - last chance to purchase, once all the supplies are gone it's fully retired 
Starting September 1st, 2016:
  • New Catalogue launches September 1st to January 4, 2017
  • Special Deals - replaces last year's Weekly Deals - starts Sept 1st each special runs for 7 days.  

Wednesday, August 24, 2016

WWC82 Libby's Challenge

On Sunday our temperature dropped from a high of 37 to only 18 degrees and we had high winds all day.  The trees in our back yard were swaying and bending with every blast of cool air and leaves and twigs were blowing everywhere. What an exciting day! 

Considering the focus on our blowing trees, it seems pretty funny and timely to usher in Libby Fen's TREE theme WWC82 for the Watercooler Wednesday challenge today.  


Here's my card:

I decided to use my Woodland Textured Impressions Embossing folder on my card face for this week's Tree Theme after watching a video by Diane Dimich on Youtube (see link at end of post).  Without a doubt, this has to be one of my all time favourite embossing folders, and I decided to CASE her card. 


I barely got to use mine last year before it was retired with the Holiday catalogue, so I was truly thankful that Stampin' Up! Demos were able to influence Stampin' Up!  to bring it back in the 2016-2017 Annual Catalogue season. Here's my version using this folder:
   

The beautiful grouping of trees on the inside of the card is from a retired stamp set called Happy Scenes.  It works well with this embossing folder.

Supplies:  

Stamp Sets: Happy Scenes (R), Timeless Textures, Picture Perfect

Ink: Dapper Denim, Soft Sky, Marina Mist, So Saffron, Crumb Cake, Early Espresso, Mossy Meadow (R), Wink of Stella Clear Brush

Card Stock: Always Artichoke, Dapper Denim, Whisper White, Crumb Cake

Accessories:  Big Shot, Trimmer, Woodland Textured Impressions Embossing Folder, Bunch of Banners Framelits, Sponge Daubers, Aqua Painter, Linen Thread, Dimensionals, Tom Bow Adhesive 

How I made it:


1.  I used a 4 1/4" x 11" piece of Always Artichoke for the card base and scored it at 5 1/2".
2.  The first layer is cut from Dapper Denim and measures 4" x 5 1/4".
3.  The second layer is a piece of 3 3/4" x 5" Whisper White card stock which was stamped with the tree scene from Happy Scenes and sponged with inks before being run through the Big Shot machine. 

 
4.  To colour the embossing folder open it up and working with a sponge on the side of the folder that has the "Sizzix" label on it, apply ink and stamping in this order:
  • Sponge soft sky on the bottom 1/3 of the embossing folder, followed by Marina Mist. 
  • Sponge a circle for the sun in So Saffron towards the middle top of the embossing folder.  
  • Sponge Dapper Denim on the top 1/3 of the embossing folder.
  • Stamp the tree scene from Happy Scenes twice on the bottom third of the embossing folder in Mossy Meadow ink
  • Place Whisper White card stock inside the embossing folder.  Before stamping look through the front of the embossing folder to set up the position you want your card stock to be stamped on, then run it through the Big Shot.  
  • Add details to the ground and trees using an Aqua Painter.  I coloured the tree trunks in Crumb Cake, the grass in Mossy Meadow.  I used a small speckled stamp from the Timeless Textures stamp set stamp set to make small speckles of Mossy Meadow and Crumb cake inks on the grass.  
  • Attach the Whisper White layer with Tom Bow Glue to the Dapper Denim layer.
5.  To finish the card I stamped the sentiment "Just a Note" from the Picture Perfect stamp set on a small scrap of Crumb Cake card stock.  I attached this with a piece of Linen Thread that was wrapped twice around the layer of Dapper Denim and Whisper White. The completed layer was adhered to the card base with Tom Bow Adhesive.
6.  I cut a piece of 5 1/4" x 4" Whisper White and attached it to the inside of the card.  I stamped this panel with the tree scene in Always Artichoke.

7.  To complete the card and add a little shimmer to the trees I used a Clear Wink of Stella Glitter Brush along the sides of the tree trunks and branches.  

I hope you like my tree card today.  Here's a link to Diane Dimich's YouTube video that explains how to ink up the inside of the embossing folder.  If you haven't tried out this technique before play around with it and see how much fun it can be.  I know you'll enjoy it.  

Well that's the end of my post for this week.  I hope you've check out the rest of the design team at the Wacky Watercooler for this challenge.  Leave us some comments, because we love to hear from you.  We like it even more when you play along with our challenges, so hopefully we'll see you at the Watercooler.  In the meantime...........

Happy Stamping!
Penny Token's Stampin' Blog 
August Hostess Code EZGKEM73

Thursday, August 18, 2016

The Wacky Watercooler Blog Hop Steps It Up for August

I don't know about you but I simply can't believe how quickly this summer is zooming by.  Not only is it rolling by quickly, but its time for the Wacky Watercooler Blog Hop once again.   Didn't we just celebrate?

I want  to welcome the awesome Fiona Whitehead to our group of Wacky Watercooler designers. Fiona's participated in many of our challenges and is a very talented stamper whom I know you're going to enjoy!  

The Wacky Watercooler Blog Hops has been pretty consistent over the years with design artists generally featuring three different projects for the hop. but we've thrown that concept out the window for today.  Yes, that's right, our August hop has a twist that we hope you'll enjoy!  Each design artist is starting out with an ordinary "I'm in a hurry I need to get this done" type of card".  Their second project will take that very same card and "step it up" a notch, and then our final projects will be a totally stepped up version that shows how fancy we really can get with this card. Don't be fooled, this is not as easy as it sounds!

Before we begin, our hops work on a circle basis so if you've started with me, just keep following the links until you wind up back here again.  If you've arrived from Heidi Weaver's blog I'm sure you're still reeling from her amazing projects.  At the end of my post just click on the Watercooler that says "next" and you'll go to Marsha Reed's amazing Coffeepot Stamping Cafe, where she has some fabulous projects.  What fun!

Project One: 
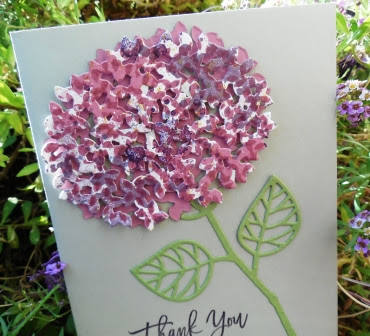
Okay, so this is the starting point of my "plain jane", "simple", "I'm in a hurry" type of card.  The focal point, the hydrangea, comes from a set I hadn't had an opportunity to use yet called Thoughtful Branches and it's matching Beautiful Branches Framelits.  This bundle is available only during the month of August or as long as supplies last.  So, what better time than this hop to show case it, and boy am I glad I did, not only for the end results but because it was an exceptionally fun bundle to use. 


Supplies:  (Note:  This supply list is for the three projects)
Stamp Sets:  Gorgeous Grunge, Thoughtful Branches (Limited Edition Only Available in August 2016),and Butterfly Basics. 
Ink:  Elegant Eggplant, Perfect Plum, Rich Razzleberry) So Saffron, Sweet Sugarplum, Wisteria Wonder
Card Stock:  Sahara Sand, Rich Razzleberry, Pear Pizazz, Sweet Sugarplum, Whisper White.
Accessories:  Big Shot, Trimmer, Beautiful Branches Framelits (Limited Edition Only Available through August 2016 or while supplies last), Itty Bitty Accents Flower Image Punch(R), Small Butterfly Punch, Tom Bow Glue, Dimensionals, Basic Rhinestones, Fluttering Embossing Folder 

How It's Made:  
1.  I cut an 8 1/2" x 5 1/2" piece of Sahara Sand card stock for the base and scored it at 4 1/4". 
2.  I looked very carefully at the fading hydrangeas in my garden to get the colour perspective and then created a palette on a piece of Whisper White card stock, using the Gorgeous Grunge splatter and spot stamps and the hydrangea image from the Thoughtful Branches set.  The colour mix was made up of:  Perfect Plum, So Saffron, Elegant Eggplant, Sweet Sugarplum and Wisteria Wonder.  


Note: I took this picture before I stamped the hydrangea image across it, so it was a lot fuller when I finished.
 3.  I cut out the hydrangea flower head with the Beautiful Branches Framelits.  It cut like butter and I must say I was so impressed, because I don't have a precision plate.

4.  I cut a second hydrangea out of Sweet Sugarplum card stock and adhered the two flower pieces together with foam tape. Glue the combined flower head in the top left hand corner using Tom Bow glue.  Tip One:  Before adding the adhesive shift the flowers just slightly so it the flower head looks fuller. Tip Two: There isn't a lot of room between the floors to fit in dimensionals so instead I cut a very small strip across the top of my adhesive foam strip and these eensy weensy pieces fit perfectly to separate the two layers and give some fullness.  

5.  Cut the stem from Pear Pizzazz card stock and adhere with Tom Bow glue.  I just did tiny little dots of glue on the back side of the leaf image and I used tweezers to lay it down on the card stock and secure.  

6.  The beautiful "Thank You" sentiment from Thoughtful Branches was stamped in Elegant Eggplant Ink just below the leaf on the left hand side of the card bottom.  

7.  The inside of the card has a 5 1/4" x 4" panel of Whisper White card stock with the simple "Your Kindness Makes a Difference" sentiment stamped in Elegant Eggplant ink.  


Project Two:
For the second project the following changes were added:
1.  I added a 5 3/8" x 4 1/8" layer of Rich Razzleberry card stock.

2.  The next layer is a 5 1/4" x 4" layer of Sahara Sand card stock.

3.  I stamped and assembled a hydrangea the same as in project one.

4.  I added a small Rich Razzleberry butterfly to the leaf.  It was punched out with the Bitty Butterfly punch. and three basic rhinestones were added to its center. 

5.  I used a retired punch called the Itty Bitty Accent punch (flower image) to punch out a number of small flower images which I shaped with a stylus ball so they had some shape. The flowers were attached with Mini Glue Dots.  I also added small basic rhinestones to their centers.

6.  The stem and sentiment placement was the same. 

7.  Nothing changed on the inside of the card.  


Project Three:


For my third project the following changes were added:

1. I added the Rich Razzleberry layer as in project two.

2. The Sahara Sand layer was embossed with the Fluttering Embossing folder.

3. I stamped the Thank you sentiment  as in projects one and two.  I then stamped the honeycomb stamp from Butterfly Basics , randomly over the Sahara Sand layer.  I used Sweet Sugarplum ink, but I stamped off before applying each image.
  
4.  I added the hydrangea as in Project Two but added more flowers and fluffed out the base so it was fuller. Instead of adding Basic Rhinestones I added small Basic Pearls.  I added Wink of Stella to all of the flowers.

5.  The stem placement was the same but I coloured the leaves and stem with Wink of Stella.

6.  I added two more butterflies in Rich Razzleberry and one in Sweet Sugarplum to the stem and added pearls to their centers instead of rhinestones.

7.  For the inside of the card I added a 4" x 5 1/4" layer of Rich Razzleberry card stock followed by a 3 3/4" x 5" layer of Whisper White.  The sentiment remained the same, however I randomly stamped the honeycomb image and added three butterflies.


Well that's it for my three "STEP IT UP" cards.  I hope you enjoyed this presentation, and the way I've used this stamp set to create them. I'd like to hear your comments, and which card you liked the most.


Marsha Reed
Heidi Weaver
Wacky Watercooler Blog Hop 


Happy Stamping!
Penny Tokens Stampin Spot
August Hostess Code:  EZGKEM73

Wednesday, August 17, 2016

WWC81- Gail's Colour Challenge

We're mid-way through August and in BC we're finally getting some weather that speaks of Summer.  It's been hot and sizzling all week with temperatures ranging in the high 30's (C) but no one's complaining, at least not yet!

I always think of Summer as the season of heat and vibrant colours and this week at the Watercooler Wednesday Challenge, our talented Gail Allen is bringing you just that.  She's pulled together some pretty exciting summer colours to challenge our imaginations. 
Here's My Card:
Since August is also a hot birthday month I thought I'd respond to this challenge with a gender neutral birthday card that's a fiesta of colour and images.   We've got balloons, splotches and sparklers and it all says fun!  

Supplies:  

Stamp Sets:  Balloon Celebrations, Stylized Birthday and Gorgeous Grunge
Ink:  Pear Pizzazz, Watermelon Wonder, Peek A Boo Peach, Daffodil Delight and Momento Tuxedo Black
Card Stock:  Pear Pizzazz, Watermelon Wonder, Peek A Boo Peach, Daffodil Delight and Very Vanilla
Accessories:  Basic Rhinestones, Balloon Bouquet Punch, Wink of Stella, Paper Trimmer, Sponge Daubers, Tom Bow Adhesive, Scissors

Assembly:
This is a pretty easy card to assemble - only ten steps required and it comes together really fast.
 1.  Cut the card base from Pear Pizzazz.  It measures 4 1/4" x 11" and is scored at 5 1/2 for a top folding card.

2.  Cut two pieces of Very Vanilla card stock measuring 4" x 5 1/4" - one is for the face of the card and the other is the inside panel.

3.  Cut a strip of Watermelon Wonder card stock 1/2" x 5 1/4" and a strip of of Peek A Boo Peach 1/4" x 5 1/4".

4.  Before assembling the front do the stamping on the Very Vanilla piece:  Stamp the sentiment "Happy Birthday" from the Stylized Birthday in Pear Pizzazz towards the top center of this card stock.  Make sure your ink pad is nice and juicy so you get a good impression.
The Stylized Birthday is a one stamp wood mount image Order #141828.  The image measures 2 1/4" x 1 3/4".

Randomly Stamp splotches from Gorgeous Grunge in the challenge colours over the remaining Very Vanilla piece.  
Gorgeous Grunge - 5 piece stamp set comes in Wood(130514)and Clear Mount (130517).  The stylized textured images really help create awesome images!
Stamp the small dandelion from the Balloon Celebrations stamp set randomly between splotches.  The overall effect you're trying to achieve is "fiesta" "confetti", "fireworks"...... in other words FUN!
 
Balloon Celebration - 35 piece Photopolymer Stamp Set #140675

 5. Cut two 1/4" x 5 1/4" strips from the Very Vanilla piece.  It should now measure 3 1/2 x 5 1/4.  Glue this to the card base lining up on the right hand side.

6.  Adhere the Watermelon Wonder strip on the left side butting it against the Very Vanilla strip.  Center the 1/4" x 5 1/4" piece of Peek A Boo Peach down the center of the Watermelon Wonder strip.
   
7.  Punch out balloons from scraps of Pear Pizzazz, Watermelon Wonder, Peek A Boo Peach and Daffodil Delight card stock.  Stamp the balloons with the dotted balloon image.  Position and stamp the balloon strings on the Very Vanilla card layer on the left side of the sentiment.  Adhere the balloons with Tom Bow adhesive.  The last balloon is mounted with dimensionals.  

For some extra detail I ran the Clear Wink of Stella Glimmer Brush around the edges of the balloons and on the dandelions in the background panel.  Love this stuff - it's subtle but picks up the light for some extra sparkle.

8.  Adhere strips of Basic Rhinestones down the center of the Peek A Boo Peach strip to the top of the first balloon and from the last balloon to the bottom of the strip.
  
9.  Finish the inside of the card with a 5 1/4 x 4" Very Vanilla card panel.  Attach the two 1/4" x 5 1/4" stamped strips to either side of this panel.  Stamp the sentiment "Let Us Celebrate" in Pear Pizzazz ink along the top left side of the strip, and add a couple of Gorgeous Grunge Splatters.


10.  Stamp the top half of the balloon strings from the left hand bottom corner of the panel towards the center.  Adhere one of each coloured balloon so they look like they are rising from the bottom of the card.  I offset the orange balloon so it actually overlapped the edge, and then I cut off the excess balloon.   

Okay now that was easy wasn't it?  Did you like this colour combo?  I hope you'll play along this week and link up your creation with our linky tool.  It's easy and our team of design artists would love to see how you've used this colour challenge.  If you're unsure go back and check out their cards - they're awesome!  Oh and while you're at it leave us some comments because we like feedback too.  

Happy Stamping!
Penny Tokens Stamping Spot

Promotions: 
August Hostess Code:  EZGKEM73 use this code on orders under $200.00 and I'll send you something FREE.

August Bonus Days -  If you earned BONUS DOLLAR(s) on your July order, don't forget to redeem by applying the code on your next order - Good until August 31st.

Paper Pumpkin BOGO PROMO - August 11th to October 10th - FIRST-time Paper Pumpkin subscribers can buy their FIRST month and get their second month FREE!

Last Free Shipping of the Year - December 9, 10 11, 2024

Heads up, it's time for the last FREE SHIPPING promo of the year! From December 9–11, you can shop and save on all qualifying orders of...