Showing posts with label Libby Fens. Show all posts

Wednesday, August 24, 2016

WWC82 Libby's Challenge

On Sunday our temperature dropped from a high of 37 to only 18 degrees and we had high winds all day.  The trees in our back yard were swaying and bending with every blast of cool air and leaves and twigs were blowing everywhere. What an exciting day! 

Considering the focus on our blowing trees, it seems pretty funny and timely to usher in Libby Fen's TREE theme WWC82 for the Watercooler Wednesday challenge today.  


Here's my card:

I decided to use my Woodland Textured Impressions Embossing folder on my card face for this week's Tree Theme after watching a video by Diane Dimich on Youtube (see link at end of post).  Without a doubt, this has to be one of my all time favourite embossing folders, and I decided to CASE her card. 


I barely got to use mine last year before it was retired with the Holiday catalogue, so I was truly thankful that Stampin' Up! Demos were able to influence Stampin' Up!  to bring it back in the 2016-2017 Annual Catalogue season. Here's my version using this folder:
   

The beautiful grouping of trees on the inside of the card is from a retired stamp set called Happy Scenes.  It works well with this embossing folder.

Supplies:  

Stamp Sets: Happy Scenes (R), Timeless Textures, Picture Perfect

Ink: Dapper Denim, Soft Sky, Marina Mist, So Saffron, Crumb Cake, Early Espresso, Mossy Meadow (R), Wink of Stella Clear Brush

Card Stock: Always Artichoke, Dapper Denim, Whisper White, Crumb Cake

Accessories:  Big Shot, Trimmer, Woodland Textured Impressions Embossing Folder, Bunch of Banners Framelits, Sponge Daubers, Aqua Painter, Linen Thread, Dimensionals, Tom Bow Adhesive 

How I made it:


1.  I used a 4 1/4" x 11" piece of Always Artichoke for the card base and scored it at 5 1/2".
2.  The first layer is cut from Dapper Denim and measures 4" x 5 1/4".
3.  The second layer is a piece of 3 3/4" x 5" Whisper White card stock which was stamped with the tree scene from Happy Scenes and sponged with inks before being run through the Big Shot machine. 

 
4.  To colour the embossing folder open it up and working with a sponge on the side of the folder that has the "Sizzix" label on it, apply ink and stamping in this order:
  • Sponge soft sky on the bottom 1/3 of the embossing folder, followed by Marina Mist. 
  • Sponge a circle for the sun in So Saffron towards the middle top of the embossing folder.  
  • Sponge Dapper Denim on the top 1/3 of the embossing folder.
  • Stamp the tree scene from Happy Scenes twice on the bottom third of the embossing folder in Mossy Meadow ink
  • Place Whisper White card stock inside the embossing folder.  Before stamping look through the front of the embossing folder to set up the position you want your card stock to be stamped on, then run it through the Big Shot.  
  • Add details to the ground and trees using an Aqua Painter.  I coloured the tree trunks in Crumb Cake, the grass in Mossy Meadow.  I used a small speckled stamp from the Timeless Textures stamp set stamp set to make small speckles of Mossy Meadow and Crumb cake inks on the grass.  
  • Attach the Whisper White layer with Tom Bow Glue to the Dapper Denim layer.
5.  To finish the card I stamped the sentiment "Just a Note" from the Picture Perfect stamp set on a small scrap of Crumb Cake card stock.  I attached this with a piece of Linen Thread that was wrapped twice around the layer of Dapper Denim and Whisper White. The completed layer was adhered to the card base with Tom Bow Adhesive.
6.  I cut a piece of 5 1/4" x 4" Whisper White and attached it to the inside of the card.  I stamped this panel with the tree scene in Always Artichoke.

7.  To complete the card and add a little shimmer to the trees I used a Clear Wink of Stella Glitter Brush along the sides of the tree trunks and branches.  

I hope you like my tree card today.  Here's a link to Diane Dimich's YouTube video that explains how to ink up the inside of the embossing folder.  If you haven't tried out this technique before play around with it and see how much fun it can be.  I know you'll enjoy it.  

Well that's the end of my post for this week.  I hope you've check out the rest of the design team at the Wacky Watercooler for this challenge.  Leave us some comments, because we love to hear from you.  We like it even more when you play along with our challenges, so hopefully we'll see you at the Watercooler.  In the meantime...........

Happy Stamping!
Penny Token's Stampin' Blog 
August Hostess Code EZGKEM73

Thursday, April 21, 2016

Wacky Watercooler April 2016 Blog Hop - A Focus on the Retiring In-Colours

One of my greatest pleasures in the past year and a half has been playing along on several of the Wacky Watercooler Blog Hops.  Now that I'm home and settled back into a crafting routine once again I'm totally excited about participating in their latest hop which is focusses on the 2014-2016 Stampin' Up! In-Colours which will soon be retiring.  
Say good bye to the 2014-2016 In-Colours - Tangello Twist, Mossy Meadow, Lost Lagoon, Hello Honey and Blackberry Bliss
Okay let's get to it! The Wacky Watercool April Blog Hop is a "circular blog hop" running from 6:00pm Thursday April 21st through 6:00pm Saturday April 23, 2016.  The focus is on the 2014-2016 In-Colours which will soon be retiring.  No matter where you begin just keep going to the “next” blog on the list and eventually you'll wind up right where you started. What fun!

If you've been working your way forward through this hop you'll have arrived here after visiting the totally talented Libby Fens's blog.   What a great selection of cards she posted to start this blog hop off.  


CASEing Our Friends:
For my first project I've been given the privilege of CASing a card designed by the very talented Marie Green.  Marie has one of those great blogs where you want to spend time wandering so it was difficult narrowing down my choice of cards to CASE.  If you haven't visited Marie's "My Tanglewood Cottage" blog site before, make sure you do, because you'll come away with lots of ideas and tips. 

Telescoping Card Technique:
For my first CASE I fell in love with one of her more recent projects entitled the "Traveler".  This is simply an incredible and inspirational card which offered me an opportunity to play with a "new to me" technique called "telescoping". Here is Marie's stunning "Traveler" card.  

Here's My Card: 


For this card I've used three of my favourite retiring in-colours - Lost Lagoon, Mossy Meadow and Hello Honey for the base and layers of my card. I also used a gorgeous designer series paper featuring those colours from the "Going Places" DSP paper pack which also retires the end of May 2016.   
This incredible marbled sheet of designer series paper was the perfect match for my second layer.  I cut a 4 x 5 1/4" piece and sponged around the edges with Lost Lagoon ink, then randomly stamped the small dots image from Party Pants around the edges, with Versa Mark Ink.  Gold Glory Embossing Powder was heat set on the dots. Love it! 
Here's a closer look at the "telescoping" layers used to highlight the big blue Maine Lobster.   I only added three layers, while Marie used four in her sample. I have to say I'm totally fascinated by the 3-D dimension this easy technique achieves.  Tip:  Make sure that you increase the depth of the foam tape for each layer you add above the first layer and use good firm foam tape so the layers don't sink. 
I used the center 3 squares on the Square Framelit Dies (counting from the center of the framelits set), but using Circle or Oval framelits would also achieve this same effect.  Originally I was going to line up the squares in a block in the center of the card, but changed this to a diamond pattern as it better suited the stamping on my design and really helps to focus on the lobster which was my intent. 

Don't you love this "birthday banner"?  This super easy to cut and stamp banner is from the coordinating Large Number Framelit Dies and Number of Years Stamp Set.  I really liked the cool "happy birthday" sentiment in Boys Will Be Boys and it fit perfectly on this banner. Bonus!  Because I liked the antique look of the dark embossed gold dots on the DSP layer, I repeated this accent on the stamped collage layer. 
One of my favourite things to create are Collage images.  For this one I began by stamping the 3 x 4 piece of Very Vanilla card stock the printed verse stamp from By the Tide.  To achieve a lighter image that I could layer other images on I stamped off the Mossy Meadow ink before each application of the word stamp to this layer. I then randomly stamped the coral image at full strength in Hello Honey.  Next I stamped the Sea Horses and Anchors in Mossy Meadow.  The beautiful lobster which is the focal point of the card front was stamped in Lost Lagoon.  I sponged the edges in Lost Lagoon and Hello Honey.

The inside of the card features a 5 1/4" x 4" layer of Very Vanilla card stock stamped in Hello Honey and Mossy Meadow.  I thought the sentiment "Hope your day stacks up to be...." from the Sprinkles of Life Stamp Set was a really fun and appropriate verse considering the stacked layers on the front of the card. 
 

Supply List: 
Stamp Sets: By the Tide, Party Pants, Number of Years, Boys Will Be Boys 
Sprinkles of Life 
Ink:  Lost Lagoon, Hello Honey, Mellow Moss, Versa Mark and Gold Glory EP
Card Stock:  Very Vanilla, Mossy Meadow, Lost Lagoon
DSP:  Going Places (Spring Occasions 2016)#140581
Accessories:  Square Framelit Dies, Heat Gun,  Large Number Framelit Dies, Big Shot, Dimensionals, Foam Tape

Peek-A-Boo Technique Card:
For my second CASE I chose a Peek-A-Boo Technique card from Marie's blog, that actually was part of the Watercooler Blog Hop in April 2015. Again, this is a "new to me" technique and I just had to try it with my own spin for a boy's birthday card.   


Here's my card:  
For this fun masculine peek-a-boo card I started with a Very Vanilla card base covered with a Mossy Meadow/Very Vanilla designer series paper from the Going Places DSP pack.  I used the Boys Will Be Boys stamp set to stamp the Robot in Mossy Meadow ink.  I used a blender pen and Hello Honey ink to colour the Robot. The Lego image was stamped on scraps of Lost Lagoon, Hello Honey and Mossy Meadow and then fussy cut glued together to form one multi piece block. I stamped the YoYo image as a background on the sentiment piece in Hello Honey.  This is such a fun stamp set to have on hand for crafting kids cards. 
When you open up this card, the magic of the Peek-A-Boo technique begins.  
As you open the card front the picture in the oval changed from the Robot to the Parachute image.  What fun!  To add some dimension to the parachute I first stamped the parachute image on the 2 1/2" oval and then stamped it again on Hello Honey.  I cut out the parachute from the Hello Honey piece and mounted it on the original image with dimensionals.  I used the Large Numbers Framelit set to cut out the number five in Lost Lagoon card stock. The "Look Who's Turning" sentiment is from the Number of Years Stamp Set.  And the "Happy Birthday to you" sentiment is from Party Pants a 2016 Sale-A-Bration stamp set.

The next few pictures show the back panels of this card.  You don't have to do anything with these panels, but I decided to continue decorating and stamping on them and this is the result.   


Supplies:

Stamp Sets:  Boys Will Be Boys, Party Pants, Number of Years
Card Stock:  Mossy Meadow, Lost Lagoon, Hello Honey
DSP:  Going Places (Occasions Spring Catalogue)
Ink:  Mossy Meadow, Hello Honey, Lost Lagoon
Accessories:  The Big Shot, Ovals Framelit Dies, Itty Bitty Accents punch (Star), Banner Punch, Dimensionals, Sponge Daubers, 11/4,1 3/4 and 1/38" circle punches, scissors  
Double Fold Card:
For my third  and final project I was inspired to CASE a card made by Lisa Curcio of Lisa's Stamp Studio.  She called it a Double Fold Card. 
Grateful Bunch Double Fold Card by Lisa Curcio of Lisa's Stamp Studio.
For measurements and a video on how to make this card click on this link.

Here's My Card:  
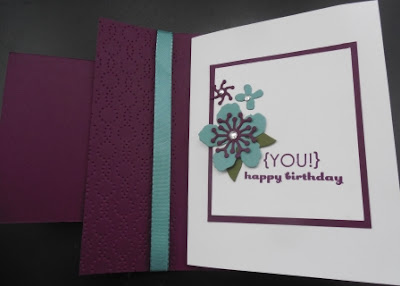
The sky's really the limit when creating with this fancy fold card.  It's just that super simple but it packs a big wow! I chose to use Blackberry Bliss as the main colour in this card and have added only small touches of Lost Lagoon and Mossy Meadow.  I think it turned out pretty posh?    


Supplies:
Stamp Sets: Remembering Your Birthday, Party Pants 
Card Stock:  Blackberry Bliss, Whisper White, Lost Lagoon, Mossy Meadow
Ink:  Blackberry Bliss
Accessories:  The Big Shot, Botanical Gardens Thinlet Dies, Lost Lagoon Ribbon, Black Berry Bliss Ribbon, Rhinestones, dimensionals 

I hope you're having fun on the blog hop today and that my creations have been an inspiration for you.  Let me know if you have any questions about the projects I made, I'd be happy to respond.  

Now it's time to move on to the amazing Buffy Cooper's blog to see her wonderful creations.  Enjoy! 


Happy Stamping!

Penny Tokens Stamping Spot  

NOVEMBER HOSTESS CODE

Happy November everyone!  I've just returned from vacation and here it is already the 6th of November, the leaves have turned, the elect...