Welcome to the last Wednesday of August. Hope you've had a good month and are looking forward to everything September has to bring.
I’m very excited to be hosting this week’s Watercooler Wednesday Challenge #WWC83. My theme for this challenge is a Tic Tac Toe project. Whoo Hoo! Are you ready? This is going to be fun, and I hope you'll join me and the Watercooler Wednesday Design Team by trying your hand at this challenge.
The fun thing about using the Tic Tac Toe outline is that you're not restricted to a sketch or image and you get to choose a variety of different elements to build your design. So put on your thinking caps because you'll begin today's challenge by selecting three elements in a row, either horizontally, diagonally, or vertically, and use those elements on a project. You can use other products as well, but you must use the three in the row you choose. What fun!
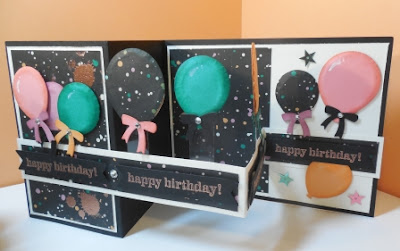
Here's My Z-Fold Birthday Card:
"Z Fold Cards are a very popular trend in card making right now. You see them all over Pinterest and other sites. There are several variations on the Z Fold, but whichever one you choose, you're guaranteed to make a great card that's quick and easy to assemble. For today's card I'm CASEing Dawn Griffith's Z Fold Pop Up Card with Balloon Bouquet Punch because I simply couldn't wait to try out her balloon pop up idea.
Supplies:
Stamps: Gorgeous Grunge, Boys Will Be Boys (R), Party Pants (R), Stylized Birthday
Inks: Emerald Envy, Peek A Boo Peach, Flirty Flamingo, Sweet Sugar Plum, Versa Mark, Momento Tuxedo Black
Card Stock: Basic Black, Very Vanilla, Emerald Envy, Flirty Flamingo, Peek A Boo Peach
DSP: Playful Palette 6 x 6 Designer Series Paper Pack
Accessories: Big Shot, Trimmer, Heat Gun, Copper Embossing Powder, Balloon Bouquet Punch, Balloon Framelit Dies, Bunches of Banners Framelit Dies, Basic Rhinestones, Glue Dots, Window Sheet Strips, Sequins, Dimensionals
Directions:
1. For the card base cut a 4 1/4 x 11" piece of Basic Black card stock and score it at 5 1/2 and 2 3/4".
2. For the Z Fold band cut a 1" x 11" piece of Basic Black card stock and score it at 5 1/2" and 2 3/4". This band when folded should fit completely across the front of the card starting at the left edge and running the width of the card to the far right side. Mine is adhered about 3/4" from the bottom. I attached the left edge first, only applying glue on the DSP and then placing the strip across the adhesive. Make sure this strip is straight and then adhere putting adhesive on the back of the 2 3/4" part and holding it down to the card. Watch Dawn's video to see placement. Note: Before attaching the band to the card complete step #6 and finish the band with step #9.
3. Cut a 2 1/2" x 4" piece of Very Vanilla for the front panel. Adhere.
4. Cut a 5 1/4' x 4" piece of Very Vanilla for the inside panel. Adhere.
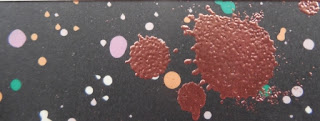
5. Cut two pieces of DSP 2 3/8 x 3 7/8". Using Versa Mark ink, randomly stamp the small splotch from Gorgeous Grunge on the DSP and heat set with Copper Embossing Powder. Adhere these DSP pieces to the front and inside Very Vanilla panels.
6. Cut a strip of DSP 1/2" x 5 1/4", and 2 pieces 1/2" x 2 1/2". Using adhesive attach these strips to the Z fold band. Leave even strip of Very Vanilla showing around the edges. Note: If you are using 12 x 12 DSP you can cut this strip to measure 1/2" by 11 and then just score at 5 1/2 and 2 3/4".
7. Punch large and small balloon shapes from DSP and card stock with the Balloon Bouquet Punch as follows: 1 large and 1 small Flirty Flamingo, 3 small Emerald Envy, 2 large and 1 small DSP, 1 small Sweet Sugar Plum, 2 large and 1 small Peek A Boo Peach.
I used a stylus and a foam mat to round the edges of my balloon and I distressed the edges with a sponge dauber and the corresponding ink. You can see the balloon technique by clicking here. I stamped the words "Cake Time" from the retired SAB set "Party Pants" on the Peek a Boo Peach large Balloon.
8. Using the Small Bow Framelit from Balloon Framelit Dies set cut out 10 bows in a variety of the card stock colours (see card) once the balloons are attached to the window strips and card add the bows with mini glue dots and basic rhinestones. Note: The glue dot will over lap the bow, so before attaching to the bow roll the glue dot a bit with your fingers to make it fit.
 |
| This wonderful little Framelit Die set coordinates with the Celebrate Today stamp set. Never be without a perfect bow with this framelit! |
 |
| Bunch of Banners Framelit die coordinates with the Birthday Banners and Banners for You photopolymer stamp sets. |
 |
| In this view you can see the window strip attached with the large glue dot. |
Attach the balloons next using large glue dots and dimensionals. The front of the balloons are puffed out (see #7). The center balloons were finished with an additional flat balloon face on the back side so you can't see the glue dots and window strip when the balloon is opened and shut.
11. I finished the inside panel with a few balloons and some sequins.
Well I think that just about does it for today's card challenge. I'll leave you with just a few more shots of this fun card. If you try out my tutorial let me know if it was easy to follow. Thanks for dropping by and make sure you visit all the other Watercooler Wednesday Design Artists to see their fabulous Tic Tac Toe creations.
Happy Stamping!
Penny Token's Stamping Spot
Ending on August 31st, 2016:
- August Hostess code EZGKEM73
- July Bonus Promo - Last chance to redeem coupons
- Thoughtful Blooms Photopolymer Stamp set - last chance to purchase, once all the supplies are gone it's fully retired
- New Catalogue launches September 1st to January 4, 2017
- Special Deals - replaces last year's Weekly Deals - starts Sept 1st each special runs for 7 days.


10 comments:
WONDERFUL card Penny. So pretty, with lots of "extras".
Jackie, thanks for dropping by and checking out the Watercooler Challenge and my card. Much appreciated. I had fun making this and I know the recipient will love it!
Oh my goodness, Penny! I didn't realize until this series of close-up photos that you used copper embossing for some of your splatters. How cool is that? Love it and love all the wonderful details you've managed to add to your special fold. Every part of it has something special to share and yet it doesn't seem crowded or overdone. Terrific card! Thanks so much for being part of our team.
Yes I managed to use a few of the extra parts of the Tic Tac Toe board on my card. Glad you noticed the splotches. That copper embossing powder just took the dsp up a notch or two and added something fun to an otherwise dark paper. Loved it! Thanks for all your terrific comments Heidi. So appreciated.
Penny, What a beautiful card. I just love those Z fold cards and you have really stepped up yours a notch or two. So many elements and they all fit together to make one beautiful card.
Thanks Heather from dropping by and checking out the challenge today. Glad you love the Z fold cards too. I hope you'll try out my tutorial and watch Dawn's video for some more tips. This is one of those great fun fold cards that you'll make time and again.
Talk about a stinkin' WOW card...you totally blew this inspiration out of the water!! Love it and can't wait to see the card in person! ;)
Wow Sheri thanks for your comments on my card. I was so happy to see that you are playing along with this challenge, and I'll definitely show you this card and technique if you want to make one on Tuesday. So much fun and fast and easy too!
This card is truly amazing! Thanks for the detailed instrutions. I'm going to give it a try.
Mary so happy you dropped by and extra happy that you liked the instructions. I hope you find them helpful and you have fun making this super easy and quick card. Have a happy stamping week!
Post a Comment