Showing posts with label Challenges. Show all posts

Monday, November 9, 2020

Warm and Toasty Snowflake Card - Freshly Made Sketches 460

This week Judy at Freshly Made Sketches has chosen a sketch that has plenty of room for stamping and adding details.  Here is her sketch:

Here's My Card:


My card features the Polar Bear from Stampin' Up!s Warm and Toasty stamp set. What fun I had colouring this big guy. 


I used Pool Party, Misty Moonlight, Balmy Blue and Smokey Slate Blends.  The beautiful snowflake filled designer paper is called  Snowflake Splendor.


The inside of the card has a strip of the gorgeous Snowflake Splendor designer paper and a sentiment from the Warm and Toasty stamp set.


Well that's it for today's post, I hope you like this card.  Drop by and leave me a comment I'd appreciate hearing from you.  


Happy Stamping!
Penny Tokens Stampin' Spot 
Penny Hanuszak Independent Stampin' Up Demo 

NOVEMBER HOSTESS CODE:  ZZ49FQKS
Apply the hostess code at the end of your order if it is less than $200.00 before s&h.  I will send you a free gift.  If your order is over $200 don't worry you'll earn Stampin' Rewards and be able to pick out your own free gift.  Thank you cards for all orders. 
Click Here to Shop 24/7 at my Online Store

Saturday, December 31, 2016

Favourites from 2016

Happy New Year Everyone! 
And, what a great year 2016 has been for me!  I've had a lot of stamping fun this year, reached some personal goals I set for my stamping hobby/business and had some great stamping achievements:
  • Was a guest attendee at a Stampin' Up Event in January in Duarte California and my card won in it's category
  • Reorganized my stamp room early in March and it works!  
  • I was invited to join the Watercooler Wednesday Challenge Blog as a member of the Design Team in April
  • Joined the Wacky Watercooler Blog Hop as a regular contributor in April
  • In May I was picked as a Display Artist for the November On Stage Vancouver and got to make projects with the Urban Collection stamp sets and dies - what fun and an honour!
  • Reached my goal of Silver Elite in December
  • Grew my Stampin' Up! Team by 2 new members in December
  • Participated in a Stampin' Up Virtual Survey during December
  • Finished and mailed out all my Christmas cards on time this year! 
  •  
So  the following is really a trip down memory lane for me and includes some of my favourite posts. I hope you're inspired and will leave some comments. 

April 2016:

Kath's WWC63 Colour Challenge Click Here:
May 2016:

Wacky Water Cooler Mashup Blog Hop Click Here:


June 2016:

Dreaming of November ......Click Here:

July 2016:

WWC78 Jean's Theme Challenge - Anything With a "B"Click Here:


August 2016:  
WW83 Penny's Z-Fold Birthday Wishes  Click Here:

September 2016:
WWC85 Jean's Colour Challenge  Click Here
October 2016:
WWC91 Marsha's Masculine Challenge   Click Here

November 2016: 
November 2016 Wacky Watercooler Blog Hop Click Here:
Check out all three projects in this blog hop.  From gift card holders to box card they are all fun!
December 2016:  

WWC99-Marsha's Clean and Simple (CAS) 

Make It With Hearts Challenge

Click Here:
Well that's it for this year.  I hope you've enjoyed this little tour and will come back and see me in 2017.  I love it when people visit my site and it absolutely makes my day when you let me know if you like the projects I'm working on.  I'd also like to here if there are particular cards you'd like me to make.    Happy New Year Everyone and Happy Stamping! 

Happy Stamping!
Penny Tokens Stampin' Spot

Wednesday, August 31, 2016

Z- Fold Birthday Wishes - WWC83 Penny's Tic Tac Toe Challenge


Welcome to the last Wednesday of August. Hope you've had a good month and are looking forward to everything September has to bring. 

I’m very excited to be hosting this week’s Watercooler Wednesday Challenge #WWC83. My theme for this challenge is a Tic Tac Toe project. Whoo Hoo!  Are you ready?  This is going to be fun, and I hope you'll join me and the Watercooler Wednesday Design Team by trying your hand at this challenge. 

The fun thing about using the Tic Tac Toe outline is that you're not restricted to a sketch or image and you get to choose a variety of different elements to build your design. So put on your thinking caps because you'll begin today's challenge by selecting three elements in a row, either horizontally, diagonally, or vertically, and use those elements on a project. You can use other products as well, but you must use the three in the row you choose.  What fun!

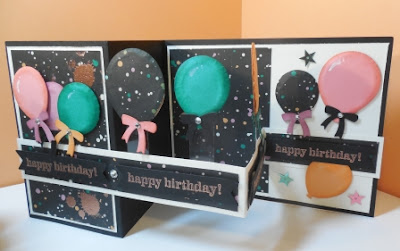
Here's My Z-Fold Birthday Card:


"Z Fold Cards are a very popular trend in card making right now.  You see them all over Pinterest and other sites. There are several variations on the Z Fold, but whichever one you choose, you're guaranteed to make a great card that's quick and easy to assemble.  For today's card I'm CASEing Dawn Griffith's Z Fold Pop Up Card with Balloon Bouquet Punch because I simply couldn't wait to try out her balloon pop up idea.

Supplies:
Stamps:  Gorgeous Grunge, Boys Will Be Boys (R), Party Pants (R), Stylized Birthday
Inks:  Emerald Envy, Peek A Boo Peach, Flirty Flamingo, Sweet Sugar Plum, Versa Mark, Momento Tuxedo Black
Card Stock: Basic Black, Very Vanilla, Emerald Envy, Flirty Flamingo, Peek A Boo Peach
DSP:  Playful Palette 6 x 6 Designer Series Paper Pack
Accessories:  Big Shot, Trimmer, Heat Gun, Copper Embossing Powder, Balloon Bouquet Punch, Balloon Framelit Dies,  Bunches of Banners Framelit Dies, Basic Rhinestones, Glue Dots, Window Sheet Strips, Sequins, Dimensionals

Directions:
1.  For the card base cut a 4 1/4 x 11" piece of Basic Black card stock and score it at 5 1/2 and 2 3/4".

2.  For the Z Fold band cut a 1" x 11" piece of Basic Black card stock and score it at 5 1/2" and 2 3/4".  This band when folded should fit completely across the front of the card starting at the left edge and running the width of the card to the far right side.  Mine is adhered about 3/4" from the bottom.  I attached the left edge first, only applying glue on the DSP and then placing the strip across the adhesive.  Make sure this strip is straight and then adhere putting adhesive on the back of the 2 3/4" part and holding it down to the card.  Watch Dawn's video to see placement. Note:  Before attaching the band to the card complete step #6 and finish the band with step #9.
Here you can see the Z fold Banner stretching from the left hand to right hand side of the card.  Because the Playful Palette DSP was 6 x 6 I cut it into 1" strips to extend across the Z fold. See note in Step #6.
3. Cut a 2 1/2" x 4" piece of Very Vanilla for the front panel. Adhere.


4. Cut a 5 1/4' x 4" piece of Very Vanilla for the inside panel. Adhere.
 

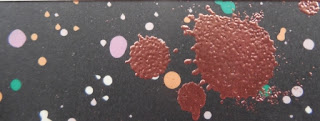
5. Cut two pieces of DSP 2 3/8 x 3 7/8". Using Versa Mark ink, randomly stamp the small splotch from Gorgeous Grunge on the DSP and heat set with Copper Embossing Powder. Adhere these DSP pieces to the front and inside Very Vanilla panels.


6. Cut a strip of DSP 1/2" x 5 1/4", and 2 pieces 1/2" x 2 1/2". Using adhesive attach these strips to the Z fold band. Leave even strip of Very Vanilla showing around the edges. Note: If you are using 12 x 12 DSP you can cut this strip to measure 1/2" by 11 and then just score at 5 1/2 and 2 3/4".

7. Punch large and small balloon shapes from DSP and card stock with the Balloon Bouquet Punch as follows:  1 large and 1 small Flirty Flamingo, 3 small Emerald Envy, 2 large and 1 small DSP, 1 small Sweet Sugar Plum, 2 large and 1 small Peek A Boo Peach.  


I used a stylus and a foam mat to round the edges of my balloon and I distressed the edges with a sponge dauber and the corresponding ink. You can see the balloon technique by clicking here. I stamped the words "Cake Time" from the retired SAB set "Party Pants" on the Peek a Boo Peach large Balloon.

8. Using the Small Bow Framelit from Balloon Framelit Dies set cut out 10 bows in a variety of the card stock colours (see card) once the balloons are attached to the window strips and card add the bows with mini glue dots and basic rhinestones. Note: The glue dot will over lap the bow, so before attaching to the bow roll the glue dot a bit with your fingers to make it fit.

This wonderful little Framelit Die set coordinates with the Celebrate Today stamp set.  Never be without a perfect bow with this framelit!
9. Stamp the "happy birthday" sentiment from Boys Will Be Boys (R) stamp set three times in Versa Mark ink on 2 3/4" x 1" strips of basic black card stock. Emboss each strip with Copper Embossing Powder and cut into banners using the straight banner from "Bunch of Banners" Framelits. Attach these banners with 2 dimensionals per banner to the center of the DSP strip on the Z Fold Band. Attach two banners to the 5" strip centering between left and right sides, then attach the remaining two banners to the center and end of the band. Note: These banners can be attached after the Z Fold Band is adhered to the card front, see step #2. I put a large rhinestone between the first two banners for a bit more sparkle.


Bunch of Banners Framelit die coordinates with the Birthday Banners and Banners for You photopolymer stamp sets.  
10. Attach the balloons with strips of window sheet cut 1/4" by 3 inches. Use large Glue Dots to attach the window sheet strips to the center Z fold band.
In this view you can see the window strip attached with the large glue dot.

Attach the balloons next using large glue dots and dimensionals. The front of the balloons are puffed out (see #7). The center balloons were finished with an additional flat balloon face on the back side so you can't see the glue dots and window strip when the balloon is opened and shut. 

In this view you can see the backs of the balloons are covered with the extra balloon images I cut out because they are visible if the card is turned around.  I also finished off the Peek A Boo Peach balloon with an extra green bow to hide the glue dot. 
11. I finished the inside panel with a few balloons and some sequins.

Because there wasn't any room for writing a greeting on the inside panel once it was decorated, I added a piece of Very Vanilla card stock to the back of the card and stamped "Happy Birthday" with the Stylized Happy Birthday stamp in Momento Tuxedo Black Ink. 
Well I think that just about does it for today's card challenge. I'll leave you with just a few more shots of this fun card. If you try out my tutorial let me know if it was easy to follow. Thanks for dropping by and make sure you visit all the other Watercooler Wednesday Design Artists to see their fabulous Tic Tac Toe creations.


Happy Stamping!
Penny Token's Stamping Spot


Ending on August 31st, 2016:
  • August Hostess code EZGKEM73
  • July Bonus Promo - Last chance to redeem coupons
  • Thoughtful Blooms Photopolymer Stamp set - last chance to purchase, once all the supplies are gone it's fully retired 
Starting September 1st, 2016:
  • New Catalogue launches September 1st to January 4, 2017
  • Special Deals - replaces last year's Weekly Deals - starts Sept 1st each special runs for 7 days.  

Monday, April 18, 2016

WWC63 - Kath's Color Challenge

Hey stampers, I'm finally back.   Although I've been home for a month now I've been slower than usual getting back into the swing of things on the home front. What that means for me is that I've had very little stamping time with my stamping friends while I take care of business.  

Well, I'm about to change that........drum roll please because I'm challenging myself to get out of my funk, throw off my gloom, grab some ink and stamps and jump back into the stamping world with both feet. How about you, are you with me?  

If you asked me what brought about this change in purpose or enthusiasm, I would have to say it was seeing Kath's Colour Challenge WWC63 on the Watercooler Wednesday Challenge site this week.  Looking at this fabulous colour combo was just the push I needed to get going (along with some gentle prodding by Heidi Weaver). This colour combo makes me feel both calm and happy and that means I'm in a good space.  

How about you, how are you affected by colour?  I'd love to hear what combinations warm your heart or whatever emotion they bring to you.  

Here's the challenge:

Here's My Card:  

I actually loved making this card so much that I decided to make a set of them and a holder so I could give it away as a gift.  Here's the rest of the ensemble:


This is a folder I made to hold the 5 gift cards and envelopes made with 3 x 5 note cards.  The base is Blushing Bride followed by layers of Watermelon and Pear Pizzazz card stock.  

The So Saffron layer was embossed with the Lovely Lacey EF and I used another piece of So Saffron to frame the Whisper White layer which was adhered with dimensionals.  The ribbon is Pear Pizzazz.  

This is the inside of the card holder.  It holds five envelopes and 5 note cards with ease.

Although the stamped layer is exactly the same for each of the five note cards, I chose to mount the stamped layer on coloured card stock before adhering to the note card.  There are 2 each of Pear Pizzazz, Watermelon Wonder and So Saffron.  

The colouring was done with a blender pen and markers.  The blossom image was stamped in Momento Black Ink.  The small yellow flowers were stamped in So Saffron and some leaves were drawn onto them in Pear Pizzazz.  The dots image was also stamped in Pear Pizzazz.  Watermelon Wonder Sequins were glued to each of the small flowers. 


In this picture you can see the five cards and one of the matching envelopes. 
Supplies:
Card Stock:  Whisper White, Watermelon Wonder, Pear Pizzazz, So Saffron and Blushing Bride
Ink:  So Saffron, Watermelon Wonder, Pear Pizzazz, Blushing Bride and Momento Tuxedo Black
Markers:  So Saffron, Watermelon Wonder, Pear Pizzazz, Blushing Bride 
Stamp Set:  Birthday Blooms 
Accessories:  Big Shot, Trimmer, Lovely and Lacey Embossing Folder, Sequins
Dimensionals, Pear Pizzazz Ribbon, Blender Pen, Tom Bow Glue , Note Cards and Envelopes
Birthday Blooms is only available in the Occasions Spring catalogue until May 31st, 2016.  
Thanks for coming to look at my cards and I hope you'll leave a comment to let me know how you like this gift set.  

Happy Stamping
Penny Tokens Stampin Spot

Addendum:  

Just a note to say that I was thrilled to hear that I "Rocked the Watercooler" and was the winner of this week's colour challenge.  Thanks to everyone who nominated me and a special congrats to Julie Gearinger and Heather Hopson who were honourable mentions with their stunning cards

Saturday, September 15, 2012

World Card Making Day - October 6, 2012


Hard to believe, I know, but October is just around the corner and you know what that means.  Along with designing your Thanks Giving Projects and Halloween goodies it's just three weeks away from Paper Craft Magazine's seventh annual World Card Making Day!

You can join your fellow card makers as the holiday card-making season officially kicks off on Saturday, Oct. 6.   Visit www.WorldCardMakingDay.com for participating retailers, exclusive projects from their sponsors, a gallery to upload your creations, and fun ideas for celebrating with your friends.  

While you're there, don't forget to enter their 2012 World Card Making Day Card Contest! This year 20 winners will be awarded a prize package valued at more than $400, and an opportunity to be published in the March/April 2013 Paper Crafts issue.   For submission details, including the five card categories, click HERE. Deadline: Monday, Oct. 15.


NOVEMBER HOSTESS CODE

Happy November everyone!  I've just returned from vacation and here it is already the 6th of November, the leaves have turned, the elect...