Wednesday, March 7, 2018

WWC #160 - Heidi's Feminine "Anything Goes" Challenge


Hi everyone and welcome back.   It's time for another Watercooler Wednesday Challenge and this week it's being hosted by Heidi Weaver.  This challenge is a feminine one and I think from the look of all the awesome cards the Design Team has shared that you're going to love it.  Heidi is challenging you to create a card or any item with a "Feminine" theme and to post it on our challenge site by 5pm Mountain Time on Monday March 12th, 2017.  


Here's My Card:

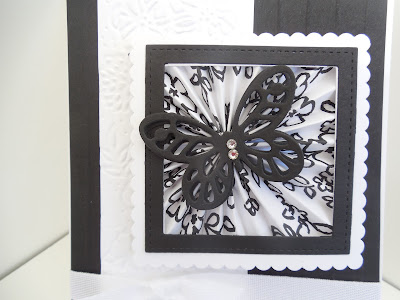
Black and white attracts me like a magnet.  It's one of my favourite colour combinations whether it's used in card making, clothing or home decor.  For whatever reason, it just reaches out to me every time.  So, when I attended a stamp camp held by Cheryl Lefore a few weeks ago and she showed us how to make this very special black and white card, I was overjoyed.
The inside of the card is simple in detail.  It consists of a 5 1/4" x 4" piece of Basic Black card stock topped with a 5" x 3 3/4" piece of Whisper White card stock.  The small floral image is from the Petal Palette stamp set and stamped in Momento Tuxedo black ink in the bottom left corner.

Supplies:
Stamp Set:  Petal Palette
Ink:  Momento Tuxedo Black Ink
Card Stock:  Basic Black and Whisper White
Specialty Papers:  Petal Passion Designer Paper 
Accessories:  Big Shot, Paper Trimmer, Layering Squares Framelits and Stitched Shapes, Petals and More Thinlet Dies, Butterfly Die  Petal Pair Embossing Folders, Stripe Embossing Folder, White Ribbon, Basic Rhinestones (2), Dimensionals.


The highlight of this card is the black and white layered frame covering of all things a lolly and a beautiful black butterfly.  Just to clarify in case you're not familiar with the term "lolly" (also know as rosettes or yoyos), a lolly is created by making a number of consecutive scores on a strip of paper, gluing the ends together and then pressing down to form a circular shape.  If you've never seen a lolly constructed, you can find  directions here. 

What's unusual about this "lolly" is that once it's created it's attached to the square frame and then the overlapping edges of the lolly are cut away and it's hidden behind the frame.  This looks hard to do, but it actually comes together very quickly.
Details:
1.  The card base is an 8 1/2" x 5 1/2" piece of Whisper White card stock scored at 4 1/4".  Because this card has some weight to it the thick card stock would better support it.

2.  The first layer is a piece of 5 3/8" x 3 7/8" piece of Basic Black card stock that is embossed with a Stripes Embossing Folder (EF). Note:  Do not attach this layer until the ribbon has been added.

3.  A 2" x 5 1/2" piece of Whisper White was embossed with the fabulous floral design EF from the Petal Pair Embossing Folder set in the Occasions Catalogue.  I absolutely fell in love with the floral detail in this one - there's lots of it.  This panel was adhered to the left side of the Basic Black layer leaving about a 1/4" gap from the side edge.  A piece of 1/4" white cotton ribbon was tied around the two panels before they were adhered to the card base.
 
You can see some of the fine detail on the White embossed strip in this photo.  Believe me it doesn't do it justice.  There are two 2 embossing folders included in the  pack that measure 6 1/2" x 2 1/4" from the Petal Pair EF, one has the floral design and the other is a stem and leaf design.

4.  The sentiment "Best Wishes" is also from the Petal Palette array of stamps and it was stamped in Momento Tuxedo black ink on a strip of Whisper White card stock and then die cut out with the label die in the Petals and More Thinlet Die set.  Two dimensionals were added to the back and it was adhered below the ribbon.  
I love the frame from the die cut.............it's perfect.
5.  To create the frame a piece of Whisper White card stock was cut out with the 3" x 3" scalloped square frame and then it was topped with the 2 3/4" stitched square die.  The centers were removed with the 2 1/2" square die.  These two pieces were adhered together with Tom Bow glue.

6.  The lolly was created with a 12" x 1 1/2" strip of the Petal Passion DSP paper that was scored every 1/4" and then folded to create the lolly as in the link above.  The frame was placed over top of the lolly with the center whole towards the top left hand side of the frame.  Once the positioning was right the frame was glued to the lolly with Tom Bow glue and the overlapping edges of the lolly were carefully cut away.  

7.Two butterflies were die cut and adhered together then attached over the hole in the lolly, and rhinestones were added to the center of the butterfly.


8.  The square was attached to the center top of the card with Tear N' Tape to make it more secure.  

And that my friends was a relatively easy card to make.  It came together very quickly.  Thanks again to Cheryl Lefore for the directions.   This very feminine card could be used for any occasion or celebration.  I hope you enjoyed this card and will try out this design.  Let me know if you do and if my instructions were helpful.  I love having feedback.  

If you haven't already checked out the cards by the Design Team Artists take a moment to pop on over to the Watercooler Wednesday main page. For details on how Heidi and the other Watercooler Artists created their projects for WWC160, just click on the name underneath and you will be taken to that blog post.  You won't want to miss them.  Until next time..... 

Happy Stamping!
Penny Tokens Stampin Spot 

Wednesday, February 28, 2018

WWC#159 - Marsha's "All About Christmas" Challenge

Hi Stampers.  Thanks for dropping by for the Watercooler Wednesday Challenge which is being hosted by Marsha and is "All About Christmas".  It's never too early to get working on your cards for next season and to that end, Marsha is challenging you to build your Christmas stash by making a card and posting it on this site.
Once you've made a card just snap a picture of it, post it on your blog, Facebook or other Social Media site, and then add your link to our LINKSKY at the bottom of our challenge page. The WWC158 Challenge is open until 5:00pm Mountain Time Monday March 5th, 2018.

Here's My Card:
My project for this week involves a very simple fun fold technique that creates an amazing WOW card.  This card is called a Bridge Fold and it's one of those cards that can be dressed up or down and used for any occasion.  Here's mine:

Supplies:
Card Stock: Whisper White 
DSP:  Merry Little Christmas (R Holiday2017)
Specialty Paper:  Silver Foil 
Accessories:  Paper Trimmer, Big Shot, Silver Foil Christmas Stickers from Simply Creative. Home Town Greetings Edgelit Dies, Dimensionals, Foam Tape,
Detail Scissors.

Details:
The Bridge Fold card makes for a terrific WOW card and can be made with many variations. The bridge piece can be made wider, it can be decorated, it can even be made with a window sheet so it's transparent and there are also different sizes of cards. 


Whatever style you choose, the Bridge Fold is simple to make and very impressive to look at. And, last but not least, the best part of all is that you can make two cards from one sheet of 8 ½” x 11” cardstock. It folds flat and can be sent in a standard A2 envelope. Gotta love that!
 

1. Cut base card stock to 8” x 4 ¼” and score at 1 ¼”, 2 ½” 5 ½” and 6 ¾”.


2. Cut four 1” x 4” pieces of card stock for mats.  I used Silver Foil. adhere to the two sides of the card base.

3. Cut four 3/4" x 3 3/4" strips of DSP and adhere to Silver Foil Mat.

4. Cut a 2 3/4" x 4" Silver Foil Mat for center of card and adhere.

5.
Cut a 2 1/2" x 3 3/4" piece of DSP and adhere to the Silver Foil Mat. Note: If you just intend to stamp a sentiment or write a note sub out the DSP for Whisper White card stock or colour of your choice, and do stamping or writing before attaching the bridge.


For the inside panel I cut out images from the Home Town Greetings die cut set.  The church and house were attached to the backing with glue after silver foil inserts were added to the back of each of the buildings.  there are two rows of buildings and the second or outer one was mounted with Foam Tape. I used store bought silver stars and sentiments from Simply Creative and attached them with Tear N tape. 
6. For the bridge cut a 5 ½” x 1 1/4"” strip of Silver Foil Card Stock and a 1" x 5 1/4" strip of DSP adhere together.

For my bridge I cut out a wintery scene with the Home Town Greeting dies and positioned it over the DSP after attaching silver foil to the backs of each of the houses.  
7. To mount the bridge strip to the card base fold the left hand side of the card so that the outer flap is facing outwards.  Measure up from the bottom of the card for whatever placement you want and then adhere the strip only to the front left panel.

8.  Open up and lay the center and right side panels face up and attach the right side of the bridge strip to the last panel on the right. Note: The bridge panel is only attached to the far left and far right panels. Because this is the way the card will open and shut, I used Tear N' Tape to secure.

9.  The back of the card has ample room for writing a message.  Personally I would layer a Basic Black and Whisper White  panel using the same dimensions as in #5 and attach it to the back. This panel would be my sentiment and my message or I could make a slot to attach a gift card.   Like I said the possibilities are many.

Back view of the card showing ample room for adding a sentiment or a pocket to hold a gift card.  See my note above about adding mats.
And that's all there is to it folks. This is a fun card and there are lots of examples on Pinterest and You Tube. I hope that you enjoyed my Christmas Bridge Card and will leave me a comment about it. Let me know if you've ever made one and if so how did your dimensions very from mine. Were they the same or larger.

If you came straight here and haven't taken the time to see the other Watercooler Wednesday Design Team members creations just click here to go to the challenge.  All the rules for using the Linsky are on that page too.

Before I go I also want to share the sad news that Judy Markowitz has left our design team because of family health issues.   I personally am going to really miss Judy's originality and creativity, but hope that she'll still join in on the challenges when she gets a chance.  

In Judy's place, we are welcoming Tenia Nelson to our group of Watercooler Artists.  Tenia hails from Denver, Colorado and we've been wowed by her edgy and eye-catching creations in previous challenges.  


Happy Stamping!
Penny Tokens Stampin' Spot 

Wednesday, February 21, 2018

WWC158 - Helen's Masculine Anything Goes Challenge

Hi stampers. This week Helen Finley is hosting the Masculine "Anything Goes" challenge over at the Watercooler. This was a tough challenge for me this week. I've had a great deal of difficulty trying to focus, to come up with an idea and to get my mojo on. Does this happen to you?

Helen's Masculine "Anything Goes" Challenge will run until 5:00pm Mountain Time on Monday February 26th.


Would you like to join us? We certainly hope so, as we love having new and returning players and can't wait to see all the projects. If you've never participated in a card challenge before it's easy to play along. All you have to do is make a card or project with a masculine theme, take some photos and link up using the Linsky at the bottom of our challenge page. There are a few other rules  to follow and that's it. Who knows perhaps you'll by our next "Rock Star". 

Here's My Card:

I'm a big fan of Tri-fold Shutter style cards so I thought I would make one for this challenge.  I used an old tutorial designed by Marcy K of Canton Ohio for the Operation Write Home blogClick this link for Marcy's  fabulous step by step tutorial and a PDF Diagram showing all the cutting measurements for the various boxes.  
In this top view you can see how the card looks when all the score lines are in the right position.  It's tricky folding them the right way so the card closes, but if you pay attention to Marcy's tutorial you'll get it right in no time.
Here's what the card looks like when it's closed properly.  There are other versions of this card made with12 x 12 paper, but the beauty of this tutorial is that it uses 8 1/2 x 11 and the finished card is A2 size, so no adjustments need to be made for an envelope.  
The fellow I made this card for likes to fish on the open sea so it was appropriate to make him a card that featured water. I stamped the lighthouse scene with Stampin' Ups! High Tide stamp set.  This set has so many stamps to help you create a wonderful seaside scene.  I stamped the light house twice fussy cut out both and layered them together and then added them to the panel with Dimensionals.  The designer paper I chose made me think of water.  It's from the Picture Party Paper Stack and features a circular design in Bermuda Bay, Pool Party and White and my coordinating card stocks were the same.  
I also used the Picture Perfect Birthday Stamp set to decorate some of the panels.  The sentiments in this set are absolutely fabulous, not only for their wording but also for the font.  Love, love, love this whole set.  Here you can get a better look at the DSP from the party stack.  It's awesome.  I also added some Glitter Enamel Dots in blue on the end panel where you can write your birthday message.  
Supplies:
Stamp Set(s): High Tide and Picture Perfect Birthday (145519)
Ink: Bermuda Bay, Pool Party
Card Stock and DSP: Bermuda Bay, Pool Party, Whisper White and Picture Perfect Party stack 6x6 #145559)
Accessories: Big Shot, Paper Trimmer, Fine Detail Paper Snips, Glitter Enamel Dots (Blues), Acryllic Blocks, Misti Platform


Well that's it for this week.  Hope you liked my Tri Fold Masculine Birthday Card project.  I'd love to hear from you if you can take the time to leave a comment.  I read every one and it simple makes my day to hear from you.
  
If you haven't already checked out all the submissions from the other Watercooler Wednesday Design Team members stop by at this link.  You  won't be disappointed.  

Happy Stamping!
Penny Tokens Stampin' Spot 

Wednesday, February 14, 2018

WWC157 - Heidi's "All About Occasions" Challenge

Hi stampers Happy Valentines Day!  Welcome to this week's Watercooler Wednesday challenge #WWC157.  Heidi Weaver is our host and our theme this week is "All About Occasions".    


We hope you'll join us  by linking up your special "Occasions" project by 5:00pm Mountain Time, Monday February 19th, 2018 to our Linsky.  Who knows, you might be our next Watercooler Rockstar.

Here's My Project:
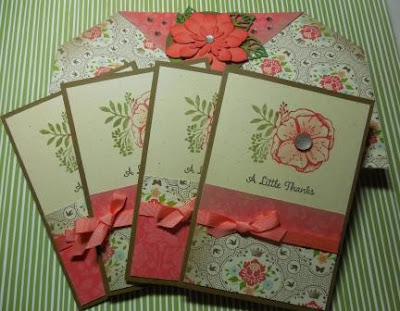
Today I want to share my Thank You Note Clutch Purse project.  This cute little clutch purse and accompanying note cards could be made for just about any "Occasion" you can think of.  Mine was made as a gift for a sweet gal friend for Valentine's Day. 


The clutch is made from a single 12 x 12 sheet of double-sided designer series paper.  No special skills or tools are needed to make this clutch, other than the ability to fold the square of paper into the clutch design.  Mine was made with retired paper stock because I'm still trying to use up what's in my stash.

The clutch holds four note cards and envelopes inside, and has a magnetic clasp to keep it closed.  Here is a link to an original tutorial and video by Dee Slater on Split Coast Stampers that clearly shows how to make this special little gift card clutch purse.   


Supplies:

Stamp Sets: Amazing You and One Big Meaning

Ink: Watermelon Wonder, Old Olive and Soft Suede

Card Stock: Ivory Fleck (R), and Soft Suede

DSP:  Stampin Up (R) - from my stash and Ivory Envelope Paper
Accessories:
Big Shot, Paper Trimmer, So Succulent and Stylish Stems Thinlets (R), Stitched Shapes 2" Circle Thinlets, 2 Small Magnets Watermelon Wonder Grosgrain Ribbon,
Faceted Gems, Basic Rhinestones, Dimensionals, Tom Bow Glue, Sticky Strip.

Note Cards:
I made my own note cards, but I've seen some beautiful sets completed with the Stampin' Up! premade note cards and envelopes that are in the Annual Catalogue.  Great value here as you get 20 note cards in Whisper White or Very Vanilla card stocks with matching envelopes and the card stock is a little thicker on the note cards so make for perfect backings.
1.  Base is 7" x 5" scored at 3 1/2"
2.  1st layer - 3 1/4" x 4 3/4" Ivory Fleck card stock.  Before adhering to the note card front stamp the floral image from Amazing you in Watermelon Wonder and Old Olive.  Stamp the sentiment "A Little Thanks" from One Big Meaning in Soft Suede ink just below the floral image. Add a Faceted Gem to the flower center.
3.  2nd layer - 3 1/4" x 3/4" strip of DSP adhere below the sentiment.
4.  3rd layer - 1 1/2" x 3 1/4" strip of DSP flip so reverse side is showing.
5.  Cut a strip of ribbon and attach over the seam created by 2nd and 3rd layer and glue ribbon ends to the back of Ivory Fleck layer.  Tie a small bow in the front with another piece of ribbon and trim ends. 
6.  For the inside of the note card cut a 3 1/4" x 4 3/4"piece of Ivory Fleck card stock and adhere.  It could be stamped with another floral image but I chose to leave my black for messaging. 

7.  Two cards and envelopes fit into each of the panels on the inside of the clutch.  They tuck in rather neatly and will  stay in place.


The Clutch:
I made the clutch following the instructions in Dee Slater's video.  I changed up the way the flaps hold shut though.  I attached two small magnets under the flaps with glue dots.  I started on one side positioning the magnet underneath the flap then flipped the clutch over and let the magnet attach itself and then added the glue dot and pressed the flap down.  These are really secure and hold the clutch shut.  You could also do a belly band or tie ribbon around the clutch if you're looking for alternate methods to close it.  

The Flower Embellishment:

I created the floral embellishment with bits and pieces of cardstock I had on hand and two of my favourite die sets - So Succulent and Stylish Stems, both retired.  
I always like to ink around the edges of my flower and leaf pieces as it seems to add more depth.  For this arrangement I layered the four flower pieces together with glue dots, and attached the assembled flower to a 2" stitched circle piece that I cut from Soft Suede card stock.  Next I added the leaves with glue dots.  The circular piece was attached to the flap with sticky strip.  A few random rhinestones were added to the flap on either side of the flower.  

And that's all there is to creating this note holder.  It's a fun and very quick to assemble project and I thoroughly enjoyed making it.  So much so, that I'm  planning to do a class on how to make these, for Mother's Day so if you're in my area and interested let me know.  

I hope you enjoyed this project as well as the ones created by the rest of the Watercooler Wednesday Design Team this week.  I'd love to hear what you think of it so leave me a comment before you go.  Your feedback is really helpful.  

Happy Stamping!
Penny Tokens Stampin' Spot 

Wednesday, February 7, 2018

WWC156 - Penny's Feminine "Anything Goes" Challenge

Welcome to this week's Watercooler Wednesday Challenge.  I'm happy to be your hostess this week and hosting a Feminine "Anything Goes" challenge.   Last week's Watercooler Wednesday Challenge received over 50 amazing entries from stamping gals all over the world.   This week I'm challenging you to beat that total and join me in making and posting a card or project with a Feminine theme.  How cool is that?
Our challenge is open until 5:00pm on Monday February 12th Mountain Time.  To participate just link your project to our Watercooler Wednesday challenge site through the Linksy at the bottom of the main page.  Check out the rules we have posted and may be you'll Rock the Watercooler.  What fun!  

Here's My Card:
For my feminine card I chose to make a birthday card using stamp sets and embossing folders from Stampin' Ups! brand new Occasions 2018 catalogue and their Sale-A-Bration flyer. 

Supplies:
Stamp Set: Amazing You (SAB-18) 147215, Picture Perfect Birthday #145519
Ink: Momento Tuxedo Black, Watermelon Wonder, Old Olive
Card Stock: Whisper White, Old Olive, Watermelon Wonder
Accessories:  Big Shot, Simple Stripes and Scattered Sequin Embossing Folders, Everyday Jar, Stitched Shapes and Circle Dies, Aqua Painter, Paper Trimmer, Wink of Stella, Dimensionals, Basic Rhinestones and Facetted Gems.

Details:  
This card began with a Whisper White card based measuring 8 1/2 x 5 1/2" and scored at 4 1/4".  

I added the following layers:
  • a 5 1/4" x 4" piece of Watermelon Wonder
  • a 4 3/4" x 3 3/4" piece of Whisper White 
  • a 3 5/8" x 4 5/8" piece of Old Olive 
  • a 3/12" x 4 1/2" piece of Watermelon Wonder that was embossed with the  Simple Stripes Embossing folder.
  • two 3" circles cut from Watermelon Wonder and Old Olive embossed with the Sequins Embossing folder 
  • a 3" circle cut from Whisper White with the Stitched Shapes thinlet dies that was stamped with the Amazing You floral image, the sun, and the sentiment "you".  
I stamped the floral image in Momento Tuxedo Black onto the 3" Whisper White Circle.  I stamped it again on a post-it-note, fussy cut this and used it as a mask. I stamped the sun in Peek-a-boo Peach above the flower.  The flower was coloured with an aqua painter and Watermelon Wonder Ink.  
Thanks for dropping in and visiting my blog this week.  I hope you enjoyed my project and that my tips on how it was designed were helpful.  I love reading comments so before you go if you can leave me a few words of encouragement you'll make my day.  

The word "celebrate" from the Amazing You stamp set was stamped in Watermelon Wonder ink on a scrap of Whisper White card stock.  I fussy cut around the sentiment and it was adhered with Dimensionals below the floral image.  I stamped the word "You" from Amazing You in Old Olive ink below the floral image and the "Happy Birthday" sentiment was stamped on another scrap in Momento Tuxedo Black ink and cut into a small banner. Some basic rhinestones and a coating of Wink of Stella on the floral design finished off the card front.  
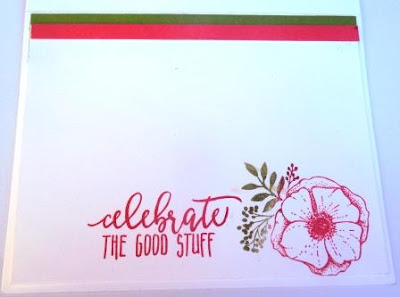
I stamped the floral image once again on the inside of the card and added the sentiment Celebrate the Good Stuff from the Picture Perfect Birthday stamp set to the inside of the card. Two 1/4" strips of Old Olive and Watermelon Wonder ink were added to the top of the inside panel. 
So that's it for today for my Feminine "Anything Goes" Watercooler Wednesday project.  I hope you liked it.  I'd love to have your comments.

Don't forget to check out the other Design Team Artist's at the Watercooler Wednesday Main challenge page.  To get a closer look at their creations simply click on their name below their sample picture.  Until next time..........
 

Happy Stamping!
Penny Tokens Stampin Spot

Last Free Shipping of the Year - December 9, 10 11, 2024

Heads up, it's time for the last FREE SHIPPING promo of the year! From December 9–11, you can shop and save on all qualifying orders of...