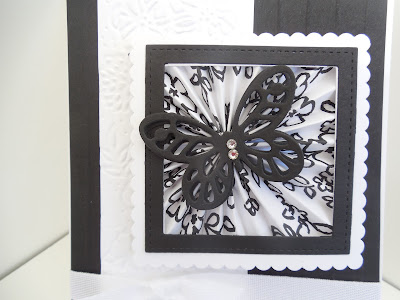
Hi everyone and welcome back. It's time for another Watercooler Wednesday Challenge and this week it's being hosted by Heidi Weaver. This challenge is a feminine one and I think from the look of all the awesome cards the Design Team has shared that you're going to love it. Heidi is challenging you to create a card or any item with a "Feminine" theme and to post it on our challenge site by 5pm Mountain Time on Monday March 12th, 2017.
Here's My Card:
Black and white attracts me like a magnet. It's one of my favourite colour combinations whether it's used in card making, clothing or home decor. For whatever reason, it just reaches out to me every time. So, when I attended a stamp camp held by Cheryl Lefore a few weeks ago and she showed us how to make this very special black and white card, I was overjoyed.
Supplies:
Stamp Set: Petal Palette
Ink: Momento Tuxedo Black Ink
Card Stock: Basic Black and Whisper White
Specialty Papers: Petal Passion Designer Paper
Accessories: Big Shot, Paper Trimmer, Layering Squares Framelits and Stitched Shapes, Petals and More Thinlet Dies, Butterfly Die Petal Pair Embossing Folders, Stripe Embossing Folder, White Ribbon, Basic Rhinestones (2), Dimensionals.
The highlight of this card is the black and white layered frame covering of all things a lolly and a beautiful black butterfly. Just to clarify in case you're not familiar with the term "lolly" (also know as rosettes or yoyos), a lolly is created by making a number of consecutive scores on a strip of paper, gluing the ends together and then pressing down to form a circular shape. If you've never seen a lolly constructed, you can find directions here.
Details:
1. The card base is an 8 1/2" x 5 1/2" piece of Whisper White card stock scored at 4 1/4". Because this card has some weight to it the thick card stock would better support it.
2. The first layer is a piece of 5 3/8" x 3 7/8" piece of Basic Black card stock that is embossed with a Stripes Embossing Folder (EF). Note: Do not attach this layer until the ribbon has been added.
3. A 2" x 5 1/2" piece of Whisper White was embossed with the fabulous floral design EF from the Petal Pair Embossing Folder set in the Occasions Catalogue. I absolutely fell in love with the floral detail in this one - there's lots of it. This panel was adhered to the left side of the Basic Black layer leaving about a 1/4" gap from the side edge. A piece of 1/4" white cotton ribbon was tied around the two panels before they were adhered to the card base.
4. The sentiment "Best Wishes" is also from the Petal Palette array of stamps and it was stamped in Momento Tuxedo black ink on a strip of Whisper White card stock and then die cut out with the label die in the Petals and More Thinlet Die set. Two dimensionals were added to the back and it was adhered below the ribbon.
 |
| I love the frame from the die cut.............it's perfect. |
5. To create the frame a piece of Whisper White card stock was cut out with the 3" x 3" scalloped square frame and then it was topped with the 2 3/4" stitched square die. The centers were removed with the 2 1/2" square die. These two pieces were adhered together with Tom Bow glue.
6. The lolly was created with a 12" x 1 1/2" strip of the Petal Passion DSP paper that was scored every 1/4" and then folded to create the lolly as in the link above. The frame was placed over top of the lolly with the center whole towards the top left hand side of the frame. Once the positioning was right the frame was glued to the lolly with Tom Bow glue and the overlapping edges of the lolly were carefully cut away.
7.Two butterflies were die cut and adhered together then attached over the hole in the lolly, and rhinestones were added to the center of the butterfly.
8. The square was attached to the center top of the card with Tear N' Tape to make it more secure.
And that my friends was a relatively easy card to make. It came together very quickly. Thanks again to Cheryl Lefore for the directions. This very feminine card could be used for any occasion or celebration. I hope you enjoyed this card and will try out this design. Let me know if you do and if my instructions were helpful. I love having feedback.
If you haven't already checked out the cards by the Design Team Artists take a moment to pop on over to the Watercooler Wednesday main page. For details on how Heidi and the other Watercooler Artists created their projects for WWC160, just click on the name underneath and you will be taken to that blog post. You won't want to miss them. Until next time.....
Happy Stamping!
Penny Tokens Stampin Spot


