Friday, June 1, 2018

New Catalogue Is Here......................let the games begin!

Today is the day we've all been waiting for in Stampin' Up! land.  The 2018-29 Annual Catalogue has launched.  

Remember that shopping doesn't begin until 12:00 Mountain Time today to allow for the "in with the new and out with the old" transition.  

In the meantime sit back and enjoy.   

Hostess Code is Back:
I have reinstated the Hostess Code starting this month, so if your order is less than $200 and isn't elligible for Stampin' Rewards, you can  apply this code to your on-line order before you finish your checkout, and this will put you in the running for a share of my workshop hostess code rewards.

JUNE HOSTESS CODE IS 
F4R9UXHA 

Okay got to run but I'll be back with more information on the new catalogue season, videos of new products and samples so make sure you come back.  

Happy Stamping!
Penny Tokens Stampin Spot 

Wednesday, May 30, 2018

WWC172 - Anything Goes Challenge

Hi stampers.  May is a five week month so that means we get to do a no host "Anything Goes" challenge at Watercooler Wednesday this week.  Are you up for the challenge.
This challenge runs until 5:00pm Mountain Time on Monday June 4th, 2018.  Check out the rules and the linky here. Hope you'll join in and have some fun!

For my project today I'd like to share a "Get Well" card that I've been working on which features one of the new Hostess sets for the upcoming catalogue year, called Hand Delivered.  I think you're going to like it.

Here's My Card:
I pulled my colour scheme for this card from the absolutely stunning new designer paper called "Tranquil Textures".  Although you're going to see this designer paper as the focus in many nautical themed projects, it also works well with other themes.  The designs are so beautiful and the colour mix is so soothing.  
The inside features more of the Tranquil Textures paper and a beautiful samp set called "Sorry For Everything".  
Supplies:

Stamp Sets:
Hand Delivered #146808 and Sorry For Everything #143820

Card Stock and Designer Paper:
Whisper White, Mint Macaron, Night of Navy and Tranquil Textures DSP #146331

Ink:  
Mint Macaron, Pineapple Punch, Night of Navy, Momento Tuxedo Black

Accessories:
Sizzix Rectangular Pin Point Frames (Non-SU), Big Shot, Paper Trimmer, Aqua Painter, Dimensionals, Tom Bow Glue, Misti

Details:


1.  This is an A2 card with a top fold.  The card base is a 4 1/4" x 11" piece of Whisper White that is scored and folded at 5 1/2".  

2. The first layer is a 5 1/4" x 4" piece of Tranquil Textures designer series paper. Because I never like to waste anything, I stamped the girl's skirt in the center of this panel and cut it out before adhering the DSP to the card base.

 3. I used Sizzix Rectangle Pinpoint Dies to cut a 3" x 4" Whisper White panel and a 3 3/8" x 4 3/4" Mint Macaron panel. The Night of Navy panel measures 3 1/8" x 4 1/8" and was cut out with my paper trimmer. All three panels were glued together with Tom Bow glue and then attached to the center of the card with Tear N' Tape. 
The Pinpoint Rectangles add a nice finished touch to these layers.

4.  The image of the girl's skirt and legs was stamped on a scrap of Whisper White with Momento Tuxedo Black ink and cut out with detail scissors.   As noted above I also stamped this image on the center of the DSP layer and fussy cut out just the skirt, which was glued to the Whisper White skirt/legs image. I lightly coloured around the DSP design on the skirt with my aqua painter and Pineapple Punch ink.  The girls legs were coloured with a skin toned blender pen.

5.  To get the mottled effect on the Whisper White layer I applied Mint Macaron ink to an Acryllic Block and stamped it straight onto the card stock.  I stamped the small cluster of dots randomly in Night of Navy ink and then stamped the flowers and coloured them with the Aqua Painter. 

6.  The sign the girl is holding was created by stamping the  image on Whisper White card stock and cutting it out with detail scissors.  I added Dimensionals to the back of this piece and it was attached above the waist band on the girl's skirt.  The sentiment "Hope You Feel Better Soon" was stamped in Night of Navy Ink on Mint Macaron.  This piece was punched out with a 1" square punch and adhered to a 1 1/8" x 1 1/8" layer of Night of Navy cardstock.  These layers were adhered to the center of the sign.  The girls fingers were coloured with a skin toned blender pen. 

7.  For the inside panel I cut a 5 1/4" x 4" panel of Whisper White Card stock and stamped the sentiment "Sorry" in Mint Macaron ink.  The "to hear you're not feeling well" sentiment was stamped in Night of Navy ink.  Two groupings of flowers were stamped in Momento Tuxedo Black ink and coloured with an aqua painter.  A 1" x 4" strip of the Tranquil Textures DSP was adhered to the bottom of the panel.  

On June 1st Stampin' Ups! new Annual catalogue will be available and you'll be able to check out all the images for the stamps and papers used in this card.  In the meantime I hope you've enjoyed this new product sneak peak and my card design.  

If you haven't had a chance to check out all the wonderful cards from the other Watercooler Wednesday Design Team you can click here.  Have fun and please come back for another visit.  

Happy Stamping!
Penny Tokens Stampin' Spot  

<a href="https://www.bloglovin.com/blog/2199104/?claim=7kgqrg74q3x">Follow my blog with Bloglovin</a>
Blogger link

Wednesday, May 23, 2018

WWC171 - Heidi's "All About Christmas" Challenge


This week the wonderfully talented Heidi Weaver is our hostess for the "All About Christmas" challenge at Watercooler Wednesday.  

I personally love these seasonal challenges as they really help me get an early start on my Christmas cards.  How about you?  Would you like to join us in making a Christmas themed project or card?  If so check out all the information on our home page.  This challenge is open until 5:00pm Mountain time on Monday May 28th, 2018.

Here's My Card:
I had so much fun making this Christmas card today and I'm delighted to share it with you.  

As you're probably aware by now, Stampin' Up! has revamped it's colour families and the new colours will be available in the release of the new Annual Catalogue on June 1st, 2018.  I can't wait that long however, so I though I'd give you a sneak peak at one of my favourites from the newly revamped "Brights Collection".  It's called "Gorgeous Grape".

I'm a big lover of purple and honestly I haven't felt this giddy about using purple in my Christmas card making since Stampin' Up! retired Concord Crush several years ago.  Check out these two favourites: November Christmas Card Class and Monkey86: Holidays & Sketch Challenge

So here's my Walking in the Winter Woods:


Just imagine it's around supper time in late November, and the sun is disappearing over the hillside as you finish your walk in the woods.  Snow is softly falling and the light is reflecting those last rays............


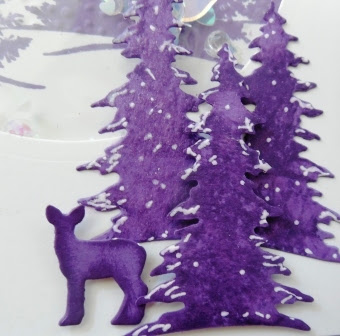
These beautiful trees and deer were die cut using the recently retired Card Front Builder Die set. These die cuts were perfect for adding an upclose scene to the bottom of the card.  I glued two trees to the card front and acetate window panel and then attached the deer and single tree with Dimensionals.  Before attaching these elements, I ran the Scenic Seasons tree stamp and Gorgeous Grape ink over the die cut tree to give the illusion of branches, and coloured around the edges with a sponge dauber. I also dabbled White Gel Pen around the tips of the trees and painted on a generous coating of Clear Wink of Stella.  These trees really shimmer and look like they have a fresh coating of snow.   


Supplies:
Stamp Up Stamp Sets:
Carols of Christmas (R), Christmas Bliss (R), Scenic Season (R)
Card Stock and Designer Papers:
Gorgeous Grape (New), Whisper White and Window Acetate 3 x 3 Sheet
Inks:  
Gorgeous Grape (New), Versa Mark
Accessories:
Big Shot, Paper Trimmer, Card Front Builder Die (R), Circle Thinlet Dies (R), Stitched Shapes Circle Dies, Wink of Stella, White Gel Pen, Sparkle Blends - Fairy Dust from Doodles Paper, Modern Label Punch, Softly Falling Embossing Folder, Heat Gun, White Embossing Powder, Adhesive Strips, Tom Bow Adhesive and Dimensionals.

Details:
1.  The card is an A2 Shaker Card with a top fold.  The base measured 4 1/4 x 11 and is scored at 5 1/2".  

2.  A 5 1/4" x 4" layer was cut from Gorgeous Grape card stock.  Before adhering this layer to the base I die cut the trees and deer from  the center of the card stock.

3.  The next panel is 5 1/8" x 3 7/8" and I cut a 3 1/4" circle in the top half.  

4.  For the window cover I cut a 3 1/2 x 3 1/2" piece of Window Acetate and adhered to the back of the panel in step 3.  Before adhering I wiped the Acetate Window sheet with my Stamping Buddy to remove any static electricity. To build the shaker wall I built a circle shape using adhesive strips and the cut circle as a guide.  

5.  The next layer is a 4" x 4" Whisper White panel that adheres to the back of the shaker outline.  I stamped the tree scene from Scenic Seasons in Gorgeous Grape and embossed to the bottom of the tree line with the Softly Falling Embossing Folder.  The dots from the embossing folder on the tree were gently sanded so it looked like fresh fallen snow.  

6.  I added Sparkle Blends Fairy Dust from Doodles Paper Playground to the inside of the shaker circle before adding the layer from step 5.  I added additional Adhesive Strips to this layer and mounted it to the card front.  

7.  I stamped the sentiment "Seasons Greetings and A Happy New Year" in Versa Mark ink on a scrap of Gorgeous Grape card stock and then heat set it.  I used the old Modern Label punch to cut out this sentiment and attached it to the top of the Acetate circle on the card front with Dimensionals.  

8.  Details related to the tree and deer scene at the bottom of the card are noted above in the photos. 

7.  I stamped the Peace on Earth sentiment from Carols of Christmas in Gorgeous Grape on a scrap of Whisper White and then cut it out with the 3" circle from Stitched Shapes dies.  This was mounted on a 3 1/4" circle of Gorgeous Grape cardstock and mounted to the inside of the card.  

I hope you enjoyed my Christmas card today.  Although it's not considered a traditional Christmas colour I think the Gorgeous Grape is very regal and works perfectly in creating this scene.  I'd love to hear your thoughts and suggestions for stamping with non-traditional colours in your creations.  

If you haven't already visited the other Design Team Artists I hope you'll revist the links before moving on.  Click here to return to the home page. 

Happy Stamping!
Penny Tokens Stampin' Spot 

Wednesday, May 16, 2018

WWC170 - Penny's Masculine "Anything Goes" Challenge

I'm happy to be the host for this week's Watercooler Wednesday and I'm challenging you to make a card or project with a "Masculine" Theme.  Father's Day is only a month away, so why don't you take my "cue" and make a Father's Day project. 


Our challenge is open until 5:00pm Mountain Time on Monday May 21st. If you are entering other challenges remember our rule about only entering a maximum of 8 challenges including ours, so you're not disqualified from winning our Rock Star and or as a runner up Rockers  All the rules and details are on our home page Watercooler Wednesday Challenges.

Before we get to my card I'd like to welcome our Guest Designer Stephanie Lanzalotto, who is filling in for Gail Allen on this weeks challenge.  Stephanie has designed an awesome card, so I hope you'll check it out.  

Here's My Card:
I've been busy getting cards ready for a Father's Day class that I'm doing towards the end of May.  This is the first of four masculine cards for that event. 


Supplies:
Stamp Set: Truly Tailored #145735 SU
Card Stock:  Night of Navy, Very Vanilla and Crushed Curry
DSP: True Gentleman Designer Series Paper 
Ink:  Night of Navy 
Accessories:  Big Shot, Alphabet Dies (Cutter Bee 54-80032), Tailored Tag Punch, Star Embellishments (Urban Underground), Dimensionals, Tom Bow Adhesive.  

Details:
1.  This is an A2 card.  The card base is cut from Night of Navy card stock and measures 8 1/2" x 5 1/2" and is a top fold scored at 4 1/4".

2.  The first layer on the card front is a 5 1/4" x 4" piece of Crushed Curry.

3.  The top layer is a piece of plaid designer series paper from the True Gentleman paper collection.  It measures 5 x 3 3/4".

4.  The lettering was cut from Night of Navy and Crushed Curry card stock with the Cutter Bee Alphabet dies.  I cut two of each colour, layered and glued them together ending with a Crushed Curry piece.  I used a sponge dauber and sponged around the top edges of the letters.  The individual letters were spaced across the center of the card and adhered with Tom Bow glue. 

 5.  I stamped the "To A Classy Kind of Guy" image from the Truly Tailored stamp set onto a scrap of Very Vanilla and fussy cut it out.  Then, I punched out a tag from Night of Navy and glued the two tags together and mounted it with Dimensionals in the bottom left corner beneath the letters. I really like that Tailored Tag punch.


6.  The metal star embellishments in the top right hand side of the card were left over from last year's Urban Underground suite.  I think they add a masculine feel and just the right balance to this card.

7.  The inside of the card started with a 5 1/4" x 4" piece of Very Vanilla card Stock.  The sentiment "Wishing You a Dapper Day" and the corner images are from the Truly Tailored stamp set and were stamped in Night of Navy ink.  I added a 1" x 4" piece of the plaid paper to the bottom of this panel to tie it in to the front of the card.  

Well, that's it for today's card.  I hope you liked it and it will inspire you to create your own Masculine cards.  I really liked the clean crisp look of this card.  The plaid paper really adds a masculine feel as do the bold letters.  

If you haven't already stopped by the home page for the Watercooler Wednesday challenges, go have a look.  The rest of the Design Team have added some really awesome cards that I know you'll love.  Thanks to all of you who participate in our challenges it's really appreciated and we love seeing all the talent that you bring to our site.  Wow, you're all amazing.  

Until next week........................

Happy Stamping
Penny Tokens Stampin' Spot 

Monday, May 14, 2018

I'm the Winner - April Sparkle Blends!

A few weeks ago I  participated in a new to me blog hop called April Sparkle Blends Release Hop sponsored by  Amber MacMurtry of Doodles Paper Playground.  What a sensational blog hop that was.   I had the most delightful time looking at the stunningly cards designed by Amber and the Sparkle Blends Designing Divas team and her other Guest Designers.  All I can say is WOW, WOW, WOW!!!!

Amber was offering a prize and asking people to comment throughout the hop.  Let me tell you I commented on each and every entry not because I wanted the prize, but because these cards and the Sparkle Blends Release were super fantastic.  

A few days later, to my astonishment I received an email from Amber letting me know I had won the grand prize - the full assortment of April Sparkle Blends and today they arrived in my mail box.  I simply have to share these with you because I'm over the moon about it.  

Just look at all these wonderful sparkle blends that I won.  
What a generous prize.  Amber sent me one of everything in the release.
Amber is a stay at home mom living in Vermont, USA who started her own small business earlier this year.  It's called Doodles Paper Playground and she sells Sparkle Blends.  

Sparkle Blends are limited edition, small batch sequin embellishment mixes that include a wide variety of specialty Mix-Ins, like seed beads, Fimo slice shapes, confetti & more.   These blends are wonderful for shaker cards.  

Amber sells her Sparkle Blends exclusively through White Rose Crafts.  Besides her blog Amber also has a Doodles Paper Playground Facebook Page.  

Here's a closeup of these beautiful blends.  I can't wait to get playing with them.  Each package is full of little treasures so they are so much more than just sequins.  


Thanks Amber, you simply made my month.  I can't wait to use these blends with my projects and I know I'll be checking out your blog and White Rose Crafts.   I wish you well in your business.  I hope all of my readers will check you out too.  
 Social Media Links for Amber MacMurtry and White Rose Crafts:


Happy Stamping!
Penny Tokens Stampin Spot 

Sunday, May 13, 2018

Happy Mother's Day

Mother's Day is here and I just want to say to all the incredible women I know and those I don't (for I know you're out there), take a bow and enjoy your special day!

Today I want to share the special card I made for my mom and a picture taken earlier this week at her home's Mother's Day Tea Party.  My mom who turned 96 this year is still going strong even though she faces lifes trials and health frailities every day.  She always looks forward to celebrating Mother's Day and having her family and loved ones shower her with attention. 
Mom won a ball cap at her Mother's Day tea this week and it was such a wonderful prize for her.  She absolutely loves it and wants to wear it everywhere.  Who knew something as simple as a ball cap could give such pleasure. 

Here's My Mother's Day Card:

This is an Eclipse card made with the beautiful Springtime Foils Specialty Designer Paper from Stampin' Ups! Sale-A-Bration.  I've used Pool Party card stock for the card base and added a layer of Copper Foil for the layer.  The letters were cut from the layer before adhering the DSP.

The inside of the card  features a flower cut from the Springtime Foils DSP and coloured with Stampin' Blends markers.   
My mom loves yellow roses so the Light and Dark Daffodil Delight blends worked perfectly.

The background on the Spring Time Foils panel was coloured with light and dark Pool Party Stampin' Blends.  It didn't blend perfectly but the beauty of that is that the finished panel looks like it was watercolored.  The leaves were coloured with light and dard Old Olive Blends. 
I embossed this very meaingful saying from the Rose Wonder stamp set in Copper Embossing Powder.

I love the Alpha Letters cut from the Copper Foil.  They are big and bold.  I positioned the letters on the floral panel and cut them out.  These letters were set aside and used for another card.   Because my mom is blind she was able to feel each of the letters on the card which was important.  She could also feel the rose embossed flowers on the card panel.  When I told her they were yellow roses she smiled and said she could see them in her mind. 


Thanks for visiting. I hope you enjoyed this card.
Happy Stamping!
Penny Tokens Stampin' Spot 

Wednesday, May 9, 2018

WWC#169 - Charlotte's All Occasions - Anything Goes Challenge


Are you ready for this week's challenge at Watercooler Wednesday?  I know I am, and so is Charlotte who is our wonderful host this week.  Charlotte's  challenge is about making a card or project for "any occasion".  That's right, it could be for a Birthday, a Wedding, maybe an Anniversary...........what ever you decide, because there's so many different occasions to celebrate.  

The WWC169  challenge will be open until 5:00pm Mountain Time on Monday May 14th, so there's plenty of time to make something and join in the fun.  All the instructions and rules for joining this blog challenge can be found here.   I hope you'll play along. 

Here's My Card: 
Friends recently moved into our neighborhood and have been busy doing a full renovation of their new home.  In preparation for their reveal, I wanted to make a special welcome card featuring the 2017 Stampin' Up! hostess set called "In The City" based on a card created by a UK stamper named Monica Gale.  I loved her version but tweaked it a bit to make it my own.  Here's my card.....


Supplies: 
Stamp Sets:  In The City (143771), Petite Pairs (122497) and Holiday Home (135095) 
Card Stock:  Natural Ivory and Calypso Coral
Ink:  Momento Tuxedo Black Ink, Versa Mark and Old Olive, Calypso Coral, Pool Party, Crumb Cake, Bermuda Bay, Daffodil Delight Stampin' Blends. 
Accessories:  Misti Mini Stamping Platform, Big Shot, Paper Trimmer, Big AEKSUCCESS Alphabet Dies (54-80032), Dimensionals, Washi Tape, Very Vanilla Embossing Powder, Embossing Buddy and Heat Gun.

Details:

1.  The card base is 8 1/2" x 5 12" scored at 4 1/4"  from Natural Ivory card stock. 

2.  Cut two 5 3/8" x 4 1/8" piece of Calypso Coral for the 1st layer on the front of the card and for the first layer for the inside of the card.  Adhere to base. 

3.  Cut two pieces of Natural Ivory measuring 4" x 5 1/4" for the front stamped layer and the inside stamped layer.  

4.  Place Natural Ivory front cover piece in the stamping platform and create a scene by placing the stamps along the card front and then stamp with Momento Tuxedo Black ink.  Colour the scene with Stampin' Blends.  Spritz lightly with Night of Navy ink.  Ground the building and truck by drawing a line along connecting with houses and defining the road.  

5.  Once the scene has been stamped position the die cuts above the street scene, raising and lowering the position of the letters to make sure all four spelled out the word HOME.  I held the dies in position with Washi Tape and then ran them through the Big Shot.  

6.  Remove the letters and save the center part of the "O".  On a scrap of Calypso Coral cut another set of letters and adhere them to the Natural Ivory  letters. Attach Adhesive Strips to the back of the letters. 

7.  Glue the stamped layer to the Calypso Coral layer and glue to the card base. 

8.  Remove the backing from the adhesive strips and carefully position in place.  Attach the center of the "O" to the card base with glue dots.


9.  On a scrap of Natural Ivory stamp the sentiment "happy new home" from the Holiday Home stamp set.  Cut the words apart with a pair of snips and discard t he word "home".  Glue the other two words "happy" and "new" to strips of Calypso Coral card stock and attach abve the "M" in Home. 

10.  On the other 4" x 5 1/4" piece of Natural Ivory stamp another scene from In the City.  Colour with Stampin' Blends.  Stamp the sentiment "so glad you're here" from Petite Pairs above the houses.  Glue to Calypso Coral layer and to card base. 


I had such fun making this card I decided to make a second one using Crumb Cake and Old Olive card stocks. I also stamped the sentiment "Welcome to our Block" from the In the City stamp set onto Old Olive card stock with Versa Mark ink.  I embossed it with Very Vanilla Embossing Powder and a heat gun and attached the sentiment with Dimensionals to the card front.  I really liked how this turned out, and it will be the actual card I give my friends.  


Thanks for dropping by today and checking out my card.  I'd love to have a comment from you.  Which version of my card do you like best?  Have you tried an Eclipse card yet?  What about the In the City Stamp set, do you love it too?  Here's one last look at these cards.   

If you haven't done so already don't forget to check out the Watercooler Main page for inspiration from the rest of the Watercooler Design Artists.  

Happy Stamping!
Penny Tokens Stampin Spot 

Close To My Heart Sale - Coming Soon!

  CLOSE TO MY HEART PROMOTION Starting October 16 at 12:00 a.m. (MT), you can purchase all* CTMH products for 30% off. That’s right—30%!  Th...