Tuesday, September 15, 2015

Watercooler Wednesday WWC33 Inspiration Challenge Winner!

Wow, I just got great news!  I was chosen as the winner for last week's inspiration challenge over at the Watercooler Wednesday challenges!  

I'm so thrilled to have won with my entry.  It was pretty stiff competition and I understand my card just squeaked by because of the pop up on the inside. 

If you haven't seen the design team and other entrants cards yet, make sure you click  on this link, you won't regret it, there's so many awesome cards to CASE.  

Here's the card I won with and the link to my post. 


Happy Stamping!
Penny Tokens Stampin Spot 

Monday, September 14, 2015

WWC33 -- Bev's Photo Inspiration Challenge

Time flies doesn't it? I can't believe it's time again for the Watercooler Wednesday challenge .  This time around it's an inspiration challenge. 

Take a look at this beautiful photo inspiration from Bev. The Watercooler Design team have created some beautiful cards, so make sure you check them out and leave them some comments, if you're inspired too.  There's definitely some good ideas going on here! 


Here's My Card: 
I'm busy making Christmas cards right now, so after thinking a bit about what I wanted to make, I  chose to design a non-traditional Christmas card using the purples, silver and hint of green from this picture. I was drawn by the picture above the bed and the bubbly light fixture when I first glanced at this picture, however there are many other subtle details for inspiration such as the silver metal head and foot boards on the bed, the pink flowers on the mannequin and the green accessories on the dresser. 

 
I chose Perfect Plum card stock for the card base, hoping to mimic the bedding first in my layout.  The card base measures 8 1/2" x 5 1/2" and was scored at 4 1/4.  Taking the dark hues from the vanity chair and shaggy carpet, I used a 5 1/2 by 3/3/4" piece of Blackberry Bliss card stock for the first mat. To mimmick the head and foot boards or rails on the bed I added 1/4" strips of Dazzling Diamonds Glimmer Paper to the edges of a 3 x 5 1/2" piece of Whisper White.

These three squares represent the wall picture.  The layers are Pear Pizzazz, Blackberry Bliss and Perfect Plum.  The mosaic tile was inked up with Wisteria Wonder and Black Berry Bliss inks.
I punched the flower center from Dazzling Diamonds Glimmer Paper with the Itty Bitty Accents flower punch and centered a medium sized Basic Rhinestone on it.  This was elevated with a dimensional to the center of the mosaic tile. The background on the Perfect Plum square was embossed with Decorative Dots TIEF.


When you open the card a delightful array of ornaments pop up to greet you. I love this little surprise and how the ornaments wobble and bobble about. 
The secret to adding these ornaments which are mounted on 1/4" by 3" strips of Window Sheet is to cut the card on the center crease line and then score at 1/4" on each side of the cut.  This forms a fold line that you can line up the pop up pieces along.  I varied the heights of each of the ornaments and cut off the excess window sheet before closing the two pieces of the card together with Tom Bow adhesive.  Make sure you use your bone folder to crease the fold both inside and outside, so that the ornaments lay properly when the card is closed and opened.
Here is a view of the underside of the ornaments.  I stamped and cut two of each ornament and mounted them back to back on the window sheets with mini glue dots so the underside of the pop up would look just as good as the original view.  The inside Whisper White panel has a sentiment from an old Stampin' Up set called Holiday Collection and measures 3 3/4" x 5 1/4".
Supplies:
Stamp Sets: Mosaic Madness (R), Ornament Keepsakes (R), Holiday Collection (R)
Ink: Blackberry Bliss, Perfect Plum, Wisteria Wonder Marker, Blackberry Bliss Marker
Card Stock: Whisper White, Blackberry Bliss, Perfect Plum, Pear Pizzazz, Dazzling Diamonds Glimmer Paper
Accessories: Modern Mosaic (R) and Decorative Dots TIEF*, Big Shot, Trimmer, Mosaic Punch (R), Itty Bitty Accents Punch, Basic Rhinestones, Tom Bow Adhesive, Window Sheet Scraps, Dimensionals
*Textured Impressions Embossing Folder 


I hope you enjoyed this card.  If you want more details on assembling this pop up drop me a line.  If I get enough response I'll do a tutorial. 

Happy Stamping!
Penny Tokens Stampin' Spot

Tuesday, September 8, 2015

Congratulations Card ......#CCM371

I spent today with my stamping bestie, Sheri for a wonderful "Stamping on Tuesday" session.  We both love doing sketch and colour challenges, so when we get together we look at what's current and what tweaks our interest, before settling on a challenge.  Today we decided to work on the Create With Connie and Mary sketch challenge #CCMC371.  

For me there's nothing like stamping with a friend on a cloudy rainy day to let the sunshine in! And, what a blast we had! I love the collaboration and chit chat that goes on when you're trying out a challenge and of course the awesome food we always have.  Today's menu included Chicken Enchiladas that were to die for and Marbled Chocolate Cheese cake.  Yum!

Here is the Connie and Marie Sketch for this week:
 Here's My Card:


Supplies:
Stamp Sets:  Bright and Beautiful (SU Retired), I Am (SU Retired)
Card Stock:  Whisper White, Basic Black, Silver Glimmer Paper
Ink:  Momento Tuxedo Black
Accessories:  Small Star Punch (R)*, Basic Rhinestones, Thinlets Label Card dies, Small and Large Oval Punches,Trimmer, Lucky Stars Embossing Folder, Big Shot.   *(R) means it's retired.


Assembly:

1.  I cut the Whisper White card stock for the base to measure 4 1/4" x 11" and scored it at 5 1/2". 
2.  The Silver Glimmer Paper mat measures 3 7/8" x 5 1/8" and the Basic Black mat measures 3 5/8" x 4 7/8".
3.  I dry embossed the black mat with the Lucky Stars Embossing Folder and 8 stars were cut out with the now retired small star punch.  This mat was adhered to the Glimmer paper layer with Tom Bow Glue
4.  The sentiment "You Are" was stamped in Momento Tuxedo Black ink on a scrap of Whisper White card stock and then cut out with one of the small label dies from the Thinlet Label Card set(R).  
5.  Although the card already has a lot of shine from the glimmer paper I added Basic Rhinestones to each of the star centers and to the ends of the label tag to make the card front extra special

6.  I layered a 5 1/4 x 4" piece of Basic Black card stock with a piece of Whisper White card stock that measures 5 x 3 3/4".  
7.  I stamped a medium sized star from the Bright and Beautiful (R) stamp set in the center of the card with black ink. 
8.  I stamped the "A Star" sentiment from the "I Am...." stamp set onto Whisper White card stock and  punched it out with the small ovals punch.  The sentiment was mounted with dimensionals onto a piece of Silver Glimmer paper that was punched out with the large oval punch.  Note:  Dimensionals don't adhere well to glimmer paper so you need to use an adhesive that has a bit of extra bond if you want your paper to stay put. 

That's it for another fun sketch challenge.   I hope you've enjoyed it!  If you get an opportunity to try out  this challenge yourself go for it.  It closes on Thursday.  Be sure to drop by the Connie and Mary Blog to check out all the other entries into this challenge.  As always there are some great card entries and inspiration.


Happy Stamping!
Penny Tokens 

Saturday, September 5, 2015

Watercooler Challenges - Watercooler Wednesday Challenge #32

The Watercooler Blog Challenges have moved to a new day and have a new title.  The challenges will now run from Wednesday to Monday and are called "Watercooler Wednesdays Challenges".  

I'm looking forward to playing along with these weekly challenges and I think you will too.  I'm challenging all of my stamping friends to join in the fun and participate in these weekly challenges.  Tell them Penny sent you.
  
Okay let's get down to business. The wonderfully talented Kath Rick's is starting off this Watercooler Wednesday challenge with her awesome sketch WWCM#32: 
Here's My Card:
I have another male birthday coming up soon, so it was the perfect opportunity to use the Watercooler Wednesday sketch to make a masculine card.  

Originally I planned to use my retired In the Wild stamp set for the images and the Go Wild DSP Paper stack for the mat layers, however all that changed.  Why?  Well, while I was doing some test stamping and checking the ink density and image clarity on the Tip Top Taupe card stock my plan took a bend in the road.  I enjoyed stamping all the animals and a beautiful pattern began emerging from my random stamping.  It didn't take me long to figure out I wanted to use the sample instead of the DSP.  Don't you just love when those unexpected things happen?  It's the a-ha moment, personified!


A 4" x 5 1/4" piece of Early Espresso and a 3 3/4" x 5" piece of Very Vanilla card stocks were adhered to the inside of the card.  Another giraffe image was stamped in Early Espresso ink and a sentiment from the retired "Full of Life" stamp set was added. 
Supplies:
Stamp Sets: Teeny Tiny Wishes, Gorgeous Grunge, In the Wild (R), Full of Life (R)
Card Stock:  Early Espresso, Tip Top Taupe
Ink:  Versa Mark, Early Espresso, Tip Top Taupe
Accessories:  Lots of Labels Framelits, Trimmer, Big Shot, Bo Chic TIEF,  Two brass brads, dimensionals, Tom Bow glue, Gold Embossing Powder, Heat Gun 
The animal images were stamped randomly with Early Espresso ink on Tip Top Taupe card stock on a 4" x 5" piece.  After stamping I cut the larger piece into two pieces measuring 1 1/2" x 4" for the top mat and 3 3/4" x 4" for the bottom mat.  I've been dying to use my new Lots of Labels Framelit dies since they arrived last week, so this was a perfect opportunity to work with them. Each layer is separated with dimensionals.
Two small gold brads I'd recycled from another project were place in the center top and bottom of the Early Espresso layer.  I stamped the "happy birthday" sentiment from Teeny Tiny Wishes in Versa Mark Ink and embossed it with Gold Embossing powder  on a piece of Tip Taupe Top card stock.  I've never been able to part with my small retired oval punch so I hauled it and the Large Oval Punch out and layered the sentiment with dimensionals before adding it to the bottom corner of the card front.
I stamped the speckled image from Gorgeous Grunge in Tip Top Taupe ink and then again with Versa Mark ink on the top and bottom panels and the background of the smaller label and then embossed them with Gold Embossing Powder. What a difference this makes!  The embossed gold specks add the right amount of life to the images. Before adhering the top stamped mat, I wrapped it a couple of times with gold thread.  Once again this small addition added more interest and life to the images.  

For the card's focal point I stamped the giraffe from In the Wild in Early Espresso ink on the smaller label.  I sponged the edges of all the layers and mats with Tip Top Taupe ink.  When I was finished I felt that the giraffe image looked a little flat, so I stamped a second giraffe with Versa Mark ink on a scrap of Tip Top Taupe card stock, heat embossed it with Early Espresso Embossing Powder and BAM! the image really popped off the page. I fussy cut the second image and mounted it over the original giraffe using small strips of dimensionals. 
 
 I hope you enjoyed this challenge and my masculine card and perhaps you'll join in the fun and enter your own creation for this challenge, you've still got time.
Happy Stamping!
Penny Tokens


Friday, September 4, 2015

Clipper Street Appreciate Day and the Storm

Last Saturday I was invited to attend a fun "Customer Appreciation Day" event being held at Clipper Street in Langley. 

This Langley scrapbooking company was nominated and won awards for being the "BEST" in 2015 for:
  • Specialty Gift Store 
  • FUN Place to Shop and 
  • Crafts and Hobby store 
When my friend Ethel and I met pre-class for breakfast at a local restaurant it was overcast and raining so we were excited about being inside for our class.  Little did we know what was in store for us later in the day.


We joined a wonderful group of ladies and our instructor Deanna to make two cards.  Here's a shot of the group:
Ethel in Wisteria Wonder and I'm wearing the Calypso Coral top.

  Here are the two cards we made:

It was a great fast paced class taught by Deanna and we really enjoyed making these multi-layered, happy cards.  We were a bit worried we wouldn't be able to finish as throughout the class the lights were flickering and a couple of times the power actually went out.  

We finished on time though, and after touring this great store and sampling
some of the lovely cake and punch we headed out to our cars. The moment we walked outside we were almost blown off our feet by the pineapple express winds that were wreaking havoc around us.  We had just walked into the worst storm since 2006 to hit the lower mainland.

We yelled hasty goodbyes and ran to our cars to get out of the wind and rain.  My car was literally rocking from the buffeting winds. Needless to say it took me a long time to drive the 34klms to my home and it was one of the most frightening driving experiences I've ever been through.  Trees were falling everywhere and the rain was so heavy at times you couldn't see out the windshield.  Power lines were down and debris and flying objects were everywhere.


I eventually made it home to safety.  When I arrived our power was out for about four hours, but we were some of the lucky ones, as over a half a million people were without power, some as much as three days, and there was so much damage and destruction. 

This was an experience I won't forget for a long time.


Happy Stamping!
Penny Tokens

Thursday, September 3, 2015

This deal ends on September 10th.  Check out my post on my Paper Pumpkin link for all the details on how you could be eligible to get 50% off on a fun monthly paper crafting kit.  

Happy Stamping!
Penny Tokens

Connie & Mary Colour Challenge - CCM370 Too Late!

I was stamping with my bestie last Tuesday and she suggested we make some cards using Connie and Mary's Colour Challenge.  Their combination of Pool Party, Watermelon Wonder and Black, sounded awesome. 

Here's their challenge:  


I really liked the card I made last week using the Butterfly Pop Up Diagonal Fancy fold, so I decided to use a similar layout for an anniversary card I was putting together.

All went well until I started trying to fine tune some of the details like how I would combine the colours.  While Sheri surged ahead and made the cut off time, I simply took too long deciding what sentiments to use and how I would use them and the next thing you know I missed the cut off for the challenge.

Oh well I'm sure that's happened to some of you too.  Since I was happy with the card I eventually made, I decided I would go ahead and share it even if it didn't make the challenge.   

Here's My Finished Card:


I finally decided to use the CELEBRATE sentiment from the Celebrate Today stamp set.  I stamped the image with Versa Mark Ink and Momento Tuxedo Black ink and heat set it with Black Embossing powder.  I couldn't find a framelit or punch that work with this image so wound up fussy cutting around the words.  I mounted it between the butterflies with dimensionals. 

Here's a view of the inside of the card.  I used the "Love begins in a MOMENT grows over TIME and lasts an ETERNITY" image from one of my favourite retired stamp sets called Occasional Quotes.  I simply love that verse.  The "Happy Anniversary" which you can barely see is from another retired stamp set called Something to Celebrate stamp.

Supplies Used:
Stamp Sets:  Watercolour Wings, Something to Celebrate (R), Celebrate Today
Ink:  Momento Tuxedo Black, Pool Party, Watermelon Wonder, Versa Mark 
Card Stock:  Pool Party, Watermelon Wonder, Black Glimmer Paper, and Whisper White 
Accessories:  Trimmer, Big Shot, Bold Butterfly Framelits and Butterflies Thinlet Dies, Basic Rhinestones, Black Sharpie Alcohol Marker, Tom Bow Adhesive, Dimensionals.  

I hope you like this card and are inspired to post your card samples even if you missed a challenge cut-off like I did. 

Happy Stamping!
Penny Tokens  

Tuesday, September 1, 2015

Holiday Catalogue 2015 - It's Live!

Are you ready for some holiday fun?  

September 1st is finally here and it's the first official day you can order from the new 2015 Holiday Catalogue from Stampin’ Up! Canada. 

I know you're going to be so excited to see this latest catalogue and all the fabulous new stamp sets, paper, dies, punches and accessories Stampin' Up! has come up with. I'm not kidding, you’re gonna love it!

Haven't got a catalogue yet?  Well, if you're one of my frequent purchasing clients your catalogue is on it's way and you should have it by week's end.  


If you haven't purchased from me this year here's how you can get on my automatic mailing list.  Simply place an on-line order valued at a minimum of $25.00 before shipping and tax and you'll be added to my automatic mail out list.  Not only will you receive this current catalogue, but you'll receive all other Stampin' Up! publications for the year, at no charge.  How's that for a deal? 
 

If you don't have a catalogue right now, don't worry.  Just click on this link or go to my right side panel on my blog and click on the Holiday Catalogue link there,....it's always available.  

Alright, don't delay check the catalogue out right now and see how you can save on  your holiday stamps and accessories.

SAVE … 15% when you purchase Bundles of stamps and punches/dies from any catalogue.  Bundle and Save 15%

Pg. 10:     Festive Fireplace Stamp set + Festive Fireside Framelits Dies
Pg. 11:     Happy Scenes Stamp Set + Hearth & Home Thinlits Dies
Pg. 12:     Jingle All the Way Stamp Set + Sleigh Ride Edgelits Dies
Pg. 15:     Embellished Ornaments Stamp Set + Delicate Ornament Thinlits Dies
Pg. 16:     Peaceful Pines Stamp Set + Perfect Pines Framelits Dies
Pg. 25:     Flurry of Wishes Stamp Set + Snow Flurry Punch
Pg. 30:     Berry Merry Stamp Set + Boughs & Berries Textured Impressions   Embossing Folder
Pg. 31:     Reason for the Season Stamp Set + Festive Flower Builder Punch
Pg. 33:     Snow Place Stamp Set + Snow Friends Framelits Dies
Pg. 34:     Holly Jolly Greetings Stamp Set + Christmas Greetings Thinlits Dies
Pg. 37:     Project Life Hello December 2015 Stamp Set + Card Collection + Accessory Pack
Pg. 38:     Project Life Seasonal Snapshot 2015 Stamp Set + Card Collection + Accessory Pack
Pg. 39:     Among the Branches Stamp Set + Woodland Textured Impressions Embossing Folder
Pg. 40:     Sparkly Seasons Stamp Set + Seasonal Frame Thinlits Dies
Pg. 41:     A Little Something Stamp Set + Square Pillow Box Thinlits Dies
Pg. 45:     Acorny Thank You Stamp Set + Acorn Builder Punch
Pg. 49:     Howl-o-ween Treat Stamp Set + Boo to You Framelits Dies
 

SAVE … with a Starter Kit for only $125. That's right sign up now to be on my team and you'll receive $155 in your choice of products including free shipping and GST paid. Plus, receive a discount of 20% on future orders while a demonstrator.

SAVE … place an order of $200 or more and earn 10%+ in Stampin’ Rewards.  Note:  If your order is less than $200.00 you'll still receive my automatic catalogue mailing and if you use my monthly Hostess Code # you'll be entered to win Hostess Code of the month benefits. 


Now for the fine print:  
Remember how hard it was to get some of your favourite stamps and supplies this summer? Between labour disputes, and unanticipated high volume sales, back orders occurred and they were very frustrating for everyone. Well if you're planning a special project or event you'll want to place your order early to ensure stock is still available and you're sure to avoid any future dreaded back orders. 

Happy Stamping!
Penny Tokens 

Monday, August 31, 2015

Butterfly Diagonal Pop Up Card

I love learning new techniques and fancy folds are among my favourites.  For today's card I was enchanted with a new to me fold called "Diagonal Pop Up" fancy fold. Now I've seen these folds in store bought cards, but I've never attempted to make one myself.  Trust me this fold is super easy and if I can do it without pulling out my hair then so can you.

Here's my card front:

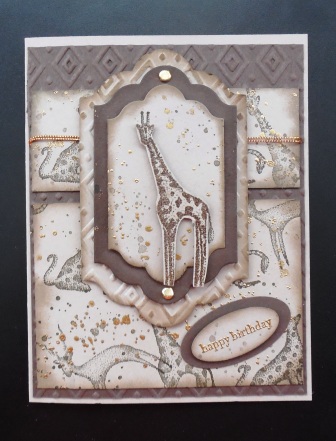
I cut a piece of Whisper White card stock measuring 3 5/8" x 5 1/2" for the center panel of the card front.  I die cut two of the large butterfly images from this piece and then embossed it with the Elegant Dots TIEF.  I cut another piece of Whisper White Card stock the same size as the first and adhered it with dimensionals behind the front panel.  I stamped the butterflies through the opening created by the larger butterfly framelit. 

I love all things glittery so to pop up the impact of the front of this card I added two 1/2" x 5 1/2" strips of silver glimmer paper on either side of the white panel before it was adhered to the card front.  Sticky strip doesn't always stick to glimmer paper, so instead of using that I put two thin strips of Tom Bow glue down each of the sides on the back of the Whisper White panel and then adhered the Glimmer strips, making sure they were showing the same width on each side of the front panel.  I also added some more bling with four large Basic Rhinestones on the bottom right hand side of the card front.   The sentiment "Sending Wishes Your Way" is from the Basic Butterfly stamp set. 
Inside of the Card:
Okay, so there's nothing major exciting about the front of my card other than the butterfly images inside the cut-a-ways. Right? So where's the magic and wow factor? 

Drum roll please...........are you ready?  What's truly exciting about this card is the fancy fold on the inside of the card! That's where the surprise lays. 


Isn't that impressive?  I thought so too, but I probably wouldn't have made this card without the inspiration and help of one of my favourite super-talented and creative stampers, Julie Davidson.   I subscribe to Julie's blog posts and newsletters, and there is always something she shares that I find interesting and helpful.  

Recently Julie posted a great video tutorial showcasing the Watercolour Wings stamp set and Bold Butterfly framelit dies.  She demonstrated a new to me fancy fold card called a Diagonal Pop Up.  How exciting!  Her card was inspiring and I loved this technique so I just had to make this card.  Rather than me giving you a step by step tutorial on how to make my card, I'm going to let the video speak for itself and share her link. Go ahead, just click on this link for her video and you'll see what I mean by super easy and fun! 

Supplies For My Card:
Stamps: Wonderful Wings Bundle , Basic Butterflies
Card stock: Elegant Eggplant, Whisper White, Silver Glimmer Paper
Ink: Elegant Eggplant, Perfect Plum, Wisteria Wonder
Accessories: Bold Butterflies Thinlet dies , Basic Rhinestones, Adhesive, Elegant Dots Textured Impressions Embossing Folder (TIEF), Dimensionals, Trimmer with Scoring Blade, Big Shot, Pencil
 
Bundle and save! Buy these two coordinating products for $45.00 CDN and save 15%.

The 15 image Watercolor Wings Photopolymer Stamp Set has made stamping classic butterflies even better by putting them in a Two-Step Stampin' set. Two-step sets have a base image and overlay images that you can combine over the base image. Use any combination of ink colors to create fantastic butterfly images. Suggested clear blocks (sold separately): a, d, e, g.

The Bold Butterfly Framelits Die set is comprised of 2 dies.  There is a large open image butterfly that measures 3-1/8" x 2-1/8" and a smaller delicately detailed butterfly that measures 2" x 1-3/8". 

 Cutting Instructions for Diagonal Pop Up Card:

  1. The card base is Elegant Eggplant and the card stock measured 5 1/2 x 8 1/2 and is scored at 4 1/4.
  2. The inside card panel is cut from Whisper White card stock and measures 7 1/2 x 4 3/4".  It is scored at 3 3/4".
  3. Using a ruler and a pencil measure 2 1/2" from the center score line to both the right and left of the inside card panel and make a small erasable pencil mark.  
  4. Measure 2 1/2" from the top of the center score line towards the bottom of the inside card panel and make a small erasable pencil mark. 
  5. Starting from the right side line up the top and center pencil marks using the score line on your paper trimmer and score to where they meet.  Repeat this process for the left hand side of the panel. 
  6. Erase pencil marks and Fold first on the center score line and then each of the side score lines, so that when the card panel is opened up a triangle pops up in the center.  
  7. I stamped and cut out a butterfly image and adhered it on the left side of the triangle with two dimensionals.
  8. Stamp your sentiments and any other design you want on your card panel and then adhere the panel with Tom Bow or other adhesive.  Tip:I applied the adhesive around the two sides of the panel to the beginning of the triangle at the top of the panel, and along the bottom of the panel. Make sure there is no adhesive on the triangle portion of the panel.  Once all the adhesive was added, I folded the panel at the center score line and then lined it up with the center score line of the card base and then closed the card.  When you do it this way, everything lines up perfectly.  
I hope you enjoyed this card and my tips and will try this out yourselves.  Let me know if you would make this card.  Right now I can think of all different kinds of things I can put on this pop up.  

How about you?  I want to know so leave me a comment and let me know what kind of card would you make and what stamp set or sets would you use to create it?  Please let me know. 

Happy Stamping!
Penny Tokens   

Paper Pumpkin Alternatives April 2024 and Sketch Challenges

The past week was so busy that time literally flew by.  I have a number of projects on the go, including working on my April 2024 Paper Pump...