Showing posts with label Stampin Up. Show all posts

Wednesday, February 14, 2018

WWC157 - Heidi's "All About Occasions" Challenge

Hi stampers Happy Valentines Day!  Welcome to this week's Watercooler Wednesday challenge #WWC157.  Heidi Weaver is our host and our theme this week is "All About Occasions".    


We hope you'll join us  by linking up your special "Occasions" project by 5:00pm Mountain Time, Monday February 19th, 2018 to our Linsky.  Who knows, you might be our next Watercooler Rockstar.

Here's My Project:
Today I want to share my Thank You Note Clutch Purse project.  This cute little clutch purse and accompanying note cards could be made for just about any "Occasion" you can think of.  Mine was made as a gift for a sweet gal friend for Valentine's Day. 


The clutch is made from a single 12 x 12 sheet of double-sided designer series paper.  No special skills or tools are needed to make this clutch, other than the ability to fold the square of paper into the clutch design.  Mine was made with retired paper stock because I'm still trying to use up what's in my stash.

The clutch holds four note cards and envelopes inside, and has a magnetic clasp to keep it closed.  Here is a link to an original tutorial and video by Dee Slater on Split Coast Stampers that clearly shows how to make this special little gift card clutch purse.   


Supplies:

Stamp Sets: Amazing You and One Big Meaning

Ink: Watermelon Wonder, Old Olive and Soft Suede

Card Stock: Ivory Fleck (R), and Soft Suede

DSP:  Stampin Up (R) - from my stash and Ivory Envelope Paper
Accessories:
Big Shot, Paper Trimmer, So Succulent and Stylish Stems Thinlets (R), Stitched Shapes 2" Circle Thinlets, 2 Small Magnets Watermelon Wonder Grosgrain Ribbon,
Faceted Gems, Basic Rhinestones, Dimensionals, Tom Bow Glue, Sticky Strip.

Note Cards:
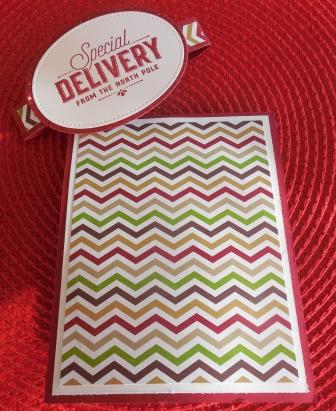
I made my own note cards, but I've seen some beautiful sets completed with the Stampin' Up! premade note cards and envelopes that are in the Annual Catalogue.  Great value here as you get 20 note cards in Whisper White or Very Vanilla card stocks with matching envelopes and the card stock is a little thicker on the note cards so make for perfect backings.
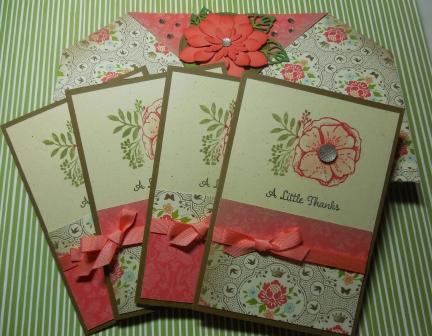
1.  Base is 7" x 5" scored at 3 1/2"
2.  1st layer - 3 1/4" x 4 3/4" Ivory Fleck card stock.  Before adhering to the note card front stamp the floral image from Amazing you in Watermelon Wonder and Old Olive.  Stamp the sentiment "A Little Thanks" from One Big Meaning in Soft Suede ink just below the floral image. Add a Faceted Gem to the flower center.
3.  2nd layer - 3 1/4" x 3/4" strip of DSP adhere below the sentiment.
4.  3rd layer - 1 1/2" x 3 1/4" strip of DSP flip so reverse side is showing.
5.  Cut a strip of ribbon and attach over the seam created by 2nd and 3rd layer and glue ribbon ends to the back of Ivory Fleck layer.  Tie a small bow in the front with another piece of ribbon and trim ends. 
6.  For the inside of the note card cut a 3 1/4" x 4 3/4"piece of Ivory Fleck card stock and adhere.  It could be stamped with another floral image but I chose to leave my black for messaging. 

7.  Two cards and envelopes fit into each of the panels on the inside of the clutch.  They tuck in rather neatly and will  stay in place.


The Clutch:
I made the clutch following the instructions in Dee Slater's video.  I changed up the way the flaps hold shut though.  I attached two small magnets under the flaps with glue dots.  I started on one side positioning the magnet underneath the flap then flipped the clutch over and let the magnet attach itself and then added the glue dot and pressed the flap down.  These are really secure and hold the clutch shut.  You could also do a belly band or tie ribbon around the clutch if you're looking for alternate methods to close it.  

The Flower Embellishment:

I created the floral embellishment with bits and pieces of cardstock I had on hand and two of my favourite die sets - So Succulent and Stylish Stems, both retired.  
I always like to ink around the edges of my flower and leaf pieces as it seems to add more depth.  For this arrangement I layered the four flower pieces together with glue dots, and attached the assembled flower to a 2" stitched circle piece that I cut from Soft Suede card stock.  Next I added the leaves with glue dots.  The circular piece was attached to the flap with sticky strip.  A few random rhinestones were added to the flap on either side of the flower.  

And that's all there is to creating this note holder.  It's a fun and very quick to assemble project and I thoroughly enjoyed making it.  So much so, that I'm  planning to do a class on how to make these, for Mother's Day so if you're in my area and interested let me know.  

I hope you enjoyed this project as well as the ones created by the rest of the Watercooler Wednesday Design Team this week.  I'd love to hear what you think of it so leave me a comment before you go.  Your feedback is really helpful.  

Happy Stamping!
Penny Tokens Stampin' Spot 

Wednesday, January 31, 2018

Watercooler Wednesday WWC#155 - "Anything Goes"

Welcome to this week's Watercooler Wednesday Challenge. Our WWC155 challenge this week is an "Anything Goes". That means that anything you want to share with us is a-okay. It could be a card, a tag, a project, whatever. All you have to do to play along is take pictures of your "anything goes" and post to our Linsky by 5:00pm on Monday February 5th, 2018. Check out our rules and how to play along on our main page.  Kath Ricks is leading the way for our Design Team on this challenge.
Here's My Card:
My "Anything Goes" project features a technique called "Ghosting". Using this technique and the floral image from the "Amazing You" Sale-A-Bration stamp
I made a total of eight thank you cards in a very short time.  Here are some views of my cards: 


Supplies:
Stamp Set: Amazing You SAB 2018, Painted Harvest,One Big Meaning
Ink: Whisper White, Fresh Fig
Card Stock: Crumb Cake, Fresh Fig
Accessories: Trimmer, Tom Bow Glue, Basic Rhinestones, Clear Wink of Stella, Purple Sharpie Marker, Heat Gun.


Details:
1. Card Base - Cut a piece of Crumb Cake 4 1/4" x 11. Score at 5 1/2".
2. 1st Layer - Cut a 5 1/4" x 4 1/8" piece of Fresh Fig and adhere.
3. 2nd layer - 5" x 4 piece of Crumb Cake.

4. Ghosting Technique:
  • Begin by stamping the flower from Amazing You on the 2nd layer with Whisper White Ink.  Set aside so ink dries or use a heat gun. 
  • Once the Whisper White ink has dried begin stamping over the images with Fresh Fig.  Make sure you offset the image slightly to create a shadow. And, that's all there is to this simple yet beautiful technique.


 5. To finish off the card face I stamped the "Thank You" from the One Big Meaning stamp set.  As you'll see later on I added some Wink of Stella and some rhinestones for some glam.

6.  I stamped the inside panel of the card with a sentiment from Painted Harvest and the flower from Amazing You.  I also stamped the back of the card with the flower and my logo stamp.  Another flower was stamped on the matching envelope. 

7.  Because I wanted to mail these cards locally instead of making a special trip to the postal station in town, I kept them very simple.  I added Clear Wink of Stella to the centers of the larger flowers and some of the greenery so there was some sparkle and shine without being weighted down with embellishments such as rhinestones.


I decided to add some Basic Rhinestones that I'd coloured with a purple Sharpie Marker to two of the cards I planned to hand deliver.  I also added some Wink of Stella to the flower centers before setting the rhinestones. 

The great thing about these cards besides, being super simple and fast to make, is that by having minimal to no embellishments added, they are inexpensive to mail. That's right - no extra postage and nothing to get mashed up in the postal machines. 

Thanks for dropping in and visiting my blog this week. I hope you enjoyed my project and that my tips on how it was designed were helpful. I love reading comments so before you go if you can leave me a few words of encouragement you'll make my day. 
 
Don't forget to check out the other Design Team Artist's at the Watercooler Wednesday Main challenge page. To get a closer look at their creations simply click on their name below their sample picture. Until next time..........


Happy Stamping!
Penny Tokens Stampin Spot

Wednesday, January 24, 2018

Watercooler Wednesday WWC154 Judy's "All About Christmas" Challenge

 
The days are starting to get longer although they seem to be flying by just as fast if not faster than a month ago.  I haven't been able to scrounge up much stamping time or Mojo since the New Year but managed to get my card finished for this week's Watercooler Wednesday "All About Christmas" Challenge being hosted by Judy Markowitz.  Nothing like getting an early start on making my Christmas cards for next season!  
How about starting your Christmas stash early too. Make a card or project and link your creation with the InLinkz at the bottom of this challenge.  It's easy!

Here's some details:
          1.-No back-linking to previous posts, your must be a new project.
          2. You must link your project back to our challenge 

          3. You must link directly to your post, not simply your general blog.
          4. Can't be linked to more than 8 challenges including ours.
          5. Have fun!

Oh, and don't forget to  use the link-up below to share your project.  The Linky closes Monday, January 29th at 5:00 p.m. Mountain Standard Time.


Here's My Card:

I've made another fun Twist N' Pop card for this week's challenge.  Hands down this card style is one of my favourite fancy folds, and you'll see many examples of it on my blog.  If you're interested in making one simply click here and check out this post for all the measurements and my working template. 

Outside Details:
One of the things I really like making for these Twist N' Pop cards is the belly band.  The belly band is "the keeper of the gate".  It's what holds back the mystery of these special cards.  Honestly with a good belly band you have absolutely no idea what's going to show up inside the card until it comes off.  What fun!
For that very reason I try to make the belly band extra special.  For this card I wanted the sentiment to be bold so I chose the Special Delivery sentiment from Merry Little Labels.  It's stamped in Cherry Cobbler ink on Whisper White card stock and cut out with the large oval from Stitched Shapes Thinlets.  

For some glitz n' glam I cut out a larger oval from Red Glimmer Paper and mounted that with foam tape behind the sentiment layer.  I added a 3/4" x 4 strip of designer paper on the front of the band and then attached the Special Delivery label with Tear N' Tape to the center front.

The card front itself is very simple and has no embellishment.  I added a 5 1/4" x 4" layer of Whisper White card stock followed by a layer of patterned paper   from "Season of Style" DSP. This paper was around a few seasons ago and I still absolutely love the colourful zig zag pattern.   The chevrons of colour are Early Espresso, Crumb Cake, Cherry Cobbler and Old Olive.  Perfect!


When the belly band comes off it reveals Santa Claus and his pack of reindeer, in all their festive glory. 
Inside Details:
Every Twist N' Pop card I make has an inside story. This one begins with Santa's Reindeer, who're eager and ready to "guide his sled tonight". I stamped the reindeer images with Stampin' Ups! Cookie Cutter Christmas which was carried over from last year. I stamped them with Momento Tuxedo Black ink on Crumb Cake and then fussy cut out all those cute little heads with my detail scissors. If you don't like fussy cutting there's a coordinating builder punch.


Using an oval or other shape as a support when you're grouping images really helps to hold them together, so I cut a 3" oval from Whisper White for these ones. Rudolph's shiny nose was cut from Red Glimmer Paper and I scattered some red sequins about for extra shine. I also added a 5 1/4" x 4" piece of Season of Style designer paper to this panel. 

I kept the bottom panel of the card very simple by only adding a 5 1/4 x 4" layer of Whisper White card stock.  I stamped Merry Christmas from Teeny Tiny Sayings in Cherry Cobbler and cut this piece and the Old Olive layer out with the two coordinating dies from the Stitched Sayings Thinlet set.  

Center Panels:
There are four center panels each adding a little bit more to the story and helping to support the greeting.  
The first panel represents the homes waiting for Santa's special delivery and consists of three layers of images.  It starts with a 3 1/4 x 2 1/4" piece of DSP followed by a 2" x 3" piece of Whisper White card stock.  I cut out the sky with the Card Front Builder dies and added a piece of silver shimmer paper behind the Whisper White panel to light up the night sky.  The houses were cut from Basic Black card stock with the Home Town Greeting Edgelit and placed on a slant.  I used the retired Sleigh Ride Edgelits to cut out the final layer of sleigh and horse from Whisper White card stock.  
The second panel is Santa's Suit and is simply constructed from Cherry Cobbler and Basic Black card stocks.  I added a silver glimmer paper square for the belt buckle and some Black Basic Rhinestones for the buttons.  

For the third panel I stamped the Santa Claus image from Cookie Cutter Christmas on a piece of Whisper White Card Stock and cut this panel out with the Pinpoint Rectangles Die. I cut out two more panels from Whisper White and Cherry Cobbler card stock and attached the Santa panel to them before adhering to the DSP.   I stamped and fussy cut a second  Santa image and coloured it with markers and Wink of Stella on the bear, cuffs and hat.

The fourth and final panel has a layer of Old Olive that was embossed with the Holly Textured Impressions Embossing Folder.  The sentiment "Just for You" is from the Merry Little Labels stamp set and the sprigs of holly were cut out with the Card Front Builder die set


Supplies:
Stamp Sets: Cookie Cutter Christmas, Merry Little Labels, Teeny Tiny Sayings
Card Stock: Whisper White, Cherry Cobbler, Basic Black, Old Olive
DSP:  Red and Silver Glimmer Paper, Season of Style (R)
Ink: Momento Tuxedo Black, Cherry Cobbler and Old Olive
Accessories:  Big Shot, Paper Trimmer, Detailed Scissors, Dimensionals, Foam Tape, Tear N' Tape, Black Rhinestones, Wink of Stella, Home Town Greetings Edgelits, Memory Box Pinpoint Rectangles #30065, Holly EF, Stitched Shapes Ovals, Sleigh Ride Edgelits, Card Front Builder Thinlets, Large Oval Punch,

I hope you enjoyed today's Watercooler Wednesday Challenge and that you've had time to check out my template and tutorial on my previous post just click here.. I also hope you've checked out the entries from all the Design Team members at the Watercooler Wednesday challenge as there are so many great ideas and inspiration.

Happy Stamping!
Penny Tokens Stampin Spot  

Wednesday, December 20, 2017

Watercooler Wednesday Challenge #150 - Heidi's Masculine Anything Goes - Two Week Challenge

Hi stampers!  Christmas is just around the corner and I don't know about you, but I'm way behind this year with my card making and Christmas preparations.   I've been thrown off schedule with all the events happening where I live and company, but I wouldn't have changed it for the world.  Life happens!  

With that in mind, this week's Watercooler Wednesday challenge is going to span two weeks instead of our regular one week, to accommodate everyone's busy schedule and Christmas week.   I think everyone will give a round of applause to our Administrators for arranging that.  I know I will.  

Remember this Linky doesn't close until Monday, January 1st, 2018 at 5 p.m. Mountain Standard Time, so you've got plenty of time to get crafting.   All you need to do is follow a few simple rules and link up your post to our blog using the Linky.  Check out the details on Watercooler Wednesday Challenge blog's home page. Hope you'll join us.

Here's My Card:
 

This week I'm adding to my Masculine birthday stash and have chosen a country western theme for those male friends and relatives who are "a little bit country". 

Supplies:
Stamp Set:  Country Living, Basic Butterfly and Cupcakes Clear Stamps, Howdy from Artful Impressions
Card Stock:  Whisper White, Crumb Cake, Early Espresso
DSP and Specialty Papers:  Coffee Break DSP, Gold Foil 
Ink:  Early Espresso, Crumb Cake and Momento Tuxedo Black, H2O Twinkles
in brown shades
Accessories:  Big Shot, Paper Trimmer, Circle Dies, Sponge Daubers,Stamp-a-ma-jig, Tom Bow Adhesive, Dimensionals, Aqua Painter.

When I began making this card I couldn't decide whether I wanted to showcase the boots or the guitar from the Country Living stamp set but after a few trial runs, I wound up doing a bit of both. 
 
Country Living Stamp Set
The Details:
The card base is an 8 1/2" x 5 1/2" piece of Crumb Cake card stock that was scored and folded at 4 1/4".  I added an Early Espresso layer that measured 5 1/4" x 4 followed by a 5 1/7" x 3 7/8" piece of the coffee ring paper from the Coffee Break Designer Series paper pack. 


I added three more layers to the card front  a gold foil, an Early Espresso and a Whisper White.  When I was trying to decide how to feature the guitars, I began stamping using my Stamp-a-ma-jig to place the guitars end to end on a larger sheet of Whisper White card stock.  I stamped the guitars in Early Espresso and coloured them with a wash of Crumb Cake and the H20's.  

I had a small Artistic Impressions stamp that said "howdy" that I thought would lend to the country feel and I stamped it randomly between the guitars with Early Espresso ink.  

I splattered Crumb Cake and Early Espresso inks over this panel to give it a weathered look.  When I finished stamping I cut this panel to 3" x 4 1/2" and adhered it to a piece of Early Espresso that measured 3 1/8" x 4 5/8".  This panel was attached to a 3 2/8" x 4 6/8" Gold Foil panel with Dimensionals.  The Gold Foil panel was glued to the center of the DSP panel. 

Love those boots.  I started out by stamping the boots with Momento Tuxedo Black ink on a piece of Whisper White card stock and then I applied a wash of Crumb Cake ink with my Aqua Painter.  I layered on Early Espresso and some of my H2O inks in various shades of brown to finish off the design.  In real life the boots look pretty leathery which was the look I was going for.  The boots were added to the front layer with Dimensionals.


I stamped the "Happy Birthday" sentiment from my Cupcake Clear Stamps set on a piece of Whisper White card stock and cut it out with a 1 1/4" circle punch. I sponged the edges of the circle with Early Espresso.   I cut additional circles from Early Espresso and Gold Foil and layered the sentiment to them.  The Dots are from my stash and I can't remember the Manufacturer.  

The inside of the card features the "Happy Birthday" sentiment from the Basic Butterfly stamp set, some more of the Coffee Break paper and a spare guitar that was left over from my earlier efforts.  After I took the pictures of the inside of the card I actually added a 1/4" x 5" strip of Early Espresso to cover the meet lines between the DSP and the White card stock.  It was an afterthought but worked well.

Well that's it for today's post.  Just a simple card, but I know it will make one of our friends very happy. How about you, do you struggle with themes for your masculine cards?  Do your like the country theme in this card?  I'd love to hear your thoughts on this and my card.

If you haven't already done so don't forget to drop by and check out the awesome masculine cards contributed by the rest of the design team.  They're pretty stunning and inspiring.  Just click here to return to the Watercooler Wednesday WWC150 Challenge.  Thanks for stopping by!

Happy Stamping!
Penny Tokens Stampin Spot

Rock Star Masculine Birthday Card

We finally have some good weather and have spent the week tidying up in the garden and the garage.  Visits to the recycling plant to get rid...