Showing posts with label Christmas Cards. Show all posts

Tuesday, November 10, 2020

Using Up Paper Scraps - Layering Circles

Welcome to my blog post today.  I love to find simple techniques for using up paper scraps and today I want to share a quick and easy one that turns nested or layered circle dies into some pretty fancy cards.  

When I saw a masculine card on Pinterest created by Sue Vine  of Miss Pinks Craft Spot I knew I had to try this out.  There are lots of different versions out there but I liked the simplicity of her card.  Here's Sue's card: 

Here's My Version of a Layered Circle Masculine Christmas Card:

I have a couple of gentlemen friends that love getting my Christmas cards, so I'm always challenged to come up with a special masculine designed card. Because they like rich but neutral tones, I chose a mix of non-seasonal designs from the Classic Christmas DSP in Whisper White, Cherry Cobbler and Sahara Sand.  

I've been using these papers a lot since they released the Curvy Creations bundle and I love them so much I just might have to order another package before they are sold out and gone forever. 

The card base is an 8 1/2 x 5 1/2" piece of Cherry Cobbler card stock scored at 4 1/4".  The first layer is a 5 1/4" x 4" piece of Sahara Sand and the second layer is a 5" x 3 3/4" piece of Whisper White, that's been embossed with the Tasteful Textile 3D Embossing Folder to give this layer a bit of depth.  

For the swirling circle design I die cut three progressively sized circles using the Stitched Shapes Circle Dies.  These circles were cut in half then layered together and adhered with Tom Bow glue starting at the circle's edge.  It's best to use a liquid glue rather than snail, because you may have to shift the circle into place.   

Once the half circles were glued together I lined up each half of the circles on the center of the Whisper White layer and then glued them down with Tom Bow adhesive.  Note:  I didn't realize until I had them down that I should have layered the second half circle in the opposite layer so when they were put together the wave would be continuous.  Oh well.  Live and learn.  

The Stitched Shapes Die set is one of those classic "must haves" for your stamping tool kit.  It has nested dies for ovals, circles and squares so you can do a lot with it, not to mention spruce up your designs with the lovely stitched edges on your die cuts.   


The "Merry Christmas" sentiment is from the Curvy Christmas stamp set.  Its stamped in Cherry Cobbler ink on a scrap of Whisper White and I cut it out with the Rectangle Stitched Dies dies.  The sentiment was mounted on a 5 1/4 x 1/2" piece of Crumb Cake card stock............ and yes, this is another goof up.  It should have been Sahara Sand, but I grabbed the wrong scrap.  Anyway before adhering this strip I embossed it with the Tasteful Textile embossing folder.

To finish off the card front I stamped two of the holly leaf images from the Christmas Gleaming stamp set in Cherry Cobbler ink on scraps of Cherry Cobbler and Crumb Cake and then fussy cut out both images. These were glued together then attached to the card face with dimensionals.  A few Cherry Cobbler leaves were cut with a die cut from the Sunflower Die set and added to the flower bunch. To complete the card face three Cherry Cobbler rhinestones were added in the top right corner.
I'm so happy Christmas Gleaming stamp set was transitioned into the Annual Catalogue from last year's Holiday Mini.  I love the sentiments  and the ornament images and holly sprig stamp so clearly.  I think this is a classic stamp and I'll be using it for years to come. 

I kept the inside of the card very simple. A sprig image from the Curvy Christmas Celebrations set was stamped off in Cherry Cobbler ink and then I stamped the Merry Christmas again across the sprig.

I also created a matching envelope by stamping the Holly design a few times in the bottom left corner of the card front in Crumb Cake and I covered the flap with the coordinating designer series paper.  

Supplies Used:

Stamp Sets:  Curvy Christmas for the Sprig and Merry Christmas sentiments, Christmas Gleaming for the holly berry image 

Ink:  Cherry Cobbler, Crumb Cake

DSP:  Classic Christmas 

Embossing Folder:  Tasteful Textile 3D 

Dies:  Stitched Shapes Dies - Circles 

Card Stock:  Whisper White, Crumb Cake and Cherry Cobbler

Elements:  Holiday Rhinestone Basic Jewels

I made a second card for a November birthday using the same technique.  This feminine version shows the versatility of this quick technique.  

Here is my  card:


Supplies Used:

Stamp sets:  Very Versailles #149275 for both sentiments on the card front 

Graceful Garden #143849 Retired.  For Rosebud on card front and inside and for the lattice on the envelope.

Here's a Card #149438 for the Happy Birthday on the inside of the card.

DSP:  Peony Garden #152483 6 x 6 sheet for three circles, Envelope Flap 2 1/4" x 5 7/8", 5 1/4" x 5/8" strip for inside of card. 

Inks:  Momento Black and Gray Granite inks.  Light/dark Petal Pink and Gray Granite Stampin' Blends.

Dies:  Stitched Shapes Circle Dies - largest of four dies 

Card Stock:  Gray Granite 8 1/2" x 5 1/2" for base and strip 3/8" x 5 1/4". Whisper White, 5 x 3 3/4" for front layer and 5 1/4" x 4" for inside layer.

Accessories:  Basic  Rhinestones

I love this Birthday card. I didn't make the same mistakes putting the circles together as I did with my first sample and it really makes a difference when you can see the proper flow.  

I'm astonished at how quickly this card comes together, with the hardest part being the choosing of papers and colours. The combination of Petal Pink and Gray Granite together is ultra soft and feminine and I'm impressed with the designer paper.  This card could have just as easily been for a wedding.  


 I hope you enjoyed today's post and the Layered Circles technique.  It's such a great way to use up your scraps.  Let me know if you try it out. 

HAPPY STAMPING!
PENNY TOKENS STAMPIN' SPOT

Penny Hanuszak, Independent Stampin' Up! Demonstrator

November Hostess Code: ZZ49FQKS

Click here to shop in my 24/7 Online Store 


Don't forget to apply the November Hostess code if you order is under $200.00 before shipping and handling. You'll get a free gift from me. If you place an order over $200.00 before shipping and handling, you will automatically earn Stampin' Rewards and can pick out your own free gifts. Everyone who orders from me will received a thank you card as I so appreciate your orders. 

Monday, November 9, 2020

Warm and Toasty Snowflake Card - Freshly Made Sketches 460

This week Judy at Freshly Made Sketches has chosen a sketch that has plenty of room for stamping and adding details.  Here is her sketch:

Here's My Card:


My card features the Polar Bear from Stampin' Up!s Warm and Toasty stamp set. What fun I had colouring this big guy. 


I used Pool Party, Misty Moonlight, Balmy Blue and Smokey Slate Blends.  The beautiful snowflake filled designer paper is called  Snowflake Splendor.


The inside of the card has a strip of the gorgeous Snowflake Splendor designer paper and a sentiment from the Warm and Toasty stamp set.


Well that's it for today's post, I hope you like this card.  Drop by and leave me a comment I'd appreciate hearing from you.  


Happy Stamping!
Penny Tokens Stampin' Spot 
Penny Hanuszak Independent Stampin' Up Demo 

NOVEMBER HOSTESS CODE:  ZZ49FQKS
Apply the hostess code at the end of your order if it is less than $200.00 before s&h.  I will send you a free gift.  If your order is over $200 don't worry you'll earn Stampin' Rewards and be able to pick out your own free gift.  Thank you cards for all orders. 
Click Here to Shop 24/7 at my Online Store

Thursday, November 5, 2020

Having Fun With Curvy Celebrations


This week I'm so excited to share some of my creations made with the Curvy Christmas and Curvy Celebrations bundle which is now available for purchase. So let's get to it.


This was a great value bundle for me as it includes two stamp sets - Quite Curvy and Curvy Christmas along with matching dies and the Classic Christmas Designer Series Pack.  


Here are two of the cards I made using the Classic Christmas paper and the Curvy Christmas stamps and dies.  I'm in love with this paper pack which features Cherry Cobbler, Sahara Sand and Shaded Spruce papers.  


Both cards feature the same simple design. I began with an A2 card base measuring 8 1/2" x 5 1/2" and scored at 4 1/4". The first layer of card stock measures 5 1/4" x 4". On the Cherry Cobbler card I cut this layer from a sheet of the Designer Paper that I used in the block design. For the Shaded Spruce card I started with a Whisper White Card Base and added a layer of Shaded Spruce.

The next layer on both cards is a 5" x 3 3/4" piece of Whisper White that is embossed. For the Cherry Cobbler card I embossed with the Snowflake embossing folder and for the Shaded Spruce one I used the Lucky Stars (retired) embossing folder.  

For the layered squares I cut two contrasting pieces of DSP into four blocks (2 of each design) measuring. 1 1/4" x 1 1/4" . I backed them with a layer of 1 3/8" x 1 3/8" card stock, then attached them with Tom Bow adhesive.  

For the beautiful flowing Whisper White card strip I used the dotted curvy line die and cut a piece measuring 5 1/4" x 2".  I cut a strip of coloured card stock measuring 3/4" x 5 1/4" and glued this to the back of the white curvy strip leaving 1/8" visible from the front.  I stamped the sentiment "May Your Days Be Merry and Bright" from the Curvy Christmas stamp set.  This strip was centered on the card face and attached with Tom Bow glue.  A few basic rhinestones in coordinating colours were the finishing touch.  

The inside panels for both these cards were made with a 5 1/4" x 4" piece of Whisper White card stock.  I adhered a 1/2" x 4" piece of DSP that coordinated with the card front down the right side.  For the sentiment I stamped off one of the branches on a scrap of paper and then stamped it in the center of the card.  By stamping off first, you lighten the tone of the ink.  Next I stamped the "Merry Christmas" sentiment over the leaf.   


For the Shaded Spruce card I moved the DSP strip to the left side and I used a different leaf sprig.  

Well that's it for today folks, but I'll be back with more Christmas cards featuring the Curvy Christmas set.  I hope you liked these two and will incorporate this design into your projects.  It's a great way to use up your stash of designer paper, and quick and easy to do.  

Happy Stamping!
Penny Tokens Stampin' Spot
Penny Hanuszak Independent Stampin' Up! Demonstrator 

November Hostess Code:  ZZ49FQKS
Add this hostess code if you place an order in my online store that is less than $200.00 before s&h and sales tax.  If you have an order that is over $200 please do not apply this hostess code, as you will receive your own Stampin' Up! rewards.   

Click here to go to my on-line store 

Monday, September 7, 2020

Confessions of a House Bound Paper Crafter

Between the loss of my mom in June and the COVID-19 thing, I've been having a very difficult time paper crafting and doing the things that truly make me happy.  

I have to be honest here and let you know I really, really  miss my mom and I miss my friends and hanging out with them.  I miss our get-togethers and fun card making times.  And although I read all kinds of motivating stories about demos that are doing this and that to carry on their Stampin' UP! relationships, quite frankly it makes my head buzz and I get tired.  

I don't know whether it's the times we live in or I'm just getting older, but I haven't figured out how to engage my friends and customers by holding Zoom and Facebook meetups and the whole virtual media thing tires me out.  I guess that's why I haven't had much MOJO going on and seem to be spending my time binge watching Netflix and trying to think my way out of this funk instead of yakking with you all and posting cards and projects.  

To my credit, I have to say my leisure time hasn't been all about watching the latest episodes of Frankie and Grace I actually have spent some time in my card studio reorganizing and doing lots of serious cleaning and purging.  One day I'll do a tour of my room, but for now this is what it's looking like:


When I've had the energy and mind, I've also been finishing up old projects, using up scraps of designer papers and retired card stock I've accumulated and trying a few new things.  I haven't felt very challenged though, until I saw this clean and simple sketch challenge from Freshly Made Sketches and it called my name.

So here's to the first challenge of the month (year actually) and what I came up with.  Hopefully I can continue to find inspiration and challenges that re-motivate me to stamp and I can continue to share with you in some form or other.    


For this card I used the Trimming the Town Designer Series Paper for my background and one of the layers.  I like all of the papers in this suite.  They're colourful and appealing in every way.  

My card base is Poppy Parade with a layer of Pool Party.  The cute little gnome is from the Gnome for the Holidays cling stamp set.  

The sentiment "There's no place like GNOME for the Christmas Season", was perfect for this card.  This card may not meet the visual "clean and simple" criteria of Freshly Made Sketches challenge #451, but it sure was simple to make. From start to finish this card took about a half an hour to make.  Having a sketch you can work with, is a great way to nudge your creativity.   You have to like that.  


I coloured the gnome with Stampin' Up! Blends, matching up the colours in the Trimming the Tree DSP ... Poppy Parade, Garden Green, Pool Party, Old Olive, Smokey Slate, Daffodil Delight and Crumb Cake.  I also added a little shine to the gnome's nose and the Christmas lights with Nuvo Drops.

Thanks for bearing with me through this rant and glimpse into my personal difficulties with procrastination and lack of motivation.  And, hopefully my card for the sketch challenge has inspired you to pick up your card supplies again and get crafting. 

I'd love to hear how you've been coping and creating.  If you're not motivated like me, I'd love to hear your story too, maybe we can work this out together.  In the meantime......

Happy Stamping!
Penny Tokens Stampin' Spot
Penny Hanuszak, Independent Stampin' Up! Demonstrator 

SEPTEMBER HOSTESS CODE:  NA46AR73


Wednesday, May 23, 2018

WWC171 - Heidi's "All About Christmas" Challenge


This week the wonderfully talented Heidi Weaver is our hostess for the "All About Christmas" challenge at Watercooler Wednesday.  

I personally love these seasonal challenges as they really help me get an early start on my Christmas cards.  How about you?  Would you like to join us in making a Christmas themed project or card?  If so check out all the information on our home page.  This challenge is open until 5:00pm Mountain time on Monday May 28th, 2018.

Here's My Card:
I had so much fun making this Christmas card today and I'm delighted to share it with you.  

As you're probably aware by now, Stampin' Up! has revamped it's colour families and the new colours will be available in the release of the new Annual Catalogue on June 1st, 2018.  I can't wait that long however, so I though I'd give you a sneak peak at one of my favourites from the newly revamped "Brights Collection".  It's called "Gorgeous Grape".

I'm a big lover of purple and honestly I haven't felt this giddy about using purple in my Christmas card making since Stampin' Up! retired Concord Crush several years ago.  Check out these two favourites: November Christmas Card Class and Monkey86: Holidays & Sketch Challenge

So here's my Walking in the Winter Woods:


Just imagine it's around supper time in late November, and the sun is disappearing over the hillside as you finish your walk in the woods.  Snow is softly falling and the light is reflecting those last rays............


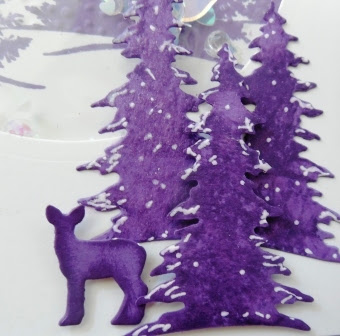
These beautiful trees and deer were die cut using the recently retired Card Front Builder Die set. These die cuts were perfect for adding an upclose scene to the bottom of the card.  I glued two trees to the card front and acetate window panel and then attached the deer and single tree with Dimensionals.  Before attaching these elements, I ran the Scenic Seasons tree stamp and Gorgeous Grape ink over the die cut tree to give the illusion of branches, and coloured around the edges with a sponge dauber. I also dabbled White Gel Pen around the tips of the trees and painted on a generous coating of Clear Wink of Stella.  These trees really shimmer and look like they have a fresh coating of snow.   


Supplies:
Stamp Up Stamp Sets:
Carols of Christmas (R), Christmas Bliss (R), Scenic Season (R)
Card Stock and Designer Papers:
Gorgeous Grape (New), Whisper White and Window Acetate 3 x 3 Sheet
Inks:  
Gorgeous Grape (New), Versa Mark
Accessories:
Big Shot, Paper Trimmer, Card Front Builder Die (R), Circle Thinlet Dies (R), Stitched Shapes Circle Dies, Wink of Stella, White Gel Pen, Sparkle Blends - Fairy Dust from Doodles Paper, Modern Label Punch, Softly Falling Embossing Folder, Heat Gun, White Embossing Powder, Adhesive Strips, Tom Bow Adhesive and Dimensionals.

Details:
1.  The card is an A2 Shaker Card with a top fold.  The base measured 4 1/4 x 11 and is scored at 5 1/2".  

2.  A 5 1/4" x 4" layer was cut from Gorgeous Grape card stock.  Before adhering this layer to the base I die cut the trees and deer from  the center of the card stock.

3.  The next panel is 5 1/8" x 3 7/8" and I cut a 3 1/4" circle in the top half.  

4.  For the window cover I cut a 3 1/2 x 3 1/2" piece of Window Acetate and adhered to the back of the panel in step 3.  Before adhering I wiped the Acetate Window sheet with my Stamping Buddy to remove any static electricity. To build the shaker wall I built a circle shape using adhesive strips and the cut circle as a guide.  

5.  The next layer is a 4" x 4" Whisper White panel that adheres to the back of the shaker outline.  I stamped the tree scene from Scenic Seasons in Gorgeous Grape and embossed to the bottom of the tree line with the Softly Falling Embossing Folder.  The dots from the embossing folder on the tree were gently sanded so it looked like fresh fallen snow.  

6.  I added Sparkle Blends Fairy Dust from Doodles Paper Playground to the inside of the shaker circle before adding the layer from step 5.  I added additional Adhesive Strips to this layer and mounted it to the card front.  

7.  I stamped the sentiment "Seasons Greetings and A Happy New Year" in Versa Mark ink on a scrap of Gorgeous Grape card stock and then heat set it.  I used the old Modern Label punch to cut out this sentiment and attached it to the top of the Acetate circle on the card front with Dimensionals.  

8.  Details related to the tree and deer scene at the bottom of the card are noted above in the photos. 

7.  I stamped the Peace on Earth sentiment from Carols of Christmas in Gorgeous Grape on a scrap of Whisper White and then cut it out with the 3" circle from Stitched Shapes dies.  This was mounted on a 3 1/4" circle of Gorgeous Grape cardstock and mounted to the inside of the card.  

I hope you enjoyed my Christmas card today.  Although it's not considered a traditional Christmas colour I think the Gorgeous Grape is very regal and works perfectly in creating this scene.  I'd love to hear your thoughts and suggestions for stamping with non-traditional colours in your creations.  

If you haven't already visited the other Design Team Artists I hope you'll revist the links before moving on.  Click here to return to the home page. 

Happy Stamping!
Penny Tokens Stampin' Spot 

Paper Pumpkin Alternative April 2024 Delicate Wings and TSOT Challenge:

I'm quite liking this sketch challenge by the gals at T ry Stamping on Tuesday (TSOT) , so have decided to give it a go.  This is a thre...