Thursday, August 7, 2014

Paper Craft Crew #102 - 1 of 3 Featured Artisan's

I just found out that I was one of the featured artisans on Paper Craft Crew Sketch Challenge #102.  this fun sketch challenge.  Click here to see Heidi Weaver and Crystal Komora's great cards!  Nice to be in such great company!

Happy Stamping!
Penny Tokens

Wednesday, August 6, 2014

Birthday Gift Bag

Nothing in my book beats a beautifully wrapped gift for someone.  I think it really shows how much you care.  Last week it was my friend Linda's birthday and I had an opportunity to do just that.  

I had her present, and I'd made her a card, but I just didn't have the right gift bag for her new Infinity scarf.  What to do?  What to do?

I checked through my stash of Designer Series Paper found some that was relatively close to the colours I used for her card and quickly put together a beautiful gift bag for her.  

Here's What I made:
The gift bag and card were a big hit! 


The paper is from the Watercolour Wonder paper pack (now retired).  I matched up Calypso Coral, Cantaloupe Crisp and the DSP to make a gorgeous flower.

I added some white sparkly tulle that was cut in narrow strips and then  tucked in between the leaves and the flower.  The tulle shimmers and adds a whimsical look to the flower.  I'm so happy the Vintage Faceted Designer Buttons are back in this season's catalogue.  They are one of my all time favourites.  These glass like buttons add just the right touch to the center of this flower.  A large basic pearl crowns the center of the button.  
When I made the flower I staggered the petals so all the gaps were filled.  The cardstock petals were embossed with the Beautiful Baroque embossing folder and then I sponged all the edges to give them a darker hue.  I assembled the layers of the flower with a glue gun.  Tip:  To get rid of all those glue wisps that seem to catch on everything when you're using a glue gun, keep a hair dryer on hand and at the end of your project, just heat set the wisps.  Like magic they disappear.
I hope this post has inspired you to make gift bags of your own.  If you would like to attend a class and make a matching bookmark, gift bag and card, check out my event calendar for details.  I plan to do an August class.

Happy Stamping!
Penny Tokens

Can You Case It CYCI30 Challenge

Sheri and I just discovered Can You Case It  challenge blog and we were excited to try out this week's sketch challenge #CYCI30 for our second card on Tuesday.  

If you're visiting this site be sure to check out their "Challenges" link on their right sidebar.  It will provide all the details about their weekly challenges which being on Sundays and end on Saturdays.  Each week there is a different theme:  sketch, colour, pick a page, scrapbook/cards Project Life, and Holiday. This is an interesting site that I know I'll be visiting.

This week is a Sketch Challenge and here is sketch #CYCI30:
Sheri and I both liked this sketch because of it's simple style and layering. The two of us are such "layer queens". Our hardest choice was deciding on the card's theme and then what colours to use. 

For my card I wanted to combine the Stippled Blossoms stamp set and the Back to Black DSP series paper but hadn't chosen any contrast colours and theme.   

Sheri was in love with the  Just Add Ink Colour Challenge, from last week and decided to do a double challenge card using these colours, and with a little bit of thought, I decided to go along with that choice.  Sheri will be posting her fabulous card on her blog:  Paper Bag Create.  Make sure you go an check it out.   


Note:  Although we both intended to enter our cards in the Just Add Ink Colour Challenge, we'd both forgotten about the International Date Line.  Since Australia is a day ahead of us here in Canada we both missed entering this challenge by "one day".  Too funny.  I'm sure you'll enjoy the cards anyway. 


Here's My Card:
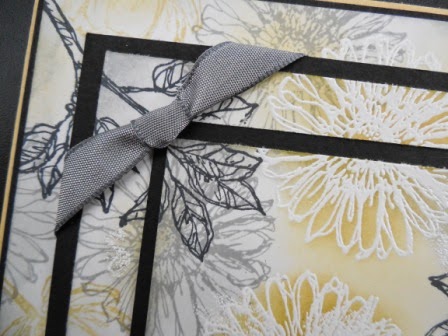
I love this card.  The mix of textures and colour are perfect, even if I do say so myself.  It's got a rich, elegant feel about it.  The Back to Black DSP is simply stunning and really adds the contrast this card needs, while the subtle stamping on the tag adds to the elegance. 

 
The ribbon was added before layers 2-5 were attached to the card base.  The bow was made by using the "Fork Bow" method of tying bows.  Works for me! 


The modern label punch worked out perfectly as a tag.  The best wishes sentiment is from Perfect Pairs stamp set. 

I kept the inside of the card fairly plain by just stamping the flower image. 

Supplies:
Stamp Sets:  Stippled Blossoms, Petite Pairs 
Ink:  Basic Gray, Memento Tuxedo Black
Card Stock:  Basic Gray, So Saffron, Basic Black and Whisper White *
Designer Series Paper:  Back to Black, Glimmer Paper - Silver
Accessories:  Trimmer, Big Shot Machine, Beautifully Baroque Embossing Folder, Scalloped Tag Topper Punch, Modern Label Punch, Corner Rounder punch 
Back to Black Designer Series Paper

How It's Made: 
1.  The Basic Black card base measures 8 1/2" x 5 1/2" and folded at 4 14".

2.  The second layer is Basic Gray card stock and measures 5 1/8" x 4 1/8". 

3.  The third layer is a piece of Back to Black Designer Paper (DSP) measuring 

4 x 5 1/16".  The edges were distressed with a sponge dauber and Basic Gray ink.  

4.  The next layer was a piece of So Saffron card stock measuring 3 1/4 x 4 1/2.  This piece was first stamped with the Stippled Blossom detailed rose in Basic Gray ink and then embossed with the Beautifully Baroque Embossing folder.  

5.  The final layer is the tag.  I chose to cut a Whisper White piece of card stock to measure 2 14 x 5 and then punched out the tag image with the Scalloped Tag Punch.  I trimmed off the excess on the sides and used a corner rounder on the bottom of the tag.  This edges of this tag were sponged with Basic Gray ink and it was adhered to the So Saffron layer with dimensionals.

6.  Stippled Blossoms rose and rose buds were stamped in Basic Gray and Tuxedo Black on the tag.  The sentiment "Best Wishes" from the Petite Pairs stamp set was stamped in Tuxedo Black ink.

7.  I punched a Modern Label from Basic Black card stock and Silver Glimmer paper for the small tag element of the card.  I layered these pieces and added a Basic Rhinestone to the bottom.

8.  Before adhering layers 2 to 5 on the card, I added a strip of 3/8" Basic Gray Taffeta Ribbon and small bow.  

9.  For the inside of the card I added a 5 x 3 3/4" Whisper White layer with a single rose stamped in the lower right hand corner.  

I hope you've enjoyed seeing this card and my details on how to assemble it. Let me know if you've ever prepared a card for a challenge and missed by seconds on the clock..........I'd love to hear your stories.  

Thanks for dropping by I thoroughly enjoyed making this card for you to see.

Happy Stamping!
Penny Tokens
 

Timeless Talk

It's another sunny day here in Abbotsford, and very warm.  But not too warm that you can't muster up the strength to stamp. My stamping buddy Sheri and I spent the morning in my craft room working on some challenge cards.  

We decided it would be a lot of fun to combine a sketch, a theme, and a colour challenge to create our first card of the day. And it was.  What a challenge!
For the first challenge we picked the theme challenge "Cute as a Button" by The Paper Players Theme Challenge #207, called "Cute as a Button" hosted by Sandy Mathis.  For this challenge all you had to do was use one or more buttons on your project.  Easy Peasy!  Make sure you check out all the great cards by the Design Team and submitters for this week's challenge, there are some really great designs! 

For our second challenge, "color", we used the Create With Connie and Mary colour challenge, which features Tangelo Twist, Bermuda Bay and Basic Grey.  We threw in a bit of Whisper White for our stamped image.  I hope you'll check out the amazing designs by the design team and submitters, especially if you're not used to using such bright colours, there are a good range of ideas to work with. 
And for our final challenge we needed a good strong sketch.  We chose sketch #179 by the gals at Try Stamping On Tuesday challenge site.  Not only did we like the sketch, but it seemed appropriate to choose this site because we always "Stamp on Tuesday".   This was a great sketch to work with.  Try Stamping on Tuesday have just added five new gals to their design team, so it's really worthwhile to check out this challenge site.  And, if you have an opportunity to make something, this challenge doesn't close until August 12th, 2014, so there's still lots of time to play along.

Here's My Card:
The card base is Basic Gray and the layers are Tangelo Twist measuring 5 1/8 x 4 1/8" followed by a 5 x 3 3/4" piece of Bermuda Bay.  This piece was embossed with the Arrow Embossing folder and then cut into three pieces and adhered to the card front.  I added 3 small flags cut with the Banner Punch.  I added Washi Tape to two of them before punching.  I also added a strip of Washi Tape in Basic Gray across the bottom of the card instead of adding ribbon.


Supplies: 
Stamp Set:  Timeless Talk, Cycle Celebration and Good Greetings* (Holiday catalogue 2014)
Ink:  Bermuda Bay, Basic Gray
Card Stock:  Tangelo Twist, Bermuda Bay and Basic Gray
Accessories:  Trimmer, Arrow Embossing Folder, Circle Framelits, Basic Rhinestones, Washi Tape, Banner Punch, Small and Large Oval Punches, Stampin' Up Buttons, dimensionals, adhesive
 
Here are the buttons I used for The Paper Players Challenge. They look so cute on these wheels.  Brings back memories of childhood when we decorated our bikes for the May Day parade. 

 
The "Celebrate" sentiment is from a brand new stamp set called "Good Greetings" which is soon to be released in the up coming Holiday Catalogue.  As a Demonstrator for Stampin' Up!, I had an opportunity to get mine free for matching a sales quota in June.  Find out how you can have an opportunity to get this stamp free too, by contacting me.
 
I liked this sentiment and image from Cycle Celebration so stamped it on my card liner in Tangelo Twist and then stamped it again in Bermuda Bay on a scrap of Whisper White Card stock.  I then punched out the center of the sentiment with the large oval punch and mounted the cut out piece with adhesive to the Tangelo image.

 
Well that's it for this post.  It was fun stamping with Sheri today.  We have so much creative energy together and we always come up with fun ideas.  If you're stamping on your own and not having much fun doing it, or your Mojo's not working, think about getting a stamp buddy, it makes life so much more creative and enjoyable!  


HAPPY STAMPING!
PENNY TOKENS 

Friday, August 1, 2014

Just Add Ink Colour Challenge #225

 I couldn't wait to get started on this week's Just Add Ink's Colour Challenge #225 because I truly like this color combo.  I think it's one of my all time favourite combinations.  
 
Here's my card: 

Supplies: 
Stamp Set:  Bloom With Hope
Ink:  Smokey Slate, Memento Tuxedo Black, So Saffron
Card stock:  Whisper White, Basic Black, So Saffron and Smokey Slate
Accessories:  Trimmer, Heat Gun, White Embossing Powder, Smokey Slate 3/8" Taffeta Ribbon, Modern Label Punch, Adhesive, Tom Bow Adhesive

How I Made This Card: 


This card was made with a fun technique known as "Triple Time Stamping".  Although it might not look it, this is a very quick and easy card to stamp and assemble.  Several months ago I posted a tutorial on my post "Fabulous Florets and Secret Garden go Triple Time".   Check out this post for measurements and details on how to make a Triple Time card.  

For this sample, I decided to make a Sympathy card, but with a change of Sentiments, this would make a wonderful Birthday, Thank You or Thinking of You card.  


I used the Bloom With Hope stamp set which is one of the wonderful new Hostess Stamp Sets in the 2014-15 Idea Book and Catalogue. 


You can get this 11-piece sketched design stamp set for FREE by hosting a party with me.  Simply give me a phone call or an email and we can set up a date and time that works for you and your friends. 


The inside of this sympathy card has a verse and flowers from the Bloom with Hope stamp set.  I've lined the interior of the card with two 5 x 3 3/4 inch Whisper White liners to provide extra writing space for special words of comfort.
 
Well that's my card for today.  Hope you liked it and will leave me a comment.  If you're interested in Hosting a Party in your home or mine, let me know.

Happy Stamping!
Penny Tokens 

What's The Big Deal?

August is Here!
How about kicking off the month with a really Big Deal?  Stampin' Up! is doing just that!  

They've come up with a really Big Deal for the whole month of August and I know you're going to be as excited as I am about it.  

Here's the Big Deal:

With every purchase of a "Big Shot" during the month of August you qualify for one of the five FREE stamp and framelit bundles offered below ........ your choice!  Now that's a deal!  


And, for those of you who already own a Big Shot, don't feel left out because Stampin' Up! has a "Big Deal" for you too.  You can purchase any of the bundles below at an amazing 15% discount.    


 Check out the Flyer for all the details:
 
The Fine Print:
  • All sets are available in either wood or clear mount stamp sets. 
  • The Bright and Beautiful stamp set is part of the brand new Holiday catalogue going live August 28th, 2014.
  • You can't purchase The Big Shot and bundles with 
    • hostess credits
    • the 50% off hostess discount or,
    • as part of a starter kits.
  •  There are no limits to how many bundles you can purchase. 
Happy Stampin!Penny Tokens 
 

Thursday, July 31, 2014

Two Card Challenges in One


Today I'm combining two fun challenges for my project.  I chose the first  because of it's awesome sketch and the second challenge because of  it's fun and motivating theme. The end result is a very colourful Birthday Card that I think you'll like.

Banners are always an easy way to add interest and charm to a card face. I think that's what attracted me to The Paper Players #206 challenge. This wonderful sketch has three banners and an oval for the focal point.


Over at the SU Only blog they're holding a "theme" challenge called "Favourite New Toys"  102 All you have to do to participate is make a card or 3D project using something that's new to you in relation to stamping.  That's right, it's all about bringing out the unused toys ....you know, the stash of new stamping stuff that's gathering dust on your work table. What a great motivator!


Here's My Card: 
In my last order I'd purchased the Blended Bloom single wood mount stamp, some Stampin Blendabilities and the All Abloom Designer Series Paper Stack and they've barely been touched, so I think they qualify for the "new toys" category.

How I Put This Card Together:
Unless I've got something specific in mind or I'm creating with a colour challenge sketch I often let the designer paper I pick help me decide what the rest of the colours in the project will be. 

For this card I could have used almost any one of the awesome patterns in the All Abloom DSP pack, but when I saw this small bold print my decision was made. This particular print reminded me of old fashioned wall paper with it's big flowers and tiny background print.  I also really liked the blend of Island Indigo, Daffodil Delight and Mossey Meadow. 
With the All Abloom Paper Stack you get 24 sheets: 4 ea. of 6 double-sided designs. 4 1/2" x 6 1/2". Acid free, lignin free. These coordinate beautifully with Blushing Bride, Daffodil Delight, Island Indigo, Lost Lagoon, Mossy Meadow, Pistachio Pudding, Strawberry Slush, Whisper White, card stocks and inks.


Creating the card front was easy.  I made a standard A2 card base in Island Indigo, and embossed the front of it with the Fancy Fan embossing folder.  For the next three layers, I pieced together Daffodil Delight measuring 3 1/2" x 4 3/4", Mossey Meadow measuring 3 3/8"x 4 5/8" followed by the DSP which measures 3 1/4" x 4 1/2".

Originally I was thinking of colouring the Blended Bloom image with Blendabilities, but I'd only purchased the Old Olive and the Cherry Cobbler sets and they didn't work with my designer paper choice. So I had to put on my thinking cap at this point...... what to do? what to do?

The "aha" moment came when I remembered I had Island Indigo, Mossey Meadow and Daffodil Delight re-inkers and could use them with a colouring technique that works really well with line stamps.  Big grin here! 

The process is simple.  I began by stamping the Blended Bloom image in Versa Mark ink on Whisper White card stock and then heat embossed it with White Embossing Powder.  

Next I sprayed water all over the image until it pooled and then using my aqua painters added ink to the wet surface.  Like magic the ink flows around the embossed edges of the petals and the colours mix to give a vivid image.  I touched up around the edges with the lightest of the Old Olive Blendability markers and I also added some Pistachio Pudding ink on a few of the petals for a softer green look.  

This almost looks like an eye, but trust me it's just the flower center. To give the flower some added colour and dimension I stamped off two additional flower images in Daffodil Delight and Mossey Meadow inks. The Daffodil Delight flower center was cut out with a 11/4" circle punch.  I sponged around the edges with  Island Indigo ink.  I punched out the Mossey Meadow image with  a 1" circle punch, and then coloured in the circle with the three Old Olive Blendability pens.  I finished this image off with a large rhinestone and attached it to the Daffodil Delight circle with a dimensional. 

Before attaching the flower to the card face, I cut three banners from scraps of Island Indigo, Daffodil Delight and Mossey Meadow cardstock, and embossed them with the Fancy Fan Embossing Folder.  A couple of Rhinestones were added to the two outside banners to bring attention to the sentiment "A Birthday wish that's just for you".  This wonderful sentiment and the one on the inside of the card are from the Remembering Your Birthday Stamp set.
I stamped the Blended Bloom in Island Indigo ink on the inside of the card and added the sentiment "friends and fun and presents too! Happy Birthday".

 
 Blended Bloom line drawing stamp is only available in Wood Mount. 


Remembering Your Birthday is a fun sentiment based stamp set that comes in Clear and Wood Mounts and is also available in French and Spanish.


I hope you enjoyed both of these challenges today and will leave me a comment to let me know what your "new toys" you haven't played with yet.  Perhaps you could do one or both of these challenges too.  There's still time.

HAPPY STAMPING 
PENNY TOKENS 

 August 2nd, 2014  Just a Note:


Thanks to Mike Funk at the Paper Players, my card was one of ten cards chosen for the "Cut Above".  Congratulations to the challenge winner, Paula Sievers, from Austrailia,  and all the other noteables!

2024-2025 Annual Stampin' Up! Catalogue has launched!

 HAPPY MAY 1ST| Today I'm celebrating and  sharing the launch of the much awaited Stampin' Up! Annual Catalogue which will run from ...