Friday, May 23, 2014

Petal Parade Double Time Stamping

Unfortunately I didn't get to play much with the free stamps and products I earned from the Sale-a-bration catalogue this year as we were away.  

One of the stamps I had been eager to use was the Petal Parade set.  I liked the look of the flower and leaf images. 

Now that I'm back home and stamping on Tuesdays, I've had an opportunity to ink up this stamp and I love the results. I think you will too when you see these five cards. 
 
Here Are My Cards:

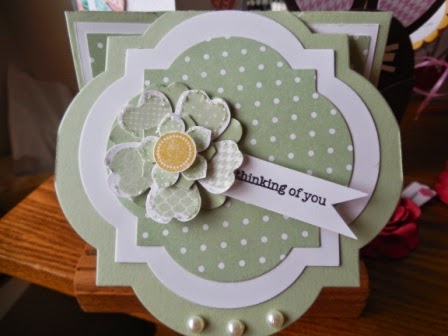
Card One is a Double Time card stamped on Naturals Ivory cardstock. To achieve the double time effect you center the Natural Ivory layer over top of the card base with repositioning tape and then stamp your images all over the cardstock.  Remove the top layer and adhere it to the Always Artichoke layer.  Add the ribbon to this layer and tie a bow.  Take the Always Artichoke layer and adhere it to the card base matching up the flower images that have over lapped and adhere it with adhesive.  
 Supplies:
Stamp Sets:  Petal Parade (SAB 2014 retired), Perfectly Penned
Ink:  Sahara Sand, So Saffron, Always Artichoke, Early Espresso
Card Stock:  Naturals Ivory measuring 4 1/4" x 11" for card base and scored at 5 1/2". Cut another layer to measure 3 3/8" x 4 7/8".  Always Artichoke layer measures 3 5/8" x 4 7/8".  
Accessories:  Ribbon 10 inches in Daffodil Delight, Adhesive, Trimmer
 
The inside of the card was left blank except for the flowers and leaves.

The Happy Birthday sentiment is from the Perfectly Penned Stamp set.

Perfectly Penned a 4 piece stamp set on page 95 of the Idea Book and Catalogue will retire on May 31st of this year. 
 
Card Two:  This is the same as card one but instead of the Naturals Ivory I've used Whisper White card stock.  All measurements and other materials remain the same.  The images are quite a bit crisper on the Whisper White and it doesn't have the homespun a look as Card number One. 

Here are Cards One and Two together.

Card Three is a side-fold card once again the Petal Parade stamp set stamped in the new Stampin' Up! In Colours - Blackberry Bliss, Lost Lagoon and Hello Honey.  

Supplies and Measurements:

Stamp Sets:  Petal Parade, Work of Art (NEW)

Ink:  Lost Lagoon, Hello Honey and Blackberry Bliss

Card stock:  Whisper White card base measuring 4 1/4" x 11 and scored at 5 1/2".  Whisper White layer measuring 3 3/8" x 4 5/8", Rich Razzleberry layer measuring 3 5/8" x 4 7/8" and a Sage Shadow layer measuring 4 x 5 14" and embossed with the Designer Dots embossing folder.  

Accessories:  Dimensionals, Designer Dots Embossing Folder, Big Shot and Trimme


Card Four is a side fold card that uses the Emboss Resist Technique.  This card uses the same cardstock, ink and measurements as Card Three.  The only additional accessories you'll need are a heat tool, Versa Mark Ink, Clear Embossing Powder, Basic Rhinestones and a sponge dauber. 

I stamped the leaves with Versa Mark Ink randomly across the White Layer, covered with Embossing Powder and then heat set it with the heat tool.  I then did the rest of the stamping on the card.  I stamped off some of the smaller flowers so the images were faded.  Once all the stamping was done I rubbed over the embossed areas with Lost Lagoon ink and the sponge dauber to bring colour to those areas. 

Card Five uses the Resist Embossing Technique too but I've changed up the colours and added a small banner.  This is a top fold card.   

The leaves were embossed using Versa Mark ink and Clear Embossing Powder.  The colour was applied with a sponge dauber once all the stamping was finished on the layer.

The sentiment "Fabulous is what you are" is from the Million and One stamp set and is stamped in Coastal Cabana ink on the inside of the card. 

The sentiment on the banner was stamped in Blackberry Bliss on a piece of Whisper White card stock and then cut out using the small banner from the Chalk Talk framelits set.  I used the next size framelit to cut out a piece of Elegant Eggplant cardstock to use as a mat for the sentiment.  The small flowers were cut out with the Itty Bitty Punch. 
 Stamps:  Petal Parade, Perfect Pennants, Million and One.

Card stock:  Whisper White, Elegant Eggplant, Coastal Cabana.

Ink:  Crumb Cake, Blackberry Bliss, Elegant Eggplant, Coastal Cabana, and Versa Mark 

Accessories:  Chalk Talk Framelits, Itty Bitty Punches, Basic Rhinestones, Clear Embossing Powder, Heat Tool, Adhesive, Dimensionals, and a Sponge Dauber.

Thanks for dropping by and visiting my blog.  Leave me a comment if you think these posts are good and inspiring you to stamp or try a new technique.

Penny 
Happy Stamping! 

Thursday, May 22, 2014

Simple Stems a Versatile Stamp Set

Here's another flower stamp set that I think simply rocks, and I'm sad because it's only going to be available for another two weeks.  
It's called Simple Stems and is in the Occasions Catalogue on page 33.  

Simple Stems is a 7 piece two-step stamp set that offers a lot of versatility as you'll see in the cards I'm posting today.  This set coordinates with the Secret Garden Framelit dies.
Wood Mount #133098 $23.95 or Clear Mount #133101 $17.95
Here Are My Cards:  

Supplies: 
Stamp Sets:  Simple Stems, Express Yourself, Blooming With Kindness
Classic Ink Pads: Real Red, Coastal Cabana
Card stock:  Crumb Cake (for base), Real Red, Whisper White
DSP:  Fresh Prints Designer Series Paper
Accessories:  2 1/2" circle punch, Basic Rhinestone Jewels, Dimensionals, Adhesive.
For the inside of the card I used a sentiment from the Blooming With Kindness stamp set.


The Blooming With Kindness stamp set includes six wonderful sentiments along with the gorgeous bloom.  I love the script.

To Make This Card:
1.  Cut Crumb Cake card stock for card base to measure 5 1/2" x 8 1/2" and score at 4 1/4".
2.  Cut Whisper White card stock to 3 3/4" x 5" for the inside of the card.  Stamp with sentiment and one of the flowers.  For the "happy birthday"
sentiment on the card front, cut a piece of Whisper White to measure 1/2" x 3 1/2" and stamp your sentiment in Real Red ink. Cut ends like banners and attach this piece last to the card front.
3.  For the DSP Layer cut 3 coordinating patterns of DSP from the Fresh Print Paper stack measuring:  First - cut DSP to measure 1 1/2 by 5 1/2" and cut in half lengthwise.  Second piece - cut piece to measure 1 1/8" x 5 1/2" and for the Third piece cut it to measure 1/2" x 4 1/4".
4.  Adhere DSP pieces to the face of the card by laying one of the first pieces on the left of the card center, then the second piece and finally the second of the First pieces.
5.  Punch out a 2 1/2" circle of Real Red card stock and attach with dimensionals to card front, overlapping the DSP strips.
6. Adhere the "third" piece of DSP over top of the red circle.  Attach with glue dots and dimensionals. 
6.  Stamp two flowers - one in Real Red and one in Coastal Cabana.  Fussy cut around the edges of each flower and attach at the top end of the circle with dimensionals.  
7.  Add the sentiment banner beneath the flowers, and place basic rhinestone jewels in each of the quarters on the circle, and in the corner of the white banner . 

Another Variation on this Card: All the measurements given above still apply to this second card I made using the Petal Parade stamp set.  I did however  changed up the ink colours to Cranberry Crisp, Coastal Cabana and Delightful Daffodil.  I also eliminated the "third" strip of DSP for this example.  The paper is "Sweet Sorbet" from the SAB catalogue.
Cut the 2/12" circle from Basic Black Cardstock. Stamp the three flowers in Cranberry Crisp, Coastal Cabana, and Daffodil Delight and fussy cut around the outline of each flower.  Adhere to the front of the black circle, just overlapping the top right hand side.  Add basic rhinestone jewels around the bottom edge of the circle.
The sentiment for these cards is from the Chalk Talk stamp set and is cut out with the Chalk Talk framelits. These are still available as a bundle in the Idea Book and Catalogue but only until May 31st. 


Kids Birthday Card Using Simple Stems:

I also made these really cute kid's birthday cards using Bold Brights (Daffodil Delight, Pacific Point and Real Red) card stocks and inks, after seeing a similar layout on Pinterest using this same layout.  It was so cute I just had to make one, which led to more.  

Who would have thought these little mop heads could be made from a "flower" head.  Cute, cute, cute!!!  I'll be looking at my stamps a little more closely from now on. 
Here's the inside of the card.  I kept it pretty simple. Tip:  If you want to keep this card flat for mailing or don't have store bought google eyes on hand, you can get almost the same look using the punch outs from the Owl Builder Punch. 

As you can see I couldn't stop at just one card I made a bunch of them.  It never hurts to have kids cards on hand.  Any combination of these "mop heads" would work for example this could be for a three year old (3) or you could have four for a four year old.  Use your imagination. 
Hope you liked these cards.  I really wanted to show you the versatility of this set and although I didn't use every flower in it,  I'm sure you get the picture.  Happy Stamping and leave me a comment if you liked this post. 

Penny

Sunday, May 18, 2014

Scalloped Tag Topper Punch Gatefold Card

Do you like flowers and butterflies?  How about fancy fold cards?  Do you like learning new techniques?  

Well today I've got all that and more for you, because I want to share a fun gate fold card made with Stampin' Ups! Scalloped Tag Topper Punch

My stamping friend Sheri and I made this card on Tuesday when we were trying out some new techniques.  

We based ours on one made by Linda Bauwin of Stamping With Linda. She called it a "landscape scallop tag topper card" because it is done width wise as opposed to the Scallop Tag Top card that's been around for awhile. Linda has included a video on her post.  

Here's one that is made features the Scalloped Tag Topper Punch on the length of the card or in portrait mode.  I made this one during Sale-a-bration, using the Flower Shop stamp set and the Sweet Sorbet DSP:

Tag Top Closure Card made with the Flower Shop stamp set.
Measurements for this card are:
1.  Card base 8 1/2 x 5 1/2 in basic black
2.  Cut panels for front - Cranberry Crisp measures 2 1/2 x 5 1/4" and DSP panel (Sweet Sorbet) measures 2 1/4 x 5". 
3.  Inside panels measure - Whisper White 3 3/4" x 5" and Cranberry Crisp measures 5 1/4 x 4.  
4.  On 5 1/2" side mark with a pencil 2 3/4" from the top and the bottom.
5.  Pull cardstock through Tag Topper Punch and line up pencil mark with the center of the scallop on the punch and punch.  Repeat on the other side of the card.
6.  Cut off the excess tabs at the top and the bottom of each side by lining up the end of the tag in the channel of the trimmer and then sliding the cutting blade up to the top to remove the little tab and then repeating to remove the bottom tab.  On the right hand side of the card you will need to score the scalloped tag topper and crease.  
7. Once you have removed the tabs on both sides of the card put the card base back in the trimmer with the creased scallop tag topper on the left hand side and line it up with the 4 1/4" line and score.  This will create your front panel.  


Here's My Card:  
   
Here is the front of our beautiful card.  I love the mix of Gumball Green, Island Indigo and Smokey Slate.  You'd think that might be a gloomy colour mix, however it looks so soft and cheerful in this card.   

The inside of the card is stamped in Island Indigo with the Papillon Potpourri stamp set.  Tip:  I like using Clear Mount stamps and acrylic blocks because they offer me more options than wood block when I'm stamping.  For instance, Sheri mounted all four butterflies on Block F (118483) Stampin' Ups! 4 7/8" x 6 inch Acrylic Block, instead of stamping them individually.  This comes in really handy if you're making several of the same card and you want them all to look the same. It allows you to set up the layout exactly as you want it.  Mounting more than one stamp on the block also works well when you're working with multiple two-step stamp images, such as the ones in the Too Kind stamp set.    

In this view you can see the full inside of the card.  There's plenty of room for writing a note or adding an additional sentiment stamp. 

SUPPLIES:
Designer Series Paper (DSP):  Watercolour Wonder DSP Occasions Cattie*
Card stock:  Whisper White, Smokey Slate, and Island Indigo
Ink:  Island Indigo
Stamp Sets: Papillon Potpourri and Chalk Talk
Accessories:  Tag Topper Punch, Chalk Talk Framelit Dies, Beautiful Wings Embosslits, Smokey Slate Taffeta Ribbon, Dimensionals, Basic Pearls, adhesive.
Papillon Potpourri is a 7-piece two-step stamping set featured on page 90 of the IB&C.  It comes in wood mount #132058 $22.95 or clear mount #123759 $17.95.  This set coordinates with the Elegant Butterfly and Bitty Butterfly punches sold on pg. 183. 
Chalk Talk is available in English, Spanish, French and Germany languages.  It coordinates with the 1 3/8" Circle, Extra Large Oval punches on pg 182 of the IB& C and with the Chalk Talk Framelits seen below. 

Chalk Talk Framelits and the Chalk Talk Stamp set can still be purchased as a bundle until the end of May 2014.  By purchasing as a bundle you automatically save 15% of the regular price.  The wood mount bundle #132731 is $53.50 and the clear mount bundle #132730 is $45.75.


* The Occasions Catalogue will be finished it's sales period on May 31st so if you need any of the products used to make this card (with the exception of the Scalloped Tag Topper Punch) you'll have to order by then or they'll no longer be available.  

HOW I MADE IT: 

1.  To make card base cut a piece of Smokey Slate card stock to measure 4 1/4 x 10 3/4".  
2.  Score this piece at 2 3/4" and 8".  Crease score lines.
3.  On 4 1/4" side measure to 2 1/8" and put a mark in pencil.  This will be your punch guide.  Repeat on both sides of the card.
4.  Insert the 4 1/4" side of the card into the Tag Topper Punch and pull all the way to the top of the punch.  Center the middle of the Tag Topper over the pencil mark and punch.  
5.  Insert in paper trimmer and cut away from top edge to the tag and repeat on the bottom half cutting away from the side of the tag to the end of the card.  Repeat on other side of the card. 
6.  To finish inside of the card cut a piece of Island Indigo card stock to measure 4 1/8" x 5 1/8" Adhere to card base.  
7. Cut a piece of Whisper White card stock to measure 4 x 5.  Stamp with butterflies in Island Indigo and adhere to Island Indigo card stock.
8.  To finish outside panels of the card cut two side panels from Island Indigo to measure 1 3/4" x 4" adhere to the card front.
9.  Measure two pieces of DSP to measure 1 1/2" x 3 3/4" and adhere them to Island Indigo panels.  
10. Using Beautiful Wings Embosslits run a scrap of Island Indigo through the Big Shot and attach to either side of the front panels.  I attached the largest butterfly die cut with dimensionals and added four basic pearls down its spine.  
11.  Stamp the "happy Big day" image from Chalk Talk in Island Indigo on a scrap of Whisper White card stock and cut it out with the corresponding die from the Chalk Talk framelits set.  Adhere to the right panel with dimensionals. 
12.  Cut a 10" piece of 3/8" Smokey Slate Taffeta ribbon and fit an end through each of the tabs on the Tag Top punch pieces and tie a box.  
13.  Now stand back and admire your card, it's all done and it was easy peasy! 

I hope you enjoyed this card and find the instructions easy to follow.  Please leave me your comments if you like making these type of cards.  I think this is a design I'll be using often as it gives such a WOW look.  

Thanks for dropping by I sure appreciate it. 

Saturday, May 17, 2014

Fabulous Florets and Secret Garden go Triple Time


Stampin' Up! is retiring two of my favourite floral stamp sets in the next couple of weeks.  The first set I will truly miss is called "Fabulous Florets".  This six piece stamp set offers a lot of versatility with it's gorgeous line stamps.  Whether you're combining these stamps to make a bouquet or using them individually you'll be amazed at how creative you can be with this set.
 
This six piece set comes in wood mount #128574 $28.95 or clear mount #123027 $21.95
The second retiring floral set is Secret Garden, another of my favourites.  This seven piece stamp set is also versatile and teamed up with the Secret Garden Framelits, it leaves other stamp sets in the dust.  For this card I used the leaf image. 


Before these sets retire I want to share a card I cased from Sandi MacIvor of Stampin With Sandi.  Sandi used Fabulous Florets and Summer Silhouettes for her card which features the Triple Time Stamping technique.  I really liked the rich colour combination Sandi used so didn't make any changes there, but I subbed out the leaf image from Secret Garden for the one she used from Summer Silhouettes and changed the sentiment.
I used the "Many Thanks" sentiment from "Another Thank You" Photopolymer Stamp Set.  This beautiful stamp set has sold out in the past few weeks.  Fingers are crossed it comes back in the Annual Catalogue.

Here is my Card:

Supplies:
Stamp Sets:  Fabulous Florets, Secret Garden, Another Thank You
Ink:  Versa Mark, Pool Party, Crumb Cake, Pear Pizzazz, Real Red, Early Espresso
Card stock: Crumb Cake, Whisper White 
Accessories:  White Embossing Powder, Heat Gun, Trimmer, Sponge Dauber, Adhesive

How It's Made:
1. Cut card base from Crumb Cake to measure 4 1/4" x 11. Score at 5 1/2".
2.  Cut two layers from crumb cake measuring2 1/4 x 3 1/2" and 3 1/4 x 4 1/2".
3. Cut three layers from Whisper White card stock measuring 2 x 3 1/4", 3 x 4 1/4" and 4 x 5 1/4".  Also cut a piece measuring 5' x 3 3/4" for the inside of the card.
4.  Use repositioning tape on the back of the two smaller Whisper White layers and attach them to the largest Whisper white layer, so they are stacked. 
4.  Stamp flower image from Fabulous Florets in Versa Mark ink three times from the top right hand corner to the bottom left hand column.  Cover with White Embossing powder and heat set.  
5.  Using Pool Party, Crumb Cake and Real Red randomly stamp additional flower images around the card layers being careful to leave some white space in between and to not overlap flowers.
6.  Stamp the leaf image from Secret Garden or Summer Silhouettes (pg 127 IB&C) three times in Pear Pizazz and twice in Crumb Cake around the perimeter of the card in the white space between flowers.  
7.  Ink up a sponge dauber with Crumb Cake and rub it over the embossed flower images on each of the layers. Later when card is assembled you can daub in other areas of the card that may need some additional colour or blending.
8. Separate the Whisper White layers and adhere the largest one to the Crumb Cake card base.
9. Adhere the other two Whisper White layers to the Crumb Cake layers and then layer these matted pieces to the card front.  Make sure your stamping images line up.  
10. Stamp sentiment stamp image on the front of the card.  
11. Adhere 5 x 3 3/4" piece of Whisper White card stock to the inside of the card.  Stamp floral images on this piece. 
12. Step back and admire your art work!  

I sponged around the edges of the layer for the inside of the card and stamped a couple of the flower images in the lower left hand corner. 

Make sure when you add your layers that all your stamped images lines up perfectly.
I found the embossing really adds a  "wow" factor to this card.  It was amazing, once the flowers were sponged with the Crumb Cake ink they virtually popped off the page. 
 
This card is absolutely stunning when you see it in real life.  The flowers are vibrant and alive with colour and yet by sponging the Crumb Cake around the heat set flowers, you attain a softness that pulls everything together on this card. 

If you like the Fabulous Floret stamp set you'll have to act fast because it will be retiring in a couple of weeks.  Check it out on my on-line store. If you liked this card or want information on the technique, please leave a comment.  Thanks for visiting and come back again real soon!

Penny

Friday, May 16, 2014

Double Gate Fold Card Tutorial


You may have seen cards like this on Pinterest or Split Coast stampers recently.  It's called a Double Gate Fold card.  

I copied my card after watching the excellent video by Dee Slater's  of Create With Dee.  Dee is so creative and always does a great job of explaining the mechanics of her cards.  I liked this card so much I couldn't wait for the video to be over so I could make one myself. 

Using this design, I made two cards, one for Mother's Day and the other for a Birthday.  Both are super cute and really give that WOW factor when they come out of the envelope.  Thanks Dee!

Here's My Cards:
This is how the Double Gate Fold card looks coming out of the envelope.  What a beautiful card front.  I absolutely love, love, love it!  It's so feminine and girly-girl that it simply puts a smile on your face.

I used Pistachio Pudding cardstock and matching InColour 2013-2014 designer series paper with Whisper White cardstock.  The Flower Shop and Petite Petals stamp sets and coordinating punches make it easy to assemble this lovely flower. 


When the card is closed on the inside it looks like this.  You can almost feel the anticipation building while the recipient takes off the belly band and opens the card. Sorry for the bad lighting on this photo.

Okay, the suspense is over.  Here's the inside view of my card.  The hinged part of the gate fold top is achieved using the Window Frames Collection framelits and Big Shot Machine and the carryover of the card front design is perfect.  For the inside flower I stamped the base flower and added a single punched Pistachio Pudding flower using the Petite Petals punch.  The Daffodil Delight center is mounted with a dimensional.  


Supplies:
Cardstock:   Pistachio Pudding, Whisper White
Stamp Sets:  Flower Shop,

DSP:  InColour 2013-2014 Designer Series Paper in Pistachio Pudding

Ink:  Pistachio Pudding, Daffodil Delight, Staz On Black Ink
Accessories:  Simply Scored Scoring Tool, Paper Trimmer, Big Shot Machine, Pansy Punch, Petite Petals Punch, 1/2" Circle Punch Dimensionals, Adhesive, Window Frames Collection Framelits, Pansy Punch, 


Here's my birthday version.  I added a few more flowers on the front of this card and some additional basic pearls on the flower centers.  When I finished the card I wasn't too crazy about my sentiment choice, so I later swapped it out for the "happy birthday" banner from the Itty Bitty Banners stamp set.  Much better!


HOW IT'S MADE:
  1. Using Simply Scored score at 2 1/8" turn the card stock 180 degrees and score again at 2 1/8".
  2. Now turn the piece and score at 4 1/4".  This score line will become the hinge part of the card.
  3. Line up one of the 2 1/8" score lines in trimmer and trim to 4 1/4" line.  Then turn and trim on the 4 1/4" line 2 1/8".  Remove and set aside trimmed off piece for flower petals (see step 12).  Repeat on other side.
  4. Set up your magnetic plate or platform in the Big Shot machine and using the 2nd from largest Window Frame Die place it over the square flap at the top of the card.  Adjust so the bottom of the die is just beneath the 4 1/4" score line.  (if you're above the line and you pass through Big Shot you'll cut off the flap.  If you're too far below the score line, the card flap won't close properly).  
  5. Place the acrylic plate from the Big Shot over top of the cardstock and die, so it's lined up just to the hinge line and run through the Big Shot.  
  6. Trim off the two excess pieces of card stock on either side of the window frame shape with scissors once the die has been removed.  
  7. For the front and inside of the card you'll need to cut two Whisper White and two DSP patterned window frames using the next two smaller dies (refer to the picture).  Layer these die cuts with adhesive and attach to the front and the inside front panel. 
  8. Cut two pieces of Whisper White card stock for the front panels to measure 1 7/8" x 4" and attach to the gate fold panels.
  9. Cut two pieces of DSP for front panels to measure 1 5/8" x 3 3/4" and adhere over the front panels.
  10. Cut a Whisper White panel for the inside of the card to measure 4 x 4.  Stamp the panel with a sentiment of your choice and one of the flowers (see picture above for tip on the flower assembly).
  11. For Belly Band cut a 9 1/2" by 1 12" piece of cardstock to match the card base and then cut a 9 1/2" x 1 1/4" piece of DSP and glue to the cardstock piece.  Once the belly band is assembled wrap it around the card so one piece overlaps the other and secure together with sticky strip.  Make a flower and attach over top of the seam.  This band should slide easily off the card - don't make it too tight.
  12. To assemble the flowers for the card front, inside flap and belly band:  
    • Stamp 3 Flower Shop gingham flowers and punch out with the Pansy Punch. 
    • Stamp 3 Petite Petals flowers and punch out with the Petite Petals Punch
    • On scraps of Whisper White card stock stamp randomly stamp 3 of the gingham flowers with Daffodil ink and punch out just the center of the flower with the 1/2" circle punch.  Note: because you only want the centers, you don't need to stamp the entire flower.
    • Punch out 3 plain cardstock flowers with the Pansy Punch and 3 with the Petite Petals punch (use the two pieces of cardstock removed from the top of the card for these flowers)
    • Using glue dots stack from the base up a plain card stock Pansy flower, a Gingham Flower, a plain card stock Petite Petal Flower and a stamped Petite Petal flower.  Mount a Daffodil Delight center piece with a dimensional.  Attach flowers with sticky strip to the front, he inside cover and belly band.  Note:  I wanted a little glimmer on my flowers to give them some added pop, so I outlined all the petals with Dazzling Details #124117 pg. 166.
  13. Stamp a sentiment of your choice on Whisper White card stock and cut out like a banner.  Attach with glue dots beneath the petals.
Okay you should now be able to create your own Double Gate Fold card.  Remember to watch Dee Slater's video so you can see how she placed the Window Die, it's much easier to understand visually than my trying to explain it in steps 4,5 and 6 above. 

I'd love to hear from you if you made this card or simply a comment on the two that I've made.  It's always exciting to hear back from someone who actually used my instructions, as to whether they were understandable and helpful.   Have a great stamping day and thanks for visiting my blog!
Penny

Rock Star Masculine Birthday Card

We finally have some good weather and have spent the week tidying up in the garden and the garage.  Visits to the recycling plant to get rid...