Thursday, July 9, 2015

CMCC#79 - Colour Me... Striking!

What a great combination of colours for this week's Colour Me challenge. They are Bermuda Bay, Marina Mist and a neutral of your choice. I chose white to offset these beachy summer colours.  

Here's My Card:
I  really like the fern fronds in the Butterfly Basics stamp set and decided to combine them with the butterflies on my birthday card.  


1.  The Bermuda Bay card base measures 8 1/2 x 11 and is scored at 5 1/2.  I embossed it with the new Elegant Dots Textured Impressions Embossing Folder (TIEF).
2.  The Whisper White mat measures 3 1/4" x 5 1/8".  The Marina Mist, Bermuda Bay and Whisper White strips on each side of the white mat measure 1/4" x 5 1/8" and were adhered with Tom Bow glue.
3.  I stamped the large lacy butterfly in Marina Mist on the bottom of the Whisper White mat.  I re-stamped this image on a post it note and used that as a mask before stamping the ferns.  The ferns were stamped in Bermuda Bay.  I only inked the stamp once and then after the first image was stamped I moved the stamp towards the left and re-stamped and then repeated this for the last image.  Note:  Don't raise the stamp in between stamping just turn a little on an angle and repeat.  You'll wind up with a nicer more evenly balanced image as the colour gradually fades out.
4.  I stamped the three small butterflies on the Whisper White card mat.  I re-stamped them on a scrap of Whisper White and cut them out with the Bitty Butterfly punch and adhered to the card base with dimensionals.  Two were stamped in Bermuda Bay and the third is in Marina Mist.  Small basic rhinestones were added for some bling to the centers of each of the butterflies. 
5.  The "Happy Birthday" sentiment from Butterfly Basics was stamped across the center on an angle in Marina Mist ink. 
6.  The whisper White card mat for the inside of the card measures 5 1/4" x 4". 7.  I stamped the greeting "Sending Good Thoughts Your Way" from the Perfect Pennants stamp set and the Butterfly in Marina Mist.  The ferns were stamped in Bermuda Bay ink.
Supplies:
Stamp Sets:  Butterfly Basics and Perfect Pennants
Ink:  Marina Mist and Bermuda Bay
Card Stock:  Whisper White, Bermuda Bay and Marina Mist
Accessories:  Elegant Dots TIEF, Big Shot, Bitty Butterfly punch, Basic Rhinestones, dimensionals and Tom Bow glue. 

Thanks as always for by.  

Happy Stamping!
Penny Tokens 

Tuesday, July 7, 2015

Love Notes

I haven't done any card challenges for a while so today I thought I'd give it a whirl again.  I feel quite proud of myself as I've actually made a card using both a colour and a sketch challenge.   

Here's My Card:

The sketch challenge is from Paper Craft Crew Card and it's sketch #PCCS151.  

I found the Pals Paper Arts colour challenge PPA258 which uses two of the new In Colours, captured my interest so I decided to go with it. 

Supplies:
Stamp Sets:  Big on You, Button Buddies (R) and Yippie Skippie (R)
Card Stock:  Whisper White, Cucumber Crush, Watermelon Wonder and Night of Navy
DSP:  Cherry on Top Paper Pack
Ink:  Cucumber Crush and Watermelon Wonder
Accessories:  Basic Rhinestones, Happy Heart TIEF, Big Shot, Ribbon Itty Bitty Accent Punches (Heart)
  

Happy Stamping!
Penny Tokens

Saturday, July 4, 2015

Open House

Today I'm backtracking a bit so I can get caught up on some posts that should have been out following my Open House launch of the new "Share the Fun" Annual Stampin' Up Catalogue.  I did so much to prepare for that event and I wanted to share it with those of you who were unable to attend.

Getting Ready:
One of the advantages of being a Stampin' Up! Demo is being able to pre-order new never before seen products from the upcoming catalogues.  So I began my preparations for my June 6 Open House with my pre-order.  I was totally stoked by the time the UPS guy came along and what fun I had unpacking this box of goodies!  Simply the best feeling!
Checking My Lists:
Whenever I get ready for an event I want to make sure I've covered all my bases.  Once I've set the date it's time to get my invitations out, organize my displays, design some Make N' Take projects and the list goes on.  Here are some pictures of the prep and finished layout.  
Upcoming Class Samples including:  Father's Day and Masculine Card Class, Christmas in July, Wedding Ensemble and Stampin' 101 information.  

This was the In Colour and Colour Collection station and showcased ink pads, re-inkers, markers and card stock.
This part of my display included new stamp sets, punches and samples including:  Sprinkles of Life, Floral Wings, Good Guy Greetings, You've Got This, Happy Birthday Everyone, Berry Basket Bigz L steel die, Tree Builder Punch, Banner Triple Punch and the Fringe Scissors.  Guests were encouraged to try out the punches and scissors.

This was a fun station, featuring the new Gift Bag Punch Board.  I made several different examples of how you can use this versatile punch to not only make gift bags but an assortment of boxes too.
 
My Make N' Take Table was well used during the day.

Make N' Take Samples featuring "You've Got It" and "Happy Birthday Everyone" stamp sets and new In Colours. 
Summer Banner:
I love making banners for my events.  As soon as I saw the new In Colours and the Sprinkles of Life stamp set I knew they would be a perfect combination for my Summer Time Banner. Here's a look at what I created. 

I like to use Lollies to show case stamps.  These lollies were made with an old DSP from 2008 called Bella Rose. This paper reminds me of summertime and country fares.  It worked perfectly with the Watermelon Wonder and Cucumber Crush card stocks and inks I used for the stamping and backgrounds.  
Bella Rose DSP from 2008......I loved this paper and bought several packs so I simply couldn't let it go to waste.
When I'm making banners I like to set up an assembly line so I can see the progress of the banner as each step is completed. First I stencil the banners, then I assemble the lollies and I lay it all out in the order I want it to go in, then I add all the other stuff.  What fun!

Loving this Sprinkles of Life ice cream cone! 

Here's another one.  These were so much fun to make.  The paper doilies and glimmer paper added some pizzazz!
I've added all the bling and everything is still laid out on my long table, just waiting for the string and the final tweaks!
 

And here it is, ta da!  I had to show this in two separate photos because I couldn't get the picture large enough, but you get the idea. As soon as guests enter my craft room area they see the banner.
Colour Collections:
I had an awesome picture frame I'd bought at Costco last year and I had my husband mount it on a wall in my craft room that I'd designated as a display area.  The frame hung on the wall empty just waiting for inspiration. When I saw how beautiful the new In Colours were that inspiration hit like a lightening bolt. I quickly got to work creating a colour collection collage.
I simply love this wall display. Each piece is a little work of art and would make nice wall decor.  Having all the colours together makes it real easy to check out what's available, and knowing that this colour collection encompasses not only ink but cardstock, ribbon, markers, and accessories makes it even better for planning out a project.

I used the Bitty Butterfly punch to create this gathering of all the standard colour collections (Neutrals are featured on a separate frame).  It starts with the Brights Collection, followed by Regals and finally Subtles.  The larger butterflies were cut out with the Butterflies Thinlet Dies. 

Subtles Collection includes: Calypso Coral, Blushing Bride, Pink Pirouette, Pear Pizzazz, Wild Wasabi, Soft Sky, Pool Party, Marina Mist, Wisteria Wonder and Crushed Curry. 

The Regals Collection includes:  Rose Red, Cherry Cobbler, Cajun Craze, Always Artichoke, Garden Green, Island Indigo,  Night of Navy, Perfect Plum, and Crushed Curry.

The Brights Collection includes:  Bermuda Bay, Daffodil Delight, Melon Mambo, Old Olive, Pacific Point, Pumpkin Pie, Real Red, Rich Razzleberry, Tangerine Tango, and Tempting Turquoise.
The Neutrals Collection includes:  Basic Black, Basic Gray, Crumb Cake, Chocolate Chip, Early Espresso, Sahara Sand, Smoky Slate, Soft Suede, Whisper White and Very Vanilla.

2015-2017 In Colours include:  Cucumber Crush, Delightful Dijon, Mint Macaron, Tip Top Taupe and Watermelon Wonder.
2014-2016 In Colour Collection includes:  Blackberry Bliss, Hello Honey, Lost Lagoon, Mossy Meadow and Tangelo TwistThese In Colours will retire in 2016.
Don't these In Colours look fabulous together?  I used the Spiral Flower Originals Big Shot die to cut out all the roses.  This is a fantastic tool to have in your tool kit.  You can create beautiful bouquets, floral cards and home decor in minutes and have fun doing it, because it's so easy to use.  I rolled all the flowers while I was watching tv, that's how simple they are to make. Check out this link if you want to see how this steel cut die works.
Oh before I go I want to show you the Stampin' Up! Colour Collection 2013*-2017 Booklets I made for my customers who placed orders over $50.00 this year.  I got great reviews on this booklet. The cover design and ring were my idea but I'd like to give credit for the template for this project to Lee Convey.  The template was designed on the now retired MDS Studios program.  Thanks so much Lee. 
Each page shows a swatch of all the colours in that collection and it's name.  This little booklet is such a handy reference tool. If you place an on-line order  or workshop order with me for $50 or more you will receive one of these booklets too.
*I included the 2013-2015 In Colours for reference, even though they were retired a lot of my customers still want to use these colours in their projects.

Well that pretty much covers my open house. It was a lot of work getting ready for it but it was so worth it.  My customers got to see all the new stamp sets, co-ordinated colour products and tools, browse through the catalogues and ask lots of questions.  We had a lots of laughs and fun doing the make n' takes.  I hope you enjoyed seeing what I was up to.  

Happy Stamping!
Penny Tokens 

Thursday, July 2, 2015

You've Got This

Every once in a while a stamp set comes along that is so awesome, you just can't wait to ink it up and play with it.

"You've Got This" is one of those sets.  This 5 piece set is available in clear mount of wood mount styles and is available in both English and French versions.


Both of my Make N' Take cards at my Catalogue launch party in early June, used this set, and it was a big hit. 

Here's our first Make N' Take:

Assembly:
  1. The card base is Baked Brown Sugar, one of last year's In Colours.  It measured 4 1/4 x 11" and was scored at 5 1/2".  
  2. The card front was embossed with the Large Polka Dot TIEF 
  3. The first layer is in Watermelon Wonder that measures 3 3/8" x 4 1/8" 
  4. The next layer is a piece of Pink Pirouette that measures 3 1/4 x 4".  Before adhering this to the previous layer it was stamped with the background image in Watermelon Wonder and then the floral image was stamped in the center in Momento Tuxedo Black Ink.
  5. To complete the floral image the flower head was stamped in Tuxedo Black Ink on Watermelon Wonder card stock.  The center of the flower was embossed with Black Embossing Powder.  The image was cut out and adhered to the original stamped image with dimensionals.   
  6. The stem of the flower was stamped in Tuxedo Black Ink on Mint Macaron card stock, cut out and glued to the original flower image with Tom Bow Glue. 
  7. The sentiment "I'm here for you" was stamped in Bake Brown Sugar ink on a piece of  1" x 3 1/2" Whisper White card stock.  The end was cut into a banner with the new Triple Banner punch.
  8. The last layer of the sentiment was cut from a 1 1/4" x 4" piece of Watermelon Wonder cardstock, then the sentiment layer was glued on with Tom Bow Glue and 3 basic rhinestones were added for some dazzle.  This piece was attached on an angle to the card front with dimensionals. 
  9. A 5 x 4" piece of Whisper White card stock was cut for the inside of the card and it was stamped with a single floral image in Baked Brown Sugar ink. 

I used a versamark pen to dab some ink in the center of the flower and then applied black embossing powder and heat set it.  It really makes the flower center pop.   


Our second Make N' Take used both the You've Got This stamp set and the new hostess set "Happy Birthday Everyone".   What a great duo! 

The Happy Birthday Everyone stamp set is one of this year's exclusive Hostess stamp sets and I know it's going to be really popular.  Just look at these sentiments, there's something for everyone on your list.


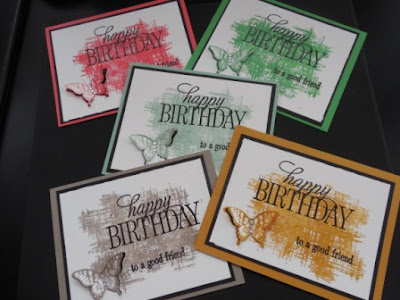
 I used the new In Colours for these fun cards and they looked great in every single colour:  Watermelon Wonder, Cucumber Crush, Dijon Delight, Mint Macaron and Tip Top Taupe.

My Open House attendees made the Mint Macaron version of this card.  Everyone was amazed and happy with how quickly this card came together.  
Mint Macaron

Assembly:
  1. Cut an 8 1/2 x 11  piece of Mint Macaron card stock and score at 4 1/4" for the card base.
  2. Cut a 4" x 5" piece of basic black card stock and adhere to the card base.
  3. Cut a piece of 3 3/4" x 5" of Whisper White card stock for the next layer.  
  4. Stamp the background stamp from the "You've Got This" stamp set in the center of the card with Mint Macaron ink.
  5. Ink up with Versa Mark Ink and stamp the sentiments towards the middle top part of the background stamped image.  Apply Black Embossing Powder and heat set.  Tip:  If you're using a clear mount stamp set mount the sentiments together on a large clear block. Test stamp the image on a scrap of paper to make sure the stamps are lined up properly and you're pleased with the image before stamping on the card face.  Make sure you clean the block before stamping with Versa Mark ink.
  6. Next, stamp the butterfly image from Papillon Potpourri in Mint Macaron ink towards the bottom left of the Whisper White layer.  Punch out the image with the Elegant Butterfly Punch.  Set the butterfly aside.
  7. Adhere the Whisper White layer to the basic black layer.  
  8. Place a small line of Tom Bow glue down the center of the butterfly's back (on unstamped side) and adhere in the space left when it was punched out.  Let it dry for a few minutes and then  lift the wings so it looks like it's in flight.  Place a strip of 4 small rhinestones down the butterfy's back.  
  9. For the inside cut a 5 x 3 3/4" layer of Whisper White card stock.  Stamp a Mint Macaron butterfly image in the lower right corner.  Stamp the "Good Things Are Going To Happen" sentiment in Versa Mark Ink.  Cover with Black Embossing Powder and heat set.  
 
Watermelon Wonder


Inside of the card

Delightful Dijon

Tip Top Taupe

Cucumber Crush


Thanks for stopping by today. I hope you enjoyed seeing these cards and how they were assembled.   My favourites from this group of cards was the Tip Top Taupe followed closely by Mint Macaron.  How about you which colour did you prefer?  My lease favourite was the Crushed Cucumber.


Happy Stamping!
Penny Tokens    

Last Free Shipping of the Year - December 9, 10 11, 2024

Heads up, it's time for the last FREE SHIPPING promo of the year! From December 9–11, you can shop and save on all qualifying orders of...