Showing posts with label paper crafting. Show all posts

Tuesday, January 5, 2016

OCCASIONS AND SALE-A-BRATION START TODAY!!!

Wow, the most wonderful sales events of the season for Stampin' Up! start today. The Occasions - Made from the Heart Catalogue and the Sale-a-bration Catalogues are now available for you to view and order from.  

Although I've permanently updated my side bar with the PDF links for these catalogues.  I thought I would make it easy and add them here.  I know you're going to love all the new products.  My wish list is long and I know yours will be too!  

Occasions 2016 - Made from the Heart
Sales Period from January 5th through May 31st, 2016:

English Version PDF

French Version
 Sale-A-Bration - Earn Free Products!
January 5th through March 31st, 2016

English Version
French Version
Happy Stamping Everyone!
Penny Tokens Stampin' Spot 

Saturday, July 25, 2015

Small Gift Box Tutorial Using Gift Box Punch Board

It seems everyone really liked the small gift box I posted in the Wacky Watercooler July Blog Hop post this past weekend, so as promised here are the instructions on how I made it. 

I can't take all the credit for this tutorial however, as my friend Sandy showed me how to make my first box with the Gift Bag Punch board.  Her example was based on a video by a UK demo named  Linda Parker.  Linda's version is made with 12" x 12" card stock and she shows some really cute samples on her video to give you an idea of how versatile this punch can be. 

What You Need to Make It:
  • 8 1/2 x 11 Card Stock for box base
  • Coordinating DSP
  • Simply Scored Score Board
  • Gift Bag Punch Board
  • Trimmer
  • Bow Builder Punch 
  • Adhesive - Sticky Strip or Tom Bow Glue and Glue Dots
Assembly:
1.  Cut the card base to measure 6 3/8 x 10 7/8".


2.  Use your Simply Scored score board to score at:
  • on the short side score at 1 3/8" and at 5", turn
  • on the long side score at 1 3/8", 3 1/4", 6 1/8" and 8"
3. Using the Gift Bag Punch Board:
If you haven't used the Gift Bag Punch Board yet, here is Stampin' Ups! introductory video which demonstrates how to use the punch and the various elements of it. It will help you understand how this wonderful tool works.
 

In this view you can see that I have punched out on the score lines and at the edges of the card stock on both sides.
  • On the long side of card stock line up the 1 3/8" score line with the starting line on the gift bag punch board and punch.  Move the card stock to the next score line (3 1/4") and punch, move to the next score line (6 1/8") and punch, and then move to the last score line (8") and punch. 
  • Line up the very right edge of the card stock on the start line and punch. 
  • Flip the card stock and repeat the process in the previous step.  
4.  Use your bone folder to burnish all the score lines.

5.  Put glue strips on the tabs or use Tom Bow glue as indicated in this photo and then assemble box. Make sure that the sides are even and square before you press down on the sticky strip to secure it.  This last step is essential for getting your box to sit squarely. 

 6.  Once the box is assembled you'll want to decorate it.  I've listed the card stock and DSP sizes below for layering mats and dsp.  You could eliminate either of these steps dependent on the look you are going for. 


Decorating the Front, Back and Sides of the Box:  
I like to decorate my boxes with card stock mats layered with a coordinating designer series paper. The photos below show where the mats would be added to the box. 


Cut Card Stock Panel mats as follows:
  • 1" x 3 1/4" cut one for front lid panel
  • 1 1/2" x 3 1/4" cut one for top lid panel
  • 2 1/2" x 3 1/4" cut two for front and back panels
  • 1 3/8" x 2 5/8" cut two for bottom side panel 
  • 1 1/8" x 1 3/8" cut two for side top lid 
Cut DSP panel mats as follows:
  • 7/8 x 3 1/8" cut one for front lid panel
  • 1 3/8" x 3 1/8" cut one for top lid panel
  • 2 1/4" x 3 " cut two for front and back panels 
  • 1 2/8 x 2 1/2" cut two for bottom side panel
  • 1" x 1 1/4" cut two for side top lid
Use Tom Bow adhesive to glue the mats together then glue to the box. 

For Banner on Lid:
The Banner Triple Punch gives you triple the banner options in one punch. You can make banners in three widths--1", 1-1/2", and 2"--in any length. Just slide the paper in, punch, and get perfectly notched banners (or gift tags, bookmarks, belly bands) every time.  Here I've used it to make the banner on the lid of the box:

1.  To make the banner: 
  • Cut a 2" x 4 1/4" piece of card stock and punch out banner shape
  • Cut a 1 1/2" x 4" piece of coordinating dsp and punch out banner shape
  • If you want a third banner cut a 1" x 3 3/4" piece of card stock and punch out same as above.
2.  Adhere the 2 or 3 banners together with sticky strip.  Line up the back edge of the banners with the back edge of the box lid and gently press the front edge of the banner over the front end of the lid.  Turn the banner over and using the Simply Scored score board make a crease where you see the fold line. On my box the crease line was approximately 2".  
Here you can see the three banners that were stacked and adhered to the top of the lid with sticky strip.  The part that extends over the top to the front of the box lid was glued down with a small piece of sticky strip to hold it in place. 

This is what the box lid looks like from the inside once the banner has been added.
 3.  If you want to secure the box lid to the box base you can add a Velcro sticky back fastener.  This is optional.  See photo for placement.

Here's My Finished Gift Box:
I didn't particularly care for the plain card stock banner on the top of the box and so I added some cherries to it, to match the smaller ones in the Cherry on Top Designer Series paper used for the panels.  The large cherries were from a stamp image in the Button Buddies (retired) stamp set.  I fussy cut them out and glued them on with Tom Bow glue.  

I added a small  Watermelon Wonder bow that was punched out with the Bow Builder punch.  It's assembled with glue dots and was adhered to the front of the lid banner.


More Samples:

Here are some additional samples of gift boxes and bags that I've made over the past few weeks, with the help of my friend.  A big hats off to Sandy Stoyanowski who first showed me how to use the Gift Bag Punch and then loaned it to me for my Open House and subsequent classes, while mine has been on back order. Can't thank you enough Sandy! 


This little cutie is made with the same dimensions but I didn't layer the card stock and DSP panels, I only adhered DSP. This box base is Island Indigo card stock and the beautiful paper is from the Bohemian DSP collection.

The card base for this box is Crisp Cantaloupe (retired In Colour 2015).  The panels are made with Strawberry Slush card stock and All Abloom Designer Series Paper (retired).  The bow was cut out of Pistachio Pudding DSP from the All Abloom Collection.
Well that's it for today.  I'll have some other gift bags and boxes to show you once I have my very own Gift Bag Punch Board and can play with it at my leisure.  I think this is one of the best tools that I've used in a while not only because it was so useful, but because it was a lot of fun.  

Before I go I'd just like to add that I think it's important if you're going to make bags and boxes that you keep templates that you can use for reference.  I have several now and it makes life so  easier when you don't have to re-create the wheel every time or look for videos and tutorials on line. Here's the template I made for this box and it has all the measurements all in one glance.
If you enjoyed this tutorial or had difficulty with it please let me know, I'd love to hear about your experiences with the Gift Bag Punch Board and this little gift box.  Any tips you can share are also appreciated.

Happy Stamping!
Penny Tokens

Tuesday, July 7, 2015

Love Notes

I haven't done any card challenges for a while so today I thought I'd give it a whirl again.  I feel quite proud of myself as I've actually made a card using both a colour and a sketch challenge.   

Here's My Card:

The sketch challenge is from Paper Craft Crew Card and it's sketch #PCCS151.  

I found the Pals Paper Arts colour challenge PPA258 which uses two of the new In Colours, captured my interest so I decided to go with it. 

Supplies:
Stamp Sets:  Big on You, Button Buddies (R) and Yippie Skippie (R)
Card Stock:  Whisper White, Cucumber Crush, Watermelon Wonder and Night of Navy
DSP:  Cherry on Top Paper Pack
Ink:  Cucumber Crush and Watermelon Wonder
Accessories:  Basic Rhinestones, Happy Heart TIEF, Big Shot, Ribbon Itty Bitty Accent Punches (Heart)
  

Happy Stamping!
Penny Tokens

Saturday, July 4, 2015

Open House

Today I'm backtracking a bit so I can get caught up on some posts that should have been out following my Open House launch of the new "Share the Fun" Annual Stampin' Up Catalogue.  I did so much to prepare for that event and I wanted to share it with those of you who were unable to attend.

Getting Ready:
One of the advantages of being a Stampin' Up! Demo is being able to pre-order new never before seen products from the upcoming catalogues.  So I began my preparations for my June 6 Open House with my pre-order.  I was totally stoked by the time the UPS guy came along and what fun I had unpacking this box of goodies!  Simply the best feeling!
Checking My Lists:
Whenever I get ready for an event I want to make sure I've covered all my bases.  Once I've set the date it's time to get my invitations out, organize my displays, design some Make N' Take projects and the list goes on.  Here are some pictures of the prep and finished layout.  
Upcoming Class Samples including:  Father's Day and Masculine Card Class, Christmas in July, Wedding Ensemble and Stampin' 101 information.  

This was the In Colour and Colour Collection station and showcased ink pads, re-inkers, markers and card stock.
This part of my display included new stamp sets, punches and samples including:  Sprinkles of Life, Floral Wings, Good Guy Greetings, You've Got This, Happy Birthday Everyone, Berry Basket Bigz L steel die, Tree Builder Punch, Banner Triple Punch and the Fringe Scissors.  Guests were encouraged to try out the punches and scissors.

This was a fun station, featuring the new Gift Bag Punch Board.  I made several different examples of how you can use this versatile punch to not only make gift bags but an assortment of boxes too.
 
My Make N' Take Table was well used during the day.

Make N' Take Samples featuring "You've Got It" and "Happy Birthday Everyone" stamp sets and new In Colours. 
Summer Banner:
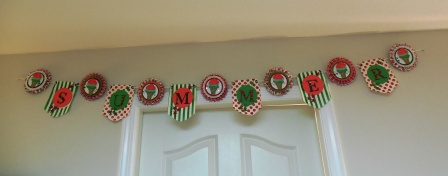
I love making banners for my events.  As soon as I saw the new In Colours and the Sprinkles of Life stamp set I knew they would be a perfect combination for my Summer Time Banner. Here's a look at what I created. 

I like to use Lollies to show case stamps.  These lollies were made with an old DSP from 2008 called Bella Rose. This paper reminds me of summertime and country fares.  It worked perfectly with the Watermelon Wonder and Cucumber Crush card stocks and inks I used for the stamping and backgrounds.  
Bella Rose DSP from 2008......I loved this paper and bought several packs so I simply couldn't let it go to waste.
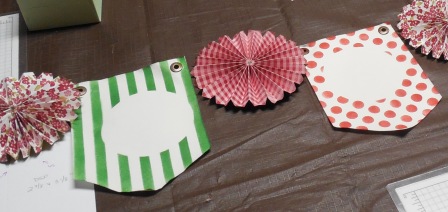
When I'm making banners I like to set up an assembly line so I can see the progress of the banner as each step is completed. First I stencil the banners, then I assemble the lollies and I lay it all out in the order I want it to go in, then I add all the other stuff.  What fun!

Loving this Sprinkles of Life ice cream cone! 

Here's another one.  These were so much fun to make.  The paper doilies and glimmer paper added some pizzazz!
I've added all the bling and everything is still laid out on my long table, just waiting for the string and the final tweaks!
 

And here it is, ta da!  I had to show this in two separate photos because I couldn't get the picture large enough, but you get the idea. As soon as guests enter my craft room area they see the banner.
Colour Collections:
I had an awesome picture frame I'd bought at Costco last year and I had my husband mount it on a wall in my craft room that I'd designated as a display area.  The frame hung on the wall empty just waiting for inspiration. When I saw how beautiful the new In Colours were that inspiration hit like a lightening bolt. I quickly got to work creating a colour collection collage.
I simply love this wall display. Each piece is a little work of art and would make nice wall decor.  Having all the colours together makes it real easy to check out what's available, and knowing that this colour collection encompasses not only ink but cardstock, ribbon, markers, and accessories makes it even better for planning out a project.

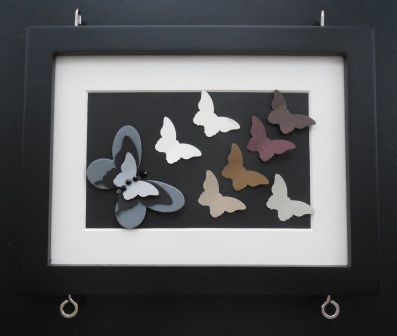
I used the Bitty Butterfly punch to create this gathering of all the standard colour collections (Neutrals are featured on a separate frame).  It starts with the Brights Collection, followed by Regals and finally Subtles.  The larger butterflies were cut out with the Butterflies Thinlet Dies. 

Subtles Collection includes: Calypso Coral, Blushing Bride, Pink Pirouette, Pear Pizzazz, Wild Wasabi, Soft Sky, Pool Party, Marina Mist, Wisteria Wonder and Crushed Curry. 

The Regals Collection includes:  Rose Red, Cherry Cobbler, Cajun Craze, Always Artichoke, Garden Green, Island Indigo,  Night of Navy, Perfect Plum, and Crushed Curry.

The Brights Collection includes:  Bermuda Bay, Daffodil Delight, Melon Mambo, Old Olive, Pacific Point, Pumpkin Pie, Real Red, Rich Razzleberry, Tangerine Tango, and Tempting Turquoise.
The Neutrals Collection includes:  Basic Black, Basic Gray, Crumb Cake, Chocolate Chip, Early Espresso, Sahara Sand, Smoky Slate, Soft Suede, Whisper White and Very Vanilla.

2015-2017 In Colours include:  Cucumber Crush, Delightful Dijon, Mint Macaron, Tip Top Taupe and Watermelon Wonder.
2014-2016 In Colour Collection includes:  Blackberry Bliss, Hello Honey, Lost Lagoon, Mossy Meadow and Tangelo TwistThese In Colours will retire in 2016.
Don't these In Colours look fabulous together?  I used the Spiral Flower Originals Big Shot die to cut out all the roses.  This is a fantastic tool to have in your tool kit.  You can create beautiful bouquets, floral cards and home decor in minutes and have fun doing it, because it's so easy to use.  I rolled all the flowers while I was watching tv, that's how simple they are to make. Check out this link if you want to see how this steel cut die works.
Oh before I go I want to show you the Stampin' Up! Colour Collection 2013*-2017 Booklets I made for my customers who placed orders over $50.00 this year.  I got great reviews on this booklet. The cover design and ring were my idea but I'd like to give credit for the template for this project to Lee Convey.  The template was designed on the now retired MDS Studios program.  Thanks so much Lee. 
Each page shows a swatch of all the colours in that collection and it's name.  This little booklet is such a handy reference tool. If you place an on-line order  or workshop order with me for $50 or more you will receive one of these booklets too.
*I included the 2013-2015 In Colours for reference, even though they were retired a lot of my customers still want to use these colours in their projects.

Well that pretty much covers my open house. It was a lot of work getting ready for it but it was so worth it.  My customers got to see all the new stamp sets, co-ordinated colour products and tools, browse through the catalogues and ask lots of questions.  We had a lots of laughs and fun doing the make n' takes.  I hope you enjoyed seeing what I was up to.  

Happy Stamping!
Penny Tokens 

Atlantic Hearts Sketch Challenge #572:

April has sure been living up to its reputation for rain showers but it's been really on the cold side which isn't normal for this t...