Showing posts with label tutorial. Show all posts

Wednesday, November 29, 2017

Watercooler Wednesday Challenge #147 - Charlotte's "Anything Goes"

Welcome to this week's Watercooler Wednesday Challenge, hosted by Charlotte.  This challenge is open to any theme or project - no holds barred.  What fun!

We hope you'll join us in the fun and enter one of your own creations.  You could be our next "Rock Star" winner.   All you have to do is make a card or project - any theme is okay - and  link it to our site via your post and follow a few simple rules.  All the stuff you need to know about playing along is located on the Watercooler Wednesday Challenge Main Page.  Our Linksy is open until 5:00pm on Monday December 4th, 2017.

Here's My Anything Goes Project:
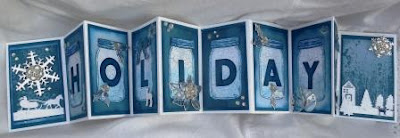
Thanksgiving is behind us now and I'm switching to Christmas mode this week. My husband spent Black Friday getting the outside of the house decorated while I was inside lugging out the Christmas ornaments.  One of the things that was missing from my collection of Christmas paraphernalia was a Christmas mantle piece, so for this week's challenge I decided to make an Accordion Card featuring the word "holidays".  

The above picture shows the deck of card sized accordion card I made all bundled up in it's belly band and here it is unfolded: 


Supplies: (All products are Stampin' Up! unless noted)

Stamps: Merry Patterns (Hostess Promo 144973), Merry Little Labels(144795), Jar of Love (141587)

Ink: Dapper Denim, Pacific Point
Card Stock: Whisper White and Dapper Denim
DSP/Specialty Papers:  Color Theory Pack (144193), Silver Foil (132178)
Accessories:Big Shot, Paper Trimmer, Tom Bow Glue, Dimensionals, Sticky Strip, Glitter Enamel Dots (144200), Clear Faceted Gems (144142)
Big Shot Accessories:  Stitched Shapes Thinlets (145372), Card Front Builder (144674), Home Town Greetings Edgelit Dies (144671), Lots of Labels (138281), Sleigh Ride Edgelits (139670 Retired), Everyday Jars (1414900
Non Stampin' Up Accessories:  Tim Holtz Snowflakes 661599, EK Tools Alphabet 54-80032, EK Tools Christmas 54-80018


How It's Made:

All of the details and measurements needed to make an Accordion Fold card are listed in my November Creative Circle Blog hop post so I won't repeat them here. Just click on this link for the details.

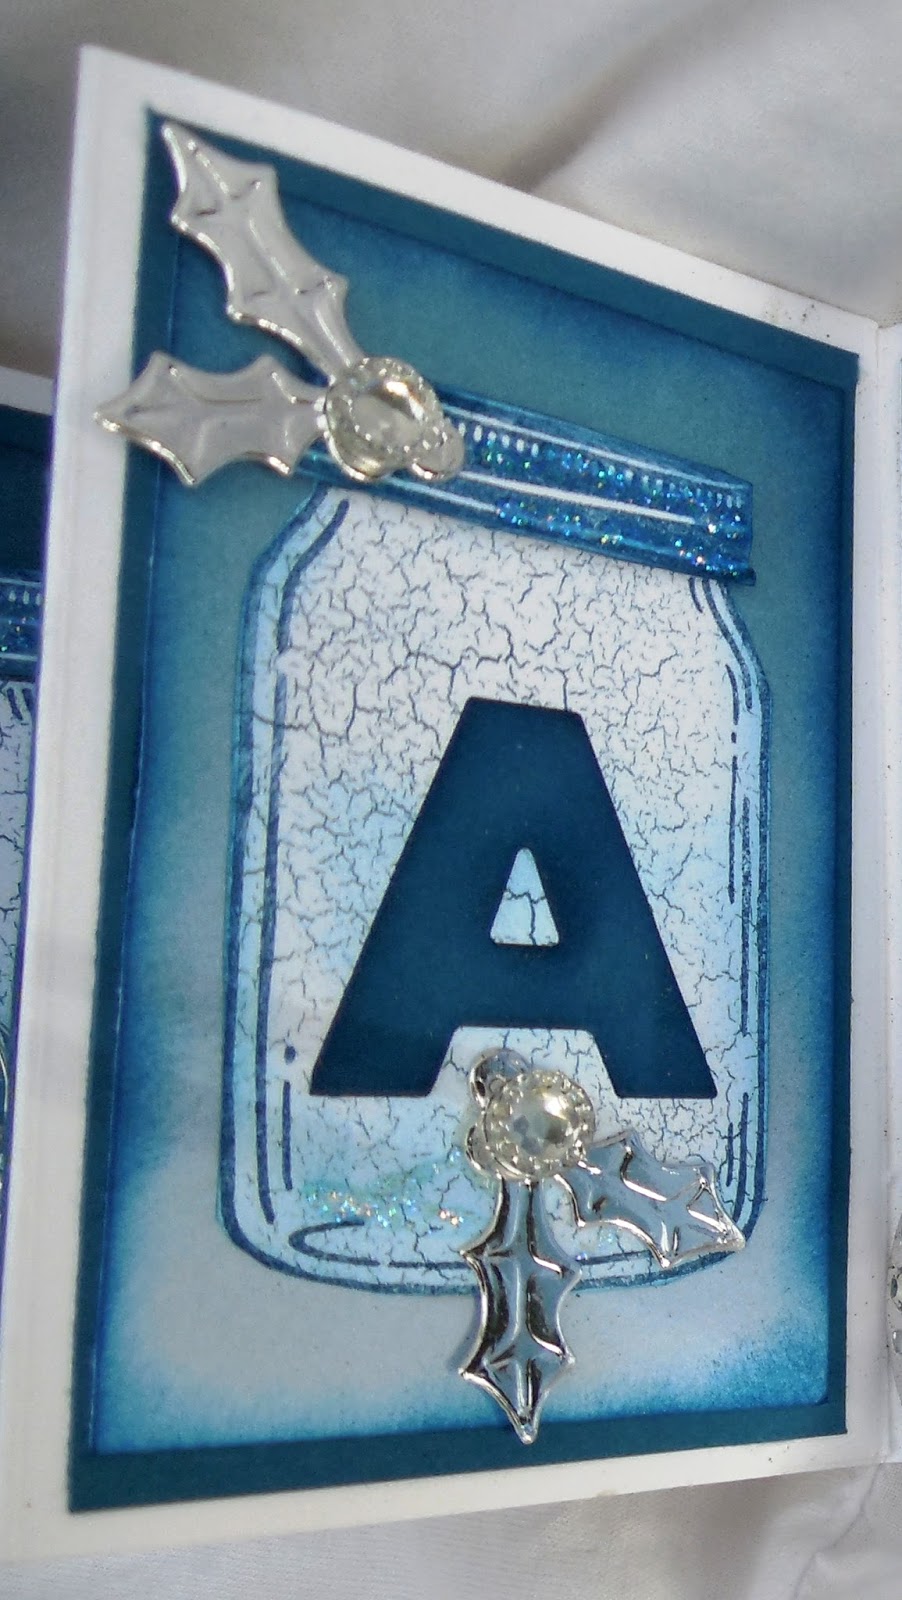
To make this Accordion Fold card I began with Whisper White and Dapper Denim card stocks for my card base and first layers. I super liked the way the Color Theory Designer Series paper worked out in my Thanksgiving Accordion fold, so I chose the Dapper Denim coloured papers from this paper pack for my DSP layers. I especially liked how the blue crackle design paper worked perfectly for show casing the mason jars from the Everyday Jar stamp set.

The hardest part of making this Accordion Fold card was deciding what word to showcase and how I wanted the alphabet letters to be displayed.  My  display only had room for an 8 letter word so "holidays" worked for me.  


I also chose to go with the mason jars from Everyday Jars because they conjured up all kinds of ideas for displays like mini lights or candle holders.  To get that effect I sponged Dapper Denim ink around in the middle of the jars and then added glimmer swirls to catch the light and look like tiny lights.  Here's a look at the individual sections of the card.
 
This is the belly band that holds the Accordion Card together when not on display.  I also set it to the side of card on my mantle because it adds to the overall decoration.  When designing this cover, I tried to incorporate all the elements of the accordion card - the deer, houses, mason jar etc.  See my supply list for the wide array of die cuts I used in this project.  I also used a ton of basic rhinestones, silver foil and glimmer. 

This is a back view of the Accordion Card in the Belly Band prior to my adding the "Let It Snow" tag.  To make it look finished and professional, I covered the back side of the tag with  a Dapper Denim layer cut out with the Lots of Labels  die cut. 


In this view you can see what the back of the Accordion Fold card looks like.  I added card stock and dsp to the two end pieces, because they are the front and back sides that show when the card is folded and held in the belly band. 

I really like how the Dapper Denim dark crackle design paper adds such a cool effect to this back panel.  I stamped the "Let It Snow" label from the Merry Little Labels set in Dapper Denim ink and added glued it flat to the back panel. 
The first panel features a horse and winter sled from an old SU Edgelit set called "Sleigh Ride".  This die cut works perfectly with the Home Town Greeting Edgelits I used on the front and back panel of this card.  The large snowflake was cut out using the Tim Holtz snowflake dies and I've added a rhinestone accent to the center. 

Each of the panels and the alphabet letters have been sponged around the edges with Pacific Point ink to add some depth.  The jar lids were stamped in Dapper Denim ink on Whisper White and I've added glimmer to give them some sparkle.  The beautiful foil poinsettia, holly leaves and Christmas baubles come from an EK Tools Die cut set called Christmas.  I've also added lots of basic rhinestones, glitter enamel dots and faceted gems to each panel for added bling and blitz.  What fun!
I love how the last panel turned out.  The scene is comprised of various die cuts from the Home Town Greetings and Sleigh Ridge Edgelits.  The Color Theory background paper added to the overall feel of a cold frosty night.  
Well that's it for this week's challenge.  I hope you liked my Accordion Fold Card and that you'll try this out yourself.  It's really a lot of fun deciding what will go on each panel.  Let me know how you like this one, I love receiving your comments.  And, as always before you go make sure you check out the other projects submitted by our wonderful Watercooler Wednesday Design Team Artists.  You won't be disappointed. 
 

Happy Stamping!
Penny Tokens Stampin Spot

Wednesday, February 15, 2017

Water Cooler Wednesday - #106 Heidi's Clean & Simple Challenge


 It's time for this week's Watercooler Wednesday Challenge #106, hosted by the incredibly talented Heidi Weaver.  Heidi is challenging us to make a Clean and Simple Card with Sparkle.
The rules are simple for our Clean And Simple challenge.  Show lots of open space, use minimal layers and use minimal embellishments.  The Watercooler Artists have given you many great examples of what our Clean And Simple challenge looks like.

Here's My Card: 
You'll see by my use of the word "Sparkle" that I chose to interpret this challenge quite literally.  I simply couldn't resist since we have a fun new Stampin' Up! stamp set called "Love Sparkles" in the new Occasions Catalogue.

Supplies:
Stamp Sets:  Love Sparkles #143183 and Balloon Adventures #142823
Card Stock:  Whisper White and Basic Black
Ink:  Momento Tuxedo Black
Accessories: Trimmer, Stamp-a-ma-jig,Tom Bow Glue, Basic Rhinestones, Wink of Stella.
 
Love Sparkles #143183  There are 13 rubber stamps in this set that are sure to help you get your glam on!  I used the little spray of stars and the word sparkle to enhance this card and loved the results.

Balloon Adventures #142823  Such a fun stamp set! I love all the sentiments and there are so many ways to use this 17 piece Photopolymer two-step stamp set that co-ordinates with the Balloon Thinlet Pop-up Dies.  Bundle and save 15%.

Assembly:
1.  Cut an 8 1/2" x 5 1/2" base from Whisper White card stock
2.  Cut a 51/4" x 4" Basic Black mat for the first layer.  Adhere to base.
3.  Cut a 5 1/8" x 3 7/8" Whisper White piece for the top mat.
4.  Starting at left edge of top mat randomly stamp a series of stars from top to bottom in Momento Tuxedo Black Ink.  Note by positioning in a different direction as you stamp each image, it will create a ribbon like effect. Colour these stars with Clear Wink of Stella.
Link stamped image as you move along the length of paper so the design flows.
5.  Cut a 1/4" x 5 1/8" strip of Basic Black  and adhere to top mat 1 1/2" from left edge.  Evenly space Basic Rhinestones down this strip.
6.  Using a Stamp-ma-jig for perfect placement stamp "Sparkle" four times.  Use the Clear Wink of Stella brush to add tiny sparkling details on each of the  letters.  Adhere this mat to the Basic Black one.  
7.  Cut a 51/4 x 4" Basic Black mat for the inside of the card and adhere with Tom Bow glue.
8. Cut a 5 1/8" x  3 7/8" Whisper White layer.  
9.  Stamp the sentiment "No One Deserves a Happier Birthday Than You" from the Balloon Adventure stamp set in Tuxedo Black Ink in the center.  
Voila this card is finished!   

Well that's it for me this week.  If you haven't had a chance to check out the other Watercooler Wednesday Design Team Artist's creations, just click on the link to return to the home page.  


And, how about playing along? If you liked this challenge give me some feedback and I hope you'll add your own "Sparkle" Clean and Simple card to our linky. This challenge is open until 5pmMT Monday February 20th.  We'd love to see your creativity and what you can do with our theme!

Happy Stamping!
Penny Token's Stampin' Spot

Wednesday, December 21, 2016

WWC99-Marsha's Clean and Simple (CAS) Make It With Hearts Challenge

Wednesday has rolled around again and it's time for the last WWC99 Watercooler Wednesday challenge  of the year since this challenge will run from December 21st through to January 2nd, 2017.  This Clean and Simple (CAS) challenge is being hosted by Marsha and it's all about "hearts". 

Just so you know the Watercooler Design Team Artists decided to lower our expectations for our CAS challenges so all you need to do is enter an uncluttered card with lots of open space and minimal layers and embellishments and you can play along.  We hope you will join in the challenge! 
 
Here's My CAS Card:
Supplies:
Stamp Sets:  Merry Mice, Bear Hugs, and Love Sparkles*
Ink:  Cherry Cobbler, Crumb Cake, Early Espresso, Delightful Dijon, Basic Black Archival Ink, Flirty Flamingo and Smokey Slate
Card Stock:  Cherry Cobbler, Cansun 90lb Watercolor Paper
Accessories:  Big Shot, Trimmer, Bear Hugs Thinlets, Aqua Painter, Baby wipes, Scissors, Dimensionals, Tom Bow glue, Tear and Tape.
The Merry Mice stamp set is from the Holiday Occasions catalogue and will retire January 2nd, 2017.  It's currently on sale in the Year End Extravaganza.  Product #42154
The cluster of hearts behind the little mouse is supposed to be a balloon bouquet. The "love you" heart is from the Bear Hugs stamp set and is cut out with the Bear Hugs Thinlet heart die. 

I bet you're wondering where that fancy double-outlined heart came from aren't you? Well, I got it for free when I attended Stampin' Up!s OnStage Presentation in Vancouver.  It's from a delightful new stamp set called "Love Sparkles" and will be available in the new Occasions catalogue, just in time for Valentine's Day.
Bear Hugs Stamp Set #39546 in the Annual Catalogue
Assembly:
1.  The Cherry Cobbler card base was cut to 8 1/2" x 5 1/2" and scored at 4 1/4". 

2.  I cut three pieces of Watercolor Paper, for the layers.  The first layer measured 4" x 5 1/4" and the second layer measured 3 3/4" x 5". The final layer which measured 4" x 5 1/4" was for the inside of the card. 

3.  I stamped the mouse image from Merry Mice with Black Archival ink on the second layer of watercooler paper. Note:  After inking up the image and before stamping, I wiped the ink off the stocking hat and piece of scarf that poked out below the mouse's arm because I didn't want them to show up on the finished card.  I just used a baby wipe to take the ink off. 

4.  I stamped a second image of the mouse on a scrap of watercolor paper and again wiped away the hat and scarf portions of the image before stamping.  I fussy cut away the bottom portion of the mouse, and the hat leaving his face, upper body and arms in tact.  And, I cut away the portion of the book top between the mouse's hands so I could insert the little red heart. This portion of the mouse was coloured the same as the base and it was mounted with dimensionals after the stamping on the base layer was finished.
 
I fussy cut out a second image of the to portion of the mouse so I could layer it on top of the original layer.  This is just a sample so it isn't cut very neatly.... it's just to give you the concept.
5.  I painted the mouse image with Cherry Cobbler, Crumb Cake, Flirty Flamingo, Early Espresso and Delightful Dijon inks, using a fine tipped aqua painter. I repeated this colouring on the portion of the mouse that would be layered later on.

6.  Because I'd eliminated the stocking hat from the second mouse image I needed to replace it with something else.  To do this, I stamped a reindeer head from the Cookie Cutter Christmas set and cut off the portion between the horns to make a little cap.  I coloured this with Delightful Dijon and then added it with a piece of dimensional to the top of the mouse's head to form a cap.  
I just wanted the portion of the deer head that is coloured in yellow.  I drew a line along the bottom of that image with a Basic Black marker and cut it out.  This became the cap on the mouse, all the rest of the

7.  I stamped the mouse image on a Post-It-Note and fussy cut this out for a mask.  I applied the mask over the mouse and stamped the heart images.  I also stamped masks for the hearts so I could layer them.  They were all stamped in Cherry Cobbler Ink.
Masks stamped on Post-It-Notes.

8.  Once the inks had dried I attached the upper portion of the mouse with dimensionals. I punched out a little red heart using the punch from the retired Itty Bitty Punch Accents set and attached it between the mouse's hands with a piece of dimensional.  I used an aqua painter and Smokey Slate ink to outline the mouse image and give some depth to the background.  Some of the Cherry Cobbler ink ran a bit so I just lightened and blended it into the background.


Note: After I made the above card, I thought I should have used flowers instead of the heart, so I had to try out that look. Voila here's what that version looked like.
The floral bouquet in this sample is from the Bear Hugs stamp set. 

9.  The layers were glued together with Tom Bow Glue and then attached to the card base with Tear and Tape.  The inside of the card was finished with the remaining Watercolor paper layer. 

Well that's it for this year! I hope you've enjoyed this card along with others I've contributed to the Watercooler Wednesday Challenges and that you'll continue to follow and contribute your cards to this site.  I'd love to hear your thoughts on this card and my little tutorial explaining how it was assembled.

I also hope you'll visit the other Watercooler Wednesday Design team sites and leave them some comments too.   It's so inspiring for us.   

Happy Stamping!
Penny Tokens Stampin' Spot

Wednesday, August 31, 2016

Z- Fold Birthday Wishes - WWC83 Penny's Tic Tac Toe Challenge


Welcome to the last Wednesday of August. Hope you've had a good month and are looking forward to everything September has to bring. 

I’m very excited to be hosting this week’s Watercooler Wednesday Challenge #WWC83. My theme for this challenge is a Tic Tac Toe project. Whoo Hoo!  Are you ready?  This is going to be fun, and I hope you'll join me and the Watercooler Wednesday Design Team by trying your hand at this challenge. 

The fun thing about using the Tic Tac Toe outline is that you're not restricted to a sketch or image and you get to choose a variety of different elements to build your design. So put on your thinking caps because you'll begin today's challenge by selecting three elements in a row, either horizontally, diagonally, or vertically, and use those elements on a project. You can use other products as well, but you must use the three in the row you choose.  What fun!

Here's My Z-Fold Birthday Card:


"Z Fold Cards are a very popular trend in card making right now.  You see them all over Pinterest and other sites. There are several variations on the Z Fold, but whichever one you choose, you're guaranteed to make a great card that's quick and easy to assemble.  For today's card I'm CASEing Dawn Griffith's Z Fold Pop Up Card with Balloon Bouquet Punch because I simply couldn't wait to try out her balloon pop up idea.

Supplies:
Stamps:  Gorgeous Grunge, Boys Will Be Boys (R), Party Pants (R), Stylized Birthday
Inks:  Emerald Envy, Peek A Boo Peach, Flirty Flamingo, Sweet Sugar Plum, Versa Mark, Momento Tuxedo Black
Card Stock: Basic Black, Very Vanilla, Emerald Envy, Flirty Flamingo, Peek A Boo Peach
DSP:  Playful Palette 6 x 6 Designer Series Paper Pack
Accessories:  Big Shot, Trimmer, Heat Gun, Copper Embossing Powder, Balloon Bouquet Punch, Balloon Framelit Dies,  Bunches of Banners Framelit Dies, Basic Rhinestones, Glue Dots, Window Sheet Strips, Sequins, Dimensionals

Directions:
1.  For the card base cut a 4 1/4 x 11" piece of Basic Black card stock and score it at 5 1/2 and 2 3/4".

2.  For the Z Fold band cut a 1" x 11" piece of Basic Black card stock and score it at 5 1/2" and 2 3/4".  This band when folded should fit completely across the front of the card starting at the left edge and running the width of the card to the far right side.  Mine is adhered about 3/4" from the bottom.  I attached the left edge first, only applying glue on the DSP and then placing the strip across the adhesive.  Make sure this strip is straight and then adhere putting adhesive on the back of the 2 3/4" part and holding it down to the card.  Watch Dawn's video to see placement. Note:  Before attaching the band to the card complete step #6 and finish the band with step #9.
Here you can see the Z fold Banner stretching from the left hand to right hand side of the card.  Because the Playful Palette DSP was 6 x 6 I cut it into 1" strips to extend across the Z fold. See note in Step #6.
3. Cut a 2 1/2" x 4" piece of Very Vanilla for the front panel. Adhere.


4. Cut a 5 1/4' x 4" piece of Very Vanilla for the inside panel. Adhere.
 

5. Cut two pieces of DSP 2 3/8 x 3 7/8". Using Versa Mark ink, randomly stamp the small splotch from Gorgeous Grunge on the DSP and heat set with Copper Embossing Powder. Adhere these DSP pieces to the front and inside Very Vanilla panels.


6. Cut a strip of DSP 1/2" x 5 1/4", and 2 pieces 1/2" x 2 1/2". Using adhesive attach these strips to the Z fold band. Leave even strip of Very Vanilla showing around the edges. Note: If you are using 12 x 12 DSP you can cut this strip to measure 1/2" by 11 and then just score at 5 1/2 and 2 3/4".

7. Punch large and small balloon shapes from DSP and card stock with the Balloon Bouquet Punch as follows:  1 large and 1 small Flirty Flamingo, 3 small Emerald Envy, 2 large and 1 small DSP, 1 small Sweet Sugar Plum, 2 large and 1 small Peek A Boo Peach.  


I used a stylus and a foam mat to round the edges of my balloon and I distressed the edges with a sponge dauber and the corresponding ink. You can see the balloon technique by clicking here. I stamped the words "Cake Time" from the retired SAB set "Party Pants" on the Peek a Boo Peach large Balloon.

8. Using the Small Bow Framelit from Balloon Framelit Dies set cut out 10 bows in a variety of the card stock colours (see card) once the balloons are attached to the window strips and card add the bows with mini glue dots and basic rhinestones. Note: The glue dot will over lap the bow, so before attaching to the bow roll the glue dot a bit with your fingers to make it fit.

This wonderful little Framelit Die set coordinates with the Celebrate Today stamp set.  Never be without a perfect bow with this framelit!
9. Stamp the "happy birthday" sentiment from Boys Will Be Boys (R) stamp set three times in Versa Mark ink on 2 3/4" x 1" strips of basic black card stock. Emboss each strip with Copper Embossing Powder and cut into banners using the straight banner from "Bunch of Banners" Framelits. Attach these banners with 2 dimensionals per banner to the center of the DSP strip on the Z Fold Band. Attach two banners to the 5" strip centering between left and right sides, then attach the remaining two banners to the center and end of the band. Note: These banners can be attached after the Z Fold Band is adhered to the card front, see step #2. I put a large rhinestone between the first two banners for a bit more sparkle.


Bunch of Banners Framelit die coordinates with the Birthday Banners and Banners for You photopolymer stamp sets.  
10. Attach the balloons with strips of window sheet cut 1/4" by 3 inches. Use large Glue Dots to attach the window sheet strips to the center Z fold band.
In this view you can see the window strip attached with the large glue dot.

Attach the balloons next using large glue dots and dimensionals. The front of the balloons are puffed out (see #7). The center balloons were finished with an additional flat balloon face on the back side so you can't see the glue dots and window strip when the balloon is opened and shut. 

In this view you can see the backs of the balloons are covered with the extra balloon images I cut out because they are visible if the card is turned around.  I also finished off the Peek A Boo Peach balloon with an extra green bow to hide the glue dot. 
11. I finished the inside panel with a few balloons and some sequins.

Because there wasn't any room for writing a greeting on the inside panel once it was decorated, I added a piece of Very Vanilla card stock to the back of the card and stamped "Happy Birthday" with the Stylized Happy Birthday stamp in Momento Tuxedo Black Ink. 
Well I think that just about does it for today's card challenge. I'll leave you with just a few more shots of this fun card. If you try out my tutorial let me know if it was easy to follow. Thanks for dropping by and make sure you visit all the other Watercooler Wednesday Design Artists to see their fabulous Tic Tac Toe creations.


Happy Stamping!
Penny Token's Stamping Spot


Ending on August 31st, 2016:
  • August Hostess code EZGKEM73
  • July Bonus Promo - Last chance to redeem coupons
  • Thoughtful Blooms Photopolymer Stamp set - last chance to purchase, once all the supplies are gone it's fully retired 
Starting September 1st, 2016:
  • New Catalogue launches September 1st to January 4, 2017
  • Special Deals - replaces last year's Weekly Deals - starts Sept 1st each special runs for 7 days.  

MAY 2024 HOSTESS CODE

Welcome to my site and Happy May everyone!    Here is my new Hostess Code for the month:  Every papercrafter needs stuff, but not everyone c...