Showing posts with label " Penny Tokens Stampin Spot". Show all posts

Wednesday, February 8, 2017

Watercooler Wednesday - #105 Marsha's Colour Inspiration Challenge


Watercooler Wednesday has rolled around again and this time we are having a colour challenge brought to you by Marsha.  WWC105 features a lot of colours but Marsha has indicated you can use a minimum of three plus a neutral of your choice.  I'm not sure what colours you see when you look at this display, but based on Stampin' Up! ink colours, I see  Mint Macaroon, Pirouette Pink, Blushing Bride, Rich Razzleberry, Always Artichoke and Smokey Slate
Here Is My Card:


My inspiration for this card came from Caro Thomas who show cased some beautiful masculine cards in June 2016, using the Swirly Scribbles Thinlet diesI really liked how she inlaid the colour pieces in the die cut.  

Initially I planned to CASE her card substituting the colours from this challenge, but after playing with the die cuts a bit I decided to change up my design and only used her colour matchup on the inside of the card.  

Supplies:
Stamp Sets:  Jar of Love #141587 and Delicate Details #143214 (SAB)
Ink:  Rich Razzleberry, Smokey Slate, Pink Pirouette, Always Artichoke, Blushing Bride - Markers 
Card Stock:  Rich Razzleberry, Always Artichoke, Pink Pirouette, Smokey Slate and Whisper White
Accessories:  Big Shot, Trimmer, Swirly Scribbles Thinlet Dies, Spray Mister, Heat Gun, Festive Embossing Folder, Tom Bow Adhesive, Adhesive Remover
Swirley Scribbles Thinlet Dies #141497
Festive Texture Embossing Folder #141471

How It's Made: 

  1. Cut card base from 8 1/2" x 5 1/2" Smokey Slate card stock
  2. Cut 1st mat 5 1/4" x 4" from Rich Razzleberry and glue to base
  3. Cut 2nd mat 3 7/8" x 5 1/8" from Always Artichoke and glue to 1st mat
  4. Cut a piece of Whisper White for the top mat measuring 3 3/4" x 4 7/8".
  5. Place the wavy die from Swirly Scribbles on the long side of this mat so that it's closer to the left edge, and run through the Big Shot.  Retain all pieces. 
  6. Cut a strip of Watercolour Paper to measure 1 1/2" x 4 7/8".  This will be the base for your colour and for adding the cut out pieces of the Swirly Scribbles. 
  7. I used markers to colour five striped bands along the length of this piece.  The bands were at least an inch high.  Once all the colour has been added spray the bands with water and allow the ink to flow.  Dry with a piece of paper towel and a heat gun.  
  8. When this piece is dry run it through the Big Shot in the Festive Embossing folder. 
  9. Add adhesive to the Swirly wave piece center and glue to the watercolour strip. Then glue the two cut out pieces to each side.  You now have a rectangle.  
  10. Stamp the "thank you" sentiment from Jar of Love below the swirl in Rich Razzleberry ink.
  11. Ink up the thin lace strip from the Delicate Details and stamp along the top and bottom edge of the card, getting as close to the edge as possible.  Glue this mat to the Always Artichoke mat.
  12. Add random sprays of Basic Pearls.
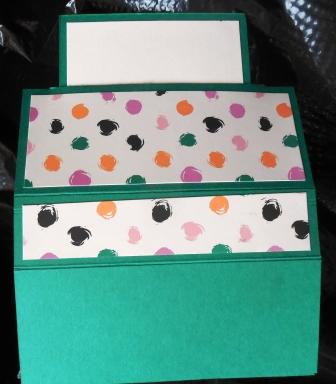
  13. Finish the inside of the card with a 4" x 5 1/4" mat of Whisper White card stock.  I cut Swirly waves from Always Artichoke, Smokey Slate and Pirouette Pink.  I adhered the Always Artichoke to the Whisper White mat and then fitted in pieces of the other colours and adhered with Tom Bow glue.  
  14. I didn't use a sentiment on the inside of the card because I wanted room to hand write my message of thanks. 
I really like how the band of colour beneath the Swirly Wave turned out.  The watercolor piece was perfect and once it was embossed the details reminded me of effervescence in the water.  This step could be done in two other ways:
  1. By gluing strips of coloured card stock to a piece of Whisper White and then embossing it or, 
  2. colour block a strip of Whisper White with your ink pads or by inking up an acrylic block and stamping bands of colour.  

I liked the effect I got with the markers and it was so fast and simple. I also like the basic pearls as they seem to carry along the idea of bubbles.
The beautiful stamped lace from the Delicate Details stamp set added some balance to the card.  It's stamped in Blushing Bride ink.  I know I'm going to be using this stamp set a lot.  I got mine for free from the Sale-A-Bration catalogue after I placed a $60.00 order. 
 

Well that's it for today.  I hope you enjoyed this card and will leave me a comment.  Also I hope you'll visit the other Watercooler Wednesday Design Artist's sites to see their projects.  I know you'll love them.  

This challenge linky is open until 5:00 pm MT Monday February 13th so I hope you'll play along with us.  We always love to see how we've inspired others.  Who knows you may be the next papercrafter to "Rock the Watercooler".

Happy Stamping!
Penny Tokens Stampin' Spot

Wednesday, January 4, 2017

WWC100 - CELEBRATION (ANYTHING GOES) CHALLENGE

This week's Watercooler Wednesday challenge is super special, and not just because it's the first challenge of the New Year.  It's special because it marks the "100th" Challenge on this site!  WOW that's so awesome! so our theme this week is an Anything Goes - as long as it's about "Celebrating".
Here's My Card:
I've been dying to share a stamp set I received for free at the November 2016 Stampin' Up! OnStage event in Vancouver, called "Birthday Blast".  This great set is part of a bundle featured in the new Occasions 2017 catalogue which goes live today.  Yippee!!!! 
 

Supply List:

Stamp Set: Birthday Blast
Card Stock: Emerald Envy, Very Vanilla, Sweet Sugarplum
DSP:  Playful Palette DSP and Scraps of Silver Glimmer Paper for stars
Ink: Momento Tuxedo Black Ink, Peek A Boo Peach, Emerald Envy, Black Marker
Accessories:  Trimmer, Detail Cutting Scissors, Dimensionals, Tear N' Tape, Basic Rhinestones, Star Punch from Itty Bitty Accents punch set, Acrylic blocks. 
Add caption Birthday Blast Bundle
Assembly:
I haven't made one of these pop up style cards since I began Stampin' Up! in 2006, so I looked up a video tutorial by Dawn Griffith that explains all the ins and outs of assembling this card.  This card goes together quickly and you could easily knock off several of these while watching television if you do your pre-cutting and stamping first.  Note at the time of writing this post I did not have the accompanying dies so fussy cut out my design.  Here are the measurements for the card stock and DSP you'll need to make my version.

Base:
  • Cut a 4 1/4" x 11" strip of Emerald Envy card stock
  • Score it at 1", 2 3/4", 3 3/4", 5 1/2" 7 1/4", 8 1/4" and 10"
  • Fold on center crease line
  • Stretch out the card stock and put the long side in the trimmer, lining up to cut along the 5 1/2" fold line.  Move the cutting blade down to 1/2" on the trimmer arm and score to 3 3/4".  
  • Cut 2 pieces DSP for top of box 1 1/2" x 4" and 2 at 3/4" x 4" 
  •  cut a 3 1/4" x 1 1/4" piece of Emerald Envy and a 3 x 1" piece of Sweet Sugarplum for the "Celebrate You" sentiment.

 Slider Piece:
  • Cut a 3" X 5 1/2" piece of Emerald Envy
  • Cut a piece of DSP 2 3/4" x 5 1/4"
  • Cut a piece of Very Vanilla card stock for back of panel 2 3/4" x 5 1/4"
  • Cut a piece of Very Vanilla card stock for front of panel 2 1/2" x 5"
 Stamping:
I stamped the "tiara" portion of the stamp twice on Emerald Envy and again on Sweet Sugarplum card stocks and fussy cut out all three images.  I cut out the top of the image from the Sweet Sugarplum stamped piece and mounted it with dimensionals to the top of the Emerald Envy image, and then glued this to the Very Vanilla front panel. 


I flipped the second Emerald Envy tiara upside down, butted the end of it up against the top portion and glued it down with Tom Bow glue. Note: I didn't layer with Sweet Sugarplum because the additional layers would prohibit the card from sliding through the slot. 
To finish this card I added a lot of Basic Rhinestone bling and some Silver Glimmer Paper stars.  The small stars and celebration confetti are also images from this stamp set and I stamped them in the background in Peek A Boo Peach and Emerald Envy Inks.   

 The finished card is very shiny and glitzy.  Remember with all this detail you have to be careful when closing the card.  If the embellishments get in the way it won't collapse easily.  Here' s what mine looks like when it's closed and it will fit in a standard envelope.  

I didn't stamp any sentiments on the back of the card as I may save this for an achievement rather than a birthday or special occasion event. 

So that's it for my celebration card today. 

 I hope if you're not already stamping or entering challenges that this will be the year you join in.  We'd love to have you submit your cards or projects to our weekly challenges. Who knows, you could "Rock the Watercooler" to display on your site. Here's how the challenge schedule is laid out every month:
Week 1 - Sketch
Week 2 - Color
Week 3 - Simply Stamping
Week 4 - Masculine
Week 5 - They don't happen that often, but when they do it will be a surprise.

I hope you'll check out the rest of the Watercooler Wednesday Design Team Artist's contributions to this very special occasion.  Our special guest designer Bronwyn Eastley is back and she will be picking a winner from the comments she receives and send them a special tutorial.  To go back to the Watercooler Wednesday blog just click here.  

HAPPY STAMPING!
PENNY TOKENS STAMPIN' SPOT  

Wednesday, December 7, 2016

WWC97 Penny's Sketch Challenge

This week, I'm happy to be hosting the sketch challenge at Watercooler Wednesday and I hope you'll play along. Here's the really fun sketch I've chosen WWC97:

Here's My Card:  
If you're a follower of my blog, you'll know I'm a big fan of masculine cards and so today I've created a masculine birthday card inspired by this sketch.  I chose a new to me stamp set called "One Wild Ride", and oh what fun I had with it!

When I looked at this sketch the layout of the elements simply screamed movement and so choosing to stamp the motorcycle was simply a no-brainer. While I was stamping "Born to Be Wild" was pumping through my brain so it made it even more fun. This song speaks volumes for the era I come from.  In case you can't remember here are the lyrics:
    Born to be Wild by Steppenwolf 
Get your motor runnin'
Head out on the highway
Lookin' for adventure
And whatever comes our way
Yeah Darlin' go make it happen
Take the world in a love embrace
Fire all of your guns at once
And explode into space

I like smoke and lightning
Heavy metal thunder
Racin' with the wind
And the feelin' that I'm under
Yeah Darlin' go make it happen
Take the world in a love embrace
Fire all of your guns at once
And explode into space

Like a true nature's child
We were born, born to be wild
We can climb so high
I never want to die

Born to be wild ........Born to be wild 

Supplies:
Stamp Set:  One Wild Ride

Inks:  Smokey Slate, Basic Black Archival Ink
Card Stock:  Basic Black, Whisper White, Smokey Slate and Peach Parfait (R)
Accessories:  Trimmer, Dimensionals, Acryllic Blocks, Wink of Stella

Assembly:
Card Base: 8 1/2 x 5 1/2" piece of Smokey Slate scored at 4 1/4"
First Layer:  5 2/8" x 3 2/8" piece of Basic Black card stock
Second layer:  5 1/8" x 3 1/8" piece of Peach Parfait card stock 
Third Layer:  5" x 3" piece of Whisper White card stock

Stamping:
1.  I stamped the motorcycle in the bottom right corner of the Whisper White layer in Basic Black Archival Ink and then stamped the sentiment "Birthday Wishes to the Leader of the Pack" above it with the same ink. 
2.   I stamped the "smudge" image from this set in Smokey Slate randomly around the background of the Whisper White piece to add some texture. 
3.  I stamped the tire track twice (end to end) on a 1/2 by 5 1/2" piece of Smokey Slate card stock and I used the Wink of Stella pen to give it some sparkle.  I used a corner rounder to round the ends of this strip and then glued it to the bottom of the Whisper White layer.


One of the best features of the card for me is the "Life's A Journey" badge.  Earlier this year I'd bought the Best Badge Punch as part of the Badges & Banners bundle on page 89 of the Annual Catalogue.  I was delighted to know  it also co-ordinated with the One Last Ride Stamp set.  What an awesome punch image. 


I used Basic Black, Whisper White and Peach Parfait card stocks to create this multi-layer badge. 

1.  For the first badge layer I stamped the badge on Peach Parfait.  I punched it out with the Best Badge punch and then cut the banner in half on the lines above and below "journey".  I also fussy cut around the badge pieces right to the black line and clipped out the little banner points on either side of the word "journey" and set them aside. 
2.  Next I stamped the badge twice on a piece of Whisper White and punched them out with the Best Badge punch.  I cut the word "journey from one of the white badges and clipped the sides of the banner into points. 
3.  To assemble I used the whole Whisper White badge as a base and glued the top Perfect Parfait badge piece in place, then glued the Whisper White word "journey" in the center of the badge, and the bottom Perfect Parfait piece of the badge.  To finish it off I fitted in the little banner points that I had set aside on either side of the word Journey. 
4.  I cut two more badges out of Basic Black card stock and cut them into quarters so I could extend the layer outside of the badge.  
5.  I mounted the finished layered badge with dimensionals to the card.  

6.  For the inside of the card I cut a piece of Whisper White card stock to measure 5 1/4 x 4 and stamped Happy Birthday (no name stamp)  and the Route 66 image from One Wild Ride on it.  

I was very happy with the way this card turned out and will be adding this WWC97 sketch outline to my "must use again" file.  I hope you liked it too and found my instructions helpful.   

I hope you've checked out the other design team artist's creations at the Watercooler Wednesday blog too, as they've come up with some great ways of using this sketch too.  Until the next time.....

Happy Stamping!
Penny Token's Stampin' Spot  

Masculine Birthday - Adventurous Sky FMS#

Welcome back and thanks for visiting my blog.  Today I have another masculine birthday card to share with you that features a soon to be rel...