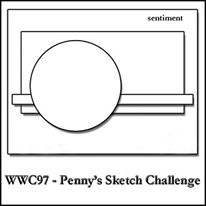
This week, I'm happy to be hosting the sketch challenge at Watercooler Wednesday and I hope you'll play along. Here's the really fun sketch I've chosen WWC97:

Here's My Card:
If you're a follower of my blog, you'll know I'm a big fan of masculine cards and so today I've created a masculine birthday card inspired by this sketch. I chose a new to me stamp set called "One Wild Ride", and oh what fun I had with it!
 When I looked at this sketch the layout of the elements simply screamed movement and so choosing to stamp the motorcycle was simply a no-brainer. While I was stamping "Born to Be Wild" was pumping through my brain so it made it even more fun. This song speaks volumes for the era I come from. In case you can't remember here are the lyrics:

Inks: Smokey Slate, Basic Black Archival Ink
Card Stock: Basic Black, Whisper White, Smokey Slate and Peach Parfait (R)
Accessories: Trimmer, Dimensionals, Acryllic Blocks, Wink of Stella
Assembly:
Card Base: 8 1/2 x 5 1/2" piece of Smokey Slate scored at 4 1/4"
First Layer: 5 2/8" x 3 2/8" piece of Basic Black card stock
Second layer: 5 1/8" x 3 1/8" piece of Peach Parfait card stock
Third Layer: 5" x 3" piece of Whisper White card stock

Stamping:
1. I stamped the motorcycle in the bottom right corner of the Whisper White layer in Basic Black Archival Ink and then stamped the sentiment "Birthday Wishes to the Leader of the Pack" above it with the same ink.
2. I stamped the "smudge" image from this set in Smokey Slate randomly around the background of the Whisper White piece to add some texture.
3. I stamped the tire track twice (end to end) on a 1/2 by 5 1/2" piece of Smokey Slate card stock and I used the Wink of Stella pen to give it some sparkle. I used a corner rounder to round the ends of this strip and then glued it to the bottom of the Whisper White layer.
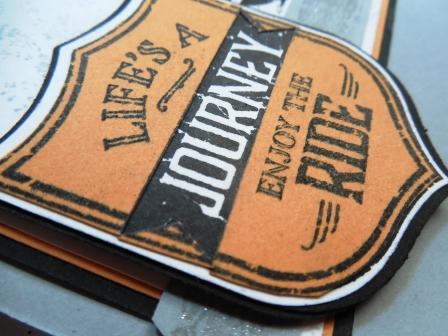
 One of the best features of the card for me is the "Life's A Journey" badge. Earlier this year I'd bought the Best Badge Punch as part of the Badges & Banners bundle on page 89 of the Annual Catalogue. I was delighted to know it also co-ordinated with the One Last Ride Stamp set. What an awesome punch image.


I used Basic Black, Whisper White and Peach Parfait card stocks to create this multi-layer badge.
1. For the first badge layer I stamped the badge on Peach Parfait. I punched it out with the Best Badge punch and then cut the banner in half on the lines above and below "journey". I also fussy cut around the badge pieces right to the black line and clipped out the little banner points on either side of the word "journey" and set them aside.
2. Next I stamped the badge twice on a piece of Whisper White and punched them out with the Best Badge punch. I cut the word "journey from one of the white badges and clipped the sides of the banner into points.
3. To assemble I used the whole Whisper White badge as a base and glued the top Perfect Parfait badge piece in place, then glued the Whisper White word "journey" in the center of the badge, and the bottom Perfect Parfait piece of the badge. To finish it off I fitted in the little banner points that I had set aside on either side of the word Journey.
4. I cut two more badges out of Basic Black card stock and cut them into quarters so I could extend the layer outside of the badge.
5. I mounted the finished layered badge with dimensionals to the card.

6. For the inside of the card I cut a piece of Whisper White card stock to measure 5 1/4 x 4 and stamped Happy Birthday (no name stamp) and the Route 66 image from One Wild Ride on it.
 I was very happy with the way this card turned out and will be adding this WWC97 sketch outline to my "must use again" file. I hope you liked it too and found my instructions helpful.

I hope you've checked out the other design team artist's creations at the Watercooler Wednesday blog too, as they've come up with some great ways of using this sketch too. Until the next time.....
Happy Stamping!
Penny Token's Stampin' Spot
Here's My Card:
If you're a follower of my blog, you'll know I'm a big fan of masculine cards and so today I've created a masculine birthday card inspired by this sketch. I chose a new to me stamp set called "One Wild Ride", and oh what fun I had with it!

Born to be Wild by Steppenwolf
Get your motor runnin'
Head out on the highway
Lookin' for adventure
And whatever comes our way
Yeah Darlin' go make it happen
Take the world in a love embrace
Fire all of your guns at once
And explode into space
Get your motor runnin'
Head out on the highway
Lookin' for adventure
And whatever comes our way
Yeah Darlin' go make it happen
Take the world in a love embrace
Fire all of your guns at once
And explode into space
I like smoke
and lightning
Heavy metal thunder
Racin' with the wind
And the feelin' that I'm under
Yeah Darlin' go make it happen
Take the world in a love embrace
Fire all of your guns at once
And explode into space
Heavy metal thunder
Racin' with the wind
And the feelin' that I'm under
Yeah Darlin' go make it happen
Take the world in a love embrace
Fire all of your guns at once
And explode into space
Like a true
nature's child
We were born, born to be wild
We can climb so high
I never want to die
We were born, born to be wild
We can climb so high
I never want to die
Born to be
wild ........Born to be wild
Stamp Set: One Wild Ride
Supplies:

Inks: Smokey Slate, Basic Black Archival Ink
Card Stock: Basic Black, Whisper White, Smokey Slate and Peach Parfait (R)
Accessories: Trimmer, Dimensionals, Acryllic Blocks, Wink of Stella
Assembly:
Card Base: 8 1/2 x 5 1/2" piece of Smokey Slate scored at 4 1/4"
First Layer: 5 2/8" x 3 2/8" piece of Basic Black card stock
Second layer: 5 1/8" x 3 1/8" piece of Peach Parfait card stock
Third Layer: 5" x 3" piece of Whisper White card stock

Stamping:
1. I stamped the motorcycle in the bottom right corner of the Whisper White layer in Basic Black Archival Ink and then stamped the sentiment "Birthday Wishes to the Leader of the Pack" above it with the same ink.
2. I stamped the "smudge" image from this set in Smokey Slate randomly around the background of the Whisper White piece to add some texture.
3. I stamped the tire track twice (end to end) on a 1/2 by 5 1/2" piece of Smokey Slate card stock and I used the Wink of Stella pen to give it some sparkle. I used a corner rounder to round the ends of this strip and then glued it to the bottom of the Whisper White layer.

I used Basic Black, Whisper White and Peach Parfait card stocks to create this multi-layer badge.
1. For the first badge layer I stamped the badge on Peach Parfait. I punched it out with the Best Badge punch and then cut the banner in half on the lines above and below "journey". I also fussy cut around the badge pieces right to the black line and clipped out the little banner points on either side of the word "journey" and set them aside.
2. Next I stamped the badge twice on a piece of Whisper White and punched them out with the Best Badge punch. I cut the word "journey from one of the white badges and clipped the sides of the banner into points.
3. To assemble I used the whole Whisper White badge as a base and glued the top Perfect Parfait badge piece in place, then glued the Whisper White word "journey" in the center of the badge, and the bottom Perfect Parfait piece of the badge. To finish it off I fitted in the little banner points that I had set aside on either side of the word Journey.
4. I cut two more badges out of Basic Black card stock and cut them into quarters so I could extend the layer outside of the badge.
5. I mounted the finished layered badge with dimensionals to the card.

6. For the inside of the card I cut a piece of Whisper White card stock to measure 5 1/4 x 4 and stamped Happy Birthday (no name stamp) and the Route 66 image from One Wild Ride on it.


I hope you've checked out the other design team artist's creations at the Watercooler Wednesday blog too, as they've come up with some great ways of using this sketch too. Until the next time.....
Happy Stamping!
Penny Token's Stampin' Spot


