This week's Watercooler Wednesday challenge is super special, and not just because it's the first challenge of the New Year. It's special because it marks the "100th" Challenge on this site! WOW that's so awesome! so our theme this week is an Anything Goes - as long as it's about "Celebrating".
Here's My Card:
I've been dying to share a stamp set I received for free at the November 2016 Stampin' Up! OnStage event in Vancouver, called "Birthday Blast". This great set is part of a bundle featured in the new Occasions 2017 catalogue which goes live today. Yippee!!!!
Supply List:
Stamp Set: Birthday Blast
Card Stock: Emerald Envy, Very Vanilla, Sweet Sugarplum
DSP: Playful Palette DSP and Scraps of Silver Glimmer Paper for stars
Ink: Momento Tuxedo Black Ink, Peek A Boo Peach, Emerald Envy, Black Marker
Accessories: Trimmer, Detail Cutting Scissors, Dimensionals, Tear N' Tape, Basic Rhinestones, Star Punch from Itty Bitty Accents punch set, Acrylic blocks.
Assembly:
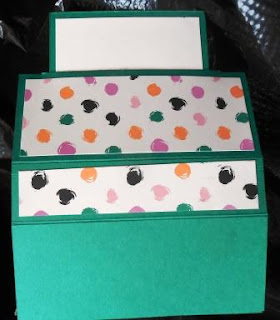
I haven't made one of these pop up style cards since I began Stampin' Up! in 2006, so I looked up a video tutorial by Dawn Griffith that explains all the ins and outs of assembling this card. This card goes together quickly and you could easily knock off several of these while watching television if you do your pre-cutting and stamping first. Note at the time of writing this post I did not have the accompanying dies so fussy cut out my design. Here are the measurements for the card stock and DSP you'll need to make my version.
Base:
Here's My Card:
I've been dying to share a stamp set I received for free at the November 2016 Stampin' Up! OnStage event in Vancouver, called "Birthday Blast". This great set is part of a bundle featured in the new Occasions 2017 catalogue which goes live today. Yippee!!!!
Supply List:
Stamp Set: Birthday Blast
Card Stock: Emerald Envy, Very Vanilla, Sweet Sugarplum
DSP: Playful Palette DSP and Scraps of Silver Glimmer Paper for stars
Ink: Momento Tuxedo Black Ink, Peek A Boo Peach, Emerald Envy, Black Marker
Accessories: Trimmer, Detail Cutting Scissors, Dimensionals, Tear N' Tape, Basic Rhinestones, Star Punch from Itty Bitty Accents punch set, Acrylic blocks.
 |
| Add caption Birthday Blast Bundle |
I haven't made one of these pop up style cards since I began Stampin' Up! in 2006, so I looked up a video tutorial by Dawn Griffith that explains all the ins and outs of assembling this card. This card goes together quickly and you could easily knock off several of these while watching television if you do your pre-cutting and stamping first. Note at the time of writing this post I did not have the accompanying dies so fussy cut out my design. Here are the measurements for the card stock and DSP you'll need to make my version.
Base:
- Cut a 4 1/4" x 11" strip of Emerald Envy card stock
- Score it at 1", 2 3/4", 3 3/4", 5 1/2" 7 1/4", 8 1/4" and 10"
- Fold on center crease line
- Stretch out the card stock and put the long side in the trimmer, lining up to cut along the 5 1/2" fold line. Move the cutting blade down to 1/2" on the trimmer arm and score to 3 3/4".
- Cut 2 pieces DSP for top of box 1 1/2" x 4" and 2 at 3/4" x 4"
- cut a 3 1/4" x 1 1/4" piece of Emerald Envy and a 3 x 1" piece of Sweet Sugarplum for the "Celebrate You" sentiment.
Slider Piece:
- Cut a 3" X 5 1/2" piece of Emerald Envy
- Cut a piece of DSP 2 3/4" x 5 1/4"
- Cut a piece of Very Vanilla card stock for back of panel 2 3/4" x 5 1/4"
- Cut a piece of Very Vanilla card stock for front of panel 2 1/2" x 5"
Stamping:
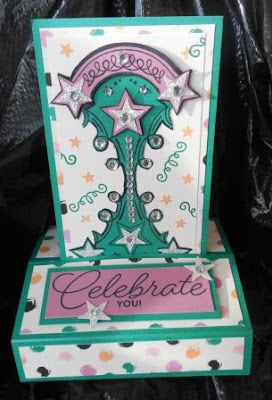
I stamped the "tiara" portion of the stamp twice on Emerald Envy and again on Sweet Sugarplum card stocks and fussy cut out all three images. I cut out the top of the image from the Sweet Sugarplum stamped piece and mounted it with dimensionals to the top of the Emerald Envy image, and then glued this to the Very Vanilla front panel.
I flipped the second Emerald Envy tiara upside down, butted the end of it up against the top portion and glued it down with Tom Bow glue. Note: I didn't layer with Sweet Sugarplum because the additional layers would prohibit the card from sliding through the slot.
To finish this card I added a lot of Basic Rhinestone bling and some Silver Glimmer Paper stars. The small stars and celebration confetti are also images from this stamp set and I stamped them in the background in Peek A Boo Peach and Emerald Envy Inks.
The finished card is very shiny and glitzy. Remember with all this detail you have to be careful when closing the card. If the embellishments get in the way it won't collapse easily. Here' s what mine looks like when it's closed and it will fit in a standard envelope.
So that's it for my celebration card today.

I hope if you're not already stamping or entering challenges that this will be the year you join in. We'd love to have you submit your cards or projects to our weekly challenges. Who knows, you could "Rock the Watercooler" to display on your site. Here's how the challenge schedule is laid out every month:
Week 1 - Sketch
I stamped the "tiara" portion of the stamp twice on Emerald Envy and again on Sweet Sugarplum card stocks and fussy cut out all three images. I cut out the top of the image from the Sweet Sugarplum stamped piece and mounted it with dimensionals to the top of the Emerald Envy image, and then glued this to the Very Vanilla front panel.
I flipped the second Emerald Envy tiara upside down, butted the end of it up against the top portion and glued it down with Tom Bow glue. Note: I didn't layer with Sweet Sugarplum because the additional layers would prohibit the card from sliding through the slot.
To finish this card I added a lot of Basic Rhinestone bling and some Silver Glimmer Paper stars. The small stars and celebration confetti are also images from this stamp set and I stamped them in the background in Peek A Boo Peach and Emerald Envy Inks.
The finished card is very shiny and glitzy. Remember with all this detail you have to be careful when closing the card. If the embellishments get in the way it won't collapse easily. Here' s what mine looks like when it's closed and it will fit in a standard envelope.
 |
| I didn't stamp any sentiments on the back of the card as I may save this for an achievement rather than a birthday or special occasion event. |
So that's it for my celebration card today.

I hope if you're not already stamping or entering challenges that this will be the year you join in. We'd love to have you submit your cards or projects to our weekly challenges. Who knows, you could "Rock the Watercooler" to display on your site. Here's how the challenge schedule is laid out every month:
Week 1 - Sketch
Week 2 - Color
Week 3 - Simply Stamping
Week 4 - Masculine
Week 5 - They don't happen that often, but when they do it will be a surprise.
I hope you'll check out the rest of the Watercooler Wednesday Design Team Artist's contributions to this very special occasion. Our special guest designer Bronwyn Eastley is back and she will be picking a winner from the comments she receives and send them a special tutorial. To go back to the Watercooler Wednesday blog just click here.
HAPPY STAMPING!
PENNY TOKENS STAMPIN' SPOT


