Wednesday, December 14, 2016

WWC98 - Kath's Color Challenge

Whew!  This week just flew by and once again it's time for the Watercooler Wednesday Challenge.  This week it's hosted by Kath and she's chosen a very festive colour challenge.  The colours you need to use in your card are:  Early Espresso, Silver, Gold and Whisper White. 

Here's My Card:  
I'm not sure which was more challenging, trying to decide what I would create for this week's challenge or taking the pictures of it.  

I still had a bunch of Christmas cards to make so I decided to work with two of my favourite stamp sets this season and a technique called "3 layer stamping" to design this  fun and festive card.  Oh and just so you know, I did use all the colours in the challenge.  It's extremely difficult to see that the Reindeer are Gold Embossed, but trust me they are. One of the reasons for this is that the Silver Foil reflects so much light that it made it difficult to photograph and you're going to have to wait until the end of this post to discover the other reason.  You'll be surprised!

Supplies:
Stamp Sets:  Cookie Cutter Christmas #142043, Merry Mice #142145
Ink:  Early Espresso, Versa Mark, Smokey Slate
Card Stock:  Early Espresso, Whisper White, Silver Foil and Gold Glimmer Paper
Accessories:  Big Shot, Paper Trimmer, Heat Gun, Gold Embossing Powder, Embossing Buddy, Bunch of Banners Framelit Dies #141488, Cookie Cutter Punch, Dimensionals, Tom Bow Glue and Basic Rhinestones


Assembly:
1.  Cut the Early Espresso card stock to 8 1/2" x 5 1/2" and score at 4 1/4".

2.  Cut the following layers of Silver Foil card stock: 5 1/4" x 4", 4 1/2" x 3 1/4" and 3 1/2" x 2 1/4".
Note:  I always cut out the centers of fancy foils or glimmer paper, because they are two precious to waste, and also because it reduces the amount of weight for mailing.  This is what my foil layers look like after they are cut.  I have a set of rectangular dies that I use to cut out the centers, but you could do this with a paper trimmer.  The lighting is very poor but trust me these layers are silver. 
3.  Cut the following layers of Whisper White card stock:  5" x 3 3/4", 4 1/4" x 3", 3 1/4" x 2".  Cut a 3" by 2" piece to stamp an extra reindeer image. Cut a 5 1/4" x 4" piece for the inside of the card.

4.  Working with the Whisper White layers place them one on top of the other and center each layer.  I hold them in place with a dab of re-positioning glue on the back side of the two smaller layers.
5.  Now the fun part.  Once I had the layers properly aligned, I randomly stamped the reindeer head from the Cookie Cutter Christmas stamp set with Versa Mark ink.  Make sure your ink is juicy. When you stamp the image you are stamping right over the layers.  Apply Gold Embossing Powder shake off and heat set the images. 
Cookie Cutter Christmas stamp Set #142043
6.  Stamp the star image from Merry Mice in Smokey Slate ink, randomly across the layers. 
 
Merry Mice #142145

7.  Stamp the reindeer head on the 3" x 2" piece of Whisper White with the Versa Mark Ink, add the Gold Embossing Powder and heat set.  Cut out the image with the Cookie Cutter Punch.
 
Cookie Cutter Punch #40396  Note:  This punch will soon be out of stock. 

8.  Punch out two bows using the Cookie Cutter Punch from Gold Glimmer Paper and attach it to the middle of the punched out reindeer's head.  Add a basic rhinestone to the center.  Set this piece aside.  Note: the second bow is for the inside of the card.

9. Starting with the smallest Whisper White layer, glue it to the smallest Silver Foil layer, then repeat with the next sized layers and finally glue the group of layers to the Early Espresso card base.  Make sure you are lining up your images (antlers, ears etc.) so they join one area to the next.

10.  Adhere the punched out reindeer head to the center of the card using dimensionals.  

10.  Stamp the sentiment "It's Time To Deck The Halls" from the Merry Mice stamp set in Early Espresso ink on a scrap of Whisper White and cut out with the Bunch of Banner Framelit Dies and Big Shot machine.  Adhere with dimensionals.  Add two basic rhinestones on the end of this banner and scatter some extra rhinestones randomly on the card front. 

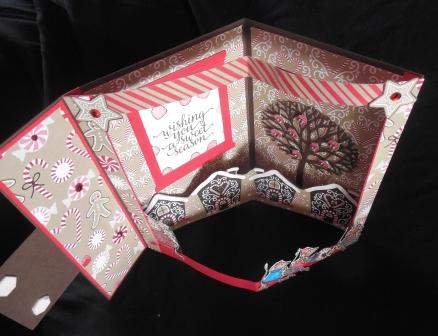
11.  For the inside of the card cut a 5 1/4" x 4" piece of Whisper White card and stamp the sentiment "Wishing You a Festive Season" from Merry Mice and the reindeer head in Early Espresso ink.  Stamp some stars in Smokey Slate.  Add the Gold Glimmer bow to the reindeer's head and add a basic rhinestone.
Stamping on inside of the card.
Okay, if you've been waiting to find out what the second reason is that the Gold Embossing doesn't show up in the pictures, read on.  Today I learned the hard way while I was in the process of embossing the images that my Gold Embossing Powder which I've had for some time, had gone bad.  What does that mean?  Well, although the powder heat set, the silica had lost it's oomph or it's ability to turn the powder into a shiny gold surface and it remained flat and dull on the surface.  Bummer!  From now on I'll be testing my Embossing Powders  before using them.  What about you?  Have you ever had this happen to you?
I hope you enjoyed this card today and my short tutorial.  Layered cards are one of those neat techniques that you can always rely on  to give a simple wow to your cards.  I hope you'll leave me a comment and let me know what you think of this card.  And, don't forget to check out what the other Watercooler Wednesday Design Team artists have created for this week's challenge. 

Happy Stamping!
Penny Token's Stamping Spot

Wednesday, December 7, 2016

WWC97 Penny's Sketch Challenge

This week, I'm happy to be hosting the sketch challenge at Watercooler Wednesday and I hope you'll play along. Here's the really fun sketch I've chosen WWC97:

Here's My Card:  
If you're a follower of my blog, you'll know I'm a big fan of masculine cards and so today I've created a masculine birthday card inspired by this sketch.  I chose a new to me stamp set called "One Wild Ride", and oh what fun I had with it!

When I looked at this sketch the layout of the elements simply screamed movement and so choosing to stamp the motorcycle was simply a no-brainer. While I was stamping "Born to Be Wild" was pumping through my brain so it made it even more fun. This song speaks volumes for the era I come from.  In case you can't remember here are the lyrics:
    Born to be Wild by Steppenwolf 
Get your motor runnin'
Head out on the highway
Lookin' for adventure
And whatever comes our way
Yeah Darlin' go make it happen
Take the world in a love embrace
Fire all of your guns at once
And explode into space

I like smoke and lightning
Heavy metal thunder
Racin' with the wind
And the feelin' that I'm under
Yeah Darlin' go make it happen
Take the world in a love embrace
Fire all of your guns at once
And explode into space

Like a true nature's child
We were born, born to be wild
We can climb so high
I never want to die

Born to be wild ........Born to be wild 

Supplies:
Stamp Set:  One Wild Ride

Inks:  Smokey Slate, Basic Black Archival Ink
Card Stock:  Basic Black, Whisper White, Smokey Slate and Peach Parfait (R)
Accessories:  Trimmer, Dimensionals, Acryllic Blocks, Wink of Stella

Assembly:
Card Base: 8 1/2 x 5 1/2" piece of Smokey Slate scored at 4 1/4"
First Layer:  5 2/8" x 3 2/8" piece of Basic Black card stock
Second layer:  5 1/8" x 3 1/8" piece of Peach Parfait card stock 
Third Layer:  5" x 3" piece of Whisper White card stock

Stamping:
1.  I stamped the motorcycle in the bottom right corner of the Whisper White layer in Basic Black Archival Ink and then stamped the sentiment "Birthday Wishes to the Leader of the Pack" above it with the same ink. 
2.   I stamped the "smudge" image from this set in Smokey Slate randomly around the background of the Whisper White piece to add some texture. 
3.  I stamped the tire track twice (end to end) on a 1/2 by 5 1/2" piece of Smokey Slate card stock and I used the Wink of Stella pen to give it some sparkle.  I used a corner rounder to round the ends of this strip and then glued it to the bottom of the Whisper White layer.


One of the best features of the card for me is the "Life's A Journey" badge.  Earlier this year I'd bought the Best Badge Punch as part of the Badges & Banners bundle on page 89 of the Annual Catalogue.  I was delighted to know  it also co-ordinated with the One Last Ride Stamp set.  What an awesome punch image. 


I used Basic Black, Whisper White and Peach Parfait card stocks to create this multi-layer badge. 

1.  For the first badge layer I stamped the badge on Peach Parfait.  I punched it out with the Best Badge punch and then cut the banner in half on the lines above and below "journey".  I also fussy cut around the badge pieces right to the black line and clipped out the little banner points on either side of the word "journey" and set them aside. 
2.  Next I stamped the badge twice on a piece of Whisper White and punched them out with the Best Badge punch.  I cut the word "journey from one of the white badges and clipped the sides of the banner into points. 
3.  To assemble I used the whole Whisper White badge as a base and glued the top Perfect Parfait badge piece in place, then glued the Whisper White word "journey" in the center of the badge, and the bottom Perfect Parfait piece of the badge.  To finish it off I fitted in the little banner points that I had set aside on either side of the word Journey. 
4.  I cut two more badges out of Basic Black card stock and cut them into quarters so I could extend the layer outside of the badge.  
5.  I mounted the finished layered badge with dimensionals to the card.  

6.  For the inside of the card I cut a piece of Whisper White card stock to measure 5 1/4 x 4 and stamped Happy Birthday (no name stamp)  and the Route 66 image from One Wild Ride on it.  

I was very happy with the way this card turned out and will be adding this WWC97 sketch outline to my "must use again" file.  I hope you liked it too and found my instructions helpful.   

I hope you've checked out the other design team artist's creations at the Watercooler Wednesday blog too, as they've come up with some great ways of using this sketch too.  Until the next time.....

Happy Stamping!
Penny Token's Stampin' Spot  

Thursday, December 1, 2016

Closeout Sale - Stampin' Up!


It's here..........the final sale of the year!  Happy December Everyone!

Starting TODAY and running through January 3rd, 2017, Stampin' Up! is offering hundreds of products at up to 60% off during their Year End Closeout sale. 

What does this mean for you?  Well, it's the beginning of a huge sell off of current high-inventory products, clearance products and retiring Holiday catalogue items. 

So, if you, your stampin' craftin' friends or family (husband or boyfriends - hint, hint) are still looking for stocking stuffers and crafty gifts they can look no further!


Stampin' Up! is offering great deals on everything including from stamp sets, bundles, paper, punches, framelits now until January 3rd, 2017. This sale is absolutely AWESOME! 

Hurry though, Accessories (Everything Else) and Clearance Rack items are only available while supplies last!!!  

Visit my on-line store to and check it out the YEAR END CLOSEOUTS!
HAPPY STAMPING!
Penny Token's Stampin' Spot

Wednesday, November 30, 2016

WWC96 - Gail Allen's Special Fold Challenge

Welcome to Watercooler Wednesday's latest challenge #WWC96.  Our awesome designer Gail Allen is hostess this week and she's chosen to feature a Special Fold Challenge. Not only do we have a great challenge but we are doubly blessed because we have the very talented Bronwyn Eastley from Australia joining us as our Guest Designer.  How exciting is that? 

Over the years I've created many cards using special folds, and I'm always excited to find and try something new to add to my repertoire.  The special fold I've chosen for this challenge is called an "Envelope Fold Card".  I ran across a tutorial on Split Coast Stampers by Melissa Banbury, several weeks ago and I was hooked. 

Although this may look like a difficult card, it's deceiving.  In fact, it was quick and easy to assemble with just a few instructions.  The most difficult part of making this card was deciding what to put on the inside.

Here's my card:  
This first picture shows just the outside of the card and you can see it looks like an envelope.  That cute little mouse from Merry Mice stamp set is guarding the  magic that happens when you open the card. 
And, here's the inside.  I've chosen to combine elements from Merry Mice, Candy Cane Lane DSP,  and the Candy Cane Lane stamp set to create a fun 3 dimensional Christmas scene. 

There's lots going on in this card, and I know it's difficult to see, however, I'll be showing you pictures from every angle so you can see all the details.

Supplies:
Stamp Sets:  Candy Cane Lane, Merry Mice
Card Stock:  Early Expresso, Real Red, Tip Top Taupe and Watercolour Paper 
Designer Series Paper:  Candy Cane Lane
Dies: Thoughtful Branches Framelits (Retired)
Ink:  Early Espresso, Black Archival Ink, Real Red, Flirty Flamingo, Pacific Point, Emerald Envy, Pear Pizzazz, Watermelon Wonder, Tip Top Taupe, Daffodil Delight, Lost Lagoon and a Red Sharpie Alcohol Ink Marker.
Accessories:  Big Shot, Trimmer, Simply Scored, Aqua painter, Thoughtful Branches and Window Frame dies, Precision Scissors for fussy cutting, Dimensionals, Sticky Strip and Tom Bow Glue.  

Assembly:
1.  Envelope Card Base:  The card base is a 6" x 10 18" piece of Early Espresso card stock scored at 2", 2 18" and 6 1/8".
2.  Inside Panels:  You can leave the back of the card plain or choose to add  DSP.  I cut two pieces of DSP measuring 3 3/4" x 5 3/4" and glued them to the back panels. Note: Leave a little space so you fold the card the DSP doesn't interfere or become too bulky to fold naturally. 

3. Window Panel:  The window pane layer is a 6" x 8" piece of Real Red card stock. Score this piece a 3/8" on both of the 6" sides. Next measure 1/2" from the top and bottom of the 8" side and a 1/2" in from the two 3/8" fold lines. Note: I used my score blade and just marked all the cutting sides and then inserted the panel in my trimmer and cut away the center rectangle. 

Add sticky strips to the inside edges of this frame and attach the frame to the 
2 1/8" score line on the left hand side and the edge of the card on the right.  Make sure the top and bottom center parts of the frame bend towards the center of the card.  

Before attaching the above window panel I cut and adhered strips of DSP to the sides and top of the frame.  They measured approximately 1/2" x 6".  I adhered them and trimmed off excess paper. 

4.  Inside Front Panel:  Cut a  piece of Real Red card stock to measure 1 3/4" x 5 3/4" for the inside front panel, and a 1 1/2" x 5 1/2" piece of DSP.  Adhere to the inside front panel.  

5.  Outside Flap:  Cut a 2 1/8" x 3" piece of Early Espresso, a 2 x 2 7/8" piece of coordinating DSP and a 1 3/4" x 2 3/4" piece of Watercolor paper for the image of the Mouse.  Glue all pieces together.  I added glue to the bottom of this flap and attached it to the middle of the outside bottom panel.  I attached  two dimensionals to the top part and then removed some of the stickiness so the panel would hold the envelope portion together when closed.  You could also just make a belly band to ensure the card stays shut.  

Once I had the card and frame assembled, I began adding images of the Merry Mice.  All of the mice were stamped in Black Archival ink on the Watercolor paper and then I fussy cut them out.  I used a variety of colours and painted them with an aqua painter.  I attached the fat little mouse with the star on it's tail to the inside right edge of the card and them glued each of the three mice with gifts and lights to the bottom edge with mini glue dots.  


I also cut out a row of houses from the Candy Cane Lane DSP>  I left the bottom of the strip flat and just fussy cut around each of the houses on the top edge of the strip. Then I attached the two outside edges of this panel with sticky strip to the back of the card and bent the center of the strip so it would fold inwards when the card was closed. When the card is open the houses stand out from the back of the card adding another layer of dimension.  
I used the tree framelit from the retired Thoughtful Branches Framelit set to cut out two trees. I cut one from Tip Top Taupe and the other from Early Espresso card stock. These trees were layered together in an offset manner and adhered to the back right hand side of the card. Eight small gumdrops were cut from the designer paper and attached to the branches with small pieces of dimensionals.  Basic Rhinestones were added to the center of each to add a bit of bling. 

For the right side of the card I used a Window Frame die cut in Real Red to frame a piece of Whisper White card stock that was stamped with the "Wishing You a Sweet Season" sentiment from Candy Cane Christmas and some gumdrops.    


So that's my special Envelope Fold card. Once again a big thank you to Melissa Banbury for her inspiration. I'm very happy with the way my card turned out and will be sending it to a very special person in my life.  I know she will totally appreciate the work I put into this card.  I hope you enjoyed it too and would love to have your feedback.  

Don't forget to check out the rest of the Design Team's creations and our Special Guest Designer, Brownyn Eastley - they're simply awesome and very inspiring.  

Happy Stamping!
Penny Token's Stampin Spot

Wednesday, November 23, 2016

WWC95 Libby's Masculine "Anything Goes" Challenge


At the beginning of November I participated in Stampin' Ups! On Stage Local in Vancouver, BC as one of the display board artists. I was tasked with creating 15 samples featuring some awesome new masculine stamp sets that will debut in January in the upcoming Occasions Spring Catalogue.  

So I'm very excited that Libby Fens is hosting the WWC95 Masculine - Anything Goes challenge at the Watercooler Wednesday blog, because I get to share a sneak peak of one of those awesome new stamp sets with you.

Here's My Card:
Drum roll please....................... 

What do you think?  Are you excited?  This card features a few of the images from a soon to be released stamp set called "Nailed It".  Let me tell you there are 15 awesome tool related rubber stamps in this set, that are bound to make your masculine cards rock. And, to make it even better, there's a co-ordinating set of framelits called "Build It".  Look for this bundle when the new Occasions catalogue goes live on January 4th, 2017!  

Supplies:
Stamp Sets:  Nailed It, Jar of Love, Gorgeous Grunge
Inks:  Delightful Dijon, Basic Gray, Basic Black Archival, Versa Mark Pad and Pen
Card stock: Basic Gray, Whisper White, Silver Foil
Accessories:  Everyday Jars Framelits, Block E, Spritzer, Big Shot, Silver Sequins, Heat Gun, Silver Embossing Powder, Embossing Buddy, Urban Underground Embellishments (New), Glue Dots Mini, Trimmer, Dimensionals and Tom Bow Glue.

Details:
While I can't give you many details about this stamp set or show you a picture of it just yet, I can tell you how I created the background for the screwdriver and the mason jar and assembled the card.

The card base was cut from a 5 1/2" x 8 1/2" piece of Basic Gray card stock and it was scored at 4 1/4".  A 4 x 5 1/4" piece of Silver Foil was cut for the silver layer.  Note:  I never waste fancy papers like this, so before adhering this piece I cut a rectangle from the center and set it aside for another project.

1.  The background was created by directly inking an acrylic block (E) with Delightful Dijon and Basic Gray inks and then spritzing them with water.  Once the block was wet I pressed it down for a few seconds on the center of a 3 3/4" x 5" piece of Whisper White card stock. 

2.  Next I inked up the medium sized spotted stamp from Gorgeous Grunge with Basic Gray ink and stamped it randomly across the Whisper White layer. 

3.  The screw driver image was stamped in Basic Black Archival ink onto the block on the Whisper White layer.  I used a Versa Mark pen to colour in the shaft of the screw driver and then heat embossed that section with Silver Embossing Powder.  I stamped the screw driver again on Basic Gray card stock and fussy cut around the handle. The Basic Gray handle was adhered to the original screw driver image with dimensionals.   

4. For the Mason Jar:
  • I stamped two large mason jar images on Whisper White with Basic Black Archival ink and cut them out with the corresponding Framelit.  
  • I fussy cut out the inside of the jar on one of the images for the front of the jar.  
  • I adhered Adhesive Strip around the edge of the second mason jar to make a well for the shaker bits.  I filled the well of the shaker card with "bits and pieces"  from the Nailed It set that were stamped and embossed with Silver Embossing Powder and cut out with the matching framelits.  I also added silver seed beads and sequins. 
  • I cut out a third mason jar from an Acetate window sheet and glued this to the back of the front jar. I wiped this piece down with my Stamping Buddy, to remove static. I removed the sticky strip from the Adhesive strip and attached the front of the card to seal the shaker.
  • I stamped the lid for the shaker jar with Versa Mark Ink on Basic Gray card stock and them heat embossed it with Silver Embossing powder.  The lid was glued  over the Whisper White lid. I used sticky strip to attach the finished mason jar to the Whisper White layer. 

  • Three very realistic metallic "screw heads" were adhered with mini glue dots to the bottom right hand corner of the card.  This is another sneak peak of a new product called "Urban Underground Embellishments".  
Well that's it for my card this week, and I hope you liked it. I'd love to have your comments, and if you haven't checked out the rest of the WWC95 Watercooler Wednesday design artists cards make sure you do, there are some great samples.   

Over the next month I'm going to be showcasing some more sneak peaks featuring stamp sets from the new Occasions Catalogue I received for free for attending OnStage.  And, when the new Occasions catalogue goes live in January I'll be posting more of the projects I made for OnStage.  You're going to love them! 
Happy Stamping!
Penny Tokens Stampin' Spot 

2024-2025 Annual Stampin' Up! Catalogue has launched!

 HAPPY MAY 1ST| Today I'm celebrating and  sharing the launch of the much awaited Stampin' Up! Annual Catalogue which will run from ...