In my last post, I shared my "Festive Flurry Goes Pink" card and details. This was such a fun and easy card to make and it delivered that WOW factor when I showed it to my friends.
I also posted it on my Pinterest site and Stampin Connection web site (a unique site just for Stampin' Up Demos to share their work and discussions), and I received a lot of wonderful comments about the Pink and Smokey Grey colour combination on a Christmas card.
I also posted it on my Pinterest site and Stampin Connection web site (a unique site just for Stampin' Up Demos to share their work and discussions), and I received a lot of wonderful comments about the Pink and Smokey Grey colour combination on a Christmas card.
One of the things I really liked about this card was the addition of the Chevron Ribbon. This 3/4" twill ribbon is simply beautiful and comes in a host of colours. So that set me to thinking and got the creative cogs in my brain turning and before you know it I decided to try the same card design but with a myriad of other colours.
My colour choices for these next cards were based solely on the Chevron Ribbon shares I'd purchased in June. And, while these colour choices may be a little unconventional for some of you, I found them exciting and fresh.
If you're interested in CASing this card all the supplies and construction information can be found on my previous post.
If you're interested in CASing this card all the supplies and construction information can be found on my previous post.
 |
| Here's a group shot of all the cards I made. They looked so awesome all together. |
 |
| I made four cards with the fold at the top. Right now I'm working on a box to hold them and will give these away as a set. It will make an awesome pre-Christmas hostess gift, don't you think? |
 |
| I made three side-fold cards and I'm currently working on a fourth to go with these so I'll have another set to give away. What fun! |
 |
| Wisteria Wonder |
 |
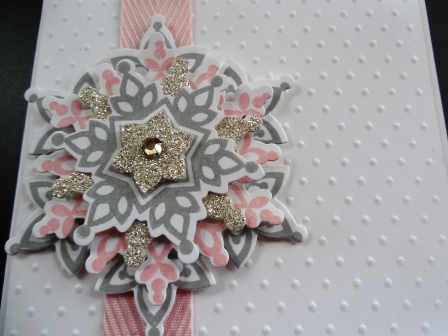
| Blushing Bride |
 |
| Marina Mist |
 |
| Crushed Curry |
 |
| Calypso Coral |
 |
| Pear Pizzazz |
 |
| This is the inside of the Pear Pizzazz card. I stamped the skate and sentiment images with the retired Winter Memories stamp set from last holiday season. I added a small amount of Dazzling Details to the mistletoe above the skate to give a little glimmer to this part of the card. It should be noted that the inside of each card matches the colour of the Chevron ribbon and ink, except for the Blushing Bride card where the image is stamped in Smokey Slate. |
Well that's it for today. Hope you enjoyed this post and will let me know what you think. For example, what colour do you like the best and do you prefer the top folding or side folding card style? I love them all but I'm most partial to the Blushing Bride and the Pear Pizazz.


