Today was the first chance I've had to sit down and work on a tutorial, so my apologies for taking so long to deliver.
Basics for Assembling Gift Box
- Start with a piece of card stock or DSP measuring 5 7/8 x 7 1/4" and score at 5/8" on all four sides.
 |
| By placing a marker on the 5/8" score line on my Simply Scored Scoring Tool it made scoring this piece so easy! |

4. Add sticky strip to the corner tabs and then remove the adhesive backing. Fold the tabs to the inside and tape to the side flap. Make sure that you square up the corners so they match. Repeat on the other side.

Once all the tabs have been adhered, the box lid should look like this on the inside.

 |
| This is a view of the outside of the lid. I made this mockup box in DSP but it's not as firm as when made from card stock, so my preference would be to make it using card stock. |
1. Cut a piece of card stock to measure 7" x 8 3/8" for the box bottom. Score it at 1 1/4" on all four sides.


3. Remove the backing from the sticky strip and fold the tabs to the inside. make sure the sides are carefully aligned.

Festive Flurry Gift Box:

- 7 x 8 3/8" piece of Whisper White card stock for bottom of box
- 5 7/8 x 7 1/4" piece of Island Indigo for lid
- 81/2" piece of Chevron Island Indigo Ribbon
- 4 x 4" piece Whisper White for Smokey Slate Large Snowflake
- 3 1/4 x 3 1/4" piece of Whisper White for Island Indigo Snowflake
- 2 3/4 x 2 3/4" piece of Silver Glimmer Paper for Glimmer Snowflake
- 2 x 2" piece of Whisper White for Smokey Slate Small Snowflake
- Small Scrap of Silver Glimmer Paper for BoHo Blossoms Punch Snowflake
- Medium Sized Basic Rhinestone
- Smokey Slate and Island Indigo Inks
- Boho Blossoms Flower Punch
- Festive Flurry Stamp Set and Coordinating Dies
1. Follow the assembly instructions above to make the bottom of the box. Note: To make the box bottom more stable I cut an additional piece of white card stock to fit in the bottom of the box and adhered this piece with sticky strip.
2. Score and cut the tabs for the lid on the Island Indigo card stock piece. Before assembling the lid adhere the Island Indigo Chevron Ribbon across the lid. I started the ribbon at the score line on the underside of the lid, ran it across the length of the lid to the other side. I used sticky strip under the ribbon to secure it. Once the ribbon is attached then finish folding and assembling the lid.
3. Stamp and assemble snowflakes for the lid top as follows:
- Stamp Large Snowflake image in Smokey Slate ink on 4 x 4" piece of Whisper White and cut out with large snowflake die
- Stamp the next size of snowflake in Island Indigo ink on 3 1/4 x 3 1/4" piece of Whisper White and cut out with corresponding snowflake die.
- Cut out a snowflake from the 2 3/4 x 2 3/4" piece of Silver Glimmer Paper using the next size snowflake
- Stamp the smallest snowflake in Smokey Slate on the 2 x 2" piece of Whisper White
- Punch out the 5-sided star with the Boho Blossoms Punch
- Adhere the medium sized rhinestone to the center of the Glimmer star.
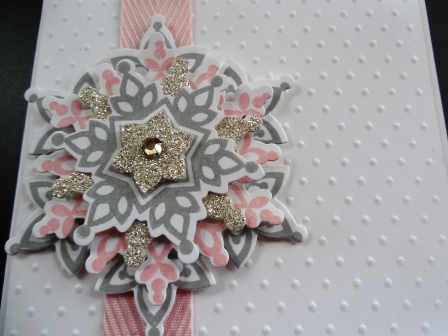
 |
| This picture shows the various sizes of snowflakes and dies used to create the center piece for the box lid. |
 |
| Box bottom, lid with ribbon and snowflakes before final assembly. |
4. Assemble the centerpiece in this order:
- Attach Island Indigo Snowflake to Large Smokey Slate Snowflake with Dimensionals
- Attach Glimmer Paper Snowflake to Island Indigo Snowflake with Dimensionals
- Attach Small Smokey Slate Snowflake to Glimmer Paper Snowflake with Dimensionals
- Attach Small Glimmer Paper Star to center of small snowflake matching the star pattern.
 |
| Back view of all the snowflakes before they were glued together. |
 |
| Island Indigo adhered to Large Smokey Slate Snowflake |
 |
| Silver Glimmer Paper Snowflake adhered to Island Indigo Snowflake. |
 |
| This view shows the small Snowflake adhered as the fourth layer. I made sure the snowflake points were turned so they never overlapped and it was easy to see the snowflake layers below. Hope that makes sense. |
 | ||||
| Finally attach the small Glimmer Paper star to the center of the small snowflake. Use the star shape outline as your guide for attaching the star. Adhere a medium sized basic rhinestone to the center. |
 |
| Finished Box and Lid |
 |
| Gift Box and four Festive Flurry Cards in Island Indigo, Wisteria Wonder, Blushing Bride and Pear Pizzazz. |
 |
| This picture shows the finished lid and the box bottom with the envelopes in it. I stamped a single snowflake in Smokey Slate on the four envelopes. |
 |
| I added a piece of Whisper White card stock to the inside of the lid to give it more stability and stamped the Smokey Slate snowflakes randomly on this piece. This piece also covers the ends of the ribbon so it has a neater appearance. |


And that's the end of my tutorial on gift boxes for the Festive Flurry Christmas cards. I hope you found it helpful. I'd love to hear from you so let me know if it worked for you.