Wednesday, January 11, 2017

#101 Watercooler Wednesday - Jean's Color Challenge

The second week of every month is a color challenge at the Watercooler Wednesday blog and this one is hosted by the incredible Jean Fitch.  Jean has chosen to mix Bermuda Bay, So Saffron and Sweet Sugarplum along with a Neutral of choice for this challenge.  What a great color combination:
Here's My Card:
Although these are spring like happy colours, I'm using them today for a sympathy card. 

I'm dedicating and giving this card to a friend who's just lost her husband and soul mate of many years and the service was today.   I'm hoping the bright colours in this card will bring some light back into her world. 


Supplies:
Stamp Set:  Nature's Wonders (2002) Retired Set, The sentiment stamps are non-Stampin' Up! rubber stamps
Card Stock:  Whisper White (Neutral), Bermuda Bay, Sweet Sugarplum, So Saffron
Ink:  Bermuda Bay, Sweet Sugarplum, So Saffron
Accessories:  Trimmer, Big Shot, Tom Bow Glue, Dimensionals Stamp-a-ma-jig and Layering Squares Framelits.

 Assembly: 

1.  The Whisper White Card Base measures 8 1/2" x 5 1/2" and was scored at 4 1/4".
2.  The Sweet Sugarplum layer measures 5 1/4" x 4" and was adhered with Tom Bow glue.
3.  The Whisper White layer measures 5 1/8" x 3 7/8" and was adhered with Tom Bow glue.
4.  I stamped the floral image in Bermuda Bay, Sweet Sugarplum and So Saffron inks on scraps of Whisper White card stock.  I cut them out with  a plain 1" x 1" die from the Layering Squares Framelits.  
5. The next layer was another Whisper White square cut with the the 1" x 1" Scalloped Edge Framelit. This scalloped square is about 1/16th" of an inch larger than the plain square die, so you just see a little fringe of the scallops around the edge of the stamped piece.  This was adhered to the stamped square with Tom Bow glue. 
6. Die cut the next largest scalloped square in each of the three solid colour card stocks and adhere them to the image of the same colour. 
7. Mount the finished squares to the card face with Dimensionals.

8. The sentiment "Thinking of You" was stamped in Sweet Sugarplum ink and centered below the scalloped squares.  I used the Stamp-a-ma-jig for straight placement. 
9. The inside of the card was stamped with the full floral image in the bottom right hand side of the card. The sentiment "With Sympathy" was stamped just above the floral image, and again I used the Stamp-a-ma-jig.    
Well that's my card for today.  Please leave me a comment if you think this card is worthy.  I hope you'll also check out the other design team members cards over at the WWC101 - Watercooler Wednesday challenge blog.  

Happy Stamping! 
Penny Token's Stampin' Spot 

Thursday, January 5, 2017

Wacky Watercooler Celebrates the Occasions Catalog and Sale-a-bration “Take One”

Happy New Year everyone and welcome to the first Wacky Watercooler Blog Hop of 2017. This is such and exciting time of year! For the next three days (January 5-7th) we're holding the first of two blog hops this month, in celebration of the arrival of the Occasions 2017 Spring catalogue and the arrival of Sale-A-Bration! 

If you've joined us for the first time, our Blog Hop runs in a circular fashion, so it doesn't matter where in the list of participants you begin. If you continue going to the next blog you'll eventually wind up where you started. So, if you started at the beginning of the hop you've arrived here from the very talented Marie Green's blog. Weren't her projects just fantastic?


Party Animal Suite


Bev Gajsek from Chilliwack BC and I were delighted to share a Display Board at Stampin' Up!s On Stage Vancouver in November 2016.


Bev created her fabulous display using products from the Party Animal Suite. She totally inspired me with her fun interpretation of this suite. She created such over the top amazing cards and 3-D projects, that I had to share them with you. Everything was so well co-ordinated, especially the stamp set and pop-up birthday cards. Here is a look at Bev's display and cards:
Bev's Display Board


Here's My Card:
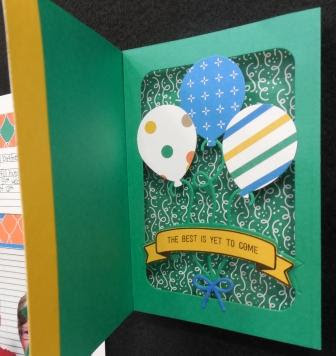
This card is so colourful.  It's sure to be a hit!  The Party Animal Designer Paper is a perfect mix of colours and designs.

These Party Animal Embellishments are so much fun.  They come in a package of 16 and there are 8 each of two designs - this balloon or a cute little party hat.  I also love this 1/8" Taffeta Ribbon.  It's awesome to work with.  I coloured the Confetti stamp image with a Tangerine Tango marker and stamped it inside and out on the card.  I know this will become one of my favourites this year because it's just the right size to add some extra pizazz to your cards.

Supplies: 
Stamp Set:  Balloon Adventures Stamp Set
Ink: Crushed Curry, Pacific Point, Emerald Envy, Tangerine Tango and Whisper White
Card Stock and Paper: Party Animal Designer Series Paper,
Accessories:  Balloon Pop-Up Dies, Trimmer, Big Shot, Tom Bow Glue, Washi Tape, Party Animal Embellishments.

The Balloon Adventures photopolymer stamp set comes with 17 image and sentiment stamps and coordinates with not only the 8 piece Balloon Pop-Up Dies but also with the Balloon Bouquet Punch. It doesn't get any better than that! Here's what the stamp and dies look like:
 

For more exciting samples check out this video by Brandi Barnard from Stampin' Up!

Urban Underground Suite:Collection:
When Stampin' Up! confirmed I had been picked to be a Display Board Artist in November at the Vancouver OnStage I was over the top excited. They told me I'd receive a "top secret" box of new products from the Occasions 2017 catalogue to design my display with.

Well, I was on pins and needles waiting to receive my supply box and see what I would be designing with. When it finally arrived in September and I opened the box I'm sure you could have heard me screaming with delight from Abbotsford to Vancouver. It was over the top and this was one of the best experiences of my stamping career.

I instantly fell in love with the new products I received, which included the Nailed It and Urban District stamp sets, the Build It Thinlet Dies and Hexagon Dynamic Embossing Folder. To make it even better Stampin' Up! also provided me with a co-ordinating card stock pack some of the Urban Underground Embellishments and Urban Underground Washi tape. The rest was up to me and I had such fun creating 15 projects to put on display and to share with you.

The Nailed It Stamp Set is awesome!  You'll love it for your masculine cards!

The Build It Thinlet Dies makes it so easy to but out the stamped shapes and mix and match papers and card stocks for your designs.  I had so much fun with these dies. 
The Hexagon Dynamic Embossing Folder is out of this world.  It embosses on card stock and foil papers, and looks great on both sides. 

Urban District - the perfect Father's Day and Birthday stamp set. 
My Display Board for OnStage Vancouver:
Here are My Cards Featuring Nailed It: 
The cards below all feature elements of the Nailed It Stamp Set, Build It Thinlet dies and the Hexagon Dynamic Embossing Folder.  The card stocks used are a mixture of Delightful Dijon, Basic Gray, and Very Vanilla.  I've also used Silver Foil, Basic Rhinestones and Gold and Silver Metallic Metal Shapes to add additional bling. 


I hope you've enjoyed the cards I've created using my favourite products so far from the the Occasions 2017 catalogue.  I will provide more details on some of the cards in the coming weeks and will feature the Urban District stamp set in the next Wacky Watercooler Blog Hop which will take place on January 19th through 21st.  Be sure to come back and visit.  


Well what do you think?  I'd love to have your comments and answer any questions you may have.  

Now it's time to see what our next blog hop artist Priscilla Iver has been up to.  Just click on her name or the NEXT link below to see what she's her terrific samples.  Thanks again for joining us at the Wacky Watercooler Mini January Blog Hop part one.  Until next time, happy stamping!  

Priscilla Iver
 
Marie Green


Wacky Water Cooler

Happy Stamping!
Penny Tokens Stampin' Spot 

Wednesday, January 4, 2017

WWC100 - CELEBRATION (ANYTHING GOES) CHALLENGE

This week's Watercooler Wednesday challenge is super special, and not just because it's the first challenge of the New Year.  It's special because it marks the "100th" Challenge on this site!  WOW that's so awesome! so our theme this week is an Anything Goes - as long as it's about "Celebrating".
Here's My Card:
I've been dying to share a stamp set I received for free at the November 2016 Stampin' Up! OnStage event in Vancouver, called "Birthday Blast".  This great set is part of a bundle featured in the new Occasions 2017 catalogue which goes live today.  Yippee!!!! 
 

Supply List:

Stamp Set: Birthday Blast
Card Stock: Emerald Envy, Very Vanilla, Sweet Sugarplum
DSP:  Playful Palette DSP and Scraps of Silver Glimmer Paper for stars
Ink: Momento Tuxedo Black Ink, Peek A Boo Peach, Emerald Envy, Black Marker
Accessories:  Trimmer, Detail Cutting Scissors, Dimensionals, Tear N' Tape, Basic Rhinestones, Star Punch from Itty Bitty Accents punch set, Acrylic blocks. 
Add caption Birthday Blast Bundle
Assembly:
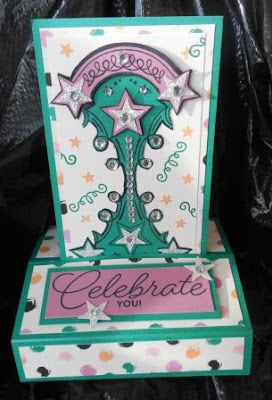
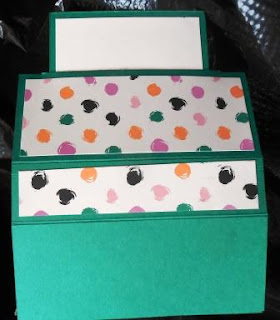
I haven't made one of these pop up style cards since I began Stampin' Up! in 2006, so I looked up a video tutorial by Dawn Griffith that explains all the ins and outs of assembling this card.  This card goes together quickly and you could easily knock off several of these while watching television if you do your pre-cutting and stamping first.  Note at the time of writing this post I did not have the accompanying dies so fussy cut out my design.  Here are the measurements for the card stock and DSP you'll need to make my version.

Base:
  • Cut a 4 1/4" x 11" strip of Emerald Envy card stock
  • Score it at 1", 2 3/4", 3 3/4", 5 1/2" 7 1/4", 8 1/4" and 10"
  • Fold on center crease line
  • Stretch out the card stock and put the long side in the trimmer, lining up to cut along the 5 1/2" fold line.  Move the cutting blade down to 1/2" on the trimmer arm and score to 3 3/4".  
  • Cut 2 pieces DSP for top of box 1 1/2" x 4" and 2 at 3/4" x 4" 
  •  cut a 3 1/4" x 1 1/4" piece of Emerald Envy and a 3 x 1" piece of Sweet Sugarplum for the "Celebrate You" sentiment.

 Slider Piece:
  • Cut a 3" X 5 1/2" piece of Emerald Envy
  • Cut a piece of DSP 2 3/4" x 5 1/4"
  • Cut a piece of Very Vanilla card stock for back of panel 2 3/4" x 5 1/4"
  • Cut a piece of Very Vanilla card stock for front of panel 2 1/2" x 5"
 Stamping:
I stamped the "tiara" portion of the stamp twice on Emerald Envy and again on Sweet Sugarplum card stocks and fussy cut out all three images.  I cut out the top of the image from the Sweet Sugarplum stamped piece and mounted it with dimensionals to the top of the Emerald Envy image, and then glued this to the Very Vanilla front panel. 


I flipped the second Emerald Envy tiara upside down, butted the end of it up against the top portion and glued it down with Tom Bow glue. Note: I didn't layer with Sweet Sugarplum because the additional layers would prohibit the card from sliding through the slot. 
To finish this card I added a lot of Basic Rhinestone bling and some Silver Glimmer Paper stars.  The small stars and celebration confetti are also images from this stamp set and I stamped them in the background in Peek A Boo Peach and Emerald Envy Inks.   

 The finished card is very shiny and glitzy.  Remember with all this detail you have to be careful when closing the card.  If the embellishments get in the way it won't collapse easily.  Here' s what mine looks like when it's closed and it will fit in a standard envelope.  

I didn't stamp any sentiments on the back of the card as I may save this for an achievement rather than a birthday or special occasion event. 

So that's it for my celebration card today. 

 I hope if you're not already stamping or entering challenges that this will be the year you join in.  We'd love to have you submit your cards or projects to our weekly challenges. Who knows, you could "Rock the Watercooler" to display on your site. Here's how the challenge schedule is laid out every month:
Week 1 - Sketch
Week 2 - Color
Week 3 - Simply Stamping
Week 4 - Masculine
Week 5 - They don't happen that often, but when they do it will be a surprise.

I hope you'll check out the rest of the Watercooler Wednesday Design Team Artist's contributions to this very special occasion.  Our special guest designer Bronwyn Eastley is back and she will be picking a winner from the comments she receives and send them a special tutorial.  To go back to the Watercooler Wednesday blog just click here.  

HAPPY STAMPING!
PENNY TOKENS STAMPIN' SPOT  
OCCASIONS JANUARY 4TH TO MAY 31ST, 2017:
Hi Everyone!  Welcome to a new year or stamping!   It's official we have a new Occasions Catalogue going live today!   


SALE-A-BRATION Jan 4th to March 31st, 2017:

How Can You Earn FREE products during SALE-A-BRATION? 

It's really simple here are four ways that you can qualify for a free product when you order from the Occasions or Annual Catalogue during the sale period from January 4th to March 31st 2017:


SHOP:  For every $60 CAD you spend (before tax and shipping), you get a FREE Sale-A-Bration product. This is the perfect time to purchase items you’ve had your eye on while earning more items for free.

HOST  Need another excuse to get together with friends? No problem, all you need to do is host a qualifying party (live or virtual) with at least $330 CAD in sales during Sale-A-Bration and you’ll earn $35 CAD more in Stampin’ Rewards! You can even apply your Stampin’ Rewards toward a Starter Kit and become a demonstrator yourself!


JOIN  It’s the best time of year to join Stampin’ Up! and my growing team.

During Sale-A-Bration, you can become a demonstrator for just $135 CAD and choose TWO additional stamp sets for your Starter Kit—any stamp set, any price! Plus, the kit ships for FREE!  NOTE:  This offer excludes Sale-A-Bration sets and bundles.

PAPER PUMPKIN SUBSCRIPTIONS:
 

What could possibly make Sale-A-Bration even better? Getting Paper Pumpkin involved, of course! It just might be the easiest way for you to earn FREE SALE-A-BRATION items.  Here's how:

Purchase a 3-Month Prepaid Subscription (137859) $74 CAD.  Get a discount on 3-month prepaid subscriptions and instantly qualify for a FREE Sale-A-Bration item!

Purchase a 12-Month Prepaid Subscription (137861) $295 CAD.  Take it to the next level with a 12-month prepaid subscription. Save over $2/month with the everyday awesome price, earn Stampin’ Rewards, and instantly qualify for 4 FREE Sale-A-Bration items!

This offer ends  March 31, 2016 at 11:50 PM (MT).


Happy Occasions and Sale-a-Bration Stamping!
Penny Tokens Stampin' Spot  

Last Free Shipping of the Year - December 9, 10 11, 2024

Heads up, it's time for the last FREE SHIPPING promo of the year! From December 9–11, you can shop and save on all qualifying orders of...