Sunday, April 20, 2014

Stampin' Up! Updates.......April 18, 2014

Just So You're In the Know....................

Stampin' Up! made the following announcements on April 18th regarding product updates. 


Basic Black Classic Stampin' Pad Update
As previously reported, Stampin' Up! has been trying to rework their Basic Black Classic Stampin' Pad for quite some time and have tried many different formulas to improve the ink's dry time when used on Whisper White or Very Vanilla Cardstock; unfortunately, they have been unsuccessful so far.

Stampin' Up! will continue to look for ways to improve the Basic Black ink; but in the meantime, please use the Jet Black StazOn Pad when stamping on Whisper White or Very Vanilla Cardstock.

Please note: The Basic Black Classic Stampin' Pad still works great with our coloured cardstock.

UNDER REVIEW FOR APPLICATION TO WHISPER WHITE AND VERY VANILLA CARDSTOCKS.  WORKS WELL ON ALL COLOURED CARD STOCKS.
Retiring 2012-2014 In Color Product No Longer Available


The Retired Products promotion starts April 21, but one retiring product is already sold out! The Raspberry Ripple Classic Stampin' Ink Refill (item 126852) is no longer available. Stampin' Up! apologizes for any inconvenience.

Don't forget to check back on Monday April 21st to see the complete list of retiring products.  Remember there is free shipping, so don't miss out on any more of your favourites before they're gone!


SOLD OUT

Friday, April 18, 2014

Million & One Flower Shop - CASE

I've been a big fan of Dawn Griffith for several years now and always make a point of checking out what's new on her blog.  Last week I came across a card she made called "A Million And One Flowers".  I liked it so much, I just had to drop everything and CASE it in it's entirety.  I think you'll agree its FABULOUS!
Million & One Stamp Set sentiment............how bold and beautiful is that?

Here's My Card: 
Sample One:  This is the first card I made CASing Dawn's design.  For this one I changed the rhinestones to Basic Pearls, and it gave the card a real "wow" look.
Sample Two:  For this card, I used Basic Rhinestones the same as in Dawn's post.  They look beautiful.  For this card I changed up the Petite Petals flowers by using two different stamp designs, however, I prefer the polka dot petal design in Sample One.
Supplies:

Stamp Sets:  
Flower Shop #130942, Petite Petals #133155 and A Million & One #126377
Flower Shop Stamp Set:  Clear Mount # 130942 $21.95 or Wood Mount #130939 $29.95 Six beautiful floral stamps that coordinate with the Pansy Punch.  
Petite Petals Stamp Set:  Clear Mount # 133155 $11.95 or Wood Mount #133152 $15.95. One beautiful flower, six gorgeous designs--it's the stamp set that keeps on giving! Includes 6 stamps. Coordinates with the Petite Petals Punch. This limited-time set is only available from January 3 through May 31, 2014, so order yours today! Available in both wood- and clear-mount.  Bundle the Petite Petals Stamp Set and the Petite Petals Punch and save 15%: Wood #134821 $24.50 or Clear Mount #134822 $21.25.


Million & One Stamp Set:  Clear Mount #126377 Price: $15.95 or Wood Mount #126375 $20.95 You don't need to say thanks in a million ways if you are sincere about just one. The two sentiments in this set are as sincere as they come. Coordinates with the Simply Fabulous Simply Sent Kit.
 Ink:  Sahara Sand Classic Ink, Staz On Black

DSP:  Sweet Sorbet (Sale-a-bration Designer Series Paper, now retired)

Cardstock:  Whisper White and Sahara Sand 

Accessories: 
Pansy Punch #130698, Petite Petals Punch #133322, Basic Rhinestones #129324, Adhesive and Dimensionals #104430.
Pansy Punch #130698 $21.95
Petite Petals Punch 133322 $12.95  pg33 Occasions Catalogue coordinates with the Petite Petals Stamp Set. Bundle and save 15% off the purchase of the stamp set and punch until May 31, 2014.
Assembly:
Sahara Sand Card stock:  
Cut the base at 4 1/4" x 11".  Place long side of card stock in trimmer to 5 1/2" mark and then move cutter blade down to 2" mark.  Remove card stock, put short side back in trimmer and line up at 2 1/4" then move cutter blade down to 5 1/2". Remove cardstock from trimmer and score across center at 5 1/2".

DSP:  
Cut two 2 " x 5 1/4" pieces from the Sahara Sand DSP paper (looks like fish scales) . Adhere these pieces to the front and inside panel on the front of the card. In sample one I sponged around the DSP with Sahara Sand ink and a sponge dauber.  This technique gives a nice vintage feel to the card.

Whisper White Card stock:  
Cut a piece of Whisper White to measure 5 1/4" x 4".  This is the inside panel of the card.  Stamp "Fabulous is What You Are" sentiment from the One In a Million stamp set in Staz On Black ink.  Adhere panel to the inside of the card.  Adhere Basic Rhinestones to the swirls on the sentiment.

On a scrap piece of Whisper White card stock stamp 4 quilt patterned flowers from the Flower Shop stamp set in Sahara Sand classic ink.  Punch out these flowers with the Pansy Punch. Now, stamp 5 flowers from the Petite Petals Stamp Set in Sahara Sand ink and punch them out with the Petite Petals punch.  Adhere the small flowers to the centers of the larger flowers with dimensionals, and finish them off with a basic rhinestone in the center.

Starting at left edge of the card adhere the flowers with dimensionals along the width of the front panel. Make sure that your dimensionals are low enough on the flower that they don't show on the reverse of the panel.  Attach the fifth Petite Petal flower to the inside of the front panel with a dimensional. 


That's it, you're done and now you have this amazing WOW card!  Thanks Dawn Griffith

Here are some other cards I've made using this design: 

This card features a Daffodil Delight card base.  The polka dot DSP is from the Watercolor Wonder Designer Series Paper in the Occasions catalogue.  The flowers are inked in Crisp Cataloupe and Daffodil Delight.  The sentiment "Celebrate Today is from the Perfectly Penned stamp set. I used Basic Rhinestones for the flower centers and on the curlycews in the sentiment.

In this photo you can see the finishing on the inside of the card.
In this closeup of the card front you can see the sponged detail around the flowers and how it sets off the flowers.  


For this version of the card I used Melon Mambo ink, card stock and Designer Paper.  This card is stunning and bright.  I used Basic Pearls for the details and again the sentiment is from the Perfectly Penned set.  All of the sentiments were stamped in Staz On Black Ink.  


The inside view of the Melon Mambo card.  I love it! So bright and cheery.  Who wouldn't want to receive this card for their special day!

 
Perfectly Penned stamp set

Okay now for something completely different.  This card uses the same framework but I wanted something cute and funny for an anniversary and I think I succeeded. 
 
It looks like these little owls are practically flying off the page, but no fear they are holding on tight with dimensionals.  The sentiment is from the Sale-a-bration stamp set called See Ya Later.  It's retired now, which is really too bad because it's such a great sentiment set.  The sentiment on this card reads "once in a lifetime you meet SOMEONE who changes everything". 


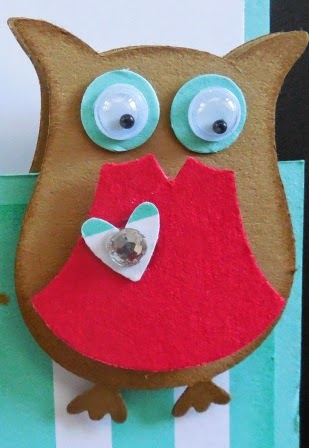
This sweet little owl is constructed with the Owl Builder Punch.  His body is punched out of Baked Brown Sugar in-colour card stock and he has a Real Red vest on.  I had some googlie eyes left over from Halloween and decided to use them for all the owls. The Owl Builder punch not only punches out the owl body but also includes 3 different sized circles for layering the eyes, the heart and the cute little vest.  This is a great punch to have in your collection because it can be used for so much more than "just an owl". 

 
This is a view of the inside front panel of the card.  Hope you get the humour in this.  The striped paper is in Coastal Cabana and is from the Fresh Prints DSP pack in the Occasions Catalogue. 
Here's the full view of the inside of this card.
 Here's a last look at four of the five cards I've made so far with this card design.  This was a lot of fun.  Hope you enjoy this post.  I'd love to hear your comments so let me know if you like them or not.

 Penny

FREE SHIPPING - LIMITED TIME

Check out my Promotions Page to find out how you can get FREE shipping from April 21st to 25th, 2014.

Wednesday, April 16, 2014

Exciting News for Scrapbookers!!!!

Stampin' Up! has made one of it's biggest announcements of the year about a new business partnership it has entered into.

Stampin' Up! is excited to tell you they've partnered with the amazing Becky Higgins to bring you the real deal-authentic Project Life products, now in exclusive Stampin' Up! colours and designs. 

Check out all the details on my Promotion's Page for this and other exciting news.

 Penny

Tuesday, April 15, 2014

Retirement Lists Coming Soon


Just a note to let you know that Stampin' Up! will be posting this year's retired stamp and accessories lists on Monday April 21st.  

Once those lists are posted the frenzy begins, so don't miss out.  This will be your last chance to get some of those sets, tools or accessories that may be on your wish list!

I'll be posting the lists on my blog on the 21st, so mark your calendar and come back and check them out.  


Stampin' On Tuesday Project #3 - Just in Time For Easter

Who doesn't like the Easter Bunny? Everyone I know not only likes, but adores him and that's why Sheri and I decided to make this cute little bunny container for our third project last Tuesday. 

Actually, I don't think I had any choice in the matter.  When I showed Sheri this Easter Bunny I made at Cheryl LeFore's stamp club back in February, she immediately wanted to make one too. 

Supplies:
Card stock: 
  • Chocolate Chip
  • Strawberry Slush
  • Basic Black
  • Very Vanilla
DSP:
  • Sweet Sorbet (Sale-a-Bration designer series paper - now retired) or DSP of your choice for ears and egg
Framelits:  Ovals Collection

Big Shot:  Petite Purse Bigz L Die 

Punches: 
  • Extra Large and Small Oval punches
  • Small Heart Punch
  • 1/4 Hole Punch
  • Word Window
Ribbon:  White Baker's Twine

Accessories: 
  • Dimensionals
  • Tom Bow glue
  • Pom Pom for tail 
Assembly:

For the Basket: 
  1. Start with a 5 1/2 x 8 1/2" piece of Chocolate Chip card stock to create the egg basket that the bunny is attached to.  Run this piece through the Big Shot with the Petite Purse Bigz L Die
  2. Cut off the purse flap as you don't need this piece. 
  3. Crease on the score lines and use sticky strip to adhere the sides of the basket.  
  4. Attach the handle with glue dots.
  5. Glue a pom pom on the back of the basket for the bunny tail.
  6. Put shredded paper in basket and add chocolate eggs or kisses for treat.
 
In step two you need to cut off the top flap that looks like a dome in this photo.

For the Bunny:  
  1. Cut a piece of Chocolate Chip  3" x 4" and die cut with the Oval Framelit for the Bunny's body.
  2. Using 1 3/4" x 2 3/4" pieces of Chocolate Chip cut out two ovals for the ears with the smallest Oval Framelit die. Punch out two more ovals for the arms and legs (2 for ears, 1 cut for arms cut in half and 1 cut in half for legs. Attach arms and legs to the body with dimensionals. 
  3. Using 2" x 2" pieces of DSP punch out 2 ovals for the insides of the ears with the extra large oval punch. Attach ears with Tom Bow glue.
  4. Punch 2 eyes from Basic Black card stock with the 1/4" punch. Adhere to bunny's face with Tom Bow glue.
  5. Punch out a small heart from Strawberry Slush card stock for the nose.  
  6. Cut three 1" strips of Baker's twine.  Attach to the back of the heart with a glue dot and then attach heart with a dimensional to bunny face.
  7. Punch out a small scrap of DSP with the small oval punch for the egg.  Place this between the arms.
  8. Stamp "Happy Easter" sentiment from the Teeny Tiny Wishes stamp set in Chocolate Chip ink on Very Vanilla card stock.
 
Here are the two bunnies we made.  Mine has the Sweet Sorbet DSP for the ears and Egg and Sheri has used retired DSP for her version.  She also used different twine for her whiskers and omitted the sentiment.

In this view you can see the cute little basket made with the Petite Purse Bigz L Die. The basket will hold a couple of small wrapped Easter eggs or some Hershey's Kisses. 
 
 
Additional note:  Sheri also made these three "Super Sized" bunnies.  Aren't they adorable?  They are twice the size of the ones we made above and she filled them with chocolate covered eggs.  She gave one to Ethel, myself and Debby at our last get-together!  What a friend!!!  

I hope you enjoyed this post and found the instructions easy to follow.  Happy Easter everyone!  

Penny 

Weekly Deals April 15th to 21st

Don't miss out the Stampin' Up's! Weekly Deals have just been posted on my Weekly Deals page.  Click here to check them out and to see what this month's hottest sellers are.

Last Free Shipping of the Year - December 9, 10 11, 2024

Heads up, it's time for the last FREE SHIPPING promo of the year! From December 9–11, you can shop and save on all qualifying orders of...