Sunday, October 6, 2013

World Card Making Day - Cards Two, Three and Four

For this post I'm going to share three Christmas themed cards that I made with my downline Sheri during our "Stampin' On Tuesday" session this week.  What a fun and productive day we had - so many laughs! 

1.  Poinsettia Card

My version of Tanya's card
While checking out clues on the LNS Fall Treasure Hunt blog list I visited Tanya Stottlemire's "Scramptastic" blog and I found some cards that really inspired me. Tanya had created a poinsettia flower using the Mosaic Madness stamp set and I just knew I had to CAS her layout.  You can check out Tanya's original card here:   

To make this card more my own, I changed up the direction of the card, added some Champagne Glimmer Paper and changed the sentiment.  Here are the supplies I used:

Supplies and Method:
Stamp sets:  Mosaic Madness and Greetings of the Season (retired)
Card Stock:  Riding Hood Red (retired), Whisper White, Champagne Glimmer Paper, and Old Olive
Ink:  Red Riding Hood (retired), Old Olive
Accessories:  Modern Mosaic Embossing Folder, Mosaic punch, 1/2" and 1" circle punches, 7/8" scalloped circle punch, Decorative Label punch.

  1. Cut 8 1/2 x 5 1/2" base from Riding Hood Red card stock and score at center.
  2. Cut a piece of Whisper White to 5 1/4 x 4" and dry emboss with the Mosaic Embossing folder.
  3. For the flower stamp 5 mosaic tiles with the floral design in Red Riding Hood red ink on matching card stock and punch out with Mosaic punch.
  4. Stamp 3 striped mosaic tiles onto scrap of Old Olive card stock and punch out with Mosaic punch.
  5. Punch a 1" circle in scrap card stock and use this for the base of the flower petals.  Arrange flower petals around it and adhere with glue dots once you've positioned them properly.  Then add the three leaves.
  6. Punch out a 7/8" scallop circle from Champagne Glimmer Paper for the center of the flower.
  7. Stamp a small center design from Mosaic stamp set in Riding Hood Red on Whisper White card stock scrap and punch out with 1/2" circle.  Add with dimensional to center of flower.
  8. Put dimensionals on the back of the flower design and leaves and add to the card face positioning it where you like it.  I chose to do my card with a side fold so positioned the flower to the top left of the card leaving room at the bottom for my sentiment.
  9. Stamp the Noel sentiment in Old Olive on scrap of Whisper White and punch out with Decorative Label punch.  Punch out another label in Red Riding hood and cut in half, position it on the back of the Whisper White label so the red shows on either side of the sentiment.  Attach to card front with dimensionals.
2.  Santa Suit Card
I've seen several versions of a Santa Suit card over the past year or so but never tried making one until I came upon Tanya's blog post.  I just loved her version and was inspired to try my hand at making one.  Here's Tanya's card and also a link to Tracy Bradley's "Stamping With Tracy Blog where Tanya first saw it.  I love this sharing! 

For my version of this card I added some paper piercing around the beard and the cute little "Ho, Ho,Ho" sentiment from the Oh Goodie stamp set in the holiday catalogue. To line up the wording I stamped using the Stamp-a-ma-jig to ensure everything was evenly spaced.  The beard was cut out of Whisper White card stock with the Apothecary Framelits and then paper pierced using the coordinating Essentials #126187 Paper-Piercing Pack. 

The inside is pretty simple.  I cut an additional image in Whisper White with the Apothecary framelits die, paper pierced it around the edges and adhered this piece to the inside wall of the card.
This is Sheri's version.  She changed up the beard by dry embossing it with the Petals-a-Plenty Embossing Folder and changing the sentiment setup.  I really like Sheri's version. 

Supplies and Method:
  1. Cut a piece of Real Red card stock to 8 1/2 x 5 1/2 and score at center.  This will be a side fold card.
  2. Cut strip of Basic Black card stock to 1 1/4" x 4 1/4" for belt and a 1 1/4" square* for buckle. Adhere this strip about 3/4" from the bottom edge of the card.  Trim off any overlap on the edges. *Note:  I punched mine out using the 1/14" punch but if you don't have that punch just use your trimmer.
  3. Cut a scrap piece of Silver Glimmer Paper to 1 3/4" x 1 3/4" and adhere with sticky strip in the center of the black belt strip.  Add the 1 1/4 inch Basic Black square with dimensionals to the center of the Silver Glimmer part.  Now you have a great Santa belt! 
  4. To finish the suit punch out two Silver Glimmer Paper buttons using the 1/2" circle punch and adhere them to the center of the card with dimensionals.
  5. For the Beard and the inside of the card cut two of the 4 7/8" x 2 3/4" shape Apothecary Framelits from Whisper White card stock. For the beard you will need to cut a piece that measures 2 1/4" from the top point of the accent piece to the end. Make sure this piece is cut straight as it needs to be adhered to the edge of the red card base. Hang on to the piece you cut off because I know you're going to want to make more of these darling cards.  Okay glue the second Apothecary piece to the inside of the card for your messaging.  
  6. Before gluing the beard and the messaging piece onto the card make sure you read my notes above regarding the different finishes Sheri and I used for the sentiment, decorating the beard, i.e. paper piercing or dry embossing and the messaging piece of the card.
3.  The Mosaic Christmas Tree 
I'm not sure who to give credit to for this next card, because I misplaced the name, but I know I found it on one of the LNS Fall Treasure Hunt blogs when I was clue hunting and I actually thought Tanya had made it.  Anyway if you made it and want credit, just drop me a line. 

This is my version and unfortunately I don't have a picture of Sheri's card which looked more like the original and sported a Merry Christmas sentiment below the tree base that was cut out with the word window. So, you have to trust me when I say her card was awesome! 


Essentially this is a very quick card to make. The most time consuming part of the assembly is getting the mosaic tiles to line up straight.  For my card I started at the bottom by adding the tree stump and building the tree from the bottom up. Sheri on the other hand felt more comfortable starting at the top layer of the mosaics and working her way down.  You choose which method works best for you.  The originator of the design actually made a template of dots, that looked something like this: 


Supplies and Method:

Stamp Sets:  Mosaic Madness and Tag It for the sentiment


Card stock:  Riding Hood Red (retired)**, Whisper White, Early Espresso (scrap) and Red Glimmer Paper (scrap)


Ink:  Riding Hood Red (retired), Wild Wassabi, Pear Pizzazz and Old Olive

Accessories:  Basic Rhinestones, Mosaic Punch, Bracket Punch, Cupcake Builder punch, Northern Flurry Embossing folder, and Big Shot machine.  


  1. Cut card base at 8 1/2 x 5 1/2" from Riding Hood Red card stock and score and fold at center.  This will be a side fold card.
  2. Cut a piece of Whisper White card stock to 4 x 5 1/4" and dry emboss with the Northern Flurry embossing folder.  I chose to emboss the full image of the snowflakes on the embossing folder, but when Sheri made her card she positioned her card stock so that only the small embossed snowflakes showed at the top.  This looked really cool too. Adhere this piece to the card base using snail or sticky strip. 
  3. Stamp Tag It sentiment in Riding Hood Red ink on a scrap of Whisper White card stock and cut it out with the Bracket punch.  Cool punch!  Using dimensionals, mount the sentiment in the upper left corner of the card.
  4. For the tree base, I used the Cup Cake Builder punch to cut the scrap of Early Espresso into a small tree stump or pot. Then,  I temporarily positioned this piece at the bottom of the card, leaving about 1/4" between the tree base and the bottom of the Whisper White layer, until I had my first row of mosaic tiles adhered.  I wanted to make sure the tree aligned correctly then I repositioned it so it was centered for the tree.  I glued this piece with sticky strip to the Whisper White layer.
  5. For the tree you need to stamp the following and punch them out with the Mosaic Punch:
    1. 4 mosaic tiles in Wild Wasabi that have a center pattern.  Adhere a basic rhinestone to the center of each design.
    2. 3 striped pattern mosaic tiles in Pear Pizzazz
    3. 3 solid pattern mosaic tiles in Old Olive
  6. Following my card layout and starting at the bottom of the tree lay out four mosaic tiles - two patterned on the ends and a stripe and solid on the center.  I glued the patterned tiles on with dimensionals and the others with snail.  Overlap the tile pieces if it makes your layout look better, but only by a smidge.
  7. Repeat for the next line, but reduce to 3 tiles and keep the patterned one in the center, again mounted with a dimensional.
  8. Repeat once again dropping down to two tiles - one striped and one solid.  Then finish the tree with the patterned tile at the top mounted with dimensionals.
  9. For the tree topper, I punched out a small star from Red Glimmer Paper and added a basic rhinestone to the center, then mounted it with a dimensional.   
And that's all there is to my three fun Christmas/seasonal themed cards.  I hope you enjoyed them.  Leave me a note if you did, I love getting your comments, it makes my day!  

Penny

Saturday, October 5, 2013

World Card Making Day - Wahoo

For me this is the best day of the year!  I get to make cards today, be creative and have fun.  

There's going to be none of the usual interruptions like vacuuming, ironing, cooking........... you know, the daily grind!  So, I can honestly shout out Wahoo!  

With that inspiration in mind I went to my card room and grabbed this month's Paper Pumpkin which is appropriately named "Wahoo", and began the first of what I hope will be many creations today.  

The Wahoo set comes with two stamps, four card bases and envelopes, two buttons and twine, some chevron tags, and a Midnight Muse Stampin' Spot.  My card is all about "congratulations" and excitement for a great accomplishment.  I hope it conveys that feeling.  

Supplies Used:

  • September Paper Pumpkin Kit
  • Gorgeous Grunge Stamp Set #130517 pg 109 IB&C
  • Yippee Skippy #131341 pg 37 IB&C
  • Tag a Bag Gift Bags #131370 pg 158 IB&C*
  • Tag a Bag Accessory Kit #130153 pg 158 IB&C* 
  • Season of Style Washi Tape #132155 Holiday Catalogue pg 25
  • Inks:  Crumb Cake, Soft Suede, Gumball Green, Calypso Coral and Versa Mark and a Midnight Muse Marker
  • Heat and Stick Powder #100625 pg 166 IB&C and Heat Tool
  • Dazzling Diamonds Stampin' Glitter #102023 IB&C 
  • Silver Glimmer Paper for Stars #124005 pg 156
  • Small Star Punch (retired)
  • Dimensionals and Sticky Strip Adhesives
 * These items can be purchased as a bundle see information on pg 159.
I made a card and instead of adding an envelope I made a matching bag so I can tuck in some extra treats like lotto tickets, a gift card or even photos of the event.
  • I wanted to jazz up the card face and what better stamp set to accomplish this than Gorgeous Grunge.  I can't get enough of those splatters and the tire skid marks.  Such fun!  
  • I also jazzed up the Wahoo sentiment by first stamping it on the card face in Midnight Muse ink.  
  • I re-stamped the image with Versa Mark ink on a scrap piece of Crumb Cake card stock and heat embossed this image with Heat and Stick Powder.  While the Heat and Stick powder was still warm I sprinkled  Dazzling Diamonds Stampin' Glitter over it and re-heated with the heat gun tool.  TIP: Take it from me, don't forget to use your Embossing Buddy on the card stock before you begin embossing so you don't get small flecks of glitter sticking all over the surface like I did.  Just saying! 
  • I fussy cut around the letters and then glued them with snail directly over top of the stamped image on the card front.  You could just see a bit of the Midnight Muse ink peeking out around the edges.  Because it wasn't quite the bold comic book look I was trying to achieve, I used a Midnight Muse marker and swiped the large end all around the lettering, and Voila, the Wahoo jumps off the page!
  • I sponged the edges of the index card with Crumb Cake ink because it was just too stark for me.  I stamped the "You Did It" sentiment in Midnight Muse and added a couple of the Chevron elements with dimensionals.  The index card was also popped up with dimensionals.
For the inside of the card I carried on the grunge theme with the Gorgeous Grunge stamp set.  I told you I love those splatters!  I added a strip of the Season of Style Washi Tape down the right hand side and stamped a lively saying from the Yippee Skippee Stamp set in Midnight Muse.

These Tag a Bag Gift Bags are so cool to work with.  You can't go wrong ordering them as a bundle with the Tag a Bag Accessory Kit (see page 159 in the IB&C).  I've gone all out using the splatter stamps from Gorgeous Grunge, the Wahoo stamp and two tags from the Accessory Kit.  I also added three small glimmer stars and a strip of Washi tape.  For the "You Did It Tag" I used my Stamp-a- ma-jig to reposition the stamp.  I think this turned out pretty cool. 

And there you have it, my Wahoo card and matching bag.  Hope you enjoyed this and are enjoying World Card Making Day. 

World Card Making Day Contest and Events - 2013

Today is a very special day.  It's a time when card makers around the world have an opportunity to gather together, take paper and ink in hand and demonstrate and celebrate their creative passion for card making.  I hope you're one of them.  

Not sure how to take part in this special day.  Well you can look for events in your neighborhood, join a card making challenge at some of the sites I've listed below, or simply invite some friends in to your home and share this day. 


To help you celebrate and kick off the card making season Stampin’ Up is having a contest . . . to inspire you even further! There are two ways to enter.

  • Post a photo of a card (or of you making a card) on Instagram on World Card Making Day. Mention us by typing @stampinup and use the hashtag: #wcmd2013 in the description.
This contest is open to everyone—demonstrators, customers, friends, spouses, children . . . you get the idea! However, there are a few conditions:

  • You must be over the age of 18 to win a prize.
  • You must use Stampin’ Up! products to create your project.
  • You may enter as many times as you wish, but each entry must feature a different card.
  • The contest will last all day on October 5, from midnight to midnight.
  • We will randomly select 100 winners from our English-speaking North American markets to receive a Paper Pumpkin kit.
A selection of pictures will be posted to our World Card Making Day Pinterest board and the winners will be announced in a current update.


Challenge Sites:

Need some card making inspiration.  Just visit any of these sites for current sketches and ideas:

Tis the Season Stamping a new Christmas Card challenge blog, that's posted it's first challenge.  They'll be posting a new challenge every other week, that will rotate between Sketches and Color Combos with a Optional Trimming. Challenges will run for two weeks so lots of time to play along. Check out their first sketch here: tistheseasonstamping.blogspot.com


SU Only Challenge #80 - Welcome Baby.  Their current challenge is to make a card – or other paper crafted project! – for a baby.  This challenge closes in two days time, but there's still time to play with it today.  Check out some of the entries so far and see what the design team has come up with just click here: http://suochallenges.com/
Created by Deanna Boos of http://www.myhomegrownart.com/

Just Us Girls blog site has a World Card Making Day Challenge going on for the next week.  There are prizes being offered. Check it out here:  http://justusgirlschallenge.blogspot.ca/    And here's their current sketch:

Pals Paper Arts Color Challenge for October is happening this week.  Their color challenge experts have chosen Pumpkin Pie, Pear Pizzazz and Baked Brown Sugar (or similar colors) to play with. Check out the samples by their uber talented resident artist's who've created some beautiful designs. occasions to inspire you.  Check out their site here:    http://www.palspaperarts.com/

Paper Craft Crew Challenge Sketches 
The Paper Craft Crew design team has come up with some fun card samples using this week's card sketch. PCCCS #61: Card Sketch which closes on October Check out their site at:  http://www.papercraftcrew.com/

Thursday, October 3, 2013

Post It Note and Pen Holder - Tutorial


Aren't these cute?  Post It Note and Pen Holders are one of my favourite gift items to make. Especially at Christmas time.  

These little cuties make great stocking stuffers or hostess gifts and sell quickly at craft and vendor fairs.  People can't resist them, after all everyone uses Post It Notes in some shape or form.

Another thing I like about making Post It Note holders is that they're adaptable for any season and they're quick and easy to make.  Anyone can make these!  

Today I'm going to walk you through the easy steps and show you some samples from my recent Christmas theme Post It Note & Pen Holders.   Enjoy!

Supplies and Accessories:
  • Small mini gel pens ( I buy mine at Staples - 12 to a package for $3.95)
  • Post It Notes (I'm using 3 x 3 post it notes for these holders)
  • Card stock cut to 3 1/4 x 7 3/8" for the base a contrasting card stock measuring 2 7/8 x 3 1/8" for the first layer and a neutral card stock measuring 2 3/4 x 3" for the next layer
  • Designer Series Paper in two coordinating designs enough to punch out four 1 1/4" squares
  • 1 1/4" Square Punch
  • Stamp Set of your choice or embellishment for center of cover
  • Ink to coordinate with DSP and card stock
  • Paper Trimmer
  • Adhesive - Snail and Sticky Strip
 Steps to Create Post It Note Holder:
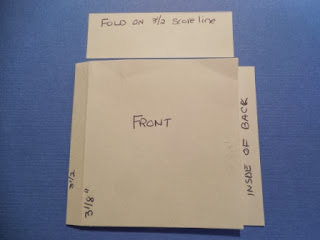
1. Cut card stock for base to measure 3 1/4 x 7 3/8", score at 3 1/8, 3 1/2 and 3 7/8 inches.


2. Crease along each score line with a bone folder. Fold cover on the 3 1/2 score line. 


3.  Make two cuts to the score line about an inch apart for the pen holder.See picture for placement.

4.  Open up the card stock and leave the slot for the pen facing outwards but push the two outer pieces to the inside of the cover.  Apply two small strips of sticky strip to the inside score line between the 3 1/2 and 3 7/8 lines and then fold to the back to adhere.


5.  Attach the Post It Note pad to the back cover with sticky strip, and   decorate the front of the  cover in whatever design you choose.  

Here's two of my recent designs:

  • For this Post It Note and Pen Holder I used Smokey Slate for the card base, Coastal Cabanna for the 1st layer (2 7/8 x 3 1/8") and Whisper White for the next layer (2 3/4 x 3") and adhered them to the front of the note holder.  
  • I cut out four 1 1/4" DSP squares from the Winter Frost DSP Stack #132183 and adhered them to Whisper White layer, leaving a space in between the squares.  
  • I adhered a piece of Silver Glimmer Paper cut to 2 3/4 x 1/4" in the center between the squares.  
  • For the embellishment I cut out two of the small snowflakes with the Festive Flurry Framelits #132193 - one was stamped in Smokey Slate on Whisper White with the Festive Flurry stamp set #131781 and the other was cut from Silver Glimmer paper.  These snowflakes were glued together with glue dots and then mounted to the center of the DSP squares with Stampin' Dimensionals.  
  • I matched up the colour of the mini gel pen with the card stock. 
  • This Post It Note and Pen Holder is made the same as the above sample, but with the following changes:  
  • I used Real Red card stock for the base and topped it with a piece of Gumball Green card stock (1st layer).
  • I added Whisper White for the next layer and topped this with four squares punched from the Season of Style DSP Stack #132181.  
  • Red Glimmer Paper was adhered to the center.  
  • I stamped the Santa image from the Tag It stamp set #130303 for the tag in Gumball Green and Real Red inks.  Tip:  I stamped two tags, one in Gumball Green and the next in Real Red and then I cut out the Real Red Santa square and glued it to the Gumball Green base. 
  • The tag was cut out with the Chalk Talk Framelit dies and mounted to the note book base with dimensionals.  I matched up a red gel pen to the notebook cover. 
Here's what the inside of the Post It Note Holder looks like.


Thank You Thursdays - What's That All About?

Stampin' Up! has reached a milestone--250 posts on their blog--and want to celebrate with you! Beginning today (October 3), they are beginning a series of Thank You Thursdays posts, where you'll be offered discounted products for one day only (while supplies last)!

How do you take advantage of these special one day offers?   Simple.  Just visit the blog each Thursday in October to see the new deal and then place an order with me.


This is Stampin' Ups! way of saying thank you for helping to make their blog an inspiring place to be!

Today's Deal:


Designer Washi Tape! Choose from one (or all three) of the designer Washi Tapes below!
 Epic Day This And That Designer Washi Tape

Regular Price $6.50 CAN Sale Price  $4.87 CAN
*Please note-The discounted price will appear at checkout.*
  Gingham Garden Designer Washi Tape

Regular Price $6.50 CAN Sale Price  $4.87 CAN
  *Please note-The discounted price will appear at checkout.*
  Witches' Brew Designer Washi Tape

Regular Price $6.50 CAN Sale Price  $4.87 CAN
  *Please note-The discounted price will appear at checkout.

Tuesday, October 1, 2013

Join for $25.00 - Oct 7-21, 2013

Join Stampin' Up! - Join My Team!

 
  • Would you like a discount on your favourite products? 
  • A chance to earn extra cash? 
  • Tons of exclusive creative ideas at your fingertips?
It you answered "yes" to any or all of these questions then you'll want to hear more about Stampin' Ups! "Join for $25.00" during this two week 25 year anniversary promotion.

Because Stampin' Up! is celebrating it's 25th Anniversary this year they want to offer you an opportunity to "join the Stampin' Up! family as a demonstrator.  What fun!  

So, from October 7th to 21st (two weeks only) you can join my Stampin' Up! team for only $25.00.  That's right $25.00 -the cost to join has never been this low - in all of Stampin' Ups! 25 years!

The Fine Print:
When you join my team you'll get the $25 Starter Kit which includes the following:
  • Up to $26.95 worth of Stampin' Up! product (it must be more than $25, but not more than $26.95 before tax)  - you choose your product, for example:
      • Whisper White 8 1/2 x 11 card stock  #100730 $9.25
      • Basic Black Ink Pad $7.25 #126980 $7.25
      • Multipurpose Liquid Glue #110755 $5.95
      • Adhesive Remover #103684 $4.50
      • Total = $26.95 
  • Business pack which includes:
    • A box of annual catalogues
    • A package of the current seasonal catalogue
    • Getting Started DVD
    • Starter Kit Business Brick 
    • Customer postcard
And, as an added bonus, here are some more reasons to join Stampin' Up! now: 
  • As a new demonstrator, you'll get an extra 10 percent discount on your  first order of $150 or more providing you place your order in the first 45 days of being a demonstrator. That means you can use the money you saved on the $25 starter kit to get 30 percent off your first order of Stampin' Up! goodies!
  • As a new recruit you'll also get two FREE months of Demonstrator Business Web Services (DBWS)!
  •  When you join my team, you'll also get my expertise and that of other members of my team because we have a passion for paper crafting, share what we love and help one another be successful, whether it's as a hobby demonstrator or as a business venture.


 Note:  During this offer, only the special $25 starter kit will be available; the regular $125  starter kit will not be available.   

Remember, this offer starts a week today on October 7th, and it only runs for for two weeks, so take advantage of it right away! Go to my web site, watch the video and click on the join now button.  It's that easy.  Check it out here:
Or call me to get started today.  

Thursday, September 26, 2013

Build a Banner Simply Create a Kit

Banners are everywhere these days.  Whether it's a celebration for a birthday, a retirement, a business opening, or for a seasonal event like Halloween or Christmas, someone's created a banner to meet the occasion.  Stampin' Up! has got on the band wagon with this new trend and created some new kits that make banner making extremely easy for the novice and experienced crafter alike. 

Stampin' Up!s Build a Banner Simply Created Kit and Accessory Kits are available from now until January 2nd, 2014 in the Holiday Catalogue.  The following video gives a great run down on this new product and was very helpful when I created my first banner. 


Build a Banner Simply Created Kit #133507 Price: $24.95 cdn

This great kit comes with the following:
  • Includes eighteen 5 x 7" blank canvas paper pennants - 6 each of 3 designs (pointed, banner and rounded) .  Each of the wonderful flexible, water proof pennants has two grommets already set so it makes stringing it together very simple.  No fussing with the crop-o-dile on this one!
  • 9 feet of jute rope to hang the pennant pieces with
  • A full set of plastic alphabet stencils for creating your words
  • Three image stencils for decorating the pennants - stripe, dot and chevron designs 
  • Stampin' Spritzer for spraying on ink.
Build a Banner Simply Created Kit #133507 Price $24.95 CDN
If you run out of pennant pieces no problem, simply order the Banner Simply Created refill kit.  The refill kit includes another 9 feet of jute rope and 18 blank canvas paper pennants.  

Banner Simply Created Kit # 132699 Price $11.95 CDN

With Halloween and Christmas just around the corner, you'll also find two accessory kits that Stampin' Up! has created to compliment the Build a Banner Simply Created Kit.  The first is the Halloween Banner and the second is the Christmas Banner Accessory Kit.
Halloween Banner Simply Created Accessory Kit #132698 Price $11.95
Christmas Banner Simply Created Accessory  Kit #132697 $11.95

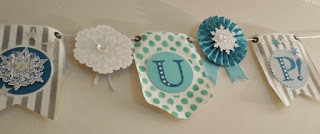
And here's my banner!


Sorry I couldn't get the picture of my banner any larger for you or clearer.  I've hung it in my paper crafting room and it is going to be a work in progress as I add some streamers to both ends and some more sparkle. 

My banner on the back wall behind our vendor table at the Basics for Babies Scrap-a-thon event on September 14th, 2013. 
Supplies & Design for My Banner:

  • To make the two words "Stampin'" "Up!" I needed 10 Pennants from the Build a Banner Base kit. 
  • One Christmas Banner Simply Created Accessory Kit
  • Typeset Alphabet Bigz Dies for the Alphabet Letters
  • 3" Circle Framelit Die
  • Coastal Cabana, Island Indigo and Smokey Slate Stamp Pad inks and Re-inkers.  
  • Coastal Cabana, Island Indigo, Pool Party, Whisper White card stocks  and Glimmer Paper
  • Sponge Daubers
  • Dimensionals and sticky strip
  • Hot Glue Gun
  • Festive Flurry Framelit Dies for Snowflakes
  • Large and Small Star Punches from Stampin' Up (retired)
  • 11 Feet of Silk White Cord (I decided to use white cord instead of the jute provided in the kit for this project)
  • Basic Rhinestone Jewels (note I used a lot more than came with the kit)
Steps:
  1. First decide on a theme for your banner, the colours you'll use and the word(s) you will add to your banner.
  2. Assemble all the pieces and accessories and cut out any additional dies you will use on your banner.
  3. Lay out the banner pieces on a table top or along the floor so you can see what you are working with.
  4. Work from the first pennant to the last and be consistent with your colour and design layout.
  5. Note:  I cut additional 3" circles from scrap card stock and used them for mounting the lollies and die cuts to the cord This step created more stability for the banner.

I alternated the pennant shapes and colours starting with a pointed pennant in Coastal Cabana dots followed by a banner shaped pennant in Smokey Slate stripes throughout the entire banner.  Each pennant was separated by a lolly or die cut.  I applied the ink to the pennants with a sponge dauber. 


The individual letters that form the words "Stampin' Up!" were cut out of Island Indigo card stock using the Typeset Alphabet Dies.  I chose these die cut letters over the stenciled ones because I wanted the letters to be super clean looking.  Once cut out, I mounted the letters on either Coastal Cabana or Smokey Gray card stock that had been cut out with the 3" Circle Framelit.  I used Tom Bow glue on the back side of the letters to adhere them.  The dots that you can see on the letters are actually medium sized Basic Rhinestone Jewels.  The addition of these Rhinestones really made the letters pop.

The additional of glimmer paper snowflakes and stars really softened the look of the banner, and the Vintage Faceted Designer Buttons added a lot of sparkle.  For the blue stars, I used a sponge dauber and Island Indigo ink on the silver glimmer paper to turn it into a turquoise blue and then I punched out some large and small stars. 

I wish you could see this banner in real life because it's really sparkly and fresh looking and you just can't see that in the pictures.  It took me two hours to create this banner and although it intimidated me at first, once I started sponging the ink on the first pennant my initial fear gave way to creative joy.  The whole process became a lot of fun and it was exciting to see the progress as the banner came together.  

This was such a rewarding process.  I hope you enjoyed seeing how this banner turned out. I'm working on a Fall Banner for Thanks Giving and will take pictures as I complete each step. 

Last Free Shipping of the Year - December 9, 10 11, 2024

Heads up, it's time for the last FREE SHIPPING promo of the year! From December 9–11, you can shop and save on all qualifying orders of...