Banners are everywhere these days. Whether it's a celebration for a birthday, a retirement, a business opening, or for a seasonal event like Halloween or Christmas, someone's created a banner to meet the occasion. Stampin' Up! has got on the band wagon with this new trend and created some new kits that make banner making extremely easy for the novice and experienced crafter alike.
Stampin' Up!s Build a Banner Simply Created Kit and Accessory Kits are available from now until January 2nd, 2014 in the Holiday Catalogue. The following video gives a great run down on this new product and was very helpful when I created my first banner.
Build a Banner Simply Created Kit #133507 Price: $24.95 cdn
This great kit comes with the following:
- Includes eighteen 5 x 7" blank canvas paper pennants - 6 each of 3 designs (pointed, banner and rounded) . Each of the wonderful flexible, water proof pennants has two grommets already set so it makes stringing it together very simple. No fussing with the crop-o-dile on this one!
- 9 feet of jute rope to hang the pennant pieces with
- A full set of plastic alphabet stencils for creating your words
- Three image stencils for decorating the pennants - stripe, dot and chevron designs
- Stampin' Spritzer for spraying on ink.
 |
| Build a Banner Simply Created Kit #133507 Price $24.95 CDN |
If you run out of pennant pieces no problem, simply order the Banner Simply Created refill kit. The refill kit includes another 9 feet of jute rope and 18 blank canvas paper pennants.
 |
| Banner Simply Created Kit # 132699 Price $11.95 CDN |
With Halloween and Christmas just around the corner, you'll also find two accessory kits that Stampin' Up! has created to compliment the Build a Banner Simply Created Kit. The first is the Halloween Banner and the second is the Christmas Banner Accessory Kit.
 |
| Halloween Banner Simply Created Accessory Kit #132698 Price $11.95 |
 |
| Christmas Banner Simply Created Accessory Kit #132697 $11.95 |
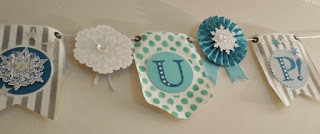
And here's my banner!
Sorry I couldn't get the picture of my banner any larger for you or clearer. I've hung it in my paper crafting room and it is going to be a work in progress as I add some streamers to both ends and some more sparkle.
 | |
| My banner on the back wall behind our vendor table at the Basics for Babies Scrap-a-thon event on September 14th, 2013. |
- To make the two words "Stampin'" "Up!" I needed 10 Pennants from the Build a Banner Base kit.
- One Christmas Banner Simply Created Accessory Kit
- Typeset Alphabet Bigz Dies for the Alphabet Letters
- 3" Circle Framelit Die
- Coastal Cabana, Island Indigo and Smokey Slate Stamp Pad inks and Re-inkers.
- Coastal Cabana, Island Indigo, Pool Party, Whisper White card stocks and Glimmer Paper
- Sponge Daubers
- Dimensionals and sticky strip
- Hot Glue Gun
- Festive Flurry Framelit Dies for Snowflakes
- Large and Small Star Punches from Stampin' Up (retired)
- 11 Feet of Silk White Cord (I decided to use white cord instead of the jute provided in the kit for this project)
- Basic Rhinestone Jewels (note I used a lot more than came with the kit)
- First decide on a theme for your banner, the colours you'll use and the word(s) you will add to your banner.
- Assemble all the pieces and accessories and cut out any additional dies you will use on your banner.
- Lay out the banner pieces on a table top or along the floor so you can see what you are working with.
- Work from the first pennant to the last and be consistent with your colour and design layout.
- Note: I cut additional 3" circles from scrap card stock and used them for mounting the lollies and die cuts to the cord. This step created more stability for the banner.
 |
| The individual letters that form the words "Stampin' Up!" were cut out of Island Indigo card stock using the Typeset Alphabet Dies. I chose these die cut letters over the stenciled ones because I wanted the letters to be super clean looking. Once cut out, I mounted the letters on either Coastal Cabana or Smokey Gray card stock that had been cut out with the 3" Circle Framelit. I used Tom Bow glue on the back side of the letters to adhere them. The dots that you can see on the letters are actually medium sized Basic Rhinestone Jewels. The addition of these Rhinestones really made the letters pop. |
I wish you could see this banner in real life because it's really sparkly and fresh looking and you just can't see that in the pictures. It took me two hours to create this banner and although it intimidated me at first, once I started sponging the ink on the first pennant my initial fear gave way to creative joy. The whole process became a lot of fun and it was exciting to see the progress as the banner came together.
This was such a rewarding process. I hope you enjoyed seeing how this banner turned out. I'm working on a Fall Banner for Thanks Giving and will take pictures as I complete each step.


1 comment:
It`s a GORGEOUS banner and STUNNING in real life! Great tip using the daubers on the canvas pennants. Cheers.
Post a Comment