Showing posts with label hand made cards. Show all posts

Monday, May 16, 2016

wwc67 - Deborah's

Whew, where did the weekend go?  So many things to do and so little time.  As a result I've just missed a wonderful challenge by Deborah entitled "All About Boxes WWC67 on the Watercooler Wednesday Blog Site.  Oh well, that will teach me not to pay attention to the time zones before posting. 

As far back as I can remember in my stamping world, I have always loved to make boxes.  Big ones, small ones it didn't matter.  Most often I like making boxes for card gift sets or for small presents.  

One day in my search for the perfect box instructions I stumbled upon a tutorial on the now defunct Stamping 411 - Stamping With the Operators blog  for a card box that actually worked.  I've been referencing this tutorial "How To Build a Card Box" by Lee Convey ever since.  

Here is My Box
If the design on my box  and colours look familiar, it's because last month I made this double fold card for the last of my three projects using the retiring In Colours for the April Wacky Watercooler Blog Hop.  Since I simply can't get enough of this colour combination I decided to use the same design and supplies for this box.   

Here's  a view of finished box lid.  I've decorated it to correspond with the double fold card inside. 

The box lid measures 6 5/8 x 8 1/8" and is scored at 1" on all sides.  It couldn't get any easier than thisThe corners are miter clipped on an angle to make folding nice and easy.  Once you've added your score tape cut from the short end fold lines to the 1" score line. 

When decorating the lid I began by cutting a 5 3/4 by 4 1/4" mat from Blackberry Bliss, and then added a second mat measuring 5 1/2 x 4" from Whisper White. For the rest of the design I just used the same format as the card, with the exception of adding more floral pieces from Botanical Gardens.

The sentiment is from the "Remembering Your Birthday" stamp set, which I'm so sad to say is retiring on May 31st.  This has been one of my "go to" sets all year and I'm really going to miss it.   The beautiful Lost Lagoon and Blackberry Bliss ribbon's are also retiring, so I made sure I had lots in my stash.
Remembering Your Birthday - this is an eight piece wood or clear mount birthday sentiment stamp set.  Order # 131350.  It's only available froom now until May 31st, 2016 before it retires forever.

Here's a side view showing the height of the box. The sides are 2" high.  The corners fit beautifully, not too snug and not too loose, so the lid isn't hard to lift off or put on. 

The bottom of the box is made exactly the same as the lid.  The starting measurement is  10 x 8 1/2".  This bottom is nice and deep so it's great for holding candy or lots of cards.

This view shows the box lid and the bottom full of matching cards.  It is the perfect box size and so easy to make. 
Supplies:
Stamp Sets: Remembering Your Birthday for the sentiment
Card Stock:  Blackberry Bliss, Whisper White, Lost Lagoon, Mossy Meadow
Ink:  Blackberry Bliss
Accessories:  The Big Shot, Botanical Gardens Thinlet Dies, Lost Lagoon Satin Ribbon, Black Berry Bliss Ribbon, Rhinestones, Dimensionals

This finished box will hold 8 cards and envelopes comfortably, so if you like giving away boxed occasion cards as a gift, this box is for you.  


Happy Stamping!
Penny Tokens Stampin Spot

Monday, April 18, 2016

WWC63 - Kath's Color Challenge

Hey stampers, I'm finally back.   Although I've been home for a month now I've been slower than usual getting back into the swing of things on the home front. What that means for me is that I've had very little stamping time with my stamping friends while I take care of business.  

Well, I'm about to change that........drum roll please because I'm challenging myself to get out of my funk, throw off my gloom, grab some ink and stamps and jump back into the stamping world with both feet. How about you, are you with me?  

If you asked me what brought about this change in purpose or enthusiasm, I would have to say it was seeing Kath's Colour Challenge WWC63 on the Watercooler Wednesday Challenge site this week.  Looking at this fabulous colour combo was just the push I needed to get going (along with some gentle prodding by Heidi Weaver). This colour combo makes me feel both calm and happy and that means I'm in a good space.  

How about you, how are you affected by colour?  I'd love to hear what combinations warm your heart or whatever emotion they bring to you.  

Here's the challenge:

Here's My Card:  

I actually loved making this card so much that I decided to make a set of them and a holder so I could give it away as a gift.  Here's the rest of the ensemble:


This is a folder I made to hold the 5 gift cards and envelopes made with 3 x 5 note cards.  The base is Blushing Bride followed by layers of Watermelon and Pear Pizzazz card stock.  

The So Saffron layer was embossed with the Lovely Lacey EF and I used another piece of So Saffron to frame the Whisper White layer which was adhered with dimensionals.  The ribbon is Pear Pizzazz.  

This is the inside of the card holder.  It holds five envelopes and 5 note cards with ease.

Although the stamped layer is exactly the same for each of the five note cards, I chose to mount the stamped layer on coloured card stock before adhering to the note card.  There are 2 each of Pear Pizzazz, Watermelon Wonder and So Saffron.  

The colouring was done with a blender pen and markers.  The blossom image was stamped in Momento Black Ink.  The small yellow flowers were stamped in So Saffron and some leaves were drawn onto them in Pear Pizzazz.  The dots image was also stamped in Pear Pizzazz.  Watermelon Wonder Sequins were glued to each of the small flowers. 


In this picture you can see the five cards and one of the matching envelopes. 
Supplies:
Card Stock:  Whisper White, Watermelon Wonder, Pear Pizzazz, So Saffron and Blushing Bride
Ink:  So Saffron, Watermelon Wonder, Pear Pizzazz, Blushing Bride and Momento Tuxedo Black
Markers:  So Saffron, Watermelon Wonder, Pear Pizzazz, Blushing Bride 
Stamp Set:  Birthday Blooms 
Accessories:  Big Shot, Trimmer, Lovely and Lacey Embossing Folder, Sequins
Dimensionals, Pear Pizzazz Ribbon, Blender Pen, Tom Bow Glue , Note Cards and Envelopes
Birthday Blooms is only available in the Occasions Spring catalogue until May 31st, 2016.  
Thanks for coming to look at my cards and I hope you'll leave a comment to let me know how you like this gift set.  

Happy Stamping
Penny Tokens Stampin Spot

Addendum:  

Just a note to say that I was thrilled to hear that I "Rocked the Watercooler" and was the winner of this week's colour challenge.  Thanks to everyone who nominated me and a special congrats to Julie Gearinger and Heather Hopson who were honourable mentions with their stunning cards

Tuesday, September 15, 2015

Watercooler Wednesday WWC33 Inspiration Challenge Winner!

Wow, I just got great news!  I was chosen as the winner for last week's inspiration challenge over at the Watercooler Wednesday challenges!  

I'm so thrilled to have won with my entry.  It was pretty stiff competition and I understand my card just squeaked by because of the pop up on the inside. 

If you haven't seen the design team and other entrants cards yet, make sure you click  on this link, you won't regret it, there's so many awesome cards to CASE.  

Here's the card I won with and the link to my post. 


Happy Stamping!
Penny Tokens Stampin Spot 

Friday, May 16, 2014

Double Gate Fold Card Tutorial


You may have seen cards like this on Pinterest or Split Coast stampers recently.  It's called a Double Gate Fold card.  

I copied my card after watching the excellent video by Dee Slater's  of Create With Dee.  Dee is so creative and always does a great job of explaining the mechanics of her cards.  I liked this card so much I couldn't wait for the video to be over so I could make one myself. 

Using this design, I made two cards, one for Mother's Day and the other for a Birthday.  Both are super cute and really give that WOW factor when they come out of the envelope.  Thanks Dee!

Here's My Cards:
This is how the Double Gate Fold card looks coming out of the envelope.  What a beautiful card front.  I absolutely love, love, love it!  It's so feminine and girly-girl that it simply puts a smile on your face.

I used Pistachio Pudding cardstock and matching InColour 2013-2014 designer series paper with Whisper White cardstock.  The Flower Shop and Petite Petals stamp sets and coordinating punches make it easy to assemble this lovely flower. 


When the card is closed on the inside it looks like this.  You can almost feel the anticipation building while the recipient takes off the belly band and opens the card. Sorry for the bad lighting on this photo.

Okay, the suspense is over.  Here's the inside view of my card.  The hinged part of the gate fold top is achieved using the Window Frames Collection framelits and Big Shot Machine and the carryover of the card front design is perfect.  For the inside flower I stamped the base flower and added a single punched Pistachio Pudding flower using the Petite Petals punch.  The Daffodil Delight center is mounted with a dimensional.  


Supplies:
Cardstock:   Pistachio Pudding, Whisper White
Stamp Sets:  Flower Shop,

DSP:  InColour 2013-2014 Designer Series Paper in Pistachio Pudding

Ink:  Pistachio Pudding, Daffodil Delight, Staz On Black Ink
Accessories:  Simply Scored Scoring Tool, Paper Trimmer, Big Shot Machine, Pansy Punch, Petite Petals Punch, 1/2" Circle Punch Dimensionals, Adhesive, Window Frames Collection Framelits, Pansy Punch, 


Here's my birthday version.  I added a few more flowers on the front of this card and some additional basic pearls on the flower centers.  When I finished the card I wasn't too crazy about my sentiment choice, so I later swapped it out for the "happy birthday" banner from the Itty Bitty Banners stamp set.  Much better!


HOW IT'S MADE:
  1. Using Simply Scored score at 2 1/8" turn the card stock 180 degrees and score again at 2 1/8".
  2. Now turn the piece and score at 4 1/4".  This score line will become the hinge part of the card.
  3. Line up one of the 2 1/8" score lines in trimmer and trim to 4 1/4" line.  Then turn and trim on the 4 1/4" line 2 1/8".  Remove and set aside trimmed off piece for flower petals (see step 12).  Repeat on other side.
  4. Set up your magnetic plate or platform in the Big Shot machine and using the 2nd from largest Window Frame Die place it over the square flap at the top of the card.  Adjust so the bottom of the die is just beneath the 4 1/4" score line.  (if you're above the line and you pass through Big Shot you'll cut off the flap.  If you're too far below the score line, the card flap won't close properly).  
  5. Place the acrylic plate from the Big Shot over top of the cardstock and die, so it's lined up just to the hinge line and run through the Big Shot.  
  6. Trim off the two excess pieces of card stock on either side of the window frame shape with scissors once the die has been removed.  
  7. For the front and inside of the card you'll need to cut two Whisper White and two DSP patterned window frames using the next two smaller dies (refer to the picture).  Layer these die cuts with adhesive and attach to the front and the inside front panel. 
  8. Cut two pieces of Whisper White card stock for the front panels to measure 1 7/8" x 4" and attach to the gate fold panels.
  9. Cut two pieces of DSP for front panels to measure 1 5/8" x 3 3/4" and adhere over the front panels.
  10. Cut a Whisper White panel for the inside of the card to measure 4 x 4.  Stamp the panel with a sentiment of your choice and one of the flowers (see picture above for tip on the flower assembly).
  11. For Belly Band cut a 9 1/2" by 1 12" piece of cardstock to match the card base and then cut a 9 1/2" x 1 1/4" piece of DSP and glue to the cardstock piece.  Once the belly band is assembled wrap it around the card so one piece overlaps the other and secure together with sticky strip.  Make a flower and attach over top of the seam.  This band should slide easily off the card - don't make it too tight.
  12. To assemble the flowers for the card front, inside flap and belly band:  
    • Stamp 3 Flower Shop gingham flowers and punch out with the Pansy Punch. 
    • Stamp 3 Petite Petals flowers and punch out with the Petite Petals Punch
    • On scraps of Whisper White card stock stamp randomly stamp 3 of the gingham flowers with Daffodil ink and punch out just the center of the flower with the 1/2" circle punch.  Note: because you only want the centers, you don't need to stamp the entire flower.
    • Punch out 3 plain cardstock flowers with the Pansy Punch and 3 with the Petite Petals punch (use the two pieces of cardstock removed from the top of the card for these flowers)
    • Using glue dots stack from the base up a plain card stock Pansy flower, a Gingham Flower, a plain card stock Petite Petal Flower and a stamped Petite Petal flower.  Mount a Daffodil Delight center piece with a dimensional.  Attach flowers with sticky strip to the front, he inside cover and belly band.  Note:  I wanted a little glimmer on my flowers to give them some added pop, so I outlined all the petals with Dazzling Details #124117 pg. 166.
  13. Stamp a sentiment of your choice on Whisper White card stock and cut out like a banner.  Attach with glue dots beneath the petals.
Okay you should now be able to create your own Double Gate Fold card.  Remember to watch Dee Slater's video so you can see how she placed the Window Die, it's much easier to understand visually than my trying to explain it in steps 4,5 and 6 above. 

I'd love to hear from you if you made this card or simply a comment on the two that I've made.  It's always exciting to hear back from someone who actually used my instructions, as to whether they were understandable and helpful.   Have a great stamping day and thanks for visiting my blog!
Penny

Thursday, May 8, 2014

Saying Good Bye - Sympathy Cards

It's been a sad time for me over the past few weeks as I've lost another two friends and an aunt to cancer, heart disease and old age.  I'm glad to have had these wonderful people in my life and to have shared in their journey.  I'm so sad for their loss and my heart goes out to their families. 

These occasions always necessitate making sympathy cards, which I find as difficult to make as masculine cards.  One is never sure what level of comfort a card will bring. 

For my cards, I try to keep the design and messaging simple, yet comforting.  I want the family to know they are in my thoughts and to have enough space on the interior of the card to share a memory or two.  

Here is the latest sympathy card's I've made:

Supplies:
Stamp Set:
The Two Kind item #130447 (Wood Mount) or #130450 (Clear Mount) is a very reasonably priced stamp set featuring 7 stamps including two lovely sentiments.  This is what's called a two-step stamp set.  The fist image is stamped in a light colour and then the second bolder image in stamped in a darker colour.
 
I love the sentiments in the Wetlands stamp set and use them often.  For this card I used the "Thinking of You" rather than a sympathy sentiment, to express my feelings. 

Cardstock:  
  • Perfect Plum for card base 8 1/2 x 5 12"
  • Whisper White - 5 1/4 x 4 for first layer
  • Pear Pizzazz - 5 x 3 3/4" for second layer
  • Whisper White - 4 3/4" x 3" for stamped layer and 5 x 3 3/4" for inside layer.
Ink:
  • Perfect Plum
  • Blackberry Bliss (NEW 2014/15 InColour)
  • Pear Pizzazz 
Accessories:Decorative Dots Embossing Folder, Big Shot, Gold cord (enough to wrap around Pear Pizzazz card stock 3 times and knot), adhesive and trimmer.


The Pear Pizzazz layer is embossed with the Decorative Dots Embossing Folder (Sale-a-bration cattie).  I used enough gold cord (retired SU product) to wrap the green layer three times and tie a knot. 
 Penny

Friday, October 11, 2013

Tags 4 You Pinwheel Tutorial


In follow up to my workshop at the end of September, I wanted to give each of my new customers a card and a thank you for their orders.  Since the workshop was a Winter/Christmas theme I decided to make each of them a Christmas card that they can actually use.

As these gals are all relatively new to stamping I wanted to keep the card simple and yet fun, so decided on using a pin wheel tag base layered on some of the Seasons of Style Designer Paper and feature the "Have a Holly Jolly Christmas" sentiment from the Tags 4 You stamp set.  This is a very simple card and so a great design for a stamp a stack class or when you want to churn out a bunch of cards for your friends and relatives assembly line style.  Here's the "how to's"

Supply List:

Cardstock:  Cherry Cobbler for the card base, Gumball Green for the pinwheel base, Whisper White for the sentiment and inside of the card

Stamps:  Tags 4 You* from the Holiday catalogue, Small Snow flake stamps or some other Winter/Christmas themed stamp to decorate the inside of the card.

Designer Paper: Seasons of Style Designer Paper, Red Glimmer Paper

Ink:  Gumball Green and Cherry Cobbler

Accessories:  Chevron Embossing Folder, Basic Rhinestones, Bracket Punch*, Apothecary Framelits, Trimmer, Sponge Daubers, Dimensionals, Adhesive strips. 

Note:  The Tags 4 You and the Bracket punch can be purchased individually or as a bundle.  You save 15% off total cost before shipping and handling when you buy the bundle.   


For the Card Front:
  1. Cut Cherry Cobbler card stock to measure 8 1/2 x 5 1/2" for the base, score at the center and fold.
  2. Dry emboss the front panel of the card with the Chevron Embossing Folder
  3. Using your trimmer cut a strip of Season of Style DSP to measure 51/2 x 1 1/2" 
  4. Cut two 5/12" x 1/4" strips of Red Glimmer Paper
  5. Choose which side of the DSP you want facing up, I chose the stripes to contrast with the pinwheel.  On the reverse side lay down two strips of sticky strip - one on each long edge and attach the two 1/4" wide strips of Red Glimmer Paper.  TIP:  I line up the glimmer paper along a straight line on my grid paper, remove the sticky strip backing on one side of the DSP and position this piece over top of the glimmer paper adjusting to make sure the amount of glimmer paper showing is even and then adhere the strip.  I repeat this for the other side of the DSP.  
  6. Adhere the DSP/Glimmer paper strip to the front of the card about 5/8" from the bottom.  TIP: Because this piece needs to bear the weight of the pinwheel I adhere it with a couple of sticky strips along each edge.
  7. For the pinwheel, cut two 2 1/4 x 2 1/4 squares of Old Olive Card stock.  Lay one square over the other to achieve a Star of David pattern and adhere together.  TIP:  When I make the first pinwheel I always line up the points on grid paper so it's evenly spaced all around.  Once I've adhered the two pieces together, I draw an outline around it so I have a template.  The template acts as a guide for making more pinwheels.  This is really helpful when you're making a lot of these cards.
  8. Once the base for the pin wheel is assembled cut eight 1" by 1" squares using your paper trimmer.  TIP: Cut 1" by 6" strips of DSP and then cut these strips down to 1" squares.  When you're assembling the pinwheel alternate the patterns of the DSP to achieve a patchwork effect.
  9. See the pictures below for placement of these squares.  It's important that when you place the first square that you only glue down half of it.  When you place the last square on the pinwheel you'll need to lift up the first one and work the last square under it.  Once the last piece is glued down, then glue down the edge from the first square so it lays flat.  This step will make sense when you make your first pinwheel.
  10. Stamp the sentiment in Gumball Green on Whisper White card stock and cut out with the bracket punch.  Glue to the center of the pinwheel with dimensionals and add two basic rhinestones for a little more bling.
  11. Attach the pinwheel to the center of the strip with dimensionals.

For the inside of this card I cut out Whisper White card stock with the Apothecary Labels Framelits and then stamped some random snowflakes with Cherry Cobbler ink to add some interest.  You could paper pierce this piece to add more interest.

The inside of this card has a piece of Whisper White card stock but to 51/4 x 4" and again some random snowflakes stamped in Cherry Cobbler ink.

Here's a batch of the cards I completed.  Don't they look cheery and bright? This design can be used for any occasion just change up your paper and sentiments.

Making the Pinwheel:

Cut 2 squares measuring 2 1/4" x 2 1/4" from coordinating card stock.  For this example I am using Island Indigo.

Using grid paper, line up the two corners of your square so the points are resting on a line (top and bottom of square).  Adjust the sides of the square so they are in the middle of a grid line.  Draw a line around the square with a marker pen.

Once you've drawn the first square remove the square and this is what it should look like. 

Line up the second square so it intersects with the first one and again draw a line around it with a marker.

Save this drawing because this will become a template that you can use to line up your squares before gluing them together.

Cut strips of designer paper to measure 1" x 6".  Cut these strips into8 1" squares.  If you move the strip along between the inches, it is easier to cut them.  Don't use a 1" punch because you waste dsp. 

Lay out the squares so you have one of one pattern and then the next in the flip side of the DSP. This just makes it easier to grab the next square for gluing onto the grid.

Glue the first square to the top pointed piece of the pinwheel.  This is your starting piece.

Only put adhesive on the right hand side of the 1" square so you can lift it at the end. You'll see when we get to that picture why you do this.

Once you have the first square in place just continue around overlapping squares and reversing the patterns as you go.


Okay now you need to lift the left hand corner of the first square.

While the corner is lifted fit the last 1" square in place and glue down, then add adhesive to the left had corner of the first square and glue it down. 

When it's all finished your pinwheel will look like this.  Make sure all the squares are glued down so they don't catch and lift.  You're now ready to put whatever embellishment you choose in the center of the square so the construction part is covered. 


To construct the strip on the face of the card cut a piece of DSP from the same paper you chose for the pinwheel to 5 1/2" x 1 1/2".  Also cut two strips of card stock or glimmer paper 1/4" x 5 1/2".  These strips will be mounted on either side of the dsp strip before it's adhered to the card front.

Just put sticky strip on the back of the DSP piece long edges and then add the smaller card stock strips.  Make sure they measure the same when you look at the flip side - see next picture.


I added a snowflake to the front of this card so this picture just shows the Festive Flurry snowflake image cut out in Silver Glimmer paper being added to the front of the pinwheel. 

Here's the finished card with the embellishment added.  I used the Honeysuckle Embossing Folder to dress up the front of the card.  Kind of looks like ice crystals. 
This is the inside of the card.  Both stamp sets used are retired.

Here are some additional pinwheel samples.  You can make these ahead and just add them to your cards when you make them.  They're so much fun to make and so quick once your pieces are cut out.  This is a terrific way to use up scraps.  
 

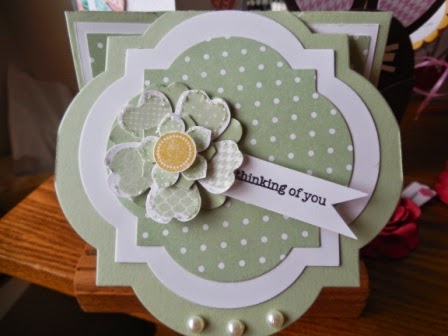
The sentiment is from the Chalk Talk stamp set and is mounted on a Red Glimmer paper scallop circle.  Silver glimmer paper replaces 4 of the 1" squares to add some bling. 

This one features Red Glimmer Paper matched up with Cherry Cobbler card stock and Season of Style Designer Series of Paper.  The stamp is from the Tags 4 You stamp set.

Here's one for Thanks Giving that was made for the Pals Paper Challenge #175 this week.  I made the designer paper as part of a One Sheet Wonder using the Wonderfall Stamp set and Gorgeous Grunge.  The patterns are stamped in Always Artichoke, So Saffron, Cajun Craze and Early Espresso inks.  I added Champagne Glimmer Paper for some bling.  The sentiment is punched out with the Bracket punch and then I punched out two more bracket labels, cut them in half and fitted them to the back of the sentiment.  Easy peasy!

Here's one I made last year using the Ornaments Stamp set and Framelits.  It was mounted on a quilt base that was achieved with strips of dsp on adhesive sheets. 


And that's it for this tutorial and post.  Hope you enjoyed it.  I'd love to have your comments and if you make one using this tutorial please link back to me.  Appreciated.

Paper Pumpkin Alternatives April 2024 and Sketch Challenges

The past week was so busy that time literally flew by.  I have a number of projects on the go, including working on my April 2024 Paper Pump...