Showing posts with label hand made cards. Show all posts

Sunday, September 22, 2013

Card Box Tutorial

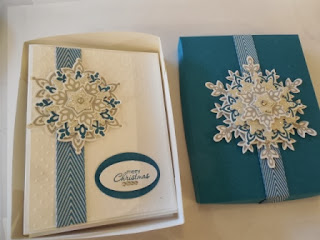
I promised to make a gift box holder for my Festive Flurry cards in my  September 7th post entitled Festive Flurry in a Festival of Colours.  

Today was the first chance I've had to sit down and work on a tutorial, so my apologies for taking so long to deliver.  

Basics for Assembling Gift Box

  1. Start with a piece of card stock or DSP measuring 5 7/8 x 7 1/4" and score at 5/8" on all four sides.
By placing a marker on the 5/8" score line on my Simply Scored Scoring Tool it made scoring this piece so easy! 
2.  Cut from the outside edge to the fold line on all four sides.  Snip a piece off each corner to make assembly easier. These tabs will be folded to the inside of the lid.  
  4.  Add sticky strip to the corner tabs and then remove the adhesive backing.  Fold the tabs to the inside and tape to the side flap.  Make sure that you square up the corners so they match.  Repeat on the other side.

Once all the tabs have been adhered, the box lid should look like this on the inside.
This is a view of the outside of the lid.  I made this mockup box in DSP but it's not as firm as when made from card stock, so my preference would be to make it using card stock. 
Box Bottom:

1.  Cut a piece of card stock to measure 7" x 8 3/8" for the box bottom.  Score it at 1 1/4" on all four sides.
 2.  Cut from the outside edge to the center fold on each corner.  Snip a small "V" to the center line to make the side pieces fit together more easily.  Add sticky strip to the corner tabs.


3.  Remove the backing from the sticky strip and fold the tabs to the inside.  make sure the sides are carefully aligned. 


Festive Flurry Gift Box:

 Supplies:

  • 7 x 8 3/8" piece of Whisper White card stock for bottom of box
  • 5 7/8 x 7 1/4" piece of Island Indigo for lid
  • 81/2" piece of Chevron  Island Indigo Ribbon
  • 4 x 4" piece Whisper White for Smokey Slate Large Snowflake
  • 3 1/4 x 3 1/4"  piece of Whisper White for Island Indigo Snowflake
  • 2 3/4 x 2 3/4"  piece of Silver Glimmer Paper for Glimmer Snowflake
  • 2 x 2" piece of Whisper White for Smokey Slate Small Snowflake
  • Small Scrap of Silver Glimmer Paper for BoHo Blossoms Punch Snowflake
  • Medium Sized Basic Rhinestone 
  • Smokey Slate and Island Indigo Inks
  • Boho Blossoms Flower Punch
  • Festive Flurry Stamp Set and Coordinating Dies
Assembling The Gift Box:

1.  Follow the assembly instructions above to make the bottom of the box. Note:  To make the box bottom more stable I cut an additional piece of white card stock to fit in the bottom of the box and adhered this piece with sticky strip. 

2.  Score and cut the tabs for the lid on the Island Indigo card stock piece.  Before assembling the lid adhere the Island Indigo Chevron Ribbon across the  lid.  I started the ribbon at the score line on the underside of the lid, ran it across the length of the lid to the other side.  I used sticky strip under the ribbon to secure it. Once the ribbon is attached then finish folding and assembling the lid.  

3.  Stamp and assemble snowflakes for the lid top as follows:
  • Stamp Large Snowflake image in Smokey Slate ink on 4 x 4" piece of Whisper White and cut out with large snowflake die 
  • Stamp the next size of snowflake in Island Indigo ink on 3 1/4 x 3 1/4" piece of Whisper White and cut out with corresponding snowflake die. 
  • Cut out a snowflake from the 2 3/4 x 2 3/4" piece of Silver Glimmer Paper using the next size snowflake
  • Stamp the smallest snowflake in Smokey Slate on the 2 x 2" piece of Whisper White
  • Punch out the 5-sided star with the Boho Blossoms Punch
  • Adhere the medium sized rhinestone to the center of the Glimmer star.  
This picture shows the various sizes of snowflakes and dies used to create the center piece for the box lid.
Box bottom, lid with ribbon and snowflakes before final assembly.

4.  Assemble the centerpiece in this order:
  • Attach Island Indigo Snowflake to Large Smokey Slate Snowflake with Dimensionals
  • Attach Glimmer Paper Snowflake to Island Indigo Snowflake with Dimensionals
  • Attach Small Smokey Slate Snowflake to Glimmer Paper Snowflake with Dimensionals
  • Attach Small Glimmer Paper Star to center of small snowflake matching the star pattern.
Attach assembled snowflakes to the center of the box lid with sticky strip.

 
Back view of all the snowflakes before they were glued together.

Island Indigo adhered to Large Smokey Slate Snowflake

Silver Glimmer Paper Snowflake adhered to Island Indigo Snowflake. 
 
This view shows the small Snowflake adhered as the fourth layer.  I made sure the snowflake points were turned so they never overlapped and it was easy to see the snowflake layers below.  Hope that makes sense.

Finally attach the small Glimmer Paper star to the center of the small snowflake.  Use the star shape outline as your guide for attaching the star.  Adhere a medium sized basic rhinestone to the center. 


Finished Box and Lid

Gift Box and four Festive Flurry Cards in Island Indigo, Wisteria Wonder, Blushing Bride and Pear Pizzazz.
This picture shows the finished lid and the box bottom with the envelopes in it.  I stamped a single snowflake in Smokey Slate on the four envelopes.
I added a piece of Whisper White card stock to the inside of the lid to give it more stability and stamped the Smokey Slate snowflakes randomly on this piece.  This piece also covers the ends of the ribbon so it has a neater appearance.


And that's the end of my tutorial on gift boxes for the Festive Flurry Christmas cards.  I hope you found it helpful.  I'd love to hear from you so let me know if it worked for you.      

Friday, August 16, 2013

Saying Thank You the Photopolymer Way!


Stampin' Up! has just released it's new "Another Thank You" photopolymer stamp set and I think you're going to fall in love with it.


Don't you just love all these images and for $16.95 what a great investment for your sentiment stamp collection. You could use this exclusive photopolymer stamp set for any occasion that calls for a thank you.

If you've used photopolymer stamps before and been unimpressed, you really need to try out Stampin' Ups! photopolymer stamps to see the difference.  They offer a versatile all-clear stamping option, and you'll find they're  top-quality.  Each stamp will give a perfectly stamped image every time. Photopolymer stamps stick amazingly well to Stampin' Ups! clear blocks and they're easy to place just where you want them. And best of all, you get to enjoy tons of images for a great price!


Note: The following clear block sizes A, B, C, D, and F which are not included in the set, work best with it. Click here to check out our clear blocks.

Check out this set for yourself and if you want it, you can order at my Online store, just click here.

Saturday, August 3, 2013

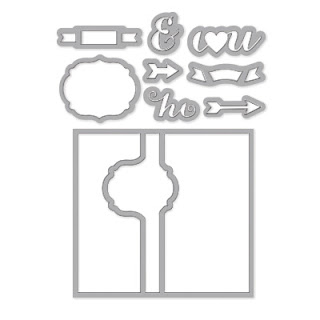
Thin Lit Dies Just Released and Life Just Got Easier!

Would you love to create movement or flip flop cards but you don't know how to go about cutting them out or you just don't want the hassle?  I've got news that will change your mind.  Thanks to Stampin' Up!, movement card creating just got a whole lot easier and you're going to love it!  And I can show you how!

I should know how difficult it can be, because I just recently demonstrated this flip card in my Masculine Card Class.  

This WOW factor card was a fun challenge for both my students and myself, but it could have been so much easier.  For one thing, it took a bit longer to demonstrate as I had to work closely with each member of the class on the scoring and placement of the framelit die, and making sure nothing moved during the process of creating the flip window.  

Now I know why they call it a WOW card! It's because it was a scary process both for me and my students, and at the end we all went "wow". Honestly, who'd want to ruin such a big chunk of card stock if the framelit die shifted  ............. not me!  Anyway the long and short of it is that doing it the old way was fun, but the whole process was really slow in a class.  And, even though I really loved this card and thought about making  a similar one for a swap card at Convention, the thought of duplicating all the steps over and over again, simply intimidated me.

Okay so what's changed and why am I excited now?  Simply this.  During Convention we saw the most awesome demonstration of a new product called "THINLIT CARD DIES".   What made it even super duper exciting is that right after Shelli demonstrated this new technique, I won the Label Card Thinlits Die during at Prize Patrol!!!!!! Dancing up and down here!

There are some products you just have to see in action before you realize how much you need them, right? This is one of them!   

These new card dies come with extra die pieces that have versatile designs, so you can use them on other projects, not just flip cards. (The Circle Card Thinlits Die comes with 10 total pieces; the Label Card Thinlits Die comes with nine total pieces.)  Great value-especially to create an interactive card!  So check out this video and then I'll give you some more details. 


Available August 1, 2013


These impressive "flip" cards will make perfect invitations, Christmas or All Occasion cards.  The main shape in the cards (circle and label) can work with a lot of Stampin' Up!s stamp images so you can create tons of different kinds cards using many different stamp sets. Here are just a few suggestions to get you started:

Label Card Thinlits Die (item 133479):

  • Happy Day Stamp Set (item 130294 W item 130297 C)

Circle Card Thinlits Die (item 133480) - $40.95
  • Worth the Wait Stamp (item 131094 W)
  • Five-Way Flower Stamp (item 131088 W)
Both card dies pair well with:
  • Oh, Hello Stamp Set (item 131931 W item 130733 C)
  • Yippee-Skippee! Stamp Set (item 131341 W item 131344 C) 
  • Really Good Greetings Stamp Set (item 130330 W item 130333 C) 
  • Regarding Dahlias Stamp Set (item 130324 W item 130327 C)

These dies also work well with our new magnetic platform (item 130658) so you can place the dies exactly where you want them!

Want more information or to see a demonstration, "try" before you buy?  Then just call or email me on my web contact page to to arrange a time.  

Monday, July 29, 2013

Convention Swap Post: Day Four


Are you ready for some more fantastic swap cards?  

I just can't believe how many wonderful cards I traded for and I only participated in one swap.

So without further a-do, here are some more great cards! 


Card Thirty-Four:  This amazing wedding card was created by my downline Ethel DeTemple, who attended Convention with me this year. Ethel is an awesome and talented Demonstrator and crafter who lives in Surrey, British Columbia. If you're looking for a Demonstrator in the Surrey area, simply type Ethel's name into the Demonstrator Locator area on Stampin' Up!  You won't regret it!  The stamp set Ethel used on this card is the "This Day Forward" stamp set from page 114 of the catalogue.  This 6-piece set has the vintage love bird and small butterfly images as well as four beautifully scripted sentiments that make this set  perfect for wedding or anniversary cards.  Ethel use Whisper White card stock for her card base and then mounted a 4 x 5 1/4" piece of Pool Party that she embossed with the Fancy Fans Embossing Folder.  The Love Bird image has been stamped in Versa Mark Ink and them embossed with Pool Party Embossing Powder. To finish off this card Ethel added a medium size Basic Rhinestone Jewel between the birds and a beautiful little bow made with the Pool Party 1/2" seam binding ribbon finishes off the front of the card.    Loved this card Ethel and loved swapping with you in the New Card Catalogue Swap!

Card Thirty-Five: Paula Mann created this really great Bon Voyage card using the Around the World stamp set from page 48 of the catalogue.  I love the way she used several of the elements from the 9-piece stamp set to make this card have a feeling of movement and fun.  This 4 1/4 x 5 1/2" card made with a Crumb Cake card base is folded at the top.  Her first layer is a piece of Midnight Muse card stock which has been embossed with the Chevron Embossing Folder.   Her next layer is a piece of 4" x 2 1/2" Very Vanilla card stock which she's ripped across the bottom edge and punched the top corners away with the 1/2" circle punch.   She's also either splattered Crumb Cake ink across this piece or stamped it with the splatter stamp from Gorgeous Grunge for a very effective look.  I luv the way she's used Gumball Green, Strawberry Slush and Baked Brown Sugar inks when stamping the accessories.  Nice combination of elements.  Finally I like the cute little bow Paula's tied with Linen Thread to link the two banners at the top right hand corner of the card.  Very fresh ideas on this card, thanks Paula! 

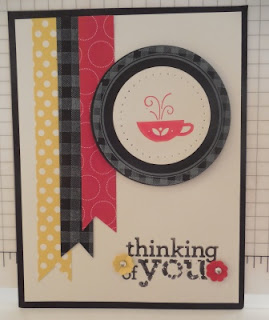
Card Thirty-Six:  Annie Medigovich created this card front using a combination of DSP papers for her banners.I believe the black gingham banner was stamped using the Gingham Wheel (don't quote me on that), at any rate a very nice combination.  Annie stamped the coffee cup and sentiment from the Kind & Cozy stamp set on page 82 of the catalogue.  How cute is this?  With a little layering and some basic rhinestones, this is an awesome card.  Thanks Annie! 

Card Thirty-Seven:  Designed by Connie Tumm of Stamp Art Squared.  Connie chose the Polka Dot Pieces stamp set on page 85 of the catalogue for her New Card Catalogue Swap card.  I'm so glad she did, because what an awesome card!  I'm loving everything about this 6-piece stamp set which includes all the cute images Connie has used and to make it super simple, these stamps coordinate with the Bird Builder Punch, Elegant Butterfly, 3/4 circle, 1 1/4" and 1 3/4" Scallop Circle Punches. The Gingham Garden DSP that Connie cut into 1 1/4" squares is perfect for showcasing the various images she chose.  Another thing I like about this card is the way she has layered Burnt Brown Sugar card stock for her card base and then matched that with another layer in the same colour.  The addition of sponging around the small squares and the top layer of this card adds a lot of depth to this card.  Thanks so much Connie, just love it!

Card Thirty-Eight:  If you love circles and medallions then you're going to love this next card designed  by Cindy Castleman.  Cindy started with a card base of Naturals Ivory and then layered it with Crumb Cake and a piece of So Saffron card stock that was embossed with the Honeycomb Embossing Folder.  What a nice combination. For her element layers and inks Cindy chose Night of Navy, Crisp Cranberry, So Saffron, and Primrose Petals card stocks lending a soft but coordinated look to the card. A beautiful strip of the new Denim Jean Ribbon tied with a Linen Thread bow completes the picture.  The stamp sets used for this card are the Happy Flowers Hostess set on page 202 and the Itty Bitty Banners stamp set on page 30.  These little banners are so easy to cut out using the Itty Bitty Framelits Dies on page 187.    Great choices all the way around, thanks Cindy. 
 
Card Thirty-Nine: This WOW card was designed by Serena Marsh another member of our small Canadian contingent.  Serena is a remarkable stamper who has lots of fresh ideas and is an adventuresome stamper.  If you're looking for a wonderful demo in the Burnaby, BC area, then contact Serena, she's your gal.  Serena's card was one of my favourites in terms of a simple but WOW card.  She used Bermuda Bay card stock for her base and then added a 2 3/4" x 5 1/2" strip of Whisper White  across the center.  Serena stamped the single wood mount stamp called "Fishing Around" on this piece and then cut it out with the 1 3/4" circle punch so she could add a Circle Treat Cup. You guessed it instant fish bowl!  Serena actually filled these little Circle Treat Cups with water so it looks like the little gold fish are floating. Unfortunately airplane travel and customs weren't so kind to these cards so a few of them suffered from water damage.  Some stampers have suggested that using a clear gel like Dippety Doo would probably have worked as well without the leakage problem. Whatever, it worked for me! She did a nice job of colouring the little gold fish and with markers.  Serena also added the birthday sentiment from the Label Love stamp set.  This awesome 7-piece set is available in English, Spanish and French and coordinates with the Artisan Label Punch sold on page 181.  Thanks Serena for joining us on our journey and making it such a fun and memorable week.  Can't wait until we can get together and stamp!   

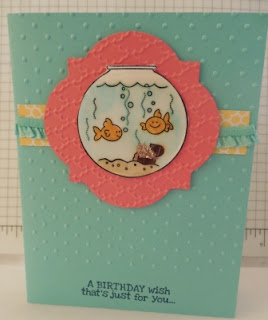
Card Forty:  Here's another awesome birthday card using the "Fishing Around" stamp.  This one designed by Cindy Carroll also uses the "Remembering Your Birthday" set on page 16 of the catelogue.  If you have lots of birthdays in your life, then this 8-piece sentiment only stamp set may be just the ticket for you.  It's available in English, French and German. Cindy's card base is the new Coastal Cabana card stock that was embossed with the Perfect Polka Dots embossing folder. I like the way she only embossed 3/4 of the card face and left room for the sentiment at the base of the card.  I also like the way she mounted her fish bowl on a piece of Melon Mambo that's been cut out with the second of the Window Frames Collection dies.  This piece was embossed using the Fancy Fan embossing folder.  The additional special touches were the small strip of Daffodil Delight paper from the Quatrefancy Specialty DSP.  This is topped with a piece of the 3/8" Ruffled Stretch Trim in Coastal Cabana. Cindy has done a simply awesome job of colouring her little fishbowl with aqua painters and then adding a clear glaze with Crystal Effects.  I also like the way she added the Champagne Glass Stampin Glitter to the treasure chest...........deluxe detail!  What a delightful card Cindy thanks for sharing!
Card Forty-One:  Designed by Linda Elliott of McKinney Texas this boldly coloured card is very hip and with the times!  She's combined Melon Mambo, Whisper White and Basic Black card stock for a very urban look.  The chevron background was created using the Positively Chevron background stamp inked in basic black. It measures 4 1/2" x 5 3/4".  Linda used Whisper White Craft (stamped off) to stamp the tag from the Chalk Talk Stamp set and then cut it out with the Chalk Talk framelits,  which can be purchased as a bundle for a 15% discount savings. Linda's card also features some basic rhinestones jewels that are cleverly placed on the card and a strip of 5/8" Whisper White Organza Ribbon.    The inside of Linda's wonderful card features a piece of Melon Mambo stamped in Whisper White Ink and the Positively Chevron background stamp.  A 1" half circle was punched out at the top center of this piece so a gift card can be inserted.   Very cute!  Thanks Linda for sharing. 

Card Forty-Two: I love the card designed by my friend Debby Evoy from Abbotsford, BC, it's gorgeous.  Debbie also attended conference with Ethel and I and was such a wonderful addition to our group.  Funny and vivacious, this gal really knows her stampin' stuff!  If you're looking for a fun and energetic stamping demo in the Abbotsford, British Columbia area, look up Debby in the Demo locator.  Tell her I sent you her way, you won't regret it!   The stamp set Debby chose for her New Card Catalogue Swap is the Six-Sided Sampler on page 125 of the catelogue.  This awesome 11-piece stamp set can be bundled with the coordinating Hexagon punch for an additional savings of 15%......... such a great deal!  Debby's awesome card starts with a base of Burnt Brown Sugar followed by a layer of Pool Party.  Next comes a layer of Early Espresso that has been embossed with the Honeycomb Embossing Folder.  A banner in Calypso Coral is centered across the card  and to this Debby has centered a beautiful lacey doilies in Pool Party.  The doily was die cut using the Delicate Doilies Sizzlits L* set on page 188.  The hexagons and sentiment were stamped in Early Espresso Ink.  What an awesome card Debby.  Thanks so much!  You're the best. 

Card Forty-Three: This lovely card front was made with a base of Midnight Muse and a layer of Gumball Green card stock.  The sentiment from the Blessings from Heaven stamp set was stamped in Midnight Muse ink.  This beautiful 6-piece set has both friendship and sympathy sentiments included.  The small medallions are from an equally great stamp set called A Round Array.  This 8-piece set coordinates with the 7/8" Scallop Circle Punch and is available in English, Spanish and French. Extra detail was added to this card by scoring it in 1/4" intervals above and below the medallions.  This was a well designed card, but unfortunately because it comes unsigned I'm unable to give thanks for it.


Card Forty-Four: Betsy Crider created this fun card using the You're My Hero stamp set on page 51 of the catalogue. This is a great set for first responders and all the cute little guys in your life.  The card base is in Night of Navy that has a layer of Basic Grey embossed with the Houndstooth Embossing Folder.   I love how Betsy stamped off the police car three times in Basic Gray ink and coloured in the star and flashing light with markers.  For her final image she's added silver mini brads to the tire hubs and a cute basic rhinestone which she's coloured red for the flashing light on top of the police car.  Too cute!  I also love the piece of Cherry Cobbler Chevron ribbon she's added below the stamped images.  This card is as cute inside as it is outside and she's repeated the Police car image with the happy birthday sentiment from this set.  Well done Betsy!

Card Forty- Five:  This beautiful card was designed by my good friend Joni Metras from Charlton MA.  Check out Joni's wonderful blog, Joni In the Spotlight  which has so many great card samples on it, and if you live in the Charlton area you might want to think about making this gal your demo because she's simply terrific!  Tell her I sent you!   For this clean and simple card Joni used a Whisper White card stock base, topped with a layer of Melon Mambo and a coordinating piece of the new Gingham Garden DSP.  She stamped "smile" on the bottom of the DSP base and the Medallion from the "Happy Day" stamp set in Melon Mambo Ink on Natural Ivory card stock.  For the medallion center she used one of the large buttons from the beautiful  Vintage Faceted Designer Series buttons on page 169 of the catalogue, and then she mounted this piece onto Melon Mambo.  Both the Naturals and Melon Mambo pieces were cut out with the Window Frames Collection dies. This set of 6-layering dies offers perfect placement for your layers and can be paired up with the Festive Paper-Piercing Pack to add an additional glam touch, as Joni has done.  Awesome card girlfriend.  Thanks so much for sharing it! 

Well that's it for today's series of Convention Swap Cards.  I hope you've enjoyed them.  Drop by and leave me a comment I'd appreciate it! 

Wednesday, July 24, 2013

Convention Swap Card Share: Day One

As promised, today I'll begin featuring a selection of cards I received for participating in the 64+1 New Catalog Stamp Set Card Swap@ Convention,  as well as some cards I swapped along the way to various events.  

I hope you'll enjoy these selections as much as I am and will leave a comment. I've been smiling ever since I received this exciting selection of cards.   And, if you recognize your card please leave a comment, I'd love to hear from you.  

I'll provide links to the card creator and products used as much as possible, but unfortunately some of the cards did not have any information accompanying them. Again, if one of these "unnamed" cards is yours, I'd loe to hear from you and amend my post with your name and link.  Okay so here we go!

Card One:
Our first card was created by Beth Martin using the Wildflower Meadow Background Stamp (pg 83) and Wildflower Meadow Embossing Folder (pg 191).  The background stamp measures  5 5/8" x 4 1/8". In case you didn't know, the Wildflower Meadow Embossing Folder also coordinates with the Gingham Garden Suite. You can buy this fantastic background stamp and coordinating folder as a bundle and save 15% (wood mount bundle #132735 and clear mount bundle #132985).   Beth has done a fantastic job of stamping this card.  The card base is Baked Brown Sugar and the 1st layer is Strawberry Slush card stock.  She's stamped her images on Very Vanilla in Strawberry Slush Ink, and the polka dots are from inking up her Perfect Polka Dots Embossing Folder.  The little "thankful for you" sentiment is from the hostess set Banner Greetings on page 202.  Ask me how you could earn this last stamp set for free.  Great card Beth!

Card Two:   Susan Gardner created this really enchanting welcome baby card using the Zoo Babies 10 piece stamp set on page 54 of the catalogue. Every character in this marvellous set is adorable.  Susan incorporated three characters from the stamp set with So Ho Subway Designer Series Paper in a real thrifty but cute way.  I also like how she added the smallest of the Basic Pearl Jewels for eyes on the elephant and rhino.  Super cute!  Any new mom would be thrilled to get this card.  Thanks Susan for sharing.

Card Three:  Kris Kok has created a super cute welcome baby card using the single stamp "Worth The Wait".   This wood mount only stamp offers terrific value at just $11.95 CDN.  It coordinates with the 1 3/4" circle punch and the 2 3/8" Scallop Circle Punch to give a very sweet layered look.  Kris has paper pieced the little turtles shell by stamping the image onto some Subtles DSP and then fussy cutting it out.  The shell is mounted onto the stamped image with dimensionals.  Kris has also added a cute touch by incorporating a small piece of the Crushed Curry Chevron Ribbon at the top of the card.  The Whisper White Layer of the card is embossed with the Perfect Polka Dots Embossing Folder and the Soft Sky layer was cut out with the Apothecary Accents Framelit and then embossed with the Stripes Embossing Folder.  Great card Kris............. loved it!

Card Four was created by Lynn Zautner (www.lynnspirations.com - Pinterest site).  Laura has used my now favourite colour combination Crisp Cantaloupe, Soft Skye and Crumb Cake for this lovely friendship card. Lynn has also used a strip of the Natural Composition Specialty DSP, which features shiny raised patterns that appear brown and glossy, for her banner.  The increasingly popular stamp set "Perfect Blend" was used for the coffee cup image and sentiment.  This three piece, two-step stamp set is economically priced at $13.95.The next detail I found really appealing was the way Lynn punched out the top corner of the Very Vanilla layer with the Scallop Trim Border punch and then added a circle of the 3/8" Ruffled Ribbon in Crisp Cantaloupe.  Wow nice touch Lynn!

Card Five:  Barbara Dykhouse created a beautiful card using the 3-piece Background Builders stamps on pg 119 of the catalogue along with one of the doilies from the Delicate Doilies 4-piece stamp set on pg 122.  Great combination!  I also love how Barbara used the new InColours - Crisp Cantaloupe, Baked Brown Sugar and Coastal Cabana for her card stock ink  and ribbon choices.  Love it.  Another cool thing that works for this card is the first layer which is embossed with the Modern Mosaic Embossing Folder.  This element just seems to pull the whole card together. Thanks Barbara for this very appealing any occasion card.

Card Six:  Sometimes the simpliest of cards pack the biggest punch.  I felt that way when I received Michele Robins-Keifer's perfect little wedding card.  Just the sweetest.  Michele stamped the flowers and sentiment using the "A Round Array" stamp set.  What a great value this set is, with a mixture of 8 sentiment and flower shapes for just $22.95 in wood mount and $17.95 in clear mount.  This stamp set is available in Spanish, French and English and coordinates with the 7/8" Scallop Circle Punch on page 182.  The card base is Wisteria Wonder followed by a layer of Whisper White that's been embossed with the Perfect Polka Dot Embossing Folder.   The sweet little banner sentiment is from the Banner Greetings Hostess Stamp Set, which you can earn for FREE with hostess dollars - ask me how.

Card Seven:  I was super excited to get this gorgeous swap card before the afternoon session on the final day of Convention.  It was created by Claire Ventre from Cincinnati, Ohio, who was sitting right behind us throughout the closing session.  Not only is this the first Christmas Card I've received this year, but it features this year's Ronald McDonald House stamp set "Tag It", which we received for FREE during Convention.  This beautiful stamp set coordinates with the Chalk Talk Framelit Dies (p. 187)and is available in English, Spanish, French and German.  Did you know that when you purchase the Tag It stamp set that Stampin' Up! donates $3.00 to the Ronald McDonald House Charities?  Such a great deal for everyone.  The Whisper White layer of this card is embossed with the Northern Flurry Textured Embossing Folder.  The last great feature I want to point out on this card is the super cute little bow. Did you notice it?   It's actually modeled after the bows on page 152 of the new catalogue, but this one is made with 1/4 inch Old Olive Grosgrain Ribbon (retired).  Love, love, love it!  I can show you how these bows are made, just come to one of my classes............. so much fun!

Card Eight:  Snowflakes anyone?  My second Christmas card came in a hallway swap with Jennifer-Buchanan-Springer from Bremerton, Washington.  Jennifer is a very special gal who I've so enjoyed meeting on a couple of occasions. Her beautiful card features the Snowflake Soiree and More Merry Messages stamp sets which are both still available as carryover stamp sets from last years Holiday Mini. To find these sets you need to go to Stamps in the on-line catalogue and when you open that selection there will be another option called "online only stamps", click on this link to see all the carryover on-line only stamps.   The snowflakes have been stamped in Marina Mist and Wild Wasabi for a beautiful colour combination.  Awesome card Jennifer!
Card Nine:  Connie Bjork from Pennock, MN designed this very sweet little " Thanks so much" card.  Connie has featured the Simply Sketched Hostess Stamp set featured on page 205 for the bird and sentiments on this card.  What a beautiful job of water colouring the bird on a small piece of water colour paper.  She's used the InColours designer series paper for the Bermuda Bay strip of DSP across the bottom of the card.  Before layering and adhering this piece she added a small strip of the3/8" Ruffled Rib bon in the Baked Brown Sugar.  Wow!  What an awesome combination.  Connie also added one of the small Very Vintage Designer Buttons tied off with some Linen Thread.  

Card Ten:  Another simple card featuring the Modern Mosaic Embossing Folder and the coordinating stamp set Mosaic Madness.  This stamp set coordinates with the Mosaic Punch on pg. 180, and in fact, you can save 15% in discount by bundling the stamp set and punch.  How's that for a great deal?  Check out the details on page 123 of the catalogue. Whisper White Taffeta Ribbon and some small Basic Rhinestones add some sophistication to this beautiful card which is stamped in Night of Navy.  Unfortunately I can't give the owner credit as there was no identifying information in the swap envelope.  Too bad this card is awesome! 

Card Eleven:  My final card today is simply awesome.  It was created by Julie Link of Inver Grove Heights, MN.  Julie's card features the stamp set "Wetlands", which is a 6-piece stamp set featuring three sentiments that look awfully similar to the retired Sincere Salutations greetings, and three image stamps.  Julie has stamped the reeds and small shore birds on her card.  So beautifully made.  This card features my favourite colour combination again - Soft Sky, Crisp Cantaloupe and Crumb Cake.  There's also some Early Espresso going on which really compliments everything. The Square Lattice Textured Embossing folder was used on the Soft Sky layer and it really pulls the card together.  Julie simply awesome, you know how to capture nature!

Words of Comfort FMS Challenge 634

Sometimes you just need some comforting words and to know that someone's thinking of you.  I felt that this week's Freshly Made Sket...