Wednesday, October 25, 2017

Watercooler Wednesday Challenge #142 - Charlotte's All About Christmas Challenge


If you haven't started getting your Christmas cards together, this week at the Watercooler should be very inspiring for you.  After all it's now just two months today until Christmas.  I know, i know!  Kick me for reminding you of that! 

Our challenge this week is being hosted by Charlotte out newest Design Team Artist, and it's "All About Christmas". You may know Charlotte by her blog name, "Lady Joyful".  She leads us off with a beautiful snowflake card.

Our Design Team simply loves seeing the creativeness of our participants and having new stampers join in our weekly challenges.  If you're planning on sharing your Christmas Themed card or project on this week's challenge, you'll want to do so before 5:00pm on Monday October 30th, 2017 when our Linsky closes.  

Our challenge rules are simple and are listed on our Watercooler Wednesday home page.  Please take time to review them so you're not disqualified from our winner and runner up draws. It's super disappointing for us when a beautiful card has to be passed over because it was entered in too many challenges.

Here's My Card:
One of my favourite products from the Stampin' Up! Holiday Catalogue this year was the Merry Music Specialty Designer Series Paper, and so my card is all about showcasing how wonderfully these papers mix and match.


Supplies:
Stamp Set:  Musical Season
Ink:  Momento Tuxedo Black
Card Stock:  Whisper White and Basic Black 
Specialty Paper:  Merry Music Special DSP, Silver Foil
Accessories:  Big Shot, Paper Trimmer, Pinpoint Rectangle Layers Dies, 1 1/4" Circle Punch, Hot Glue Gun,Tom Bow Adhesive, Simply Scored, Sponge Dauber.

Details:
1.  Cut an 8 1/2" x 5 1/2" Basic Black card base and score at 4 1/4".

2.  Cut a 5 1/4 x 4" layer of Whisper White and adhere to base.

3.  Cut a 3 7/8" x 5 3/8" piece of Black & White Writing DSP and adhere to the 1st layer.

4.  Cut a  3 1/4" x 4 1/4" piece of Silver Foil.  For my card I die cut this piece using my Pinpoint Rectangle Layers Dies (non SU).  Center and adhere to the DSP layer.
In this view you can see the beautiful  mixture of papers with the silver foil.  These papers are ultra light compared to regular DSP packs, so it doesn't add much more additional weight to the card having a series of layers.

5.  Cut a 3 1/8" x 4 1/8" piece of Black and White Snowflake design DSP and adhere to the center of the foil.  

6.  For the Lolly, cut a 12" x 1 3/4" strip of the Merry Music DSP  and score at 1/4" intervals from end to end.  Use a sponge dauber and Tuxedo Black ink to sponge the edges.  Fold alternately on the 1/4" score lines.  Punch out a 11/4"  circle from Basic Black card stock to use as a base.  Join the ends of the strip together and then form a lolly by gathering the edges together and pushing down gently onto the black circle.  Put a dollop of hot glue in the center of the and press down so the circle holds the lolly's shape.   Punch out another 1 1/4" circle from Black and White DSP and cover the front center of the lolly. 
Note:  If you've never made a lolly before here's a link to Shelley Godby's blog where she shares instructions and a video on how she makes hers (a bit different from mine, but same concept).  These are great for all kinds of projects like banners, rosettes etc.

7.  To finish off the lolly, stamp the sentiment Peace, Joy, and Love from the Musical Season stamp set on to a 3 1/4" x 1/2" strip of  Whisper White card stock and adhere to the center of the lolly.  Use a generous amount of Tom Bow glue to adhere the lolly to the center of the card front.

8.  For the inside of the card cut a 4" x 5 1/4" piece of Whisper White card stock and adhere to the card base.  Stamp the sentiment "May the spirit....." from the Musical Seasons stamp set in Momento Tuxedo Black ink.  

9.  To finish the inside panel adhere a 3/4" x 3 3/4" strip of the handwriting DSP to the bottom of the panel.  Die cut a  trumpet from Silver Foil with the Musical Instruments Thinlet dies.  Adhere, and as Frenchie would say, "Voila you're finished". 


Well, that's it for today's challenge.  Hope you enjoyed this black and white Musical Season themed Christmas card.  I know I had fun making it and plan to make a few more of these before the card exchange is upon us.  For this type of card I will definitely make a box style envelope so the lolly isn't compressed in the mail.  Enjoy!  

If you started at my blog and haven't see the rest of this week's creations by the Watercooler Design team make sure you go back and check them out.  What an awesome array of seasonal cards.  Love them.


Happy Stamping!
Penny Token's Stampin' Spot   

Wednesday, October 18, 2017

Watercooler Wednesday Challenge #141 - Heidi's Masculine "Anything Goes"

Hello stampers!  Hope you've had a good week and been able to set aside a bit of time for stamping.  We've been on a road trip so it's been quite hectic and not a lot of time for creating but I did manage to get my card ready for WWC141 Heidi's Masculine "Anything Goes" challenge this week at the Watercooler.

If you've been following along with my blog posts since this Spring, you'll know that I'm a super big fan of the Twist N' Pop or Pop N' Twist technique and have shared many cards I've made showcasing this design.  I've also shared a tutorial on how I make my cards

The Twist N' Pop card is also a huge favourite of my dear husband's.  In fact, I can't count the number of times he's requested me to make one of these cards for our male friends for birthdays or special events.  He really likes it when I make the cards specific to their personal likes or themes.

So,  it will come as "no surprise" when I tell you my challenge card this week is another Twist N' Pop card. But, this masculine Twist N' Pop is a very, very  special one because I made it with lots of love for my hubby's October birthday.  I'm sure you'll figure out what his passion is when you see this card.

Here's My Card: 


Supplies:
Stamp Sets: Stylized Birthday, On the Green (R), Badges and Banners, High Tide, Gordon the Golfer (Artistic Impressions), Golf Ball (Val Scrap), Happy Birdie (Amuse), and Many Mower (R-09)
Card Stock:Old Olive, Whisper White, Chocolate Chip, Retired DSP
Ink: Old Olive, Tuxedo Momento Black, Chocolate Chip, Old Olive, Smokey Slate and Soft Sky.
Accessories:  Patterned Paper Decorative Masks (brick), Paper Trimmer, Detail Scissors, Scallop Circle Punch for Cloud Mask, Best Badge Punch, 
Tom Bow Glue, Sticky Strip.

Details:


1.  My card base is a 41/4" x 11" Old Olive card stock scored at 5 1/2".  

2.  The first layer is a 4" x 5 1/4" piece of Chocolate Chip card stock.

3.  The second layer is a piece of Whisper White  measuring 3 7/8" x 5 1/8".  

4. I stamped Gordon the Golfer from AI in black ink on the card face and then stamped a second image on a post it note for a mask.  I fussy cut out the mask and laid it over the original stamped imaged. The mask will remain in place until all the background sponging is completed. 

5. I punched out a mask with the Scallop Punch from scrap card stock to make the clouds.  Beginning at the top left edge of the panel I sponged the top  2/3rds of the card with soft sky ink, twisting and maneuvering the scallop circle to create the cloud effect.  

6.  The black birds were stamped using a bird cluster from the High Tide stamp set.  The grass was stamped using the large grass image from the same stamp set.  Before stamping on the grass sections I sponged the bottom of the card with a mixture of Chocolate Chip and Old Olive inks.


7.  For Gordon's shirt and trousers I stamped his image again on scraps of old Designer Series papers that were in shades of Old Olive and Chocolate Chip.  I cut them out with my detail scissors and adhered them with Tom Bow glue.  I coloured the rest of the image with markers and I highlighted the creases on the shirt and pants to blend them in.
Card Inside:

I have so much fun mixing and matching stamp sets and DSP when I create the inside of these cards.  For the top panel on this card I cut a 4" x 5 1/4" piece of Chocolate Chip card stock and topped it with a 3 7/8" x 3" piece of  long retired Old Olive and White Christmas paper that worked perfectly.

The four accordion panels each have a 2 1/4" x 3 1/4" panel of Chocolate Chip Card Stock and a 2" x 3" panel of Whisper White.  

1.  The first panel is stamped with the golfer from a 2009 Stampin' Up! set called "And Many Mower".  I simply couldn't part with this one, and it was  a "par-fect" start to the panel.  I used the scalloped circle mask to sponge in the sky, stamped the image in  Momento Tuxedo black ink and coloured the image with Old Olive, Chocolate Chip and Smokey Slate markers.  

2.  For the second panel I sponged the brick stencil from the Patterned Papers Decorative Masks with Chocolate Chip ink.  The badge was stamped in Old Olive ink on a scrap of Whisper White and cut out with the Best Badge Punch.  I punched a second badge from Old Olive and glued it to the back of the first badge and attached it with Dimensionals to the brick background.


3.  The third panel has a great golf themed image from another retired Stampin' Up! set called On the Green.  This was one of the first single stamps sold by Stampin' Up!   I simply stamped this image in Chocolate Chip.  I sponged the edges of all the white panels with Chocolate Chip before mounting them.  

4.  The final panel has the sky and green background sponged in as before and the Golf Ball image is stamped in black ink.  I added the sentiment "happy birdie to you" also in black ink.


5. For the bottom I cut a 4" x 5 1/4" piece of Chocolate Chip card stock and topped it with a 3 7/8" x 3" piece of  Whisper White card stock that had been sponged with Chocolate Chip around the edges.  I stamped the sentiment "Happy Birthday" in Chocolate Chip using the Stylized Birthday stamp.  


And that's all there was to making this card.  My hubby the golfer absolutely loved it.  I hope you enjoyed it to.  


If you'd like to join us for this week's Watercooler Wednesday challenge it's easy, just add your link to our Linsky on the WWC homepage before 5:00 MST on Monday October 23rd.  We'd love to have you join us! 

Wednesday, October 11, 2017

Watercooler Wednesday Challenge #140 - Libby's "All About Birthdays"

Happy belated Thanksgiving to all my fellow Canadians. I hope you had a wonderful time with friends and family this past weekend and time to reflect on all the things one can be grateful for in life.

This week's Watercooler Challenge is being hosted by "Queen of Clean", Libby Fenns and it's an All About Birthday's Challenge.  That means you can make anything you want for this challenge with the proviso that it's a birthday card or has a birthday theme, and that you haven't entered it in more than 8 challenges including ours!  

This challenge is open until 5:00pm MST on Monday October 16th, so I hope you'll join in the fun.  Our Design Team has created some wonderful projects to share with you so be sure to drop by the home page and check them out.
 

Here's My Card:
 
I'm excited to share this card which uses a new to me technique called Nouveau Retiform.  This was a popular style many years ago and was recently showcased in a tutorial on Split Coast Stampers by Lydia Fiedler.  Lydia demonstrates her updated technique.  As soon as I saw it I knew I wanted to try this out. 

Supplies:
Stamp Sets:  Half Full #144999, Tuscan Vineyard #141902, Balloon Celebration #140675
Ink:  Berry Bliss, Lemon Lime Twist, Crushed Curry and Momento Tuxedo Black
Card Stock:  Basic Black, Whisper White and Lemon Lime Twist
Accessories:  Deluxe Card Template Stencil 6-C (Deluxe Cuts), Sponge Daubers, Post It Note paper, Paper Trimmer, Wink of Stella, Tom Bow Adhesive
I loved the colour blend on my card and all the great wine images from the Half Full stamp sets.  The colour blocks work perfectly for showcasing the individual stamps.  I used my Stamp-a-ma-jig to align the word "enjoy". 

Isn't this grape cluster from Tuscan Vineyard super deluxe?  I paired it with the Happy Birthday sentiment from  Balloon Celebrations.   Although the image in this picture is black and white, I actually coloured the grapes and leaves with markers and Wink of Stella.
Details:
1.  For the card base cut an 8 1/2" x 5 1/2" piece of Basic Black and score at 4 1/4".
2.  Cut a 5 1/8" x 3 7/8" piece of Lemon Lime Twist for the first layer and adhere to the card base.
3.  Cut a 3 3/4" x 5" piece of Basic Black for the second layer and adhere to the first layer.
4.  Cut a 3 5/8" x 4 7/8" piece of Whisper White for the third layer.  Before adhering to the second layer sponge over the stencil and stamp the images.
5.  Place the stencil over the Whisper White piece and tape down the edges with Washi tape so it doesn't shift while applying colour.
 6.  Using Crushed Curry, Lemon Lime Twist and Berry Bliss sponge daubers sponge over the stencil to get the desired effect.  Note:  I used post it notes between the lines so I didn't carry the colour from one square into another.  
7.  Stamp your selected images in Momento Tuxedo Black ink.  I coloured over the wine bottle label, the wine in the wineglasses and the holly berries with Wink of Stella.
Half Full Stamp set in is the Holiday 2017 Catalogue

8.  For the inside panels cut a 5 1/8" x 3 7/8" layer of Lemon Lime Twist and adhere to the card base. 
9.  Cut a 3 3/4" x 5" piece of Whisper White and stamp the sentiment and image in Momento Tuxedo Black ink.  Adhere to Lemon Lime Twist layer.  


I didn't exactly follow Lydia's awesome instructions in her tutorial since I used  sponge daubers to apply my ink instead of a brush, but the results were similar and I was pretty happy with the outcome.   

It's funny, I had this stencil earmarked for sale at my recent garage sale for $2.00, but fortunately for me, there were no takers.  When I saw Lydia's tutorial and her gorgeous card, I quickly pulled the stencil from my sale bin and put it back into commission.  I'm so pleased with the results I know I'll be hanging on to this stencil and using it again and again.  

Well that's it for my Happy Birthday card this week.  I hope you enjoyed it and I've inspired you to try the Nouveau Retiform technique.  If you do I'd love to see what you make or have a comment from you.  

If you haven't checked out the rest of the Watercooler Wednesday Design Team simply click here and you'll return to the home page.  Click on the names below the pictures to visit each of the Design Team.  Until next time............


Happy Stamping!
Penny Tokens Stampin' Spot

Saturday, October 7, 2017

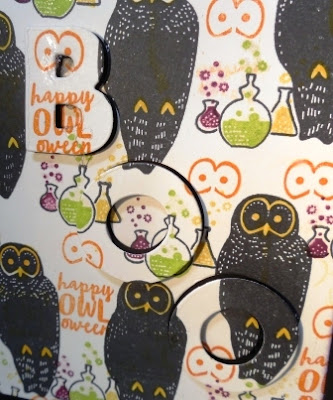
World Card Making Day - BOO

Did you remember that today is World Card Making Day, a day celebrated throughout the world by stampers and scrapbookers.  It's a day for remembering those you love with a card.  A day for relaxing with friends and being creative.  Hope you get your card on today!  

Here's Mine:
Happy Halloween!   Love this fun background paper I designed.

I used Foam Adhesive Strips to pop up the lettering because they're a tad higher than Dimensionals. 

The Crushed Curry moon is the large surface circle (not quite) image from the Swirly Bird Photopolymer Stamp set.  I covered the entire surface of the moon with Wink of Stella.  Although this is the inside of the card, it could easily be a card front.  What do you think?
 
Swirly Bird


I've been wanting to try the eclipse technique for a while now, but I didn't have the large alphabet dies that everyone's using so I put it off.  But a friend was visiting the other day and she brought an alphabet die set with her (Non-SU), and I thought what the heck!  

The background paper for the front of my card was created with the Spooky Cat stamp set.  I stamped randomly all over a piece of Whisper White card stock until I had a pattern I loved and then I cut it down to fit my card. 
I love those owls.  What fun to stamp.  You can't see it but there's lots of shimmer on this card from my Wink of Stella.
This stamp set is part of the Spooky Night Suite in the new Holiday Catalogue.  It's a very reasonably priced Photopolymer stamp set on it's on or it can be purchased as part of a bundle with the fantastic Cat Punch.
 
Enjoy!

Happy Stamping!
Penny Tokens Stampin' Spot

Wednesday, October 4, 2017

Creative Circle Design Team Blog October Hop - "Haunted Halloween"

September was a complete blur for me with frenzied card making sessions, garage sales and other events so it's hard to think that the month has gone and Halloween is just around the corner. Quite truthfully I've been so focused on getting my Christmas projects finished, I hadn't given too much thought to Thanksgiving or Halloween. Yikes! What was I thinking!

Well, no worries. I'm happy to say that the Creative Circle Design Team (CCDT) led by the wonderful Liz Holloway, hasn't lost it's direction or focus and our very creative and uber talented crew of international stampers is here to dazzle you with a "Haunted Halloween" October hop.

But, before we begin, I'd like to welcome our newest CCDT team members, Jay Soriano of Mitosus Crafts and Stesha Bloodhart of Stampin Hoot. I've been so looking forward to seeing their creations on this hop and it's so awesome to have their collective talents join us this month.

 
Jay Soriano
Stesha Bloodhart


Here's My "Haunted Halloween" Art Decor
Halloween is always such a fun time of the year and  I so look forward to seeing what Trick or Treats Stampin' Up! has in store for us in the Holiday Catalogue.  Well I must say I wasn't disappointed this year!  In fact, the Spooky Night Suite on pages 52 through 55 were the inspiration for me to make this  Halloween Sampler. 

Supplies From the Spooky Night Suite:
Card Stock: Basic Black, Very Vanilla, Cajun Craze, Orange Glimmer Paper, Silver Foil
DSP:  Spooky Night
Ink: Pumpkin Pie, Momento Tuxedo Black, Versa Mark, Smokey Slate
Accessories:  Cat Punch #144666, Black Rhinestone Jewels, Detailed Gate Thinlet Dies, 1", 11/4", 1 3/8" Circle Punches, Bunch of Labels Thinlets, Wink of Stella Clear, Big Shot, Paper Trimmer, Tom Bow Adhesive, Foam Adhesive Strips, Dimensionals.  
Spooky Cat Bundle -18 Photopolymer Stamps are included in the Spooky Cat stamp set.  It includes tattooed cats, witches' hats, growling owls, bubbly potions, and a rat—who needs "the Scottish play" when you can have this!  The cat punch is a no-brainer for punching out beautiful cat silhouettes that can be used at any time of the year and for any occasion.
The Graveyard Gate Bundle is a spooky collection of  graveyard head stones gates and sentiments for creating a spooky setting.  I absolutely love the Detailed Gate Thinlet Dies which are part of the bundle.  These dies can be used for other occasions besides Halloween, such as Sympathy and Wedding cards.

Details:


Picture Frame: I started out with a 13 1/2" x 11" glass picture frame from the Dollar Store. I used a full sheet of DSP from the Spooky Night DSP pack to line the inside of the frame. I added two 1" by 11" strips of Cajun Craze card stock on either side of the DSP to cover the expanse of the frame. 

Sampler Base: For the base of the sampler I used an 8 1/2" x 10 5/8"" piece of Basic Black card stock. The next layer was a 9 3/4" x 7 7/8" piece of DSP.
Potions, pumpkins, witches' hats, cats, and eerie trees; this Halloween-themed Designer Series Paper has it all and it coordinates with Basic Black, Cajun Craze, Pumpkin Pie and Very Vanilla. Product #144610 Spooky Night DSP

Panels: I decided on a layout for my sampler and then measured out the panels I would need to cut. I needed the following: 
1.  Top and Bottom Center Panels:  I cut two 4" x 1" pieces of Basic Black and two 3/4" x 4" pieces of DSP with the science bottles.  These panels frame the center panel on the top and bottom.  I sponged the edges of the DSP with Basic Black ink before adhering them to the card stock. 
This is the center top panel.  I  stamped the mysterious beakers from the Spooky Cat stamp set on a piece of Whisper White card stock and then cut it out with a 1" circle punch.  It was layered on a 11/4" basic black circle layer and added to the panel with Dimensionals.
This is the bottom center panel.  I stamped the black rats from the Spooky Cat stamp set on this panel.
2.  Center Panel: The center panel began with a 4" x 5 1/2" piece of Basic Black card stock.  The next layer was a 3 7/8" x 5 1/4" piece of Orange Glimmer Paper left over from last year's Halloween stash.  I cut out the bottom center of this paper so it wouldn't be wasted and later on cut out the numerals "31".  The next layer was a 3 3/4" x 5 1/8" piece of Very Vanilla card stock.
Lots of detail went into creating this graveyard scene.  I began by cutting out the stars and moon on the top of the panel with the Card Front Builder Die Cuts.  


Next I stamped a variety of head stones in the lower part of the panel with Momento Tuxedo Black ink.  I used masks and stamped some of the tomb stone images off at least 2 times to give a misty impression and some additional depth.  This panel has a real spooky feel going on!

I cut out the filigree gate which is totally awesome with the Detailed Gate Thinlet Die and Basic Black card stock. I used Adhesive Foam strips on the back of the gate and attached it over the stamped tomb stones.    I stamped the two brick columns using stamps from the Graveyard Gate stamp set and mounted them with Dimensionals on either side of the gate, matching up the outer edges so they didn't overlap the panel.  

To finish off the gate I stamped the sentiment "Open if You Dare" on Very Vanilla Card Stock and cut it out with the 1 1/4" circle punch and then layered it on a 1 3/8" Orange Glimmer circle.  The edges were sponged with black ink before it was adhered with Dimensionals.  I die cut the lock and key from Silver Foil. 
For the Gate sign I stamped the "You're Invited" image from the Graveyard Gate stamp set in Versa Mark ink and embossed it with Black Embossing Powder. I cut it out and mounted it in position with Dimensionals.  To make it even more spookier I stamped a bunch of bats around it.  Some of the bats were fussy cut out with my detail scissors and added with Mini Dimensionals. 
3.  Right Panels:
The top right panel began with a 2 1/2" x 5 1/2" piece of Basic Black card stock followed by a Cajun Craze piece that measured 2 1/4 x 5 1/4 and a 2 1/8 x 5 1/8" piece of dotted DSP.  The Trick or Treat sentiment was stamped on Pumpkin Pie and cut out with a banner from the Bunch of Banners Thinlet Dies.  A couple of Basic Black Rhinestones were added on the edges.  

The sparkly date numerals were cut from the center Orange Glimmer Panel and DSP using the Large Number Framelit Dies and mounted with the Eclipse technique and they're mounted with Foam Adhesive Tape.  The "Eat at Your Own Risk" sentiment was stamped on Very Vanilla card stock and cut out with the 1" circle punch and mounted on a 1 1/4" piece of Pumpkin Pie.  

The Large Numbers Thinlet  dies are a great investment and can be used for many occasions.  They cut out the numbers from Glimmer and Foil papers with ease. 

The bottom right panel began with a 2 1/2" x 2 1/8 piece of Basic Black card stock, layered with a 2 3/8 x 2" piece of DSP with the witches hats design.  The edges were sponged with Tuxedo Black Ink.  I stamped a witches hat and fussy cut it out and mounted it with Dimensionals.  Although you can't see it in the picture I coloured the buckle with Crushed Curry and then added Wink of Stella to make it sparkle. 
 

4. Left Panels:
The top panel began with a 3 1/4 " x 2 3/4" piece of Basic Black card stock topped with the DSP that has all the pictures of the tree limbs and the moons. I stamped the owl in Tuxedo Black ink onto the limb and then re-stamped it on Very Vanilla card stock using Versa Mark ink. I embossed with Black Embossing powder and then fussy cut out this image and adhered it with dimensionals. Loved this panel!


The center panel measures 1 1/4" x 2 3/4" and I've added the DSP with the writing on it.  

The bottom panel is 2 3/4" x 2 7/8" piece of Basic Black card stock topped with a piece of DSP that has the cats on it. I punched out one of the black cats from this paper and mounted it with Dimensionals.  I coloured the cat with Wink of Stella to give it some shine. 
 
I hope you liked my Halloween Sample and that it's inspired you to make some Halloween creations of your own.  Whether you set aside time just for yourself, stamp with your girlfriends or have a family night you'll be making memories for seasons and years to come, and having a whole lot of fun in the process!
 
Your next stop on this hop is the incredibly talented Liz Holloway's blog.  Wow I know she has some amazing tricks and treats for you and you're going to be scary thrilled to see what she's designed. 

Happy Stamping!
Penny Tokens Stampin' Spot

Thanks for stopping by and Happy Haunted Halloween!


Black and White Anniversary - FMS #669

I'm up for another sketch challenge card, how about you?  Narelle Farrugia is the sketch designer for  Freshly Made Sketches #669  this...