
You may have seen cards like this on Pinterest or Split Coast stampers recently. It's called a Double Gate Fold card.
I copied my card after watching the excellent video by Dee Slater's of Create With Dee. Dee is so creative and always does a great job of explaining the mechanics of her cards. I liked this card so much I couldn't wait for the video to be over so I could make one myself.
Using this design, I made two cards, one for Mother's Day and the other for a Birthday. Both are super cute and really give that WOW factor when they come out of the envelope. Thanks Dee!
Here's My Cards:
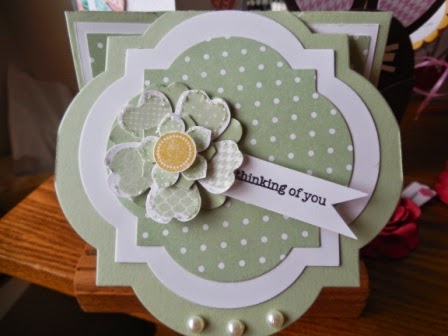 | ||
| This is how the Double Gate Fold card looks coming out of the envelope. What a beautiful card front. I absolutely love, love, love it! It's so feminine and girly-girl that it simply puts a smile on your face. I used Pistachio Pudding cardstock and matching InColour 2013-2014 designer series paper with Whisper White cardstock. The Flower Shop and Petite Petals stamp sets and coordinating punches make it easy to assemble this lovely flower. |
 |
| When the card is closed on the inside it looks like this. You can almost feel the anticipation building while the recipient takes off the belly band and opens the card. Sorry for the bad lighting on this photo. |

Supplies:
Cardstock: Pistachio Pudding, Whisper White
Stamp Sets: Flower Shop,
DSP: InColour 2013-2014 Designer Series Paper in Pistachio Pudding
Ink: Pistachio Pudding, Daffodil Delight, Staz On Black Ink
Accessories: Simply Scored Scoring Tool, Paper Trimmer, Big Shot Machine, Pansy Punch, Petite Petals Punch, 1/2" Circle Punch Dimensionals, Adhesive, Window Frames Collection Framelits, Pansy Punch,
 |
| Here's my birthday version. I added a few more flowers on the front of this card and some additional basic pearls on the flower centers. When I finished the card I wasn't too crazy about my sentiment choice, so I later swapped it out for the "happy birthday" banner from the Itty Bitty Banners stamp set. Much better! |


- Using Simply Scored score at 2 1/8" turn the card stock 180 degrees and score again at 2 1/8".
- Now turn the piece and score at 4 1/4". This score line will become the hinge part of the card.
- Line up one of the 2 1/8" score lines in trimmer and trim to 4 1/4" line. Then turn and trim on the 4 1/4" line 2 1/8". Remove and set aside trimmed off piece for flower petals (see step 12). Repeat on other side.
- Set up your magnetic plate or platform in the Big Shot machine and using the 2nd from largest Window Frame Die place it over the square flap at the top of the card. Adjust so the bottom of the die is just beneath the 4 1/4" score line. (if you're above the line and you pass through Big Shot you'll cut off the flap. If you're too far below the score line, the card flap won't close properly).
- Place the acrylic plate from the Big Shot over top of the cardstock and die, so it's lined up just to the hinge line and run through the Big Shot.
- Trim off the two excess pieces of card stock on either side of the window frame shape with scissors once the die has been removed.
- For the front and inside of the card you'll need to cut two Whisper White and two DSP patterned window frames using the next two smaller dies (refer to the picture). Layer these die cuts with adhesive and attach to the front and the inside front panel.
- Cut two pieces of Whisper White card stock for the front panels to measure 1 7/8" x 4" and attach to the gate fold panels.
- Cut two pieces of DSP for front panels to measure 1 5/8" x 3 3/4" and adhere over the front panels.
- Cut a Whisper White panel for the inside of the card to measure 4 x 4. Stamp the panel with a sentiment of your choice and one of the flowers (see picture above for tip on the flower assembly).
- For Belly Band cut a 9 1/2" by 1 12" piece of cardstock to match the card base and then cut a 9 1/2" x 1 1/4" piece of DSP and glue to the cardstock piece. Once the belly band is assembled wrap it around the card so one piece overlaps the other and secure together with sticky strip. Make a flower and attach over top of the seam. This band should slide easily off the card - don't make it too tight.
- To assemble the flowers for the card front, inside flap and belly band:
- Stamp 3 Flower Shop gingham flowers and punch out with the Pansy Punch.
- Stamp 3 Petite Petals flowers and punch out with the Petite Petals Punch
- On scraps of Whisper White card stock stamp randomly stamp 3 of the gingham flowers with Daffodil ink and punch out just the center of the flower with the 1/2" circle punch. Note: because you only want the centers, you don't need to stamp the entire flower.
- Punch out 3 plain cardstock flowers with the Pansy Punch and 3 with the Petite Petals punch (use the two pieces of cardstock removed from the top of the card for these flowers)
- Using glue dots stack from the base up a plain card stock Pansy flower, a Gingham Flower, a plain card stock Petite Petal Flower and a stamped Petite Petal flower. Mount a Daffodil Delight center piece with a dimensional. Attach flowers with sticky strip to the front, he inside cover and belly band. Note: I wanted a little glimmer on my flowers to give them some added pop, so I outlined all the petals with Dazzling Details #124117 pg. 166.
- Stamp a sentiment of your choice on Whisper White card stock and cut out like a banner. Attach with glue dots beneath the petals.
I'd love to hear from you if you made this card or simply a comment on the two that I've made. It's always exciting to hear back from someone who actually used my instructions, as to whether they were understandable and helpful. Have a great stamping day and thanks for visiting my blog!
Penny


4 comments:
These cards are beautiful Penny. Hope to give this a try. TFS the tutorial.
Patti thanks so much for dropping by and commenting on my card. I hope you do try it. It's really fun and easy. Have a great weekend.
I love this! Thanks for sharing!
Thanks so much Susan for dropping by and commenting. Much appreciated.
Post a Comment