Wednesday, July 30, 2014

Designer Series Paper Promo ends tomorrow

BUY 3 GET 1 FREE PROMO...
Time is running out! It's getting down to the wire, so if you're thinking about picking up a great deal on Stampin' Up!s Designer Series Paper Promo don't delay, it ends tomorrow, July 31st. 

Today and tomorrow you can still purchase three packages of Designer Series Paper and receive a fourth one of your choice for FREE! That's like getting $13.50 off your purchase and receiving an extra DSP for - ABSOLUTELY FREE! There's no limit to the number of free DSP packs you can receive. 


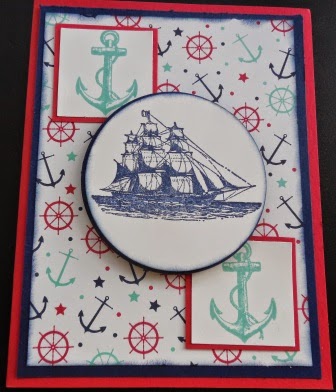
Here are the Designer Series Papers that are available for purchase with this promo:

Connie and Mary Thursday Card Sketch Challenge CCMC313

My stampin' buddy Debby came over this afternoon and we made some awesome cards. What a great time we had.   It's nice having some sketches available when other stampers visit, because it gives us something to work on and we all like doing the challenges. 

One of the cards we made today was based on the "Create with Connie and Mary" Thursday challenge.  

Here's the Challenge Sketch.

Here's My Card:
I really liked this sketch from the moment I saw it and I quickly had a vision of the card I wanted to make.  The sketch design really made me think of sports for some reason and since I only have one sports related stamp set, Good Sport, my decision was final.

Supplies:
Stamp Sets:  Good Sport (retired), Remembering Your Birthday
Designer Series Paper:  Moonlight Paper Stack, Silver Glimmer Paper
Card Stock:  Whisper White, Smokey Slate,  
Ink:  Basic Gray, Lost Lagoon, Hello Honey
Accessories:  Trimmer, Circle Framelits, 1 1/4" and 1 3/8" circle punches, Star from Itty Bitty Accents Punches, Basic Rhinestones, Dimensionals, Adhesive, Glue Dots. 

I decided to turn the design on its side and have the patterned paper pieces at the top of my card.  I used paper from the Moonlight DSP paper stack.  I can't say enough about this little paper pack, it makes it so easy to mix and match colours. For example the three paper designs I chose made me think of a playing field, balls and penalty flags.  

I cut a piece of Smokey Slate card stock to measure 1 7/8 by 5 1/2 and used this for a base for the patterned paper.  I cut pieces of the patterned paper to measure 1 6/8 by 2"  and then cut them again on angles to match the sketch pattern.  When I attached them to the smokey slate base I left small gaps in between the pattern pieces and then adhered small strips of Silver Glimmer paper along these seams.

I chose a soccer theme for my birthday card and I think with the bling I added it's clearly a feminine card. Before I attached the designer paper panel, I stamped the flourish once on the card base in Lost Lagoon ink and then again on a scrap of Whisper White card stock, then adhered the panel over the top half.  

I cut out the circle with my Circle Framelits and then mounted it with dimensionals, matching the bottom swirls to the swirls stamped on the card base.  I punched a glimmer paper circle with the 1 3/8" circle punch and adhered it to the center of the flourish with dimensionals.  The soccer ball was stamped in Hello Honey and adhered to the glimmer piece with glue dots. 
Three basic rhinestones were attached to the stars.I stamped Happy Birthday in the bottom right hand corner of the card front with the Basic Gray ink.   The stamp is from the Remembering Your Birthday stamp set and it was just perfect for this card.. 


I stamped another great sentiment from the Remembering Your Birthday to the inside of the card and added a small silver glimmer star punched out with the Itty Bitty Accents Punch pack.  To finish the inside I cut a piece of the DSP to measure 3/4" x 5 and adhered it to the top of the inside panel. 
Remembering Your Birthday is an 8 piece stamp set that comes in Clear or Wood Mount and is available in French.
If you like my card I hope you'll leave me a comment, and I hope you will check out the submissions by the Connie and Marie Design team as well as other folks who've accepted the challenge.  And how about you? There's still lots of time to make your own card with this fun sketch and play along.  

Happy Stamping!
Penny Tokens 

Tuesday, July 29, 2014

Pals Paper Arts Sketch Challenge PPA213

I totally missed this Pals Paper Arts Challenge (PPA213) this week, so this is going to be an uber quick post.  There's something about the timing on their challenges, that I keep missing.  It must be the East Coast time slot.  Oh well, I'll get it right next time.

Here's the sketch that got my interest up:

Here's My Card:
This is another Masculine Birthday card made with Maritime Designer Series Paper and the Open Sea stamp set.  If you like this Maritime DSP there's still time to get in on the Designer Series Paper Buy 3 Get The Fourth for Free - this special promo ends on July 31st. 


I'm so sad that the Perfectly Penned stamp set was retired this year.  It's one of my faves for masculine cards.  An alternative to this set is Sassy Salutations
The Happy Birthday sentiment in the Sassy Salutations stamp set isn't as large in this stamp set, however it's still got a heavy masculine quality to it.  The other bonus is the additional great sentiment stamps in this set, such as Feel Better and Congratulations. 
Supplies:
Stamp Sets:  The Open Sea, Perfectly Penned (retired)
Ink:  Night of Navy, Real Red, Coastal Cabana
Designer Series Paper:  Maritime
Cardstock:  Whisper White, Night of Navy, Read Red
Accessories:   2 1/2" Circle Punch, 3" Circle Framelit, 1 1/4" and 1 3/8" Square Punches, Adhesive and Dimensionals.

Happy Stampin!
Penny Tokens

Sunday, July 27, 2014

Bon Voyage Bicycle Trip

The Tour De France is wrapping up today and reminded me of my friend who's an avid bicyclist and fan.  I know she's going on an end-of-the-summer bicycle rally to the Interior of the Province, so I thought it would be nice to make a Bon Voyage card  for her.

In keeping with the real competition, I wanted my card to have a vintage European flair, so I chose rich dark colours for the layers and I needed just the right stamp set to achieve the old world look.  And, after searching through my stamp sets I chose Postage Due because of the French Script in the background and the beautiful bicycle image.  It seemed fitting.

Here's My Card: 
Supplies: 
Ink:  Mossey Meadow and Hello Honey
Card Stock:  Crumb Cake, Mossey Meadow and Hello Honey
Stamps:  Postage Due and World Tour
Accessories:  Big Shot, Trimmer, Designer Frames Embossing Folder,  Beautifully Baroque, 3/4" circle punch, 1" and 1 1/4" square punches, Crumb Cake 3/8" Taffeta Ribbon, Dimensionals and Adhesive.

Postage Due is a 4 piece stamp set that comes in Clear Mount (126397), Wood Mount (132064) and A Brush Stroke set for My Digital Studio.  It coordinates with the Postage Stamp Punch on page 222.

 How It Came Together:

The card base is a standard A2 size in Crumb Cake.  This was topped with a 5 1/4" x 4" piece of Mossey Meadow cardstock.  I double embossed a 5 x 4" piece of Hello Honey cardstock with the Beautiful Baroque and Rectangular Designer Frames* Embossing folders and cut this piece down to 3 1/2" x 4".  From the remaining Hello Honey cardstock I  punched out three 1 1/4" square pieces and mounted three of the bicycle images with dimensionals on top of them.

** Although the Designer Frames Embossing folders have been retired, they've been replaced by some really cute ones called "Fun Frames".  Check them out on page 227 of the catalogue. 

These three portions of the bicycle were stamped on Crumb Cake cardstock and punched out with a 1" square punch.  The edges were sponged with Hello Honey ink and then they were mounted with dimensionals on a 1 1/4" piece of the embossed Hello Honey cardstock. 

The inside of the card was lined with a piece of 5" x 3 3/4" Crumb Cake cardstock that was stamped with the Bon Voyage stamp from the World Tour stamp set (retired.) I stamped the image again on Hello Honey and cut the  "Bon Voyage" from this piece and glued it onto the center of the stamped image, for some focal interest.  I also added a 1/4" piece of Mossey Meadow cardstock on the right hand side of the card.

I used two stamps from the World Tour and the Postage Due stamp for the Envelope details.  On the bottom left hand side of the card you can see the 3/4" circle - it was stamped on Crumb Cake and then punched out with the 3/4" circle punch and added with dimensions to the card front.  The complete image of that stamp is also featured on the bottom left hand corner of the envelope.

So what do you think?  Do you like this card?  If so leave me a comment and let me know what you like most about it.  Thanks for dropping by.

Happy Stamping!
Penny Tokens

Saturday, July 26, 2014

Artisans Anonymous Quarterly Meeting

I first joined Stampin' Up! in 2006 and was introduced through my Up Line to a large group of stampers in the Fraser Valley area called "Colourful Impressions". 
This group of about 170 stampers led by Kristina Koch, met quarterly.  Everyone shared their love of stamping through displays, card swapping, demonstrations, and projects.  Through this wonderful group we learned a lot about Stampin' Up!, about being a hobby demonstrator or running a successful business.  Many of our group won honours such as the Rising Star award or top Canadian sales, had mention in the Stampin' Success demonstrator magazine, and so there was always something to share and be excited about.  Oh and did I mention we had a ton of fun going to these meetings.  

Unfortunately circumstances do change, and when Kristina left Stampin' Up! a year or so ago the group began to drift away and a big gap was left in my life and I'm sure in the lives of many of my fellow stampers.  We missed getting together and sharing our love of stamping. But, it looks like a new group is forming and things are about to change again.

Artisans Anonymous Quarterly Meeting

Last night, I got together with Diane Ison, Maureen Pollock, Debby Evoy and my sister to go on a road trip to Chilliwack where we  joined a group of ladies for a meeting of Jennilee Paul's Artisans Anonymous group.

We had lots of laughs on our road trip and a truly great evening of stamping, socializing and sharing.  It felt like old times being with my friends from Colourful Impressions and meeting all these new gals from the Artisans group, who welcomed us in.  All of us want to join this group for quarterly events.


How about you?  Are you a Stampin' Up! Demonstrator in the Fraser Valley area or elsewhere in the lower mainland looking for a group to join.  Well if so, you're welcome to attend these quarterly meetings too.  Jennilee has opened up her group to "all" current Stampin' Up Demonstrators in the area. The next meeting is on October 9th, and you can check out the details on Jennilee's events page.  Carpool like we did, we had fun! 

So What Did We Do and Talk About?

Our hostess, Jennilee attended the recent Inspire, Create and Share Stampin' Up! Convention in Salt Lake City along with Betty Gajsek, Tammie Thiessen and Diane Ison.  They were all excited to share "the news", regarding the upcoming Holiday catalogue, new products and promos, classes they attended and what impressed them most about the Convention.  It sounds like they learned a lot and came back with goals for the coming year and lots to show their customers.  Thanks ladies! 

Contact me by July 30th, to find out how you can get your free copy of this upcoming Holiday catalogue.

Make N' Takes:


What would be a gathering of stampers without Make N' Takes?  As it turns out we made two fantastic projects.  Our first project came from the July " Make a Wish" Paper Pumpkin Kit, which is just filled with exciting product:

July's Paper Pumpkin kit called Make a Wish contains 6 boxes, 6 card bases and 12 tags, along with a 10 piece stamp set, ribbon, stickers, an ink spot etc. to decorate with. Quite a lot in that little box!  You can check out a lot of great samples made with this Paper Pumpkin kit on Pinterest. 

I loved these stars!  They really look like chrome. 

Here is the card and gift box we made together - how nice this would be as a hostess or special occasion gift, and yes you can change the wording to suit the occasion.
The box assembles in about 3 seconds and there were these great round tags that could be decorated and tied to the boxes with the deluxe satin ribbon that's included. I really liked the combination of Blackberry Bliss (ink and stripes on the box) and the Soft Sky (stars and lettering). Very elegant and festive.


Paper Pumpkin currently has a 50% off sale on now until September 10th, for brand new subscribers, so if you're interested in received a monthly kit with all kinds of goodies in it for making quick and simple projects you'll want to sign up now.  Click here for more details on Paper Pumpkin.


My Paper Pumpkin
Make sure you use the PROMO CODE: HALFOFF2 when you place your order and pick me as your demonstrator so I can show you how to make the most of your kits.   

What's really great about Paper Pumpkin is that you can buy a monthly subscription or prepaid subscriptions for 3, 6 or 12 months. If at any time after subscribing to Paper Pumpkin you'd like to stop it can be cancelled without any hassle.  Watch this video to see what a kit looks like and how fast and easy it is to make something.

For Our Second Make N' Take:
We also made two cards using the Kinda Eclectic Stamp Set and some of the new In Colour products, that were demonstrated at Convention.  

Start your subscription now at My Paper Pumpkin.


Here are the two cards, a plain one on the left and then a stepped up version on the right.  
Both cards both were stamped with the Kinda Eclectic Stamp set  which is featured on page 164 of the 2014-2015 IB&C (Idea Book and Catalogue).  This six-piece stamp set co-ordinates with the Elegant and Bitty Butterfly punches and comes in clear and wood mount versions. 
This is the plain version of the card.  The base is a standard A2 Whisper White card stock measuring 81/2 x 5 1/2" and scored at the center. The sun was stamped in Hello Honey and the leaves were stamped in Mossey Meadow ink.  Some of the leaves were stamped off to give them a softer image.

A small piece of Sweet Taffy Designer Series Paper (DSP) was glued in the center on an angle and layered with a 4 x 1" piece of Crumb Cake card stock.  The dotted image from the Kinda Eclectic stamp set was stamped in Crumb Cake ink on this layer and followed by the sentiment "A little kindness goes a long way", in Mossey Meadow ink. The ends of this strip were cut into banner points using the Hexagon Punch.   
    
Kinda Eclectic 6 piece stamp set.  Wood Mount #135347 $33.95 or Clear Mount #135350 $24.95.
This is the stepped-up version of the card.  The little flowers which I've added with glue dots and decorated with basic pearls, were punched out with the new Itty Bitty Accents Punch Pack.  The large butterfly was stamped in Tangelo Twist and then punched out with the Elegant Butterfly Punch.  

The small butterfly was punched from Vellum with the Small Butterfly Punch and attached with a glue dot to the center of the larger one. The smallest of the Basic Pears were added to the center crease of the butterfly. The brown loopy stuff is linen thread.  To get the loose loops, simply wrap a couple of loops of ribbon around your fingers and then adhere it to the design with glue dots or sticky strip, then cover with the banners.  
In this stepped up version, you can see the added background.  To achieve this look we inked up the back of the Honeycomb Embossing Folder with Crumb Cake ink and then transferred the ink to the front of the Whisper White card stock base. 

These were both fun cards to make and I can see the "Kinda Eclectic" Stamp set gaining a lot of popularity this summer because of the variety of stamps in the set.

Demonstration:

Zentangle Card by Lydia Fielder
Diane Ison was very impressed as were the others with the workshop she attended by Lydia Fielder on Zentangle techniques.  Zentangle is a relaxing form of doodle art that fast taking the country by storm.  

Diane shared some really great samples of Zentangle Designs that can be done simply with a black or coloured marking pen.  Diane used the pens from the Project Life set for her samples.  

Although I don't have a copy of the simple designs Diane showed us, I am posting a video by Lydia Fielder on Split Coast Stamping creating a Zentangle design with Stampin' Ups! Blended Bloom stamp. 

Here's another of Lydia's amazing designs with the Blended Bloom stamp that really impressed the gals.  This one is simply done with the Aqua Painter, Daffodil Delight ink and watercolour paper.  


Created by Lydia Fielder.  Posted on Split Coast Stampers.

Well I'm happy I could share this update on the Artisan's Anonymous group and this week's outing.  We had a lot of fun, learned a few things and are very excited about the upcoming catalogue and new products that will be coming out.  

Until next time, Happy Stamping!
Penny Tokens


Thursday, July 24, 2014

GET 50% OFF PAPER PUMPKIN FOR THE NEXT TWO MONTHS

Check out my Paper Pumpkin Update today and you could be started on a fun new adventure and get 50% off for the next two months.  


Monochromatic Wedding Card

There's another fun challenge going on over at The Paper Players blog site.  Right now there's still time to enter if you're interested.   

This week's challenge has to do with colour, and very specifically it's a #205 Sandy's Clean and Simple Monochromatic theme challenge.  


Here's My Card:

The card base is a piece of 8 1/2 x 5 1/2" Whisper White card stock.  I've added a layer of Crumb Cake card stock that was embossed with the Beautiful Baroque Embossing Folder. 
 

A small piece of DSP from the Moonlight Designer Series paper pack that has a Whisper White and Crumb Cake flower petal pattern was added to the top of the card for interest. This piece measured 3 7/8" x 1 1/4". A piece of Whisper White card stock was added next. On this piece I stamped a full and a partial floral image from the Blended Bloom stamp in Crumb Cake ink.


Blended Bloom single wood block stamp Item #135906.

For the center of my flowers I chose to use the circle image from the Serene Silhouettes stamp set, stamped in Crumb Cake and decorated with Basic Pearls.  The butterfly and floral images are very delicate  and I hoped that by combining this image with the floral image it would bring a sense of romance and whimsy to my wedding card. 
For the sentiment I stamped "For the Newlyweds" from the Teeny Tiny Wishes stamp set in Soft Suede ink. I really love the flowering script in this sentiment.  I punched out the sentiment with the large oval punch and mounted it on a Crumb Cake label that was die cut using the Apothecary Framelits set.  This piece was also embossed with the Beautifully Baroque Embossing Folder.  
Apothecary Art Framelits

I hope you enjoyed my latest card.  Please leave me a comment if you think it's worthy.  And don't forget to pop on over to The Paper Players blog to check out all the other cards made for this challenge.  Appreciated.

Happy Stamping!
Penny Tokens

Rock Star Masculine Birthday Card

We finally have some good weather and have spent the week tidying up in the garden and the garage.  Visits to the recycling plant to get rid...