Showing posts with label Watercooler Wednesday Challenges. Show all posts

Wednesday, March 14, 2018

WWC161 - Helen's "All About Occasions" Challenge


Hey thanks for stopping by.  I have a fun card to share with you for the Watercooler Wednesday Challenge this week.  Our host is Helen Finlay and she's challenging you to create a card or project for any occasion.  So, folks the sky is the limit because it can be about any holiday, a wedding or anniversary, a birthday, retirement...........oh and the list goes on.  

Here's My Card:
During the  month's of March and April, my paper crafting is all about "birthdays".  It's like everyone I know was born in these two months.  What's with that?  

The card design I'm featuring this week is not original to me.  It was designed by my friend and fellow demo Cheryl LeFore.  Cheryl introduced me to Brusho Crystal Colour inks and how to use them in the creation of this wonderful card.
Thank you Cheryl.  


Supplies:
Stamp Set:  Beautiful Day 5 piece rubber stamp set.
Card Stock:  Dapper Denim, Crushed Curry, Whisper White 
Ink:  Dapper Denim, Crushed Curry, Versa Mark and Prussian Blue and Yello Brusho's Crystal Color
Accessories:  Big Shot, Paper Trimmer, Clear Acryllic Blocks, Fluttering Embossing Folder, 3/8" Mini Chevron Ribbon in Crushed Curry, Heat Gun, White Embossing Powder, Basic Rhinestones, Tom Bow Glue, Water Sprizer and Aqua Pen.

Details:

1.  The card base is an 8 1/2" x 5 1/2" piece of Dapper Denim scored at 4 1/4".

2.  The first layer is a 5 1/4" x 4" piece of Crushed Curry card stock.  Adhere to card base.

3.  The second layer consists of two pieces of card stock.  The upper part is a 3 1/2" x 4" piece of Watercolor Paper and the bottom piece is 1 3/4" x 4" piece of Dapper Denim that has been scored with the Fluttering embossing folder.  Note:  I messed up putting this piece on the card, and didn't realize until it was finished that I put it on upside down and backwards.  Don't do this at home............just saying.
Not only are the butterflies upside down, but I also attached the piece with the debossed side showing. I obviously wasn't paying enough attention to the details when I assembled this part.   

4.  The butterfly from the Beautiful Day set on page 26 of the Stampin' Up! Occasions catalogue was stamped in Versa Mark ink on the Watercolor Paper and heat embossed with White Embossing Powder.  Once the embossing powder was heat set I spritzed water over the paper and wet it fairly well and then sprinkled on Prussian Blue and Yellow Brusho Crystals to create this colourful backdrop for the butterfly image.  Note:  This is a messy technique so make sure you have paper towels on hand and use the brushos with a gentle hand as a little go a long way.  

The Brushos are a watercolor ink crystal, that when mixed with water make wonderful washes.  You simply sprinkle or shake the brushos directly on tothe watercolour paper and then spray with water.  The colours will burst and flow.  You can use an aqua painter to move them around.  Here's a video on how to use them properly.  

5.  Once the watercolour paper was dry it was adhered to the top part of the Crushed Curry layer and then the Dapper Denim strip was attached.  The Crushed Curry ribbon strip was added before this layer was attached to the card front.  

6.  Three Basic Rhinestones were added to the center of the butterfly for adornment.  

7.  The inside panels on the card are a 5 1/4" x 4" piece of Crushed Curry and a 5" x 3 3/4" piece of Whisper White.  The small rosettes and the sentiment "Happy Birthday, May Your Day Be AS Beautiful As You" are from the Beautiful Day stamp set.  

8.  I made a coordinating envelope by stamping a partial image of the Butterfly and flowers in the bottom left corner. 

This was a fairly quick card to make and one that would be easy to do in assembly line fashion.  The embossing on the watercolour paper was a bit difficult because of the bumpy texture of the paper, so be persistent when applying the heat to make sure you have embossed everything.  

I hope you liked this week's card.  If you have any questions about the Brushos or how I assembled this card, please comment or contact me on my email.  

For details on how Helen and the other Watercooler Artists created their projects, just click on the name underneath the pictures and you will be taken to that blog post.  Click here to go to the WWC161 Challenge.  Lots of really cool cards!  Until next time.....

Happy Stamping!
Penny Tokens Stampin Spot 

Wednesday, March 7, 2018

WWC #160 - Heidi's Feminine "Anything Goes" Challenge


Hi everyone and welcome back.   It's time for another Watercooler Wednesday Challenge and this week it's being hosted by Heidi Weaver.  This challenge is a feminine one and I think from the look of all the awesome cards the Design Team has shared that you're going to love it.  Heidi is challenging you to create a card or any item with a "Feminine" theme and to post it on our challenge site by 5pm Mountain Time on Monday March 12th, 2017.  


Here's My Card:

Black and white attracts me like a magnet.  It's one of my favourite colour combinations whether it's used in card making, clothing or home decor.  For whatever reason, it just reaches out to me every time.  So, when I attended a stamp camp held by Cheryl Lefore a few weeks ago and she showed us how to make this very special black and white card, I was overjoyed.
The inside of the card is simple in detail.  It consists of a 5 1/4" x 4" piece of Basic Black card stock topped with a 5" x 3 3/4" piece of Whisper White card stock.  The small floral image is from the Petal Palette stamp set and stamped in Momento Tuxedo black ink in the bottom left corner.

Supplies:
Stamp Set:  Petal Palette
Ink:  Momento Tuxedo Black Ink
Card Stock:  Basic Black and Whisper White
Specialty Papers:  Petal Passion Designer Paper 
Accessories:  Big Shot, Paper Trimmer, Layering Squares Framelits and Stitched Shapes, Petals and More Thinlet Dies, Butterfly Die  Petal Pair Embossing Folders, Stripe Embossing Folder, White Ribbon, Basic Rhinestones (2), Dimensionals.


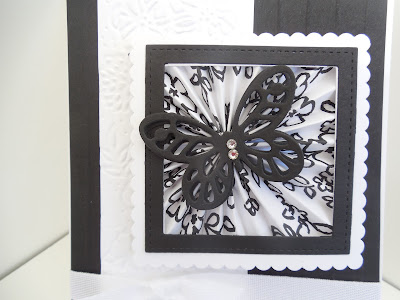
The highlight of this card is the black and white layered frame covering of all things a lolly and a beautiful black butterfly.  Just to clarify in case you're not familiar with the term "lolly" (also know as rosettes or yoyos), a lolly is created by making a number of consecutive scores on a strip of paper, gluing the ends together and then pressing down to form a circular shape.  If you've never seen a lolly constructed, you can find  directions here. 

What's unusual about this "lolly" is that once it's created it's attached to the square frame and then the overlapping edges of the lolly are cut away and it's hidden behind the frame.  This looks hard to do, but it actually comes together very quickly.
Details:
1.  The card base is an 8 1/2" x 5 1/2" piece of Whisper White card stock scored at 4 1/4".  Because this card has some weight to it the thick card stock would better support it.

2.  The first layer is a piece of 5 3/8" x 3 7/8" piece of Basic Black card stock that is embossed with a Stripes Embossing Folder (EF). Note:  Do not attach this layer until the ribbon has been added.

3.  A 2" x 5 1/2" piece of Whisper White was embossed with the fabulous floral design EF from the Petal Pair Embossing Folder set in the Occasions Catalogue.  I absolutely fell in love with the floral detail in this one - there's lots of it.  This panel was adhered to the left side of the Basic Black layer leaving about a 1/4" gap from the side edge.  A piece of 1/4" white cotton ribbon was tied around the two panels before they were adhered to the card base.
 
You can see some of the fine detail on the White embossed strip in this photo.  Believe me it doesn't do it justice.  There are two 2 embossing folders included in the  pack that measure 6 1/2" x 2 1/4" from the Petal Pair EF, one has the floral design and the other is a stem and leaf design.

4.  The sentiment "Best Wishes" is also from the Petal Palette array of stamps and it was stamped in Momento Tuxedo black ink on a strip of Whisper White card stock and then die cut out with the label die in the Petals and More Thinlet Die set.  Two dimensionals were added to the back and it was adhered below the ribbon.  
I love the frame from the die cut.............it's perfect.
5.  To create the frame a piece of Whisper White card stock was cut out with the 3" x 3" scalloped square frame and then it was topped with the 2 3/4" stitched square die.  The centers were removed with the 2 1/2" square die.  These two pieces were adhered together with Tom Bow glue.

6.  The lolly was created with a 12" x 1 1/2" strip of the Petal Passion DSP paper that was scored every 1/4" and then folded to create the lolly as in the link above.  The frame was placed over top of the lolly with the center whole towards the top left hand side of the frame.  Once the positioning was right the frame was glued to the lolly with Tom Bow glue and the overlapping edges of the lolly were carefully cut away.  

7.Two butterflies were die cut and adhered together then attached over the hole in the lolly, and rhinestones were added to the center of the butterfly.


8.  The square was attached to the center top of the card with Tear N' Tape to make it more secure.  

And that my friends was a relatively easy card to make.  It came together very quickly.  Thanks again to Cheryl Lefore for the directions.   This very feminine card could be used for any occasion or celebration.  I hope you enjoyed this card and will try out this design.  Let me know if you do and if my instructions were helpful.  I love having feedback.  

If you haven't already checked out the cards by the Design Team Artists take a moment to pop on over to the Watercooler Wednesday main page. For details on how Heidi and the other Watercooler Artists created their projects for WWC160, just click on the name underneath and you will be taken to that blog post.  You won't want to miss them.  Until next time..... 

Happy Stamping!
Penny Tokens Stampin Spot 

Wednesday, February 21, 2018

WWC158 - Helen's Masculine Anything Goes Challenge

Hi stampers. This week Helen Finley is hosting the Masculine "Anything Goes" challenge over at the Watercooler. This was a tough challenge for me this week. I've had a great deal of difficulty trying to focus, to come up with an idea and to get my mojo on. Does this happen to you?

Helen's Masculine "Anything Goes" Challenge will run until 5:00pm Mountain Time on Monday February 26th.


Would you like to join us? We certainly hope so, as we love having new and returning players and can't wait to see all the projects. If you've never participated in a card challenge before it's easy to play along. All you have to do is make a card or project with a masculine theme, take some photos and link up using the Linsky at the bottom of our challenge page. There are a few other rules  to follow and that's it. Who knows perhaps you'll by our next "Rock Star". 

Here's My Card:

I'm a big fan of Tri-fold Shutter style cards so I thought I would make one for this challenge.  I used an old tutorial designed by Marcy K of Canton Ohio for the Operation Write Home blogClick this link for Marcy's  fabulous step by step tutorial and a PDF Diagram showing all the cutting measurements for the various boxes.  
In this top view you can see how the card looks when all the score lines are in the right position.  It's tricky folding them the right way so the card closes, but if you pay attention to Marcy's tutorial you'll get it right in no time.
Here's what the card looks like when it's closed properly.  There are other versions of this card made with12 x 12 paper, but the beauty of this tutorial is that it uses 8 1/2 x 11 and the finished card is A2 size, so no adjustments need to be made for an envelope.  
The fellow I made this card for likes to fish on the open sea so it was appropriate to make him a card that featured water. I stamped the lighthouse scene with Stampin' Ups! High Tide stamp set.  This set has so many stamps to help you create a wonderful seaside scene.  I stamped the light house twice fussy cut out both and layered them together and then added them to the panel with Dimensionals.  The designer paper I chose made me think of water.  It's from the Picture Party Paper Stack and features a circular design in Bermuda Bay, Pool Party and White and my coordinating card stocks were the same.  
I also used the Picture Perfect Birthday Stamp set to decorate some of the panels.  The sentiments in this set are absolutely fabulous, not only for their wording but also for the font.  Love, love, love this whole set.  Here you can get a better look at the DSP from the party stack.  It's awesome.  I also added some Glitter Enamel Dots in blue on the end panel where you can write your birthday message.  
Supplies:
Stamp Set(s): High Tide and Picture Perfect Birthday (145519)
Ink: Bermuda Bay, Pool Party
Card Stock and DSP: Bermuda Bay, Pool Party, Whisper White and Picture Perfect Party stack 6x6 #145559)
Accessories: Big Shot, Paper Trimmer, Fine Detail Paper Snips, Glitter Enamel Dots (Blues), Acryllic Blocks, Misti Platform


Well that's it for this week.  Hope you liked my Tri Fold Masculine Birthday Card project.  I'd love to hear from you if you can take the time to leave a comment.  I read every one and it simple makes my day to hear from you.
  
If you haven't already checked out all the submissions from the other Watercooler Wednesday Design Team members stop by at this link.  You  won't be disappointed.  

Happy Stamping!
Penny Tokens Stampin' Spot 

Wednesday, January 31, 2018

Watercooler Wednesday WWC#155 - "Anything Goes"

Welcome to this week's Watercooler Wednesday Challenge. Our WWC155 challenge this week is an "Anything Goes". That means that anything you want to share with us is a-okay. It could be a card, a tag, a project, whatever. All you have to do to play along is take pictures of your "anything goes" and post to our Linsky by 5:00pm on Monday February 5th, 2018. Check out our rules and how to play along on our main page.  Kath Ricks is leading the way for our Design Team on this challenge.
Here's My Card:
My "Anything Goes" project features a technique called "Ghosting". Using this technique and the floral image from the "Amazing You" Sale-A-Bration stamp
I made a total of eight thank you cards in a very short time.  Here are some views of my cards: 


Supplies:
Stamp Set: Amazing You SAB 2018, Painted Harvest,One Big Meaning
Ink: Whisper White, Fresh Fig
Card Stock: Crumb Cake, Fresh Fig
Accessories: Trimmer, Tom Bow Glue, Basic Rhinestones, Clear Wink of Stella, Purple Sharpie Marker, Heat Gun.


Details:
1. Card Base - Cut a piece of Crumb Cake 4 1/4" x 11. Score at 5 1/2".
2. 1st Layer - Cut a 5 1/4" x 4 1/8" piece of Fresh Fig and adhere.
3. 2nd layer - 5" x 4 piece of Crumb Cake.

4. Ghosting Technique:
  • Begin by stamping the flower from Amazing You on the 2nd layer with Whisper White Ink.  Set aside so ink dries or use a heat gun. 
  • Once the Whisper White ink has dried begin stamping over the images with Fresh Fig.  Make sure you offset the image slightly to create a shadow. And, that's all there is to this simple yet beautiful technique.


 5. To finish off the card face I stamped the "Thank You" from the One Big Meaning stamp set.  As you'll see later on I added some Wink of Stella and some rhinestones for some glam.

6.  I stamped the inside panel of the card with a sentiment from Painted Harvest and the flower from Amazing You.  I also stamped the back of the card with the flower and my logo stamp.  Another flower was stamped on the matching envelope. 

7.  Because I wanted to mail these cards locally instead of making a special trip to the postal station in town, I kept them very simple.  I added Clear Wink of Stella to the centers of the larger flowers and some of the greenery so there was some sparkle and shine without being weighted down with embellishments such as rhinestones.


I decided to add some Basic Rhinestones that I'd coloured with a purple Sharpie Marker to two of the cards I planned to hand deliver.  I also added some Wink of Stella to the flower centers before setting the rhinestones. 

The great thing about these cards besides, being super simple and fast to make, is that by having minimal to no embellishments added, they are inexpensive to mail. That's right - no extra postage and nothing to get mashed up in the postal machines. 

Thanks for dropping in and visiting my blog this week. I hope you enjoyed my project and that my tips on how it was designed were helpful. I love reading comments so before you go if you can leave me a few words of encouragement you'll make my day. 
 
Don't forget to check out the other Design Team Artist's at the Watercooler Wednesday Main challenge page. To get a closer look at their creations simply click on their name below their sample picture. Until next time..........


Happy Stamping!
Penny Tokens Stampin Spot

Wednesday, January 10, 2018

Watercooler Wednesday #WWC152 - Kath's "All About Occasions" Challenge

Hi Stampers!  How's your week going?   We're getting rain in this part of the world and although sadly needed because of the drought conditions, it's still dull,dismal and wet.  The upside is it'll only last a few days, and maybe, just maybe I can get some stamping time in during the showers.  

We have a new challenge for you today on Watercooler Wednesday, hosted by Kath.  She's challenging us to create something for an "Occasion".  The WWC152 challenge is open to everyone  until Monday January 15th at 5:00pm MST.  So why don't you join us, who knows you could ROCK THE WATERCOOLER!
Here's My Card:
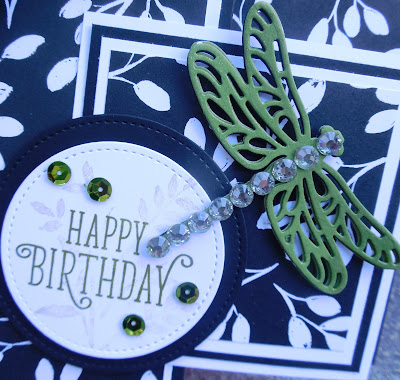
The occasion I'm  celebrating is my friend "M's" upcoming birthday.  I wanted to create a sophisticated and glam card for her and I think I hit it on the mark with this "Double Z Joy Fold Card". 
Here is the Double Z Joy Fold Card opened up.  This is a  5 1/2" x 5 1/2" square card when closed.  I made a special envelope for it with my Envelope Board, but forgot to take a picture for you.  I lined the flap with the green striped paper and stamped a Dragonfly on the front. 
 
Supplies:
Stamp Sets: Dragonfly Dreams and Happy Birthday Gorgeous
Card Stock:  Basic Black, Whisper White, Old Olive
DSP:  Merry Little Occasions
Ink:  Old Olive
Accessories:  Big Shot, Paper Trimmer, Stitched Shapes (Circles) Dies, Detailed Dragonfly Thinlet Dies, Dimensionals, Tom Bow Glue, Sticky Strip, Large Basic Rhinestones, Green Sequins,Wink of Stella.

Details:
The Base Panel is 11' x 5 1/2" Basic Black card stock scored at 2 3/4" and 5 1/2".  Use bone folder to crease score lines in Mountain and Valley folds. 

 For the panel layers cut:
  • Front Panel cut a 2 1/2" x 5 1/4" Whisper White and a 2 1/4" x 5" piece of DSP and adhere.
  • Inside Panel cut a 2 1/2" x 5 1/4" Whisper White and a 2 1/4" x 5" piece of DSP and adhere.
  • For Square panel cut a 5 1/4" x 5 1/4" Whisper White and a 5" x 5" piece of DSP and adhere.  
 The Joy Fold Panel is a 9 1/4" x 3 3/4" Whisper White piece scored at 2 3/4" and 5 1/2". Use bone folder to crease the panels in Valley and Mountain folds.  

For the panel layers cut:
  • For Square Panel cut a 3 1/2" square of Basic Black, a  3 1/4" x 3 1/4" piece of Whisper White and a 3" x 3" piece of DSP and adhere.  
  • For Inside Panel cut a 2 1/2" x 3 1/2" piece of Basic Black, a 2 1/4" x 3 1/4" piece of Whisper White and a 2" x 3" piece of DSP and adhere. 
  • For the Last Panel cut a 2 1/2" x 3 1/2" piece of Basic Black and a 2 1/4" x 3 1/4" piece of Whisper White. Adhere.  Stamp the sentiment "It's Your Day" from Happy Birthday Gorgeous set in Old Olive ink. adhere. 
For Front Circles cut the largest stitched circle from Basic Black.  Cut the next largest circle from Whisper White. Adhere together with dimensionals.  Stamp the floral image after stamping off twice in Old Olive on the white circle.  Stamp the sentiment "Happy Birthday" across the center in Old Olive.

Cut three Dragonflies using the Detailed Dragonfly Thinlets  - 2 from Old Olive and 1 from Basic Black and adhere in a stack.  Add large basic rhinestones down the spine.  I coloured the wings with Wink of Stella to give some luminescence.

To Assemble:
1.  Add Tom Bow Glue to the back of the last panel of  the Joy Fold section.  this will be attached at the midway point on the large square panel. 
Once it's attached, fold up both the the Joy Fold Panel and the Back Panel and add glue to the left edge of the Joy Fold Panel and secure to the Back Panel.  Tip:  Before you add the adhesive check your panel placement to get your best position.  

Once the panels are adhered together attach the circle and Dragonfly to the front panel and add some sequins.


Well that's it for this week's card.  I hoped you enjoyed it and will try this fancy fold.  You'll find it is a quick and easy card to assemble and the sky's the limit in terms of decorating it.  It can be used for any occasion.  I'd be happy if you'd leave me your thoughts on this card.  

If you haven't visited the Watercooler Wednesday main page and checked out the cards by the other Design Team members you can click here to link  back.  You won't be disappointed.  Lots of inspiration this week. 

Happy Stamping!
Penny Tokens Stampin Spot 

Wednesday, December 20, 2017

Watercooler Wednesday Challenge #150 - Heidi's Masculine Anything Goes - Two Week Challenge

Hi stampers!  Christmas is just around the corner and I don't know about you, but I'm way behind this year with my card making and Christmas preparations.   I've been thrown off schedule with all the events happening where I live and company, but I wouldn't have changed it for the world.  Life happens!  

With that in mind, this week's Watercooler Wednesday challenge is going to span two weeks instead of our regular one week, to accommodate everyone's busy schedule and Christmas week.   I think everyone will give a round of applause to our Administrators for arranging that.  I know I will.  

Remember this Linky doesn't close until Monday, January 1st, 2018 at 5 p.m. Mountain Standard Time, so you've got plenty of time to get crafting.   All you need to do is follow a few simple rules and link up your post to our blog using the Linky.  Check out the details on Watercooler Wednesday Challenge blog's home page. Hope you'll join us.

Here's My Card:
 

This week I'm adding to my Masculine birthday stash and have chosen a country western theme for those male friends and relatives who are "a little bit country". 

Supplies:
Stamp Set:  Country Living, Basic Butterfly and Cupcakes Clear Stamps, Howdy from Artful Impressions
Card Stock:  Whisper White, Crumb Cake, Early Espresso
DSP and Specialty Papers:  Coffee Break DSP, Gold Foil 
Ink:  Early Espresso, Crumb Cake and Momento Tuxedo Black, H2O Twinkles
in brown shades
Accessories:  Big Shot, Paper Trimmer, Circle Dies, Sponge Daubers,Stamp-a-ma-jig, Tom Bow Adhesive, Dimensionals, Aqua Painter.

When I began making this card I couldn't decide whether I wanted to showcase the boots or the guitar from the Country Living stamp set but after a few trial runs, I wound up doing a bit of both. 
 
Country Living Stamp Set
The Details:
The card base is an 8 1/2" x 5 1/2" piece of Crumb Cake card stock that was scored and folded at 4 1/4".  I added an Early Espresso layer that measured 5 1/4" x 4 followed by a 5 1/7" x 3 7/8" piece of the coffee ring paper from the Coffee Break Designer Series paper pack. 


I added three more layers to the card front  a gold foil, an Early Espresso and a Whisper White.  When I was trying to decide how to feature the guitars, I began stamping using my Stamp-a-ma-jig to place the guitars end to end on a larger sheet of Whisper White card stock.  I stamped the guitars in Early Espresso and coloured them with a wash of Crumb Cake and the H20's.  

I had a small Artistic Impressions stamp that said "howdy" that I thought would lend to the country feel and I stamped it randomly between the guitars with Early Espresso ink.  

I splattered Crumb Cake and Early Espresso inks over this panel to give it a weathered look.  When I finished stamping I cut this panel to 3" x 4 1/2" and adhered it to a piece of Early Espresso that measured 3 1/8" x 4 5/8".  This panel was attached to a 3 2/8" x 4 6/8" Gold Foil panel with Dimensionals.  The Gold Foil panel was glued to the center of the DSP panel. 

Love those boots.  I started out by stamping the boots with Momento Tuxedo Black ink on a piece of Whisper White card stock and then I applied a wash of Crumb Cake ink with my Aqua Painter.  I layered on Early Espresso and some of my H2O inks in various shades of brown to finish off the design.  In real life the boots look pretty leathery which was the look I was going for.  The boots were added to the front layer with Dimensionals.


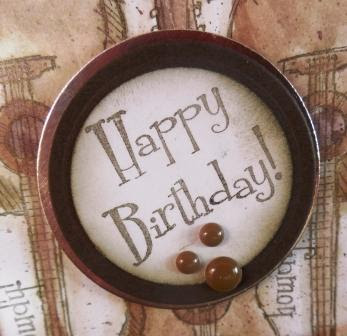
I stamped the "Happy Birthday" sentiment from my Cupcake Clear Stamps set on a piece of Whisper White card stock and cut it out with a 1 1/4" circle punch. I sponged the edges of the circle with Early Espresso.   I cut additional circles from Early Espresso and Gold Foil and layered the sentiment to them.  The Dots are from my stash and I can't remember the Manufacturer.  

The inside of the card features the "Happy Birthday" sentiment from the Basic Butterfly stamp set, some more of the Coffee Break paper and a spare guitar that was left over from my earlier efforts.  After I took the pictures of the inside of the card I actually added a 1/4" x 5" strip of Early Espresso to cover the meet lines between the DSP and the White card stock.  It was an afterthought but worked well.

Well that's it for today's post.  Just a simple card, but I know it will make one of our friends very happy. How about you, do you struggle with themes for your masculine cards?  Do your like the country theme in this card?  I'd love to hear your thoughts on this and my card.

If you haven't already done so don't forget to drop by and check out the awesome masculine cards contributed by the rest of the design team.  They're pretty stunning and inspiring.  Just click here to return to the Watercooler Wednesday WWC150 Challenge.  Thanks for stopping by!

Happy Stamping!
Penny Tokens Stampin Spot

2024-2025 Annual Stampin' Up! Catalogue has launched!

 HAPPY MAY 1ST| Today I'm celebrating and  sharing the launch of the much awaited Stampin' Up! Annual Catalogue which will run from ...