Well we managed to make it through another soggy weekend here in Abbotsford. I'm starting to grow webs between my toes. Too bad it wasn't nicer for Father's Day on Sunday. It poured most of the day and I know a lot of BBQ's and camping trips were rained out. Sigh......
This week's challenge at the Watercooler Wednesday is a "Masculine Anything Goes" theme hosted by Fiona. This challenge will run from June 21st until Monday June 26th at 10:00MT. I hope you'll join our Design Team (DT) and share a masculine card or project. We'd love to have you join us this week.
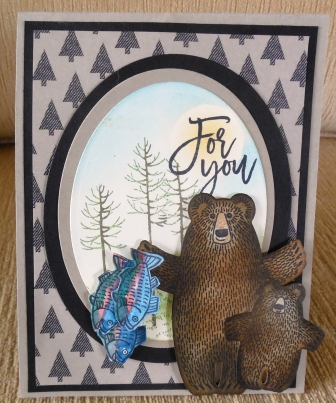
Here's My Card:
 This is another Twist N' Pop card made with love for my youngest brother who turns 58 on July 4th. He's an outdoorsy kind of guy who loves nature and fishing, so I thought he'd appreciate this birthday card. Oh and I added images from one of my favourite stamp sets "Bear Hugs" because we've had a bear lurking around in the woods behind our house for the past week. Hopefully he'll keep on trekking down to the river and out into the Valley, so I can get out for a walk soon.
Supplies:
Stamp Sets: Bear Hugs, Thoughtful Branches, and Balloon Adventures
Ink: Momento Tuxedo Black for images and sentiments. Early Espresso and Soft Suede for bears. Dapper Denim, Tranquil Tide, Watermelon Wonder, Pear Pizzazz, Soft Sky and So Saffron for background scenes and fish.
Card Stock: Crumb Cake, Basic Black, Very Vanilla
Designer Series Paper (DSP): Warmth and Cheer (R) - Clearance Rack
Accessories: Big Shot, Paper Trimmer, Bear Hugs and Ovals Thinlits, Acrylic Blocks, Wink of Stella, Aqua Painter, Sponge Daubers, Dimensionals, Sticky Strip or Tear N' Tape, Tom Bow Glue.

 How It's Made:
My instructions are for this specific card, however they can be adapted for any Twist N' Pop card layout. I'm a very visual person and while I watched a lot of videos on how this card was made, it didn't come easy for me until I made a paper template I could follow. I cut my original template from plain white card stock and included all the measurements and placements for the Tear N' Tape placement and score lines. This works for me and I hope it will work for you too. Okay so here we go:
This Twist N' Pop card starts with two 8 1/2" x 11 sheets of Crumb Cake card stock.
This week's challenge at the Watercooler Wednesday is a "Masculine Anything Goes" theme hosted by Fiona. This challenge will run from June 21st until Monday June 26th at 10:00MT. I hope you'll join our Design Team (DT) and share a masculine card or project. We'd love to have you join us this week.
Here's My Card:

 |
| I wanted to send a gift card with this birthday wish so I added a 4" x 2 1/2" piece of basic black card stock for a gift card holder in the top of this card. I punched a half circle with a 1" circle punch in the center of the card to make for easier access for the gift card. |
Supplies:
Stamp Sets: Bear Hugs, Thoughtful Branches, and Balloon Adventures
Ink: Momento Tuxedo Black for images and sentiments. Early Espresso and Soft Suede for bears. Dapper Denim, Tranquil Tide, Watermelon Wonder, Pear Pizzazz, Soft Sky and So Saffron for background scenes and fish.
Card Stock: Crumb Cake, Basic Black, Very Vanilla
Designer Series Paper (DSP): Warmth and Cheer (R) - Clearance Rack
Accessories: Big Shot, Paper Trimmer, Bear Hugs and Ovals Thinlits, Acrylic Blocks, Wink of Stella, Aqua Painter, Sponge Daubers, Dimensionals, Sticky Strip or Tear N' Tape, Tom Bow Glue.

 |
| The fish, baby bear and sentiments are all from the now retired Bear Hugs stamp set. Definitely this is one of my favourite stamp sets. So cute! |
 |
| Sentiment is from Balloon Adventures. |
My instructions are for this specific card, however they can be adapted for any Twist N' Pop card layout. I'm a very visual person and while I watched a lot of videos on how this card was made, it didn't come easy for me until I made a paper template I could follow. I cut my original template from plain white card stock and included all the measurements and placements for the Tear N' Tape placement and score lines. This works for me and I hope it will work for you too. Okay so here we go:
This Twist N' Pop card starts with two 8 1/2" x 11 sheets of Crumb Cake card stock.
- From the long side of the first sheet cut:
- 4 1/4" x 11" card base scored at 5 1/2". Mark a dot at the center of the score line for positioning the Hinge piece.
- 10" x 3 1/2" panel scored at 2 1/2, 5 and 7 1/2" for the Picture panel. Fold along score lines and burnish with bone folder. Your piece should have a valley, mountain and valley fold when it's facing upright. To decorate the picture panels cut the following:
- 4 pieces of Basic Black card stock 3 1/4" x 2 1/4" - one for each panel
- 4 pieces of Very Vanilla card stock 3" x 2" one for each panel. The two center panels will be stamped with images and/or sentiments, so are left plain. Do your stamping before adhering.
- 2 pieces of DSP 2 7/8" x 3 7/8" for the two outer panels.
- Once the above layers have been adhered with Tom Bow Glue, flip this picture panel over and put two strips of Tear N' Tape in the top right hand corner of the first panel and on the bottom inside left of the last panel.
- Cut a 3/4" x 10" piece for belly band and score it at 2" and 6 3/8" (Note: you may have to adjust scoring for the belly band dependent on the thickness of the finished card - so don't score until you're finished).
- From the second sheet create the Hinge Panel:
- On short side of 8 1/2" x 11 card stock cut an 8" x 3 1/2" piece and score it on the long side at 1 3/4".
- On all four sides measure down 2 1/4" and mark with a pencil. Make sure these measurements are exact or your hinge won't work properly.
- Use your score bar on your paper trimmer to make the X in the center of this piece. Start from the right side and score a line from the 2 1/4" mark to the corresponding mark on the left hand side. Make sure both marks are sitting in the well of the trimmer before scoring.
- Repeat this score line but this time go from left to right. Your scored lines should have formed a perfect X in the center of the hinge panel.
- Fold on the 1 3/4" score line and burnish with your bone folder. Next fold in on the diagonal lines making sure they line up and once you're satisfied burnish with your bone folder. You should now have a piece that looks like a house. Put two strips of Tear N' Tape on the triangular part of the house peak on both sides.
- Remove the Tear N' Tape on both sides of the peak. Carefully line up the peak of the house against the mark you made on the score line of the card base. Before pressing down make sure the hinge is even on both sides and precisely in the middle with the tip of the peak touching the score line.
- Close the card base and press down. Your hinge should now be securely mounted to the inside of your card base. When you open the card base it should open fully.
- Adding the panel to the hinge:
- Open the card base so the hinged piece is lying flat. Make a small pencil mark so it shows above the score line to help you with placement of the picture panel.
- Remove the sticky strips from the picture panel and with the decorated side of the picture panel facing upwards center the mountain fold of the panel against the mark made on the card base. Make sure the top edge of the picture panel is not only lined up with the center of the card, but it is also sitting against the top and bottom edges of the hinge piece.
- When you've got it exactly in the middle and you've lined up everything just press down the sides of the picture panel and they will adhere to the hinge. Now close the card. If you've done everything correctly the picture panel and hinge will magically close. You may have to do it a couple of times to make it move fluidly.
I'm sharing the drawn out template with you as well as pictures of my actual cut out template pieces. For easy reference I store the cut out template pieces in a clear envelope so it's handy every time I make this fancy fold card. Enjoy.
Well that's it for today Stampers. I hope you've enjoyed my card and my little tutorial and it was easy to follow. I'd like to have your feedback if you plan to use my instructions and how they work out for you. Trust me once it's all cut out and you play with it a bit you'll find it's one of the simplest cards to make. The main thing is remembering to mark everything for placement and be precise with it. It's a pain, I know but remember the old carpenter's saying..... "measure twice cut once", as it really applies with this card and will save you from wasting both time and materials.
If you've come directly here and haven't checked out the other Watercooler Wednesday design team's masculine cards make sure you do, as you're in for a treat. And remember this challenge is open until June 26th. We'd love to have you join in.
Happy Stamping!
Penny Tokens Stamping Spot
 |
| The measuring/cutting dimensions for the card base, picture panel and belly band of my Twist N' Pop card. |
 |
| This is the back side of the Picture Panel template and shows wear the Tear N' Tape is placed. |
 |
| This diagram shows the cutting and scoring lines for the Hinge Panel as well as the placement of the Tear N' Tape, when the hinge has been folded. The red dashed line is not a score line in this picture. You'll see in the cut template pictures below that the two sides of the house are actually split in the center and if scored and folded properly should line up side by side. |
 |
| These are my template diagram pieces all cut out. It makes it easier for me to use as a teaching tool and to jog my memory on placement if I haven't made this fancy fold card for a while. |
 |
| This picture shows the reverse side of the picture panel and the right side of the Hinged Panel when it's folded and the placement of the Tear N' Tape. Don't use too much tape and make sure you've got it placed properly or the Hinge and Picture Panels will not work together. |
 |
| Here you see the folded hinge panel being placed against the center mark on the inside of the card base. If I was doing this for real, I would have removed the Tear N' Tape strips from both sides of this panel. Once I've made sure this hinged piece is lined up evenly on both sides and with the center mark then simply close the card and press down to make sure the adhesive on the both sides of the peak adheres to the card base. |
 |
| Once you've adhered the hinged piece and you open the card base it will look like this. Bear in mind that my sample isn't glued down so it looks bulgy in the center. |
 |
| Take the picture panel and I fold the two outer panels inward and then set up this panel over top of the "now" adhered hinge panel and line up with the center of the card base. You can see the Tear N' Tape is facing towards the outside on both the top and bottom of the Picture panel. |
 |
| Once I had it lined up properly in the last photo I removed those strips of Tear N' Tape and simply open both sides of the Picture Panel and press down. The Tear N' Tape will adhere to the Hinged Panel and Voila you have a Twist N' Pop card. |
If you've come directly here and haven't checked out the other Watercooler Wednesday design team's masculine cards make sure you do, as you're in for a treat. And remember this challenge is open until June 26th. We'd love to have you join in.
Happy Stamping!
Penny Tokens Stamping Spot


