Showing posts with label Thank You Cards. Show all posts

Wednesday, April 4, 2018

WWC#164 - Marsha's Feminine Anything Goes Challenge


Welcome Stampers!  Hope you had a wonderful Easter weekend.  We were invited to a small family gathering on Sunday for dinner, and it was just perfect. The food was terrific, conversation was great and we got to break bread with one another again.  Although the day started on the cloudy and windy side it finished with a glorious blaze of sun in the West.  Pretty fitting for the Easter weekend!  

The only problem with a long weekend, and especially a four day one, is getting back to the grind and into the routine of things. Monday was a day of mishaps and time delays which was quite fitting, as my horoscope said Mercury Retrograde in my birth sign was going to wreak havoc.  Right on point!  


We have a Feminine Anything Goes Challenge this week being hosted by Marsha.  She's challenging you to design a feminine card or project and post it with links to our site by 5:00pm Mountain time on Monday April 9th.  I hope you'll join us.  Our design team seems to have been synched in our thinking because many of the designs this week have a floral focus.  Mine fit right in the groove.  

Here's My Card:
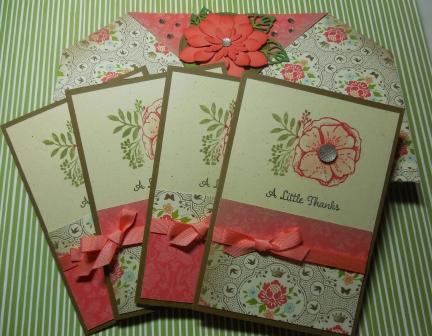
I've been working on some ultra feminine "Thank You" cards for my customers who placed March orders.  I love how they turned out.  I used a Sale-A-Bration stamp set I hadn't gotten around to using called "Heartfelt Blooms".  Oh my gosh I wish I'd used this set sooner, because I totally fell in love with it!   
How do you like the combination of floral stamp with the Designer Series Paper. I think it really works well together, and the basic gray panel really helps to show case the floral design and add just the right touch of femininity.  

The inside of the card is pretty basic.  The Whisper White panel measures 5 1/4 x 4.  I stamped a small portion of the floral image in the bottom right hand corner, leaving plenty of white space for writing a message of thanks.  

Stampin' Ups! Whisper White Envelopes have a super deluxe shiny finish that accepts ink so well.  I used a standard envelope and stamped the image across the back flap.  I think this really added to the feminine look of the card.  Alternatives to stamping the flap would be to create a liner or use the DSP to cover the outside of the flap.  

These cards were quick and easy to make using my Mini Misti positioning tool.  Stampin' Up!  has a new platform tool that will be coming out with the new catalogue called a Stamperatus.  

Supplies:
Stamp Sets: Heartflet Blooms (Sale-A-Bration 2018 - Retired)
Ink: Basic Gray, Flirty Flamingo
Card Stock: Whisper White, Basic Gray, Flirty Flamingo
Accessories:  Paper Trimmer, 8" Coordinating Taffeta Ribbon, Dimensionals, Whisper White Envelopes, Tom Bow Glue.

How It's Made:  
1.  Cut Flirty Flamingo to 8 1/2" x 5 1/2" and score at 4 1/4" for the base.
2.  Cut a piece of Designer DSP to 5 1/4" x 4" and adhere to the base.
3.  Cut a piece of Whisper White to 4 1/4" x 3 1/4" - once the layering on this panel is finished attach to the card face with Dimensionals or score tape depending on the thickness you want. 
4.  Cut a piece of Basic Gray to 4" x 3" adhere to Whisper White panel.
5.  Cut a piece of Whisper White to 2 3/4" x 3 3/4" and stamp sentiment and image on it.  Tie ribbon around this piece before adhering to Basic Gray panel. 
6.  For the inside cut a 5 1/4" x 4" panel of Whisper White card stock.  Stamp a portion of the floral image in the bottom right hand corner.
7.  Stamp the image on the flap of the envelope.  

Here are some additional samples using this design:
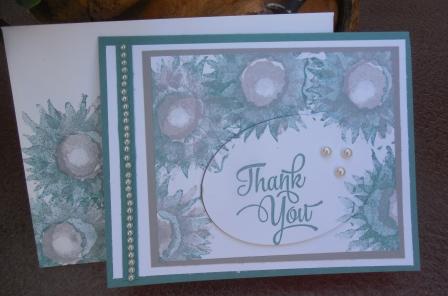
This sample is in Island Indigo and Whisper White.  The ribbon is 1/4" White Cotton.  
Island Indigo
For this card I used Lemon Lime and switched the contrast card stock to Basic Black to give it some additional pizzazz.  I forgot to put ribbon on the stamped panel before adhering it to the black one, so just addd some black rhinestones 

I decided to keep things simple on the inside of the card, and just added a strip of designer paper on the right hand side of the card.  The black mat adds some drama.

This card is made with Berry Burst DSP, inks and card stock.  The contrasting card stock and ribbon are Crumb Cake.


I love the captions in the Heartfelt Blooms set.  There are three different ones:  "Thinking of You", Sending Heartfelt Thoughts" and "Thank You".  The fonts in these sentiment are simply beautiful.


I loved all the variations I made and the versatility of the double sided designer papers gives you even more choices.  This is a terrific way to use up some of those paper stashes, we all have.  

Well that's it for today.  I hope you've enjoyed my floral feminine cards this week and that you'll use this design template for your own cards.  You can create the same effect using any larger floral stamp so don't be intimidated if you don't have the Heartfelt Blooms.  Cards in this style can be used for any occasion and it's an economical way to get your card supplies loaded up.  

If you haven't already checked out the WWC164 Challenge on the main Watercooler Wednesday site, take some time and check it out.  The other DT members have created some beautiful cards to share with you and would be delighted if you visited them too.  Until next time............

Happy Stamping!
Penny Tokens Stampin Spot 

Wednesday, February 14, 2018

WWC157 - Heidi's "All About Occasions" Challenge

Hi stampers Happy Valentines Day!  Welcome to this week's Watercooler Wednesday challenge #WWC157.  Heidi Weaver is our host and our theme this week is "All About Occasions".    


We hope you'll join us  by linking up your special "Occasions" project by 5:00pm Mountain Time, Monday February 19th, 2018 to our Linsky.  Who knows, you might be our next Watercooler Rockstar.

Here's My Project:
Today I want to share my Thank You Note Clutch Purse project.  This cute little clutch purse and accompanying note cards could be made for just about any "Occasion" you can think of.  Mine was made as a gift for a sweet gal friend for Valentine's Day. 


The clutch is made from a single 12 x 12 sheet of double-sided designer series paper.  No special skills or tools are needed to make this clutch, other than the ability to fold the square of paper into the clutch design.  Mine was made with retired paper stock because I'm still trying to use up what's in my stash.

The clutch holds four note cards and envelopes inside, and has a magnetic clasp to keep it closed.  Here is a link to an original tutorial and video by Dee Slater on Split Coast Stampers that clearly shows how to make this special little gift card clutch purse.   


Supplies:

Stamp Sets: Amazing You and One Big Meaning

Ink: Watermelon Wonder, Old Olive and Soft Suede

Card Stock: Ivory Fleck (R), and Soft Suede

DSP:  Stampin Up (R) - from my stash and Ivory Envelope Paper
Accessories:
Big Shot, Paper Trimmer, So Succulent and Stylish Stems Thinlets (R), Stitched Shapes 2" Circle Thinlets, 2 Small Magnets Watermelon Wonder Grosgrain Ribbon,
Faceted Gems, Basic Rhinestones, Dimensionals, Tom Bow Glue, Sticky Strip.

Note Cards:
I made my own note cards, but I've seen some beautiful sets completed with the Stampin' Up! premade note cards and envelopes that are in the Annual Catalogue.  Great value here as you get 20 note cards in Whisper White or Very Vanilla card stocks with matching envelopes and the card stock is a little thicker on the note cards so make for perfect backings.
1.  Base is 7" x 5" scored at 3 1/2"
2.  1st layer - 3 1/4" x 4 3/4" Ivory Fleck card stock.  Before adhering to the note card front stamp the floral image from Amazing you in Watermelon Wonder and Old Olive.  Stamp the sentiment "A Little Thanks" from One Big Meaning in Soft Suede ink just below the floral image. Add a Faceted Gem to the flower center.
3.  2nd layer - 3 1/4" x 3/4" strip of DSP adhere below the sentiment.
4.  3rd layer - 1 1/2" x 3 1/4" strip of DSP flip so reverse side is showing.
5.  Cut a strip of ribbon and attach over the seam created by 2nd and 3rd layer and glue ribbon ends to the back of Ivory Fleck layer.  Tie a small bow in the front with another piece of ribbon and trim ends. 
6.  For the inside of the note card cut a 3 1/4" x 4 3/4"piece of Ivory Fleck card stock and adhere.  It could be stamped with another floral image but I chose to leave my black for messaging. 

7.  Two cards and envelopes fit into each of the panels on the inside of the clutch.  They tuck in rather neatly and will  stay in place.


The Clutch:
I made the clutch following the instructions in Dee Slater's video.  I changed up the way the flaps hold shut though.  I attached two small magnets under the flaps with glue dots.  I started on one side positioning the magnet underneath the flap then flipped the clutch over and let the magnet attach itself and then added the glue dot and pressed the flap down.  These are really secure and hold the clutch shut.  You could also do a belly band or tie ribbon around the clutch if you're looking for alternate methods to close it.  

The Flower Embellishment:

I created the floral embellishment with bits and pieces of cardstock I had on hand and two of my favourite die sets - So Succulent and Stylish Stems, both retired.  
I always like to ink around the edges of my flower and leaf pieces as it seems to add more depth.  For this arrangement I layered the four flower pieces together with glue dots, and attached the assembled flower to a 2" stitched circle piece that I cut from Soft Suede card stock.  Next I added the leaves with glue dots.  The circular piece was attached to the flap with sticky strip.  A few random rhinestones were added to the flap on either side of the flower.  

And that's all there is to creating this note holder.  It's a fun and very quick to assemble project and I thoroughly enjoyed making it.  So much so, that I'm  planning to do a class on how to make these, for Mother's Day so if you're in my area and interested let me know.  

I hope you enjoyed this project as well as the ones created by the rest of the Watercooler Wednesday Design Team this week.  I'd love to hear what you think of it so leave me a comment before you go.  Your feedback is really helpful.  

Happy Stamping!
Penny Tokens Stampin' Spot 

Wednesday, December 13, 2017

Watercooler Wednesday Challenge #149 - Marsha's Occasions Challenge

Wow a new challenge hosted by Marsha and a brand new theme which we think you'll love.  This challenge is all about "Occasions" - you know Halloween, Christmas, Valentines, Anniversaries, Weddings, Birthdays, 4th of July ......you name it.  What ever occasion fits your need, this will be the challenge week  to show off your project.


Here's My Card:
We've had lovely new neighbors move into our park and last week they held a wonderful Open House to introduce themselves and meet everyone.  I wanted to make a special card to not only welcome them to our "neighborhood", but also to thank them for their hospitality and such a fun evening.  

Here is my "Welcome to the Neighborhood' card. 
Supplies:
Stamp Sets:  In the City Photopolymer Stamp Set, One Big Meaning
Card Stock:  Whisper White, Basic Black, Smokey Slate
Ink:  Momento Tuxedo Black, Cherry Cobbler, Soft Sky, Smokey Slate, Lemon Lime Twist, Garden Green, Tangerine Tango, Hello Honey, Dapper Denim. Daffodil Delight, Calypso Coral, Pool Party
Accessories:  Acryllic Blocks, Detailed Scissors for Fussy Cutting, Dimensionals, Tom Bow Adhesive 

In the City is a 60 piece Photopolymer two step stamping set that is only available  through Stamping Rewards and is in the 2017/18 Annual SU Catalogue.


Details:

In the City is a really fun photopolymer two-step stamp set with 60 images that present endless possibilities for creating cards and projects. When I first got this set I couldn't decided which of the images I wanted to use, so rather than sweat about it, I just sat down and began stamping on scrap paper. 

I store my pre-stamped images in a photo case.  Perfect!  When I'm watching TV I can fussy cut out the images of my choice and keep them safe in this case. 
What a fun afternoon I had and this was such a great way to get to know the stamp set.  The two-step stamping requires two sets of ink - one for the line image and one for the colour portion of the image. You can also colour the images or add details with markers or the new blendabilities.   By stamping all the line art first,  I was able to stamp a lot of the images and have them on hand for making card projects.  
Simply a great way to use up all those scraps of Whisper White I had hanging around!

The beauty of pre-stamping and colouring is that I can pick and choose what buildings, trees, or vehicles I want to use at  a later time. You can also load up an acryllic block with multiple images for the first step and stamp them all at one time. Later you can go in and colour them with the second stamps or by hand with a marker. 


1.  Start this card with an 8 1/2" x 5 1/2" piece of Basic Black card stock.  Score and fold at 4 1/4".
2.  The second layer is a 5 1/4" x 4" piece of Whisper White.
3.  The third and final layer is a piece of Smokey Slate card stock cut out with the 4 3/8" x 3 3/8" Pinpoint Rectangles Die Cut (memory box).
4.  The sentiment Welcome to our Block is from the In The City stamp set too and was perfect for this card.  It was stamped on a scrap of Whisper White in Momento Tuxedo Black ink.  The strip measured 1/2" x 2".  This was mounted on a piece of Smokey Slate and Basic Black card stocks and adhered to the center bottom of the card face with Dimensionals.  
5.  Various building shapes, trees and vehicles  were added with Tom Bow adhesive and Dimensionals. 
6.  A 5 1/4" x 4" panel of Whisper White was cut and adhered to the inside of the card.  I stamped a "thank you" image from the One Big Meaning stamp set in the center of the page.  Sorry I can't show you, I didn't take a picture of the finished page before giving the card away.  Trust me it looked good.
7.  I stamped another Thank You image from this set on the envelope front as I was hand delivering and I wanted it to look good too.  

And that's all there was to this card.  I know I'll be using these sets lots as they're so much fun and so easy to use together.  I hope you enjoyed this post and my card and that you'll leave me a comment.  

Don't forget to drop by the Watercooler Wednesday main page and see the wonderful "Occasions" cards submitted by the other members of the Design Team.  Lots of inspiration there.  We're also searching for a new Design Team artist so if you're interested check out how to apply.  All the details are at the top of the here.
Happy Stamping!
Penny Tokens Stampin Spot

Wednesday, December 6, 2017

Watercooler Wednesday Challenge #148 -Heidi's Feminine "Anything Goes"

Hi Stampers.  Wow the time is zipping by and once again it's time for the Watercooler Wednesday challenge.  This week's challenge is hosted by Heidi Weaver and she's challenging us to make a Feminine "Anything Goes" card or project. 
We hope you'll join in the fun and enter one of your own creations.   All you have to do is make a Feminine themed card or project and link it through your  post to our Linsky and follow a few simple rules.  What could be easier?  All the stuff you need to know about playing along is located on the Watercooler Wednesday Challenge Main PageOur Linksy is open until 5:00pm  Mountain Time on Monday December 11th.  


Here's My Feminine Card:

Supplies:
Stamps: Painted Harvest, One Big Meaning
Ink: Lost Lagoon, Smokey Slate
Card Stock: Lost Lagoon, Smokey Slate and Whisper White
Accessories: Big Shot, Paper Trimmer, Ovals Framelits, Stitched Rectangular Dies, Basic Pearls, Dimensionals, Tom Bow Glue.


Some Details:
1. The card base is an 8 1/2" x 5 1/2" piece of Lost Lagoon card stock scored and folded at 4 1/4". Lost Lagoon is a retired In Colour from Stampin' Up!

2. The first layer of this card is a piece of Whisper White card stock measuring 4" x 5 1/4" and adhered to the card base.

3. The third layer is a 4 3/4" x 3 3/4" piece of Smokey Slate card stock adhered to the top right hand side of the card leaving a 1 5/8" gap on the left hand side.


4.  The final layer is a 3 1/2" x 4 1/4" piece of Whisper White.  This layer is stamped with the Painted Harvest two step sunflower around the outer edges and top of the panel.  The first layer of the flower is Lost Lagoon followed by Smokey Slate for the second flower and the inner part of the flower is Smokey Slate.  
5.  Before adhering the panel in step 4, stamp the "thank you" sentiment from One Big Meaning in the middle white space on the panel.  Cut out this piece with a 3" oval from the Oval die cuts set.  Once the main panel is adhered to the Smokey Slate panel, attach this oval with Dimensionals in its original slot.  Add three medium sized Basic Pearls to the side of the oval. 


6. Cut a 1/4" x 4" strip of Lost Lagoon and adhere it to the center of the white margin on the left hand side. Run a strip of Basic Pearls down the center.

7.  For the inside of the card cut a 5 1/4" x 4" panel of Whisper white.  Stamp the sentiment "Your Kindness...." and a couple of the flowers in Lost Lagoon and Smokey Slate inks.  Make an envelope to match.
I have to apologize for the poor quality of these photos.  They simply don't do the card justice.  Apart from that I hope you've enjoyed this card.  I simply love these flowers and the soft muted images you can obtain by matching two coordinating colours.  I'd love to hear from you so please let me know if you like these images too.  

Make sure you check out the other design team artists and their beautiful creations in this week's challenge. 
Before I go just a reminder that we're looking for a new Design Team Member to replace Libby Fenn's on our team.  If you're interested all the details on how you can be considered are on the beginning of this post.  Check it out here.
Happy Stamping!
Penny Tokens Stampin' Spot

Wednesday, November 1, 2017

Watercooler Wednesday Challenge #143 - Gail's Feminine "Anything Goes"


Gail Allen is hosting our Watercooler Wednesday challenge this week and is challenging us to make a Feminine card.  It can be for any occasion or event and it can even be a 3-D, so long as it captures a feminine element.   The challenge is open until 5:00pm MST on Monday November 6th , so if you're interested why not join us and link up your creation.  


Here's My Card:
I haven't had much of an opportunity to use the new Powder Pink Incolour since it came out in June, so I thought this week's Feminine challenge would be the perfect time to try it out.   I also needed a few "Thank You" cards for female friends so the timing was perfect.


This was a super easy card to make, it just required stamping and paper trimming.  What could be easier.

Supplies:
Stamps:  Painted Harvest #144783
Ink:  Smokey Slate and Powder Pink
Card Stock:  Basic Gray and Powder Pink
Accessories: Paper Trimmer, Acrylic Blocks, and Tom Bow Glue

Details:
I am so pleased with this two-step Photopolymer stamp set because it stamps beautifully every time and is very versatile. The Powder Pink and Smokey Slate combo created a very dreamy, feminine looking floral image. I absolutely love it!

 I started with an 8 1/2" x 5 1/2" Basic Gray card base, scored and folded at 4 1/4".  I added a 4" x 5 1/4"  layer of Powder Pink, followed by a 3 3/4" x 5" layer of Whisper White.  I cut a 4" x 5 1/4" piece of Whisper White for the inside panel.  


I began stamping three of the large floral images in Powder Pink on the left hand side of the Whisper White Panel. The flowers do not overlap and I didn't require a mask.

Next I inked up the smaller floral image with Smokey Slate ink and stamped over top of the first three images.  To add just a bit more definition and colour to the flowers I re-inked then re-stamped the image shifting the placement just a tad clockwise.  Perfect! 

The center of the flower is stamped in Powder Pink and the small dotted image is in Smokey Slate.  The sentiments are stamped in Smokey Slate.  I stamped two flowers on the inside panel and added the sentiment. 
I stamped envelopes with the floral image too, but forgot to take a photo. My friends loved these cards.

Another Card:
I also want to share another Thank You card and envelope made with the same stamp set but in fall colours.  

These were stamped with Crushed Curry, Old Olive and Tangerine Tango inks and layered on matching card stock.  I used my rectangle stitched dies (non SU) to cut out the layers, which adds much more sophistication to the card. Using a sponge dauber and Crushed Curry ink, I also stenciled the back ground after the floral images were stamped using the diamond patterned stencil from the Pattern Party Decorative Masks set.  
I loved the colour combination and the addition of leaves and stenciling design in this card and making these cards almost became addictive.  Here are some more images of this card and envelope.


Love the way this stamped on the envelope and picked up  the fibers from the paper.  Beautiful!
Okay, that's it for today.  I hope you liked my thank you cards using the Painted Harvest Stamp set.  I'd love to hear your thoughts on these cards.  If you haven't seen the wonderful selection of cards from our Design team yet don't forget to check them out.  Click here to return to the Watercooler Wednesday Home page.  

Happy Stamping!
Penny Tokens Stampin' Spot 

Masculine Birthday - Adventurous Sky FMS#

Welcome back and thanks for visiting my blog.  Today I have another masculine birthday card to share with you that features a soon to be rel...