I really like the old fashioned rose and its many petals and leaves. Every time I stamp with this set I get "wows", and that's pretty special.
Today I'm going to show you two Get Well cards I made with this set and then I'll give you a little primer on the techniques I used to create these beautiful cards.
 |
| Stippled Blossoms Clear-Mount Stamp Set #126747(cm) Price: $22.95 or #132076(w) Price $32.95 Set Quantity: 10 |
Masculine Get Well Card: Version One
The first card was designed for a male friend recovering from surgery. Because his surgery was of a serious nature, I wanted a card that conveyed our get well wishes in a masculine fashion but showed how heartfelt we were about his recovery. I think I captured that with this card which is made with the Circle Card Thinlet.
 |
| I used a 51/2 x 8 1/2 piece of Crumb Cake card stock to make an extended card base for this get well card. You can see the technique I used in this previous post. The "Fresh Prints" Designer paper I've used has a wonderful geometric clean masculine design which co-ordinates well with the rose pattern. |
Stamp Sets: Stippled Blossoms, Sincere Salutations (retired)
Card Stock: Crumb Cake, Early Espresso, Whisper White
DSP: Fresh Prints Designer Series Paper Stack from the Occasions Mini #132996
Ink: Crumb Cake, Early Espresso
Accessories: Stamp-a-ma-jig, Big Shot, Circle Card Thinlets Die, Basic Pearls, Circle Framelits 2 1/2 Circle Punch, Sponge Dauber, Scissors, Adhesive, Dimensionals.
 |
| Circle Card Thinlits Die #133480 Price: $40.95 The amazing Thinlits Card Dies create your card that flips in just one step. |
 |
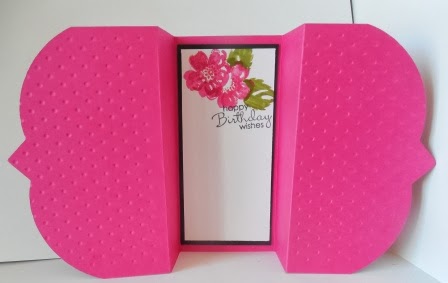
| I like the extended card base when using the Circle Card Thinlets. It gives me more room to write a message. I stamped the Get Well sentiment in Early Espresso Ink. |
Supplies:
Card Stock: Crumb Cake, Real Red, Whisper White
Stamp Sets: Stippled Blossoms, Sincere Salutations (retired)
DSP: Fresh Prints Designer Series Paper Stack from the Occasions Mini #132996
Ink: Crumb Cake, Real Red and Cherry Cobbler
Accessories: Stamp-a-ma-jig, Big Shot, Circle Card Thinlets Die, Basic Pearls, Circle Framelits 2 1/2 Circle Punch, Sponge Daubers, Scissors, Adhesive, Dimensionals.
Feminine Get Well Card: Version Two

For the feminine version of this card I used a different patterned paper from the Fresh Prints DSP Paper Stack. I simply love this pattern which incorporates Coastal Cabana, Crumb Cake, Real Red and Whisper White inks. The beautiful vines and flowers really make my rose pop off the page. This is the perfect card for a girlfriend who is recovering from minor day surgery and needing a cheery little greeting.
 |
| These smaller flowers were also made with the Two-Step Stamping technique and then cut out by hand. To give them some dimension I used my bone folder to curl the petals and leaves and adhered them to the card front with dimensionals. The single pearls in the are the perfect touch. |
 |
| By masking the rose with a cut out of the image, I was able to place the leaves where I wanted them around the main image. I used the smallest sized basic pearls in the center of the rose. Don't they look pretty? |
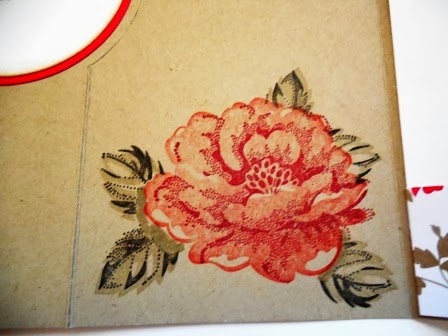 |
I love how the rose on the inside panel of the card stamped out on the Crumb Cake cardstock. Very vintage looking.
|

 |
| This is what the card looks like from the back. |
Note: I didn't realize I had a smudge on my camera lense, so unfortunately in these last couple of photos and in the masculine ones it looks like a red smudge on the cardstock. Not so, luckily. All is good!
Techniques:
To achieve the perfect rose image I've used a couple of techniques. One is called Two-Step Stamping and the other is called Masking.
Two-Step-Stamping:
If you've never used a Two-Step Stamp or are unfamiliar with the technique, don't worry because it's pretty straight forward. When you get your stamp set it will have two of each image that is two step. One will be a flat surface and the other will be a line image. All you need to do is:
1] Stamp the base image (solid image) with a lighter ink.
2] Position and stamp the overlay image (line image) with a darker ink. This will provide the details on the image.
To make sure that everything line's up correctly use a Stamp-a-ma-jig. I think the Stamp-a-ma-jig is one of the best stamping tools in my tool kit. It helps me line up sentiments perfectly or work with a mask and have total accuracy.
 |
| Stamp-A-Ma-Jig #101049 Price: $15.50 This is the perfect tool to keep you from ever ruining a whole project with one crooked image! The stamp positioner gives you the ability to place an image exactly where you want it, every time. Allows for fast and precise stamp placement. The Stamp-a-ma-jig is perfect for word and letter placement. The kit includes a washable plastic sheet, sturdy plastic construction, non-skid base and instructions. |
1] Stamp image on card stock.
2] Stamp it again on a piece of scratch paper (post it notes work well because of adhesive on back).
3] Cut carefully around the scratch paper image, cutting just inside the lines; this will be your mask.
4] Place the mask on top of the card stock image.
5] Stamp another image over a portion of the mask to create layered, interacting images.
6] Remove the mask to see the finished look.
7] To stamp a partial image, use tape to cover the part of the stamp you don't want to appear, ink the stamp, remove the tape, and stamp the image.
QUICK TIP
- To ensure that the mask stays in place, stamp image on a Post-It® note, making sure that you retain some of the sticky part of the note with your image. If you don't have a Post-It note you can use repositioning glue or tacky glue.
- When you're finished, don't throw away your masks, keep them in your stamp case for future use. You can use them many times.
Penny
Promotions and Specials