Showing posts with label Get Well cards. Show all posts

Monday, May 6, 2024

Words of Comfort FMS Challenge 634

Sometimes you just need some comforting words and to know that someone's thinking of you.  I felt that this week's Freshly Made Sketch challenge with the sentiment on a diagonal would work well for this card. 

Here is Kim's sketch: 

Click here to see details and design team submissions 

Here is my Card: 


I fell in love with the Thoughtful Journey 6 x 6 Designer Series Paper featured in the new Annual Catalogue and decided on a piece that would work perfectly for a background for this card. Each of the 48 double sided papers have wonderful patterns that you can mix and match. They coordinate with Blackberry Bliss, Cajun Craze, Calypso Coral, Lost Lagoon, Misty Moonlight, Peach Pie, Petunia Pop, Pool Party, Pretty Peacock and Wild Wheat cardstocks.

I chose this piece which features some trees and has such a peaceful design.  

Supplies:

Cardstock:  

  • 8 1/2" x 5 1/2" piece of Moody Mauve scored at 4 1/4"
  • 5 3/8 x 4 1/8 piece of Wild Wheat cardstock for mat
  • 6" x 3/4" piece of Whisper White for center strip
  • 5 1/4" x 4" piece of Whisper White for inside mat
Designer Series Paper:
  • Thoughtful Journey 5 1/4 x 4 cut on an angle 
Accessories: 
  • Starform Glitter strips and dots, Blackberry Bliss Ink and a sentiment stamp from the April Paper Pumpkin Delicate Wings stamp set. 


This card came together very quickly.  I hope you enjoyed this post.

Happy Stamping
Penny Tokens Stampin' Spot
Penny Hanuszak, CDN Stampin' Up! Demo since 2006

Visit my Online Store it's open 2/47


Click here for applying Hostess Code to Orders


Tuesday, July 15, 2014

Nautical Get Well

We've been having a heat wave for the last few days and it's brought soaring temperatures and sleepless nights.  So, when you can't sleep you might as well stamp..........right?

I'd been trying to come up with a masculine "Get Well" card and when I checked out this week's sketch on Paper Craft Crew Challenges it grabbed me right away. I love when that happens! 
 Here's the sketch:

You can check out the design team's submissions and other entries by clicking here:  PCCSC #101
Here's my card:
 

As luck would have it, I'd just received an order from Stampin' Up! and was thinking of using some of the new Designer Series Paper (DSP) called Maritime to make a nautical theme card.  One look at the sketch and I knew I would be able to incorporate the DSP and stamps from the Open Sea stamp set into my card.  
The Open Sea Stamp Set is perfect for making masculine cards and teamed up with the new Maritime DSP it's sure to be a big hit. 
For the inside of my card I wanted to make a bold statement so I chose to use the "Get Well" sentiment from a recently retired set called Perfectly Penned*.  I love the script on this stamp and I thought it went perfectly with the Open Sea images.  I stamped it in Real Red ink.  The ship image is stamped in Night of Navy.  The inside layer dimensions are 5 x 3 3/4"
*Some alternative "get well sentiments" from the new 2014-15 catalogue that would work for this card can be found in the following sets:  Fabulous Four on pg 13, Sassy Salutations on pg 67, A Dozen Thoughts on pg 108 and Really Good Greetings on pg 120.

I love the bold written message I used for the front of the card.  The sentiment "Sending Good Thoughts Your Way", is from the Perfect Pennants 10 piece stamp set on page 16 of the catalogue.  When you're looking for sentiments remember that Stampin Up has put together a Greeting Alphabet Stamp Set Index on pages 245 -247 of the catalogue. The Whisper White banner was cut out with the Banner Framelits and the image was popped up with dimensionals on the card face. 

The map image from the Open Sea has been layered with Night of Navy and Real Red card stock that was cut out with the Circles framelits.  The beautiful little arrow comes from the Label Card Thinlets die set.   I used a red Sharpie Marker to colour one of the medium sized Basic Rhinestones and glued it to the tail of the arrow for a bit of bling. 

Supplies Used: 
Stamp Sets:  The Open Sea, Perfectly Penned and Perfect Pennants
Card Stock:  Whisper White, Night of Navy and Real Red
DSP:  Maritime #133696 coordinates with Coastal Cabana, Night of Navy, Real Red and Whisper White
Ink:  Real Red and Night of Navy
Accessories:  Circle Framelits, Banner Framelits, Label Card Thinlets, 1/4" Whisper White Grosgrain Ribbon, Large Basic Rhinestone coloured red with Sharpie Marker, Dimensionals, Paper Trimmer, Big Shot, Adhesive


During the month of July you can buy 3 Designer Series Papers and get a fourth one for free.  That's how I got my Maritime Paper and I'm loving it! 

Here's one last look at my card.  I love how the Maritime DSP gives such a strong nautical image to the face of this card.  The designs are so classic.

Hope you enjoyed this post and will come back and see me again sometime soon.  Please leave a comment if you like this card, it's the only way I know if I'm making something that's appealing to others.  So let me know would you like to receive this card?  I'd appreciate it.

HAPPY STAMPING
PENNY TOKENS

Thursday, February 6, 2014

Circle Thinlet Cards Using Stippled Blossoms

In the past few weeks, Stippled Blossoms  a ten piece Two-Step stamp set from the Idea Book and Catalogue has become one of my favourite stamp sets.  

I really like the old fashioned rose and its many petals and leaves. Every time I stamp with this set I get "wows", and that's pretty special.

Today I'm going to show you two Get Well cards I made with this set and then I'll give you a little primer on the techniques I used to create these beautiful cards.  
Stippled Blossoms Clear-Mount Stamp Set #126747(cm) Price: $22.95 or #132076(w) Price $32.95  Set Quantity: 10

Masculine Get Well Card:  Version One
The first card was designed for a male friend recovering from surgery. Because his surgery was of a serious nature, I wanted a card that conveyed our get well wishes in a masculine fashion but showed how heartfelt we were about his recovery.  I think I captured that with this card which is made with the Circle Card Thinlet.


I used a 51/2 x 8 1/2 piece of  Crumb Cake card stock to make an extended card base for this get well card.  You can see the technique I used in this previous post.  The "Fresh Prints" Designer paper I've used has a wonderful geometric clean masculine design which co-ordinates well with the rose pattern.
Supplies:
Stamp Sets:  Stippled Blossoms, Sincere Salutations (retired)
Card Stock:  Crumb Cake, Early Espresso, Whisper White 
DSP:  Fresh Prints Designer Series Paper Stack from the Occasions Mini #132996
Ink:  Crumb Cake, Early Espresso
Accessories:  Stamp-a-ma-jig, Big Shot, Circle Card Thinlets Die, Basic Pearls, Circle Framelits 2 1/2 Circle Punch, Sponge Dauber, Scissors, Adhesive, Dimensionals.
Circle Card Thinlits Die #133480 Price: $40.95  The amazing Thinlits Card Dies create your card that flips in just one step.


I like the extended card base when using the Circle Card Thinlets.  It gives me more room to write a  message.  I stamped the Get Well sentiment in Early Espresso Ink.  

Supplies:
Card Stock:  Crumb Cake, Real Red, Whisper White 
Stamp Sets:  Stippled Blossoms, Sincere Salutations (retired)
DSP:  Fresh Prints Designer Series Paper Stack from the Occasions Mini #132996
Ink:  Crumb Cake, Real Red and Cherry Cobbler 
Accessories:  Stamp-a-ma-jig, Big Shot, Circle Card Thinlets Die, Basic Pearls, Circle Framelits 2 1/2 Circle Punch, Sponge Daubers, Scissors, Adhesive, Dimensionals.

Feminine Get Well Card:  Version Two


For the feminine version of this card I used a different patterned paper from the Fresh Prints DSP Paper Stack.  I simply love this pattern which incorporates Coastal Cabana, Crumb Cake, Real Red and Whisper White inks. The beautiful vines and flowers really make my rose pop off the page.  This is the perfect card for a girlfriend who is recovering from minor day surgery and needing a cheery little greeting.  


These smaller flowers were also made with the Two-Step Stamping technique and then cut out by hand.  To give them some dimension I used my bone folder to curl the petals and leaves and adhered them to the card front with dimensionals.  The single pearls in the are the perfect touch.

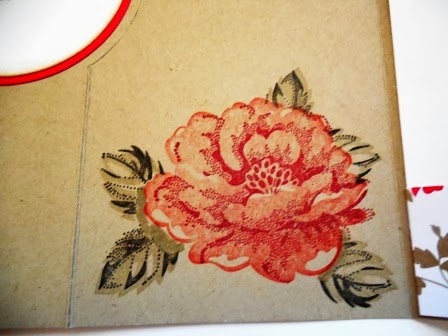
By masking the rose with a cut out of the image, I was able to place the leaves where I wanted them around the main image.  I used the smallest sized basic pearls in the center of the rose.  Don't they look pretty?

I love how the rose on the inside panel of the card stamped out on the Crumb Cake cardstock.  Very  vintage looking. 


This is what the card looks like from the back.

Note:  I didn't realize I had a smudge on my camera lense, so unfortunately in these last couple of photos and in the masculine ones it looks like a red smudge on the cardstock.  Not so, luckily. All is good!

Techniques:
To achieve the perfect rose image I've used a couple of techniques.  One is called Two-Step Stamping and the other is called Masking.

Two-Step-Stamping:
If you've never used a Two-Step Stamp or are unfamiliar with the technique, don't worry because it's pretty straight forward. When you get your stamp set it will have two of each image that is two step.  One will be a flat surface and the other will be a line image.  All you need to do is:

1]   Stamp the base image (solid image) with a lighter ink. 
2]   Position and stamp the overlay image (line image) with a darker ink.  This will provide the details on the image.  

To make sure that everything line's up correctly use a Stamp-a-ma-jig.  I think the Stamp-a-ma-jig is one of the best stamping tools in my tool kit.  It helps me line up sentiments perfectly or work with a mask and have total accuracy.  
Stamp-A-Ma-Jig #101049  Price: $15.50 This is the perfect tool to keep you from ever ruining a whole project with one crooked image! The stamp positioner gives you the ability to place an image exactly where you want it, every time. Allows for fast and precise stamp placement.  The Stamp-a-ma-jig is perfect for word and letter placement.  The kit includes a washable plastic sheet, sturdy plastic construction, non-skid base and instructions.
Masking:
1]   Stamp image on card stock.
2]   Stamp it again on a piece of scratch paper (post it notes work well   because of adhesive on back).
3]   Cut carefully around the scratch paper image, cutting just inside the lines; this will be your mask.
4]   Place the mask on top of the card stock image.
5]   Stamp another image over a portion of the mask to create layered, interacting images.
6]   Remove the mask to see the finished look. 
7]   To stamp a partial image, use tape to cover the part of the stamp you don't want to appear, ink the stamp, remove the tape, and stamp the image.


QUICK TIP 

  • To ensure that the mask stays in place, stamp image on a Post-It® note, making sure that you retain some of the sticky part of the note with your image. If you don't have a Post-It note you can use repositioning glue or tacky glue.  
  • When you're finished, don't throw away your masks, keep them in your stamp case for future use. You can use them many times.

Penny 
Promotions and Specials 

NOVEMBER HOSTESS CODE

Happy November everyone!  I've just returned from vacation and here it is already the 6th of November, the leaves have turned, the elect...