Showing posts with label masking. Show all posts

Monday, January 25, 2021

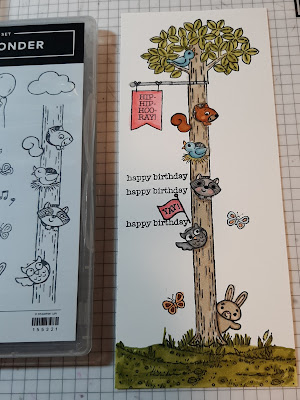
Woodland Wonder Slimline - #FMS469

I liked the layout of Kim's Freshly Made Sketches #469 design and all the great samples by the FMS Design Team this week, so decided to give it a go.

FMS#469

My original plan for this sketch was to create a thank you card using a large font "thank you" instead of the three lines in the sketch.  My "any shape" image was going to be a floral image.  

Well that was the plan when I started out but somewhere along the line it morphed into a slimline birthday card.  That's the fun thing about creativity, you're not always sure where the path will lead.    

Here's My Card:  

My slimline card featuring stamps from the Woodland Wonder stamp set measures 9 x 4 inches.  I cut a piece of Cinnamon Cider card stock that measured 8" x 9" for the card base and scored it at 4".  The first layer is a 7 3/4" x 3 3/4" piece of Old Olive and the Whisper White layer measured 7 1/2 x 3 1/2".  

The Woodland Wonder Stamp Set #155321 includes balloons, animals from the forest, pieces of a tree that you can put together, and great sentiments to let someone know you're thinking of them on their special day. This set features 16 photopolymer stamps, that work well with either the Stamperatus stamp platform or with acrylic blocks a, b, d, i.  This stamp set doesn't have coordinating dies  but at $23.00 CDN it's a terrific value and it's super easy to fussy cut out the images.  This stamp set is available in the January to June Mini catalogue from now until June 2021.  

I stamped "happy birthday" three times on the left hand side of the card, leaving a gap in between number two and three so I could fit in the little "yay" flag. 

I stamped all the images on the card stock using my Stamperatus stamping platform. The platform made it so easy to line up the images.  All of the images were stamped with Momento Tuxedo Black ink and then coloured with Stampin' Blends. Inks used to colour the animals, tree and grasses at the base included light and dark shades of: Old Olive, Crumb Cake, Gray Granite, Smokey Slate, Balmy Blue, Flirty Flamingo, Pumpkin Pie, and Basic Black. 

I re-stamped all the images on masking paper, fussy cut them and applied them over the original images before sponging in the sky with Pool Party ink.  I was so excited to do this step because I purchased the new blending brushes from Stampin' Up and this was my first try with them.  I was not disappointed!  

I stamped all my images on Stamping Masking Paper by Inkadoodle.  This works better than post it notes for me, because they sheets stay tacky for a long time and you can fit a lot of images on them to cut out. Another great thing about this masking paper is the full coverage of the image which makes it easier to sponge over. 

This picture isn't quite right though, because in my eagerness to start sponging, I stamped on the wrong side of the paper. Fortunately I had only cut out one image before discovering the error or my ways.  

Okay, error corrected and everything is masked properly in this photo.  I started blending at the top of the panel and the new blending brush was easy to move around and gave me the exact colouring I was looking for.  I think I am in love!  


To create the grass look at the base of the tree I used a stamp from the By The Dock stamp set. I applied the stamp in various directions to create the uneven ground effect and coloured it with light and dark Old Olive blends.  

By The Dock Stamp has a number of great stamps but the one I've used the most is the little patch of grass.  So versatile.

For the inside of the card I again began with a 8 3/4"x 3 3/4" piece of Old Olive card stock and an 8 1/2" x 3 12" piece of Whisper White. 

I stamped the sentiment "hope your day stacks up to be one good thing on top of another" in Momento Tuxedo Black ink and added the rabbit and balloon to the right side.  The "Happy Birthday"  sentiment is from the Here's A Card stamp set and was  stamped in Old Olive ink.  

It wasn't my intention when I started stamping the inside of this card to have balloons across the bottom, but my inky fingers left some marks that I had to cover up.  The cover-up worked except for the green balloon which seems to be flying a little higher..... oh well.

Well that's it for my post today.  I'm really enjoying the slimline card and glad that I switched gears and made this card.  It gave me an opportunity to try new things like the blending brushes and the Woodland Wonder set.  What fun!  

Cheers and as always, 

Happy Stamping!
Penny Tokens Stampin' Spot
Penny Hanuszak, Independent Stampin' Up! Demonstrator 

JANUARY HOSTESS CODE:

Sale-A-Bration Is On - January 5th to February 28th, 2021
For every $60 and/or $120 you spend from either the Annual Catalogue or the January-June Mini, you’ll earn an exclusive Sale-A-Bration item for free! Depending on the amount you spend, you’ll be able to mix ‘n’ match the Sale-A-Bration items you earn. Stampin' Up! has provided a stunning variety of stamp sets and Designer Series Paper for you to choose from—take a look.


Shop My 24/7 On-Line Store:  Click Here

Thursday, February 6, 2014

Circle Thinlet Cards Using Stippled Blossoms

In the past few weeks, Stippled Blossoms  a ten piece Two-Step stamp set from the Idea Book and Catalogue has become one of my favourite stamp sets.  

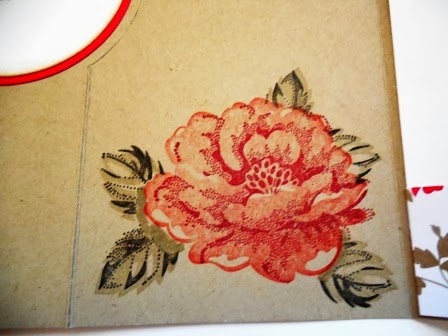
I really like the old fashioned rose and its many petals and leaves. Every time I stamp with this set I get "wows", and that's pretty special.

Today I'm going to show you two Get Well cards I made with this set and then I'll give you a little primer on the techniques I used to create these beautiful cards.  
Stippled Blossoms Clear-Mount Stamp Set #126747(cm) Price: $22.95 or #132076(w) Price $32.95  Set Quantity: 10

Masculine Get Well Card:  Version One
The first card was designed for a male friend recovering from surgery. Because his surgery was of a serious nature, I wanted a card that conveyed our get well wishes in a masculine fashion but showed how heartfelt we were about his recovery.  I think I captured that with this card which is made with the Circle Card Thinlet.


I used a 51/2 x 8 1/2 piece of  Crumb Cake card stock to make an extended card base for this get well card.  You can see the technique I used in this previous post.  The "Fresh Prints" Designer paper I've used has a wonderful geometric clean masculine design which co-ordinates well with the rose pattern.
Supplies:
Stamp Sets:  Stippled Blossoms, Sincere Salutations (retired)
Card Stock:  Crumb Cake, Early Espresso, Whisper White 
DSP:  Fresh Prints Designer Series Paper Stack from the Occasions Mini #132996
Ink:  Crumb Cake, Early Espresso
Accessories:  Stamp-a-ma-jig, Big Shot, Circle Card Thinlets Die, Basic Pearls, Circle Framelits 2 1/2 Circle Punch, Sponge Dauber, Scissors, Adhesive, Dimensionals.
Circle Card Thinlits Die #133480 Price: $40.95  The amazing Thinlits Card Dies create your card that flips in just one step.


I like the extended card base when using the Circle Card Thinlets.  It gives me more room to write a  message.  I stamped the Get Well sentiment in Early Espresso Ink.  

Supplies:
Card Stock:  Crumb Cake, Real Red, Whisper White 
Stamp Sets:  Stippled Blossoms, Sincere Salutations (retired)
DSP:  Fresh Prints Designer Series Paper Stack from the Occasions Mini #132996
Ink:  Crumb Cake, Real Red and Cherry Cobbler 
Accessories:  Stamp-a-ma-jig, Big Shot, Circle Card Thinlets Die, Basic Pearls, Circle Framelits 2 1/2 Circle Punch, Sponge Daubers, Scissors, Adhesive, Dimensionals.

Feminine Get Well Card:  Version Two


For the feminine version of this card I used a different patterned paper from the Fresh Prints DSP Paper Stack.  I simply love this pattern which incorporates Coastal Cabana, Crumb Cake, Real Red and Whisper White inks. The beautiful vines and flowers really make my rose pop off the page.  This is the perfect card for a girlfriend who is recovering from minor day surgery and needing a cheery little greeting.  


These smaller flowers were also made with the Two-Step Stamping technique and then cut out by hand.  To give them some dimension I used my bone folder to curl the petals and leaves and adhered them to the card front with dimensionals.  The single pearls in the are the perfect touch.

By masking the rose with a cut out of the image, I was able to place the leaves where I wanted them around the main image.  I used the smallest sized basic pearls in the center of the rose.  Don't they look pretty?

I love how the rose on the inside panel of the card stamped out on the Crumb Cake cardstock.  Very  vintage looking. 


This is what the card looks like from the back.

Note:  I didn't realize I had a smudge on my camera lense, so unfortunately in these last couple of photos and in the masculine ones it looks like a red smudge on the cardstock.  Not so, luckily. All is good!

Techniques:
To achieve the perfect rose image I've used a couple of techniques.  One is called Two-Step Stamping and the other is called Masking.

Two-Step-Stamping:
If you've never used a Two-Step Stamp or are unfamiliar with the technique, don't worry because it's pretty straight forward. When you get your stamp set it will have two of each image that is two step.  One will be a flat surface and the other will be a line image.  All you need to do is:

1]   Stamp the base image (solid image) with a lighter ink. 
2]   Position and stamp the overlay image (line image) with a darker ink.  This will provide the details on the image.  

To make sure that everything line's up correctly use a Stamp-a-ma-jig.  I think the Stamp-a-ma-jig is one of the best stamping tools in my tool kit.  It helps me line up sentiments perfectly or work with a mask and have total accuracy.  
Stamp-A-Ma-Jig #101049  Price: $15.50 This is the perfect tool to keep you from ever ruining a whole project with one crooked image! The stamp positioner gives you the ability to place an image exactly where you want it, every time. Allows for fast and precise stamp placement.  The Stamp-a-ma-jig is perfect for word and letter placement.  The kit includes a washable plastic sheet, sturdy plastic construction, non-skid base and instructions.
Masking:
1]   Stamp image on card stock.
2]   Stamp it again on a piece of scratch paper (post it notes work well   because of adhesive on back).
3]   Cut carefully around the scratch paper image, cutting just inside the lines; this will be your mask.
4]   Place the mask on top of the card stock image.
5]   Stamp another image over a portion of the mask to create layered, interacting images.
6]   Remove the mask to see the finished look. 
7]   To stamp a partial image, use tape to cover the part of the stamp you don't want to appear, ink the stamp, remove the tape, and stamp the image.


QUICK TIP 

  • To ensure that the mask stays in place, stamp image on a Post-It® note, making sure that you retain some of the sticky part of the note with your image. If you don't have a Post-It note you can use repositioning glue or tacky glue.  
  • When you're finished, don't throw away your masks, keep them in your stamp case for future use. You can use them many times.

Penny 
Promotions and Specials 

NESTS OF CHRISTMAS PAPER PUMPKIN ALTERNATIVES USING #fms#662

 Here's the latest sketch challenge from Freshly Made Sketches #662 and designed by Jen T.  Make sure you check out the Design Team car...