Showing posts with label Feminine Cards. Show all posts

Wednesday, December 6, 2017

Watercooler Wednesday Challenge #148 -Heidi's Feminine "Anything Goes"

Hi Stampers.  Wow the time is zipping by and once again it's time for the Watercooler Wednesday challenge.  This week's challenge is hosted by Heidi Weaver and she's challenging us to make a Feminine "Anything Goes" card or project. 
We hope you'll join in the fun and enter one of your own creations.   All you have to do is make a Feminine themed card or project and link it through your  post to our Linsky and follow a few simple rules.  What could be easier?  All the stuff you need to know about playing along is located on the Watercooler Wednesday Challenge Main PageOur Linksy is open until 5:00pm  Mountain Time on Monday December 11th.  


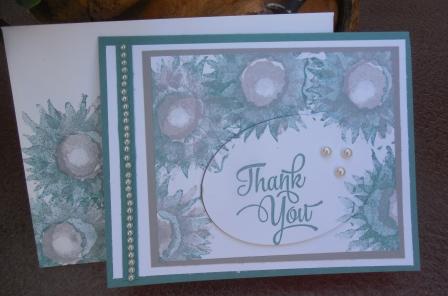
Here's My Feminine Card:

Supplies:
Stamps: Painted Harvest, One Big Meaning
Ink: Lost Lagoon, Smokey Slate
Card Stock: Lost Lagoon, Smokey Slate and Whisper White
Accessories: Big Shot, Paper Trimmer, Ovals Framelits, Stitched Rectangular Dies, Basic Pearls, Dimensionals, Tom Bow Glue.


Some Details:
1. The card base is an 8 1/2" x 5 1/2" piece of Lost Lagoon card stock scored and folded at 4 1/4". Lost Lagoon is a retired In Colour from Stampin' Up!

2. The first layer of this card is a piece of Whisper White card stock measuring 4" x 5 1/4" and adhered to the card base.

3. The third layer is a 4 3/4" x 3 3/4" piece of Smokey Slate card stock adhered to the top right hand side of the card leaving a 1 5/8" gap on the left hand side.


4.  The final layer is a 3 1/2" x 4 1/4" piece of Whisper White.  This layer is stamped with the Painted Harvest two step sunflower around the outer edges and top of the panel.  The first layer of the flower is Lost Lagoon followed by Smokey Slate for the second flower and the inner part of the flower is Smokey Slate.  
5.  Before adhering the panel in step 4, stamp the "thank you" sentiment from One Big Meaning in the middle white space on the panel.  Cut out this piece with a 3" oval from the Oval die cuts set.  Once the main panel is adhered to the Smokey Slate panel, attach this oval with Dimensionals in its original slot.  Add three medium sized Basic Pearls to the side of the oval. 


6. Cut a 1/4" x 4" strip of Lost Lagoon and adhere it to the center of the white margin on the left hand side. Run a strip of Basic Pearls down the center.

7.  For the inside of the card cut a 5 1/4" x 4" panel of Whisper white.  Stamp the sentiment "Your Kindness...." and a couple of the flowers in Lost Lagoon and Smokey Slate inks.  Make an envelope to match.
I have to apologize for the poor quality of these photos.  They simply don't do the card justice.  Apart from that I hope you've enjoyed this card.  I simply love these flowers and the soft muted images you can obtain by matching two coordinating colours.  I'd love to hear from you so please let me know if you like these images too.  

Make sure you check out the other design team artists and their beautiful creations in this week's challenge. 
Before I go just a reminder that we're looking for a new Design Team Member to replace Libby Fenn's on our team.  If you're interested all the details on how you can be considered are on the beginning of this post.  Check it out here.
Happy Stamping!
Penny Tokens Stampin' Spot

Wednesday, November 1, 2017

Watercooler Wednesday Challenge #143 - Gail's Feminine "Anything Goes"


Gail Allen is hosting our Watercooler Wednesday challenge this week and is challenging us to make a Feminine card.  It can be for any occasion or event and it can even be a 3-D, so long as it captures a feminine element.   The challenge is open until 5:00pm MST on Monday November 6th , so if you're interested why not join us and link up your creation.  


Here's My Card:
I haven't had much of an opportunity to use the new Powder Pink Incolour since it came out in June, so I thought this week's Feminine challenge would be the perfect time to try it out.   I also needed a few "Thank You" cards for female friends so the timing was perfect.


This was a super easy card to make, it just required stamping and paper trimming.  What could be easier.

Supplies:
Stamps:  Painted Harvest #144783
Ink:  Smokey Slate and Powder Pink
Card Stock:  Basic Gray and Powder Pink
Accessories: Paper Trimmer, Acrylic Blocks, and Tom Bow Glue

Details:
I am so pleased with this two-step Photopolymer stamp set because it stamps beautifully every time and is very versatile. The Powder Pink and Smokey Slate combo created a very dreamy, feminine looking floral image. I absolutely love it!

 I started with an 8 1/2" x 5 1/2" Basic Gray card base, scored and folded at 4 1/4".  I added a 4" x 5 1/4"  layer of Powder Pink, followed by a 3 3/4" x 5" layer of Whisper White.  I cut a 4" x 5 1/4" piece of Whisper White for the inside panel.  


I began stamping three of the large floral images in Powder Pink on the left hand side of the Whisper White Panel. The flowers do not overlap and I didn't require a mask.

Next I inked up the smaller floral image with Smokey Slate ink and stamped over top of the first three images.  To add just a bit more definition and colour to the flowers I re-inked then re-stamped the image shifting the placement just a tad clockwise.  Perfect! 

The center of the flower is stamped in Powder Pink and the small dotted image is in Smokey Slate.  The sentiments are stamped in Smokey Slate.  I stamped two flowers on the inside panel and added the sentiment. 
I stamped envelopes with the floral image too, but forgot to take a photo. My friends loved these cards.

Another Card:
I also want to share another Thank You card and envelope made with the same stamp set but in fall colours.  

These were stamped with Crushed Curry, Old Olive and Tangerine Tango inks and layered on matching card stock.  I used my rectangle stitched dies (non SU) to cut out the layers, which adds much more sophistication to the card. Using a sponge dauber and Crushed Curry ink, I also stenciled the back ground after the floral images were stamped using the diamond patterned stencil from the Pattern Party Decorative Masks set.  
I loved the colour combination and the addition of leaves and stenciling design in this card and making these cards almost became addictive.  Here are some more images of this card and envelope.


Love the way this stamped on the envelope and picked up  the fibers from the paper.  Beautiful!
Okay, that's it for today.  I hope you liked my thank you cards using the Painted Harvest Stamp set.  I'd love to hear your thoughts on these cards.  If you haven't seen the wonderful selection of cards from our Design team yet don't forget to check them out.  Click here to return to the Watercooler Wednesday Home page.  

Happy Stamping!
Penny Tokens Stampin' Spot 

Wednesday, July 5, 2017

Watercooler Wednesday Challenge #126 - Fiona's Feminine "Anything Goes" Challenge

Well it's a whole new month, and we're starting it off with a fresh new look.  What do you think of our new banner and badges?  It was time to update our Watercooler Wednesday image and I think that Heidi Weaver and Marsha Reid have done an excellent job of recreating our look.  I'm loving it and I think it's very modern and cool looking.  

This week's WWC126 challenge, hosted by Fiona Whitehead has a "Feminine" Anything Goes theme. 
If you're interested in playing along with this challenge all the rules can be found on the Watercooler Wednesday Home Page.  This challenge runs until 5:00pm MT Monday June 10th, 2017.   

Here's My Card: 
With summer finally heating up this week, I've noticed one of Nature's true wonders, the dragonfly, is back.  I've spotted several around my garden and have watched them in fascination.  Because they've so inspired me, I decided to feature dragonflies on my Feminine "Anything Goes" card this week.


Supplies: Stamp Sets:  Dragonfly Dreams and Beautiful You
Card Stock:  Whisper White and Tranquil Tide
Ink:  Tranquil Tide
Accessories:  Paper Trimmer, Basic Rhinestones, Tom Bow Glue, Wink of Stella, Score Pal.


Dimensions:1.  Card Base measures 8" x 7 1/4" and is scored at 4". Whisper White.

2.  1st Layer - 3 1/4" x 6 5/8" Tranquil Tide

32nd Layer - 3 1/8" x 6 1/2" 

4.  I stamped two Dragonfly images from Dragonfly Dreams on the 2nd layer in Tranquil Tide ink and added 5 Basic Rhinestones to the body of each of them.  The sentiment "Live with Passion, Laugh Out Loud and Love Deeply " is from the Beautiful You stamp set.   Wink of Stella was brushed across the wings to add some magical shimmer.

   
5.  Even Clean and Simple cards sometimes need a little boost of elegance, so using my Score Pal I scored a line 1/4" around the Tranquil Tide layer on the card front.

6.  I stamped the dancing girl and the sentiment "Life Looks Beautiful on You", in Tranquil Tide ink in the bottom right hand side of the card base inside the card.  
So that's it for this week's post.  Thanks for dropping by to take a look.  I hope you liked the clean and simple lines of this card.  Leave me a comment if you get a chance and come back next week for another great Watercooler Wednesday challenge.

Happy Stamping!
Penny Tokens Stampin' Spot

Tuesday, April 9, 2013

All Dressed Up Birthday Card

April is another busy birthday month for me, starting off with my dear mom's birthday on the 4th.  She was 91 this year........... it's amazing considering all she's been through!  Then my girlfriend's birthdays start and there are several, plus a graduation from business college.   

In preparation for this month long celebration of "girlie" life events I  ordered the All Dressed Up Bundle, Dress Form Pop n' Cuts and the Card Base Pop n' Cuts Big Die Cuts from the Spring Catalogue.  

I knew these exciting new products were going to come in handy for making birthday and celebration cards for my girlfriends and family members, but I didn't know just how much I would fall in love with them.  It's like being twelve again and playing with my Katie Keen cutouts!. 

So naturally, I'm really excited to showcase my first "All Dressed Up" card for you.  I know you're going to like it too (at least I'm hoping you'll tell me whether you like it or not)! 


This picture is of the card front.  I cut the card base with the Pop n' Cuts Card Base Die using a 4 1/4" x 11" piece of Primrose Petals Card Stock.  This card base is very unique to Stampin' Up! as there are two slits at one end and the card base to close the card and a scrolled end which adds a little extra pizzazz to the card.  I layered up the stamped image on Pear Pizzazz, Primrose Petals and Whisper White card stocks.  The stamp image is a from a retired SU stamp set called Roses in Winter.  Although this image is no longer available, you could create a similar card using a more current version of this fabulous 2-step stamp set called Stippled Blossoms (Item #126745/126747 on page 78 of the IB&C). 

The images were stamped in Pear Pizzazz and Primrose Petals inks and then I used a Color Spritzer Tool to create a spattered look with markers. Three Basic Pearls complete the picture. 

Now there should be a drum roll here as I open the card because this is the show stopper.  At least I think so!!!!!
  
Just look at this dress and sweater set, isn't it simply the cutest? Very vintage and cool looking.  


I used some retired designer series paper for the inside of the card and the dress.  I really liked the "wallpaper" look achieved with this soft two-toned striped paper, and I think it  showcases the dress rather nicely. 

And, what entryway wouldn't be complete without a mirror?  Easy enough to add simply by cutting a small oval piece of Silver Glimmer Paper for the mirror  and adding a frame in Basic Gray.  Both ovals were cut out with the new Ovals Collection Framelit Dies, another great accessory from the Spring Catalogue.  

This picture shows the inside of the card.  It really pops up beautifully when opened.  I added a sentiment card layer in Whisper White and Pear Pizzazz card stock and stamped a small rose from the retired set called Baby Blossoms. Again Stippled Blossoms would achieve the same look. The sentiment is from another retired set called Happiest Birthday Wishes
Although not a very clear image, this will give you an idea of how the Pop Up works.  It doesn't show it fully extended as I was trying to juggle the camera and the card...........where's my husband when I need him.  Anyway, I' sure you you get the drift!
  • And here's the dress - isn't it just the cutest? I used the sleeved version of the dress in the All Dressed Up Framelits package.  
  • The DSP pattern is the reverse side of the striped paper. 
  • It was very simple to add a cardigan sweater to this outfit.  I wanted the sweater to come down over the dress hips, so used a 2" scrap of Pear Pizazz card stock over the framelit die.  Once the sweater was cut out, I scored the center on my Simply Scored board and cut it down the center to give me two sweater pieces.  The sweater pieces were arranged on top of the dress, so a little bit of the neckline on the dress showed. Small basic pearls were used for the buttons.  
  • I made a dicky out of a piece of scrap left from removal of the sweater neckline. The addition of this small piece seemed to tie in the dress and dress form better.  
  • The dress form which is another one of the framelit dies was cut out in Primrose Pink for contrast and glued on top of the dress form in the Pop n' Cuts outline. This adds a little more stability to the dress form.  
  • Finally, five medium sized Basic Pearls that come on the adhesive strip in the package, were used for the necklace.    

I'd sure like to hear your thoughts on this new card style and the design.  I know that the Pop N' Cuts Bigz Die Card Base and accessories will become one of my go-to tools in my accessory box this year, there is just so much more that can be done with them.  I hope to share lots of cards and 3D items using these stamps and accessories over the coming days/weeks.  

Now I'm off to create some more birthday cards..............stay tuned. 


Click Here to Visit My On-Line Store


LINKS TO CURRENT PROMOTIONS AND CONTESTS
CHECK THEM OUT:
Current Promotions:
  1. Spring Surprise Promotion – March 15 to May 30, 2013 
  2. Special Delivery – Sent With Love 
  3. This and That Promotion  
  4. Single Stamps Promotion – Extended to July 31st, 2013 Because of Enormous Response
a.    Assortment 3 
b.
  Assortment 4


  Contests:   
  1. Win a Trip to San Diego - Contest Closes April 30th!
  2. LNS Treasure Hunt Blog Hop - Win $150 in Stampin' Up! Products

Thanks for visiting my blog, I really appreciate it! Happy Stamping!  Please leave a comment if you liked this post and found it helpful!


Email:  pennyhanuszak@telus.net

Paper Pumpkin Alternative April 2024 Delicate Wings and TSOT Challenge:

I'm quite liking this sketch challenge by the gals at T ry Stamping on Tuesday (TSOT) , so have decided to give it a go.  This is a thre...