Showing posts with label Birthday Card. Show all posts

Monday, August 31, 2015

Butterfly Diagonal Pop Up Card

I love learning new techniques and fancy folds are among my favourites.  For today's card I was enchanted with a new to me fold called "Diagonal Pop Up" fancy fold. Now I've seen these folds in store bought cards, but I've never attempted to make one myself.  Trust me this fold is super easy and if I can do it without pulling out my hair then so can you.

Here's my card front:

I cut a piece of Whisper White card stock measuring 3 5/8" x 5 1/2" for the center panel of the card front.  I die cut two of the large butterfly images from this piece and then embossed it with the Elegant Dots TIEF.  I cut another piece of Whisper White Card stock the same size as the first and adhered it with dimensionals behind the front panel.  I stamped the butterflies through the opening created by the larger butterfly framelit. 

I love all things glittery so to pop up the impact of the front of this card I added two 1/2" x 5 1/2" strips of silver glimmer paper on either side of the white panel before it was adhered to the card front.  Sticky strip doesn't always stick to glimmer paper, so instead of using that I put two thin strips of Tom Bow glue down each of the sides on the back of the Whisper White panel and then adhered the Glimmer strips, making sure they were showing the same width on each side of the front panel.  I also added some more bling with four large Basic Rhinestones on the bottom right hand side of the card front.   The sentiment "Sending Wishes Your Way" is from the Basic Butterfly stamp set. 
Inside of the Card:
Okay, so there's nothing major exciting about the front of my card other than the butterfly images inside the cut-a-ways. Right? So where's the magic and wow factor? 

Drum roll please...........are you ready?  What's truly exciting about this card is the fancy fold on the inside of the card! That's where the surprise lays. 


Isn't that impressive?  I thought so too, but I probably wouldn't have made this card without the inspiration and help of one of my favourite super-talented and creative stampers, Julie Davidson.   I subscribe to Julie's blog posts and newsletters, and there is always something she shares that I find interesting and helpful.  

Recently Julie posted a great video tutorial showcasing the Watercolour Wings stamp set and Bold Butterfly framelit dies.  She demonstrated a new to me fancy fold card called a Diagonal Pop Up.  How exciting!  Her card was inspiring and I loved this technique so I just had to make this card.  Rather than me giving you a step by step tutorial on how to make my card, I'm going to let the video speak for itself and share her link. Go ahead, just click on this link for her video and you'll see what I mean by super easy and fun! 

Supplies For My Card:
Stamps: Wonderful Wings Bundle , Basic Butterflies
Card stock: Elegant Eggplant, Whisper White, Silver Glimmer Paper
Ink: Elegant Eggplant, Perfect Plum, Wisteria Wonder
Accessories: Bold Butterflies Thinlet dies , Basic Rhinestones, Adhesive, Elegant Dots Textured Impressions Embossing Folder (TIEF), Dimensionals, Trimmer with Scoring Blade, Big Shot, Pencil
 
Bundle and save! Buy these two coordinating products for $45.00 CDN and save 15%.

The 15 image Watercolor Wings Photopolymer Stamp Set has made stamping classic butterflies even better by putting them in a Two-Step Stampin' set. Two-step sets have a base image and overlay images that you can combine over the base image. Use any combination of ink colors to create fantastic butterfly images. Suggested clear blocks (sold separately): a, d, e, g.

The Bold Butterfly Framelits Die set is comprised of 2 dies.  There is a large open image butterfly that measures 3-1/8" x 2-1/8" and a smaller delicately detailed butterfly that measures 2" x 1-3/8". 

 Cutting Instructions for Diagonal Pop Up Card:

  1. The card base is Elegant Eggplant and the card stock measured 5 1/2 x 8 1/2 and is scored at 4 1/4.
  2. The inside card panel is cut from Whisper White card stock and measures 7 1/2 x 4 3/4".  It is scored at 3 3/4".
  3. Using a ruler and a pencil measure 2 1/2" from the center score line to both the right and left of the inside card panel and make a small erasable pencil mark.  
  4. Measure 2 1/2" from the top of the center score line towards the bottom of the inside card panel and make a small erasable pencil mark. 
  5. Starting from the right side line up the top and center pencil marks using the score line on your paper trimmer and score to where they meet.  Repeat this process for the left hand side of the panel. 
  6. Erase pencil marks and Fold first on the center score line and then each of the side score lines, so that when the card panel is opened up a triangle pops up in the center.  
  7. I stamped and cut out a butterfly image and adhered it on the left side of the triangle with two dimensionals.
  8. Stamp your sentiments and any other design you want on your card panel and then adhere the panel with Tom Bow or other adhesive.  Tip:I applied the adhesive around the two sides of the panel to the beginning of the triangle at the top of the panel, and along the bottom of the panel. Make sure there is no adhesive on the triangle portion of the panel.  Once all the adhesive was added, I folded the panel at the center score line and then lined it up with the center score line of the card base and then closed the card.  When you do it this way, everything lines up perfectly.  
I hope you enjoyed this card and my tips and will try this out yourselves.  Let me know if you would make this card.  Right now I can think of all different kinds of things I can put on this pop up.  

How about you?  I want to know so leave me a comment and let me know what kind of card would you make and what stamp set or sets would you use to create it?  Please let me know. 

Happy Stamping!
Penny Tokens   

Saturday, August 1, 2015

Sprinkles of Life Birthday Card


Samples from pg 189 of the Share the Fun Annual Catalogue
I purchased the Sprinkles of Life stamp set featured on page 189 of Stampin' Ups! new "Share the Fun" 2015-16 catalogue, and I'm having so much fun with it. 

This very special stamp set has 22 images.  It's a two-step Photopolymer stamp set that co-ordinates with the brand new Tree Builder punch seen on page 167 of the catalogue.   Two-step stamping is a really great way to layer your images.
Sprinkles of Life 22 Photopolymer stamps in English (139971) or French. Use clear acrylic blocks - a, c and g.  
Tree Builder Punch Item #7.  Multiple shapes for layering and more.  $22.00
Besides all the great sentiments and images in this set it's very special for another reason.  The purchase of this stamp set can "Make a Difference" to families with children who are receiving medical treatment far from home and supported through Ronald McDonald House Charities (RMHC).  Stampin' Up! donates $3 to RMHC from the purchase price of every Sprinkles of Life stamp set sold.  Todate, Stampin' Up! has donated  over a million dollars to RMHC and their network of local RMHC chapters.  Isn't that awesome?

Whatever your celebration is and whether you want to stamp a tree, an ice cream cone or a cupcake, this stamp set's got it all.  Here are some fun projects I've made with the set.  

My Sprinkles of Life Birthday Card was inspired by Carol Payne's recent post in which she combined this set and the Mini Gift Bag Thinlet to make a gift card holder. Great idea! 

Here's my version:

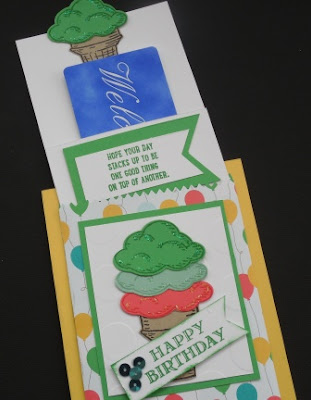
I made a whole card, using Daffodil Delight for the card base, and I mounted the Mini Gift Bag to the front of the card.   I've added an insert with the gift card.  Here's a view of the outside front of the card.  I luv, luv, luv it! 

And, this is what it looks like opened to the center of the card.  Lots of room for writing a note and birthday wishes.
I used the  Big on You (retired) stamp set for the inside of the card.  Love the Cucumber Crush ink  with the Daffodil Delight

 Here are some more pictures showing the detail:

I love adding the Dazzling Details to these scoops of ice cream.  It just seems to bring them to life.  I also am a fan of the Big Dot Embossing Folder which adds just a subtle hint of texture behind the cone and ties in with the balloons on the designer series paper. 
 The sentiment is from the Sprinkles of Life set.  The tag was cut out with the Banner Triple punch.  The insert for the Gift bag was made with a


The ice cream on the top of the cone is used to pull the gift card from the gift bag, so you need to ensure it's really mounted securely to the top of the white card stock piece. 


Another project I made using the "ice cream cone" images from the stamp set was rosettes for my summer banner.  The ice cream cones just added the perfect touch.  Here are some close-ups:


Well that's it for today, but I'll be back on August 20th along with the other members of the Wacky Watercooler August Blog Hop.  We'll each be presenting two projects focusing on the Sprinkles of Life stamp set.  I can't wait to see what everyone comes up with.  Hope you'll bookmark that date and drop by for a visit!

Thursday, July 9, 2015

CMCC#79 - Colour Me... Striking!

What a great combination of colours for this week's Colour Me challenge. They are Bermuda Bay, Marina Mist and a neutral of your choice. I chose white to offset these beachy summer colours.  

Here's My Card:
I  really like the fern fronds in the Butterfly Basics stamp set and decided to combine them with the butterflies on my birthday card.  


1.  The Bermuda Bay card base measures 8 1/2 x 11 and is scored at 5 1/2.  I embossed it with the new Elegant Dots Textured Impressions Embossing Folder (TIEF).
2.  The Whisper White mat measures 3 1/4" x 5 1/8".  The Marina Mist, Bermuda Bay and Whisper White strips on each side of the white mat measure 1/4" x 5 1/8" and were adhered with Tom Bow glue.
3.  I stamped the large lacy butterfly in Marina Mist on the bottom of the Whisper White mat.  I re-stamped this image on a post it note and used that as a mask before stamping the ferns.  The ferns were stamped in Bermuda Bay.  I only inked the stamp once and then after the first image was stamped I moved the stamp towards the left and re-stamped and then repeated this for the last image.  Note:  Don't raise the stamp in between stamping just turn a little on an angle and repeat.  You'll wind up with a nicer more evenly balanced image as the colour gradually fades out.
4.  I stamped the three small butterflies on the Whisper White card mat.  I re-stamped them on a scrap of Whisper White and cut them out with the Bitty Butterfly punch and adhered to the card base with dimensionals.  Two were stamped in Bermuda Bay and the third is in Marina Mist.  Small basic rhinestones were added for some bling to the centers of each of the butterflies. 
5.  The "Happy Birthday" sentiment from Butterfly Basics was stamped across the center on an angle in Marina Mist ink. 
6.  The whisper White card mat for the inside of the card measures 5 1/4" x 4". 7.  I stamped the greeting "Sending Good Thoughts Your Way" from the Perfect Pennants stamp set and the Butterfly in Marina Mist.  The ferns were stamped in Bermuda Bay ink.
Supplies:
Stamp Sets:  Butterfly Basics and Perfect Pennants
Ink:  Marina Mist and Bermuda Bay
Card Stock:  Whisper White, Bermuda Bay and Marina Mist
Accessories:  Elegant Dots TIEF, Big Shot, Bitty Butterfly punch, Basic Rhinestones, dimensionals and Tom Bow glue. 

Thanks as always for by.  

Happy Stamping!
Penny Tokens 

Sunday, June 28, 2015

Peek-A-Boo Flip Top Card

On May 28th and June 18th I posted some cards that used a technique called the "Peek-A-Boo Flip"  or "Fold Over Window" card and I promised to give you  some information on how to create them. Sorry that it took so long and I missed a couple of deadlines. 

As mentioned in my Wacky Watercooler Blog Hop post, I found the original design, a graduation card, on Glenda Caulkin's blog.  She had designed a card for her nephew and did a great video showing how she did it. 

I also came across a Sympathy Card created by Dawn Olchefske's called A Fold Over Window Card.  Dawn's video is also an excellent source for information on measuring correctly. 

Okay, so what did I do for my cards?  Well, here's a birthday card I made featuring the Celebrate Today stamp set:


Supplies: 
Stamp Set:  Celebrate Today
Ink: Watermelon Wonder (New In Colour Ink - 2015-2016 Annual Catalogue)
Card Stock: Bermuda Bay, 
DSP:  New - Cherry on Top DSP 2015-2016 Annual Catalogue 
Accessories:  Trimmer, Embossing Folder, Big Shot, Balloon Framelit Dies (coordinates with the  Celebrate Today stamp set or can be used on it's own), sponge daubers, Mono Adhesive,

Assembly:

1.  To begin, make all your paper cuts as follows:
  • 1 piece of 3 1/4" x 11"co-ordinating card stock for flip panel, score at 5 1/2"
  • 1 piece of 4 1/4" x 5 7/16" co-ordinating card stock for the card base 
  • 1 piece of 3 x 5 7/16" Whisper White card stock for the center panel
  • 2 strips of DSP or cardstock measuring 1/2" by 5 7/16" for the decorative panels.
2. Decorate the front of the 3 1/4" x 11 flip panel in your style by:
  • stamping or embossing the flip panel to fit your design
  • using a die cut or punch to cut a piece for the window or peek a boo opening. 
3.  To assemble the inside of the card:
  • Stamp images and/or sentiment on the inside panel.
  • Glue the Whisper White panel to the center of the card base.  Tip: I line up the card base and center panel using grid paper, when I can see that it's even on both sides I adhere the white panel
  • I use Tom Bow glue to adhere the two decorative strips along the edges of the white center panel.  Make sure that these pieces line up at the top and are butted up tightly against center panel. Once you've adhered these pieces, flip the card base over and trim away any overlapping edges along the top and bottom of the card base.
  • To finish the front of the card, center the flip panel, against the front side of the card base.  Again I'd recommend using the grid or a ruler to make sure the flip piece is evenly lined up on both sides of the card base.  Next I add Tom Bow glue to the back of the panel and re-center the piece being careful not to get glue on anything. Once you're satisfied with the placement lay the card down and press so the back of the flip panel attaches to the back of the card base.    When you use Tom Bow glue, you still have an opportunity to reposition the card piece if it isn't quite centered.  
This Peek-a-Boo Flip Top fancy fold can be used for any occasion.  Your imagination and creativity are the only limits for making this very versatile, inexpensive and fun card.  Here are some other cards I've made using this technique:

Sympathy Card:
I wanted a simple and clean looking Sympathy Card that didn't involve a lot of layers. For this card, I stamped the cross hatch image in Smokey Slate and the flower from the "You've Got This" stamp set in Elegant Eggplant on the flip panel of this card.  

The opening was die cut using the small label from the now retired Thinlets Card Labels die set. The inside sentiment is from the Petite Pairs stamp set.  I chose Smokey Slate for the card base cut the two decorative strips from Elegant Eggplant that was embossed with the Lovely Lace embossing folder.


It's a little hard to see but I took the fine tip of my Elegant Eggplant marker and outlined the center parts of the flowers to make them standout a bit more.  It worked beautifully and there's just a hint of a darker shade of Eggplant which was perfect.

I repeated the flower image on the inside of the card but I stamped off before adding the image so that it was a bit softer.  

Graduation Card: 
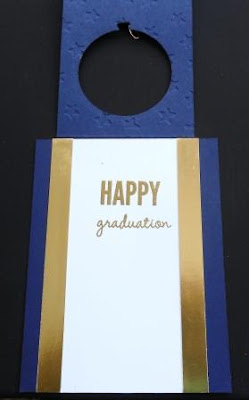
Once again, here's the graduation card I made for my niece who recently graduated. I pretty much CASED this card from Glenda Caulkin's, as noted above.  

I did the card base in Night of Navy card stock, and the two decorative panels were cut from Gold Foil sheets.  Love that stuff!  

The "Celebrate Today" Photopolymer stamp set was a perfect choice for this joyous occasion.  I love the versatility of the images and sentiments in this set. Tip: if you're searching for this set in the catalogue and can't find it, that's because it's filed under "Everyday Occasions" rather than birthdays, because it's one of those sets that's just so much more.  

I embossed the Happy Graduation sentiment and balloon tail with Gold Embossing powder.  The front of the flip panel is dry embossed with the Lucky Stars Embossing Folder.  Metallic Gold thread was used for the bow on the balloon base. 


Christmas Card:  
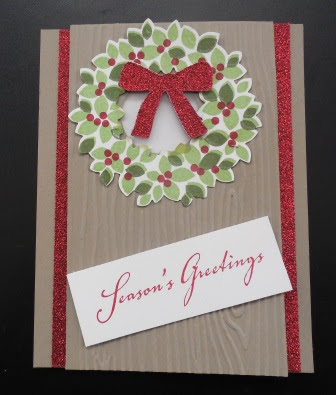
Here's an early Christmas card made with this same technique.  This card is going to be one of my Christmas in july Stamp-a-Stack cards because it's so quick and easy to assemble. 

I used Tip Top Taupe one of the new In Colours for the card base and flip panel piece.  I dry embossed the Flip Panel with the Woodgrain Embossing Folder and cut out the hole with a 1 3/8" circle punch.  

The wreath is from the Wondrous Wreath stamp set and it was cut out with the coordinating Wonderful Wreath framelit dies.  I'm so happy that both of these products were carried over from the Holiday Occasions Catalogue.  

I love all the accessories that come with the Wonderful Wreath framelit dies including the little bow?  It's the perfect size.  I cut the decorative panel pieces and two bows from Red Glimmer paper .  I glued the bows together so that the glimmer paper is showing on both sides, before I attached it to the wreath with glue dots.  

While you can't see it in this photo, I've added a window transparency sheet behind the wreath so it looks like it's hanging over a real door window.  I cut out the window sheet with a 1 3/8" circle punch and adhered it to the back of the wreath.  I didn't want all the leaves showing through the transparency so I re-cut the Tip Top Taupe 1 3/8" circle negative with a 1 1/4" circle punch and attached it behind the wreath.  You can see it in the second picture below.


You can see the second bow and the inner circle I made with Tip Top Taupe, to hide the unfinished back of the wreath.  


Well that's it for this post.  I hope I've shown you how much fun and how versatile this  Peek-a-Boo or Fold Over Window card can be, and I hope my instructions as well as the video links were easy to follow.  Look forward to hearing your comments.

HAPPY STAMPING!
PENNY TOKENS 

Thursday, June 18, 2015

The Wacky Watercooler Blog Hop Welcomes the New Annual Catalog(ue)


Hi everyone and welcome to my contribution to the June Wacky Watercooler Blog Hop

This month we're celebrating the launch of the new 2015-2016 Share the Fun Annual Catalogue, and projects related to Father's Day, Graduation and "something new".  

There are lot's of participants in this blog hop so I hope you'll play along and visit everyone's site between now and Saturday night (June 20th).  There are some awesome projects that I know you're going to love!

If you've been following the blog hop from the beginning you will have arrived here from the wonderful and talented Jackie Susnick's blog.  

Father's Day Project:

For my first project, I've made a Father's Day Card using the Guy Greetings stamp set featured on page 98 of the catalogue. Before I share my card, I just want to express how grateful I am that this stamp set was carried forward from the Spring Occasions catalogue.  It is probably one of the best male themed stamp sets I've used in a long time. 

Guy Greetings Stamp Set #137178 is a 22 piece stamp set that comes in Clear or Wood Mount and Photopolymer, and is available in English and French versions.  
Here's My Card:
Love that Tip Top Taupe Striped paper from the Cherry on Top DSP Paper Pack. 
Supplies:
Cardstock:  Whisper White, Chocolate Chip, Watermelon Wonder and Tip Top Taupe
Ink:  Tip Top Taupe,  Watermelon Wonder
DSP: Cherry on Top  Designer Series Paper Stack #138443
Accessories:  Extra Large and Large Oval Punches, 1" and 1 1/4" square punches, scissors, trimmer, adhesive and dimensionals.  


Graduation Card 
Since my niece is graduating this month, I wanted to make her a special graduation card.  While scouting around on the internet for graduation card ideas I found one by Glenda Caulkins of The Stamp Camp blog, that really caught my interest.  As the school colours were exactly what I was looking for, I decided to CASE her original card, with is called a "Peek A Boo Front Flip card".  You can see Glenda's card here, and here's my original CASE with a couple of changes.
This is a flip top fancy fold card.  Just the center part opens up.  I'll be posting more details and a brief tutorial on how this card and the shaker card below are assembled in my Sunday post, so make sure you come back and check it out.
When you open the flip top you have room to right your message below the sentiment.
When I was asked to make something with a graduation theme for this blog hop, I wanted something a little more exciting so I used the same card colours and stamp set, but designed a "shaker" card.

Both cards were made with the Celebrate Today stamp set, another carry over and favourite of mine. 


Here's my graduation shaker card:
 

I added some gold and royal blue seed beads along with the Metallic Sequins to the inside of the balloon shaker.  What fun!  The sentiment is embossed with Gold Embossing Powder.
Supplies:
Stamp set:  Celebrate Today

Cardstock:  Very Vanilla, Night of Navy and Gold Foil 
Ink:  Versa Mark 
Accessories:  Balloon Framelits, Metallics Sequin Assortment, Gold Seed Beads (non-SU), Fun Foam, Adhesive, Gold Stampin' Emboss Powder, trimmer, Big Shot
 
This is the bundle which includes 17 Photopolyer two-step stamp images and 4 framelit dies.  By purchasing these products as a bundle, you save 15% off the original price.


Something New 
For my "Something New" project, I wanted to share a combo gift card holder and birthday card made with this year's Ronald McDonald House (RMH) Charities stamp set "Sprinkles of Life".  Did you know that for every Sprinkles of Life stamp set sold, Stampin' Up! contributes $3.00 towards the RMH Charities?  I think that's so awesome!

Sprinkles of Life is a 22 piece Photopolymer stamp set that you're absolutely going to fall in love with.  It has a matching punch called the Tree Builder which helps you cut out all those ice cream or cup cake tops in the blink of an eye!
Here's My Card:


The gift card holder on the inside of the mini gift bag. 
Here you can see the gift card holder with an actual gift card inserted in it. 
Supplies:
Cardstock:  Daffodil Delight, Cucumber Crush, Watermelon Wonder, Mint Macaron, Tip Top Taupe and Whisper White 
Ink:  Watermelon Wonder, Cucumber Crush, Tip Top Taupe, 
DSP: Cherry on Top  Designer Series Paper Stack #138443
Accessories:  Tree Builder and Banner Triple Punches, Mini Treat Bag Thinlits, Dazzling Details, sequins, trimmer, adhesive and dimensionals.
The Banner Triple Punch gives you triple the banner options in one punch. You can make banners in three widths--1", 1-1/2", and 2"--in any length. Just slide the paper in, punch, and get perfectly notched banners (or gift tags, bookmarks, belly bands) every time. * Punch size: 3-3/8" x 5-3/4" x 1-1/4"
Well that's the end of my projects for this month. Enjoy the remainder of the blog hop... and thanks for stopping by!  

Since this is a circular blog hop you have some choices about how to proceed.  You can click on the "next" button below to move on to the awesome Kath Rick's blog or move back to Jackie Susnick's.  You can also click on the Home link and go back to the beginning of the hop where all the participant's blog links are listed.  Come back and visit again soon!

Click here to go to Kath Rick's incredible blog


Click here to go back to Jackie Susnik's blog
If you want to start at the beginning of the blog hop you can click on this link to go back to the Wacky Watercooler Blog Hop site for the list of participants.  

Rock Star Masculine Birthday Card

We finally have some good weather and have spent the week tidying up in the garden and the garage.  Visits to the recycling plant to get rid...