Welcome to Watercooler Wednesday's latest challenge #WWC96. Our awesome designer Gail Allen is hostess this week and she's chosen to feature a Special Fold Challenge. Not only do we have a great challenge but we are doubly blessed because we have the very talented Bronwyn Eastley from Australia joining us as our Guest Designer. How exciting is that?
 Over the years I've created many cards using special folds, and I'm always excited to find and try something new to add to my repertoire. The special fold I've chosen for this challenge is called an "Envelope Fold Card". I ran across a tutorial on Split Coast Stampers by Melissa Banbury, several weeks ago and I was hooked.
Although this may look like a difficult card, it's deceiving. In fact, it was quick and easy to assemble with just a few instructions. The most difficult part of making this card was deciding what to put on the inside.
Here's my card:
 This first picture shows just the outside of the card and you can see it looks like an envelope. That cute little mouse from Merry Mice stamp set is guarding the magic that happens when you open the card.
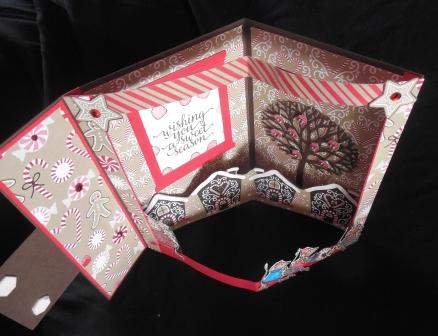
 And, here's the inside. I've chosen to combine elements from Merry Mice, Candy Cane Lane DSP, and the Candy Cane Lane stamp set to create a fun 3 dimensional Christmas scene.
There's lots going on in this card, and I know it's difficult to see, however, I'll be showing you pictures from every angle so you can see all the details.
 Supplies:
Stamp Sets: Candy Cane Lane, Merry Mice
Card Stock: Early Expresso, Real Red, Tip Top Taupe and Watercolour Paper
Designer Series Paper: Candy Cane Lane
Dies: Thoughtful Branches Framelits (Retired)
Ink: Early Espresso, Black Archival Ink, Real Red, Flirty Flamingo, Pacific Point, Emerald Envy, Pear Pizzazz, Watermelon Wonder, Tip Top Taupe, Daffodil Delight, Lost Lagoon and a Red Sharpie Alcohol Ink Marker.
Accessories: Big Shot, Trimmer, Simply Scored, Aqua painter, Thoughtful Branches and Window Frame dies, Precision Scissors for fussy cutting, Dimensionals, Sticky Strip and Tom Bow Glue.
Assembly:
1. Envelope Card Base: The card base is a 6" x 10 18" piece of Early Espresso card stock scored at 2", 2 18" and 6 1/8".
 2. Inside Panels: You can leave the back of the card plain or choose to add DSP. I cut two pieces of DSP measuring 3 3/4" x 5 3/4" and glued them to the back panels. Note: Leave a little space so you fold the card the DSP doesn't interfere or become too bulky to fold naturally.
3. Window Panel: The window pane layer is a 6" x 8" piece of Real Red card stock. Score this piece a 3/8" on both of the 6" sides. Next measure 1/2" from the top and bottom of the 8" side and a 1/2" in from the two 3/8" fold lines. Note: I used my score blade and just marked all the cutting sides and then inserted the panel in my trimmer and cut away the center rectangle.
 Add sticky
strips to the inside edges of this frame and attach the frame to the
Add sticky
strips to the inside edges of this frame and attach the frame to the
2 1/8" score line on the left hand side and the edge of the card on the right. Make sure the top and bottom center parts of the frame bend towards the center of the card.
Before attaching the above window panel I cut and adhered strips of DSP to the sides and top of the frame. They measured approximately 1/2" x 6". I adhered them and trimmed off excess paper.

4. Inside Front Panel: Cut a piece of Real Red card stock to measure 1 3/4" x 5 3/4" for the inside front panel, and a 1 1/2" x 5 1/2" piece of DSP. Adhere to the inside front panel.
5. Outside Flap: Cut a 2 1/8" x 3" piece of Early Espresso, a 2 x 2 7/8" piece of coordinating DSP and a 1 3/4" x 2 3/4" piece of Watercolor paper for the image of the Mouse. Glue all pieces together. I added glue to the bottom of this flap and attached it to the middle of the outside bottom panel. I attached two dimensionals to the top part and then removed some of the stickiness so the panel would hold the envelope portion together when closed. You could also just make a belly band to ensure the card stays shut.

 Once I had the card and frame assembled, I began adding images of the Merry Mice. All of the mice were stamped in Black Archival ink on the Watercolor paper and then I fussy cut them out. I used a variety of colours and painted them with an aqua painter. I attached the fat little mouse with the star on it's tail to the inside right edge of the card and them glued each of the three mice with gifts and lights to the bottom edge with mini glue dots.


I also cut out a row of houses from the Candy Cane Lane DSP> I left the bottom of the strip flat and just fussy cut around each of the houses on the top edge of the strip. Then I attached the two outside edges of this panel with sticky strip to the back of the card and bent the center of the strip so it would fold inwards when the card was closed. When the card is open the houses stand out from the back of the card adding another layer of dimension.
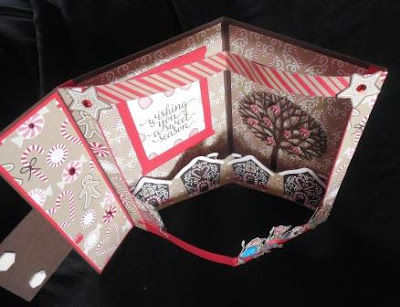 I used the tree framelit from the retired Thoughtful Branches Framelit set to cut out two trees. I cut one from Tip Top Taupe and the other from Early Espresso card stock. These trees were layered together in an offset manner and adhered to the back right hand side of the card. Eight small gumdrops were cut from the designer paper and attached to the branches with small pieces of dimensionals. Basic Rhinestones were added to the center of each to add a bit of bling.

For the right side of the card I used a Window Frame die cut in Real Red to frame a piece of Whisper White card stock that was stamped with the "Wishing You a Sweet Season" sentiment from Candy Cane Christmas and some gumdrops.

 So that's my special Envelope Fold card. Once again a big thank you to Melissa Banbury for her inspiration. I'm very happy with the way my card turned out and will be sending it to a very special person in my life. I know she will totally appreciate the work I put into this card. I hope you enjoyed it too and would love to have your feedback.
 Don't forget to check out the rest of the Design Team's creations and our Special Guest Designer, Brownyn Eastley - they're simply awesome and very inspiring.
Happy Stamping!
Penny Token's Stampin Spot

Although this may look like a difficult card, it's deceiving. In fact, it was quick and easy to assemble with just a few instructions. The most difficult part of making this card was deciding what to put on the inside.
Here's my card:


There's lots going on in this card, and I know it's difficult to see, however, I'll be showing you pictures from every angle so you can see all the details.

Stamp Sets: Candy Cane Lane, Merry Mice
Card Stock: Early Expresso, Real Red, Tip Top Taupe and Watercolour Paper
Designer Series Paper: Candy Cane Lane
Dies: Thoughtful Branches Framelits (Retired)
Ink: Early Espresso, Black Archival Ink, Real Red, Flirty Flamingo, Pacific Point, Emerald Envy, Pear Pizzazz, Watermelon Wonder, Tip Top Taupe, Daffodil Delight, Lost Lagoon and a Red Sharpie Alcohol Ink Marker.
Accessories: Big Shot, Trimmer, Simply Scored, Aqua painter, Thoughtful Branches and Window Frame dies, Precision Scissors for fussy cutting, Dimensionals, Sticky Strip and Tom Bow Glue.
Assembly:
1. Envelope Card Base: The card base is a 6" x 10 18" piece of Early Espresso card stock scored at 2", 2 18" and 6 1/8".

3. Window Panel: The window pane layer is a 6" x 8" piece of Real Red card stock. Score this piece a 3/8" on both of the 6" sides. Next measure 1/2" from the top and bottom of the 8" side and a 1/2" in from the two 3/8" fold lines. Note: I used my score blade and just marked all the cutting sides and then inserted the panel in my trimmer and cut away the center rectangle.

2 1/8" score line on the left hand side and the edge of the card on the right. Make sure the top and bottom center parts of the frame bend towards the center of the card.
Before attaching the above window panel I cut and adhered strips of DSP to the sides and top of the frame. They measured approximately 1/2" x 6". I adhered them and trimmed off excess paper.

4. Inside Front Panel: Cut a piece of Real Red card stock to measure 1 3/4" x 5 3/4" for the inside front panel, and a 1 1/2" x 5 1/2" piece of DSP. Adhere to the inside front panel.
5. Outside Flap: Cut a 2 1/8" x 3" piece of Early Espresso, a 2 x 2 7/8" piece of coordinating DSP and a 1 3/4" x 2 3/4" piece of Watercolor paper for the image of the Mouse. Glue all pieces together. I added glue to the bottom of this flap and attached it to the middle of the outside bottom panel. I attached two dimensionals to the top part and then removed some of the stickiness so the panel would hold the envelope portion together when closed. You could also just make a belly band to ensure the card stays shut.


I also cut out a row of houses from the Candy Cane Lane DSP> I left the bottom of the strip flat and just fussy cut around each of the houses on the top edge of the strip. Then I attached the two outside edges of this panel with sticky strip to the back of the card and bent the center of the strip so it would fold inwards when the card was closed. When the card is open the houses stand out from the back of the card adding another layer of dimension.

For the right side of the card I used a Window Frame die cut in Real Red to frame a piece of Whisper White card stock that was stamped with the "Wishing You a Sweet Season" sentiment from Candy Cane Christmas and some gumdrops.


Happy Stamping!
Penny Token's Stampin Spot


10 comments:
Holy moly batgirl....jawdropping kicks butt card!! I would love to open this in the mail for Christmas..nudge nudge wink wink!!! Stunning and TFS the recipe. Luvs ya and miss ya heaps and heaps. xoxo
So cute Sheri! Glad you liked it! What fun to make! Miss you too!
Penny - did you hear my gasp as I opened your blog feed?? OH.MY.GOSH. What an amazing card - and using those adorable Merry Mice! :) What a stunner! You knocked this one out of the park, my friend!
Penny, you Rock! This a WoW card for sure. I agree with Sheri this is a kick butt card. I can just see those little Mice making off with the candy and laughing all the way.
I agree with Sheri...............This is a Kick Butt Card. Wow, you rock! I can just hear those little mice laughing as they take off with the candy. Beautiful card.
Thanks Deb and Heather for your fun comments on this card. You'll have to try one of these. Awesome!
Hi Deb, when I saw the front of your card I wondered if you had been on Splitcoast and had come across the awesome Envelope Fold Card Tutorial. I did that fold this week as well for the Creative Crew. Isn't it super fun and very easy? Love the 'wow' factor as the card is revealed. The mousey Christmas scene is so ...o cute. Thanks for your lovely comments on FB and my blog.
Thanks for commenting Bronwyn. I'm a big fan of Melissa's and so when she first shared this tutorial on Split Coast back in April/16 she had my attention, and I tucked it away for future. I was surprised to see you had also created with this design. I'm sure it will be as popular as the Z fold once people catch on to it. It's such a fun fold.
Oh. My. Stars. This is FABULOUS!!!!!!! What a big surprise in this little gem! Great work! Love this idea.
Thanks Libby. It's a fun card. I can't wait to use my new stamps when I get home in March to make another one.
Post a Comment