Wednesday, March 22, 2017

Watercooler Wednesday Challenge #111 - Marsha's Masculine "Anything Goes" Challenge

I felt bad missing Heather's Watercooler Wednesday CAS Bunny card challenge last week, but I was traveling and had no time to stamp.  What a terrible feeling.  But, not to worry because I'm back with a fun card for Marsha's #WWC11 Masculine "Anything Goes" Challenge.  "Anything Goes" means that whatever is submitted is fine whether it be a card, a 3-D project, a scrapbook page just so long as the entry has a masculine theme.  What fun!  
Here's My Card:
My card features a fun stamp and die bundle from the Occasions Catalogue called Custom Tee and the T-Shirt Builder which I've married up with the  CAS Colors & Sketches Challenge #215:

Inside and out, this card has an "all boy sports theme" going on that meets the criteria for this Masculine Anything Goes challenge.  

I love that there are so many great sentiment stamps to use with the T-Shirts in the Custom Tee set.  There's also a set called "Designer Tee" in the Sale-A-Bration catalogue that's available for FREE until March 31st with a $60 CDN order .  It has 10 wonderful Photopolymer stamps that  fit in the middle of the T-shirt.  T
Supplies:
Stamp Sets:  Custom Tee, Balloon Adventures, Cozy Critters Hostess Set, Great Sport (Retired)
Inks:  Rich Razzleberry, Old Olive, Pacific Point
Card Stocks:  Very Vanilla, Rich Razzleberry, Old Olive and Pacific Point
Accessories:  Trimmer, Big Shot, T-Shirt Builder Dies, Circle Framelits, Itty Bitty Accent Star Punch (R), Bunch of Banners Thinlets, Tom Bow Glue, Glue Dots, Basic Rhinestones, Sponge Dauber.
What fun!  I loved how this card came together.  Here's the details:

1.  The card base was a piece of Very Vanilla card stock measuring 4 1/4" x 11" and scored at 5 1/2".

2.  The first layer is Rich Razzleberry and measures 4 x 5 1/4".  

3.  The second layer is Pacific Point and it measures 3 3/4" x 5"

4.  I used one of the retired Circle Die Stamps to cut a 3 1/4" circle from the Pacific Point layer.  I randomly stamped soccer balls from the Good Sport (R) stamp set and small birthday presents from the Cozy Critters Hostess set in Pacific Point ink on this layer.

5.  I was going to use a 3" circle die to cut out a smaller circle in the Rich Razzleberry layer, but decided to use the T-Shirt Builder die instead.  I lined up the T-Shirt so that it was in the middle of the 3 1/2" circle.  

6.  I glued the first and second layers together but before I attached them to the card base I cut off the bottom right hand corner on an angle, which exposed the Very Vanilla card base, once these layers were adhered.  I stamped the sentiment "All Star Champs" from the Customer Tee stamp on an angle in this space.  I stamped "#1" in Old Olive ink in the middle of the T-Shirt. 
7.  I created a banner label using the Bunch of Banners Thinlet dies and stamped "Birthday Boy" in Pacific Point ink.  

8.  I punched out some small stars with the Itty Bitty Accents Star punch (R) from Old Olive and Rich Razzleberry card stocks and adhered them with Mini Glue Dots to the banner and the card layer.
8.  To finish the inside of the card  I stamped the Rich Razzleberry T-shirt that was left over with the sentiment "All Star Champ" and sponged the edges with Rich Razzleberry ink, and adhered it to the top inside panel of the card.  A few random Old Olive and Pacific Point stars were added. 
9.  The bottom inside layer was stamped with the sentiment "No One Deserves a Happier Birthday Than You" from the Balloon Adventures stamp set in Pacific Point ink.  A soccer ball was stamped in the bottom right corner in Pacific Point and two small gift boxes were stamped in Rich Razzleberry.
Well that's it for me this week.  I hope you liked this card and will leave me some comments.  

I hope you'll drop in and visit the other Design Team Artists for some more inspiration at the Watercooler Wednesday Challenge Blog.  I also hope you'll play along with us by linking to the InLinksy no later than 5pm Mountain Standard Time on Monday March 27th. Instructions are at the bottom of the Watercooler Wednesday challenge blog post.   We'd love to have you join us. 


Happy Stamping!
Penny Tokens Stampin' Spot

Wednesday, March 8, 2017

Watercooler Wednesday - #WWC109 Heidi's Colour Challenge

For today's Watercooler Wednesday Challenge, Heidi Weaver has provided us with a great set of colours which she cleverly took from a favourite scarf.  The colours are Island Indigo, Pool Party, Very Vanilla and Basic Black.
Here's My Card:
Right now I have a lot of "thank you" notes and cards to go out so I've turned to one of my favourite stamp sets Birthday Blooms.  I can't get enough of the large flower in this stamp set. The image is so easy to colour or it can be left neutral for a great line image.  Either way works
Birthday Blooms is an 8 piece stamp set that's available in Wood or Clear mount

Supplies:
Stamp Sets: Birthday Blooms, Jar of Love and Avant Garde
Card Stock:  Island Indigo, Pool Party, Very Vanilla, Water Colour Paper, Basic Black
Ink: Island Indigo, Pool Party and Pear Pizazz markers, Momento Tuxedo Black Accessories: Trimmer, Big Shot, Pinpoint Rectangle Layer Dies (Memory Box), Basic Rhinestones, Fine Tip Aqua Painter, Tom Bow Adhesive
Measurements:
1.  Card Base 8 1/2"  5 1/2" Basic Black scored at 4 1/4"
2.  1st Layer:  Pool Party 5 1/4" x 4
3.  2nd Layer: Island Indigo 4 3/4" x 3 3/4" cut with Pinpoint Rectangle die
4.  3rd Layer:  Basic Black   3 1/4" x 4 1/4" cut with Pinpoint Rectangle die
5.  4th Layer: Watercolor Paper (Very Vanilla) 4 1/8" x 3 1/8" cut with Pinpoint rectangle die. 
6.  Finish the inside with 5 1/4 x 4" Very Vanilla card stock.   
I didn't have Island Indigo or Pool Party stamp pads so I used markers.  The floral image was first stamped in Island Indigo ink.  I scribbled the marker on to the stamp surface making sure I covered the whole image well and then I stamped it on the watercolour paper.  To colour it I scribbled again but this time on the acryllic block with Pool Party and Island Indigo markers.  The acryllic block acts like a pallette to hold the  colour and by adding a spritz of water to the block it's easy to apply the colour with an Aqua Painter.  The leaves are shaded with Pear Pizzazz and Island Indigo markers. 

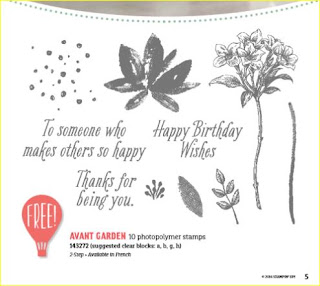
I highlighted the center of the flower with the "stamen" from the Sale-A-Bration stamp Avant Garde in Momento Tuxedo Black ink. This tiny stamp added a big punch of colour and shape to the middle of the flower.  

I coloured a shadow around the rose by applying water and carefully pulling the Island Indigo out around the flowers.  The background is stamped in a mixture of Pear Pizzazz and Pool Party using the bubble background stamp from Avant Garde.  To finish it off I added some random Basic Rhinestones and used the "thank you" stamp from Jar of Love in the top right hand corner.
And that's it for today, a nice simple layered card.  If you haven't already, I  hope you'll check out the samples from the other Design Artists for this Watercooler Wednesday challengeThey've out done themselves with these colours and their beautiful projects.  

The challenge is open until  Monday March 13th at 5:00pm Mountain Standard time, so why don't you link up your own creation.  We'd love to have you join us, and play along. 

Happy Stamping!
Penny Tokens Stampin Spot  

Tuesday, March 7, 2017

Reverse Words 2nd Release Sale-A-Bration 2017

On February 21st Stampin' Up released four new products for the 2017 Sale-A-Bration season. 
Today I'd like to share a video of one of the stamp sets included in that release.  It's called the Reverse Words stamp set. I know you're going to love it! 
Wow the designs Andrea created are simply awesome and so simple.  It’s amazing all you can do with just two awesome stamps!  The images in the Reverse Words Stamp Set are bold enough to stand on their own for a cute, simple effect or you can get more creative. 

This is the perfect set for creating lots of party invites or thank you cards and the designs also look gorgeous when stepped up with layers and bling for a project worthy of someone special.

You can get the Reverse Words Stamp Set for FREE with a qualifying purchase during Stampin' Up!'s annual Sale-A-Bration event (through March 31, 2017). 

What's a qualifying order? 
All you have to do is place a minimum $60.00 order (before S&H and tax) on my online store and you qualify for a FREE product from the Sale-A-Bration 2017 product line.   Double that and you can get two free products and so on.  Here's a look at the Sale-A-Bration Free Products.
Sale-A-Bration 2017 Flyer
 
Sale-A-Bration 2nd Release Flyer

Happy Stamping!
Penny Tokens Stampin Spot

Wednesday, March 1, 2017

Watercooler Wednesday - #WWC108 Gail's Sketch Challenge

The week's just keep flying by, and once again it's time for the weekly Watercooler Wednesday Challenge.  This time around it's a fun sketch #WWC108 that's being hosted by Gail Allen.
We welcome all submissions so why not make a card using this sketch and link it to our challenge site.  This sketch challenge runs from March 1st through March 6th, 2017 at 5:00pm MST. 

Here's My Card:
What a fun sketch!  Since I had a 70th birthday party to attend on Friday I decided to make another birthday card using the Shadowbox fancy fold techniqueThis sketch layout worked perfectly for the card front. For details on how to make this fancy fold and the link to a video created by Dawn Griffith just click on this link.

Here's a view of the inside:

Supplies: 
Stamp Set: Balloon Adventures
Ink: Momento Tuxedo Black Ink, Pacific Point
Card Stock: Whisper White, Pacific Point, 
DSP:  Party Animal, Pumpkin Pie Glimmer Paper
Accessories: Big Shot, Balloon Pop-Up Thinlet Dies,Stitched Rectangular Squares (Non SU), Mini Treat Bag Thinlet, Tweezers


I purchased the Balloon Adventures and Balloon Pop-Up Thinlet Dies as a bundle and saved 15%.  I knew I would use both of these sets many times over so they were a great value!
 
In this first card I didn't add a sentiment other than the "No One Deserves a Happier Birthday Than You" to the front of this card because the rectangle took up so much room and there wasn't a lot of space left to stamp along the line.

Assembly:
1. Card Base - Tangerine Tango 5 1/2" x 101/2" scored at 1/2", 4", 4 1/2", 8"
2. 1st Front Layer - Whisper White 4" x 5 1/2"
3. 2nd Layer - Tangerine Tango 3 3/4" x 5 1/4"
4. Party Animal DSP 3 1/2" x 5" Cut on an angle
5. Tangerine Tango 2 1/4" x 3 1/4"
6. Whisper White for sentiment 2 1/8" x 3 1/8". Also a scrap for sentiment on second card.
7. Whisper White layer for inside front panel 3 x 5 1/2"


Stepped Up Version:
I liked this design sketch and Shadow Box card so much that I made a second  version.  This card will be for a girlfriend whose birthday is in April.  I wanted to step up this version and make it a little more feminine than the first version so I began by changing the colour scheme from Pacific Point to Tangerine Tango and the DSP patterns.  

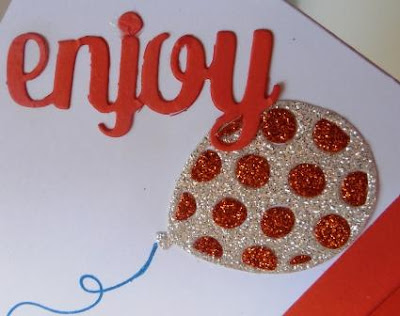
Other changes included swapping out the Pumpkin Pie Glimmer paper balloons used in the first card to Dazzling Diamonds.  I added the "Party On" sentiment along the paper division so it was true to the sketch challenge.

The "Party On" and "No One Deserves a Happier Birthday Than You" are just two of the great sentiments from the Balloon Adventures stamp set
I glammed up the inside of the card by adding the negative images from the Pumpkin Pie balloons to the Dazzling Diamonds ones. The result is a super shiny pumped up version of the balloons.  I also punched out some Pacific Point stars and glued them behind the balloon images to enhance the background. 

For the left hand side of the card I cut out the word "enjoy" from the Mini Treat Bag Thinlets and another balloon image.  

I'm happy I left more white space for writing my happy birthday messaging on this version of the card.  Isn't that balloon string gorgeous?  It's from the Balloon Adventures stamp set too. What fun!  
Mini Treat Bag Thinlet dies - lots of great dies in this set beside the bag frame.
 

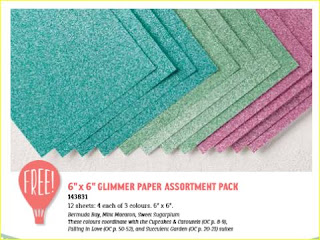
Note: When I cut out the balloon images with my Big Shot I always set the negative images that are removed aside just in case I want to re-use them. I don't want to dig through the garbage can later on.  To make these teeny tiny pieces easier to handle use a pair of tweasers or a short bamboo skewer to pick them up.  I add my Tom Bow glue to the negative space and then re-insert the pieces. The Pumpkin Pie Glimmer paper came out this year with the Fall Occasions and I was so happy I had some left for this card.  This Glimmer Paper combination seemed to work really well together.  I'm excited to get the new Glimmer Paper Stack that's being offered in the Sale-A-Bration second release, and will use it the same way. 


Thanks so much for checking out my card today.  So what do you think?  Let me know which version of the card you like more or whether they're both okay.  I know that I'll be using this sketch often as it was so quick to pull together and it will be terrific on any card front and for any occasion.


Happy Stamping!
Penny Tokens Stampin Spot 

Tuesday, February 28, 2017

On February 21st Stampin' Up! let us know about their second release of FREE products for the 2017 Sale-A-Bration sales period.  The release included two new stamp sets and today I want to share a video by Carrie Cudney demonstrating how to use one of them.  

She's demonstrating how to be creative with the Make a Medallion stamp set, which is so versatile.  This set is an 8 piece Photopolymer that coordinates with the Circle Framelit Dies.  You can't purchase this stamp set but you can earn it for FREE by placing a minimum $60CDN order (before tax & shipping and handling) with me before March 31st, 2017.  Check out my on-line store.

Here's Carrie's great video presentation:

Happy Stamping!
Penny Tokens Stampin Spot

Wednesday, February 22, 2017

Sale-A-Bration - 2nd Release - New Items

Just when you think Sale-A-Bration couldn't get any better… Stampin' Up has
added 2 new stamp sets and a super awesome 6x6 stack of Glimmer Paper. How cool is that!  This additional promotion is available between February 21st and March 31st.  Get yours while the supplies last.

What Is All The Fuss About?
To earn any of these three new products you simply have to place an order of $60 CDN.  Other ways to take advantage are by hosting workshops or joining Stampin' Up!
 

Make a Medallion Stamp Set - photopolymer - #143274


6x6 Glimmer Paper Pack Assortment: Bermuda Bay, Mint Macaron, Sweet Sugarplum #143831

Reverse Words Stamp Set, clear mount #143319 or wood mount #143316

New Flyer:
CLICK HERE to view the brochure with the 3 new releases

Bringing Back Birthdays .... cards that is!

In this day of technology and speed most people tend to respond to special occasions and events by sending out e-cards and Facebook messages.  Sending or giving a friend a card the old fashioned way, is often overlooked by the sender, but the receiver never forgets the delight of picking up the mail and discovering something special, just for them.  It's like getting extra presents!

For my birthday this month I received greetings both electronic and by mail and I was delighted with all of them. Everyone was so thoughtful and it made my day so special.  

I just had to share three very special handmade cards I received.They simply made my day and you couldn't wipe the grin of my face or replace the joy in my heart as I opened them.  Thanks Betty Lee, Phyllis and Heather for not only remembering my day but for sharing in my joy of a hand made card and taking the time to drop them in the mail.  

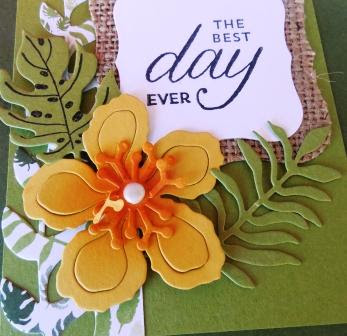
Betty Lee's card was made with the beautiful Botanical Builder Dies and paper.  The tropical feel of this card just made me so happy.  I loved it!
Oops that stamen got a little bent out of shape when I was photographing this card.  The colouring on this flower and leaf are fantastic.  I also like the burlap die cut in the background.  It really enhances the sentiment.  Great job Betty Lee.

Phyllis' "Beautiful You".  This is like a mini piece of art!

I'm a super huge fan of the Stampin' Up! Beautiful You stamp set  and this card just embodies the versatility you can achieve by adding colour.  Beautiful Phyllis.  I was blown away by the colour mix and artistry in this card, not to mention the good wishes for my day!
Inside and out these cards designed by my wonderful sister Heather, were so awesome.  I'm a huge fan of Graphic 45 Designer papers and Stamps and this one is especially beautiful.  I love that this card is tall.  I'm so used to seeing A2 sizes that it was refreshing to get one in this style.  Something I'll have to remember. 

I love the sentiment Heather used for this card.  It's absolutely so true and I really try to live that mantra.   The stamped image reminds me of one of my favourite paintings by Jack Vetriano, "The Singing Butler".  Awesome!  Thanks so much Heather for remembering me in this way. 
I hope you enjoyed this card share as much as I did.  Once again ladies thanks for making my day!

Happy Stamping!
Penny Tokens Stampin' Spot 

2024-2025 Annual Stampin' Up! Catalogue has launched!

 HAPPY MAY 1ST| Today I'm celebrating and  sharing the launch of the much awaited Stampin' Up! Annual Catalogue which will run from ...