Thursday, August 15, 2013

A Missed Challenge - CCMC263

I was working on a challenge card for the Connie and Mary Sketch Challenge CCMC263, but unfortunately I missed the cut off at noon today.  That's what happens when life gets in the way.  I can't waste the card though so I want to share it with you.

Here's the sketch:


And here's my card:


Stamps: Blooming with Kindness and Teeny Tiny Wishes
Ink:  Baked Brown Sugar
Cardstock:  Whisper White, Baked Brown Sugar
Accessories:  Corner Rounder Punch, 3/8" Baked Brown Sugar Ruffle Stretch Ribbon, Dimensionals, Basic Pearls.

Tuesday, August 13, 2013

Stampin' Up! Interactive

Click Here for PDF Version

Stampin' Up! Interactive - Products come to life in the holiday catalogue thanks to a fun interactive app that's been introduced by Stampin' Up!  

To get started:

  • Have you got your seasonal catalogue yet?  You'll need it to work this app, so contact me today.

  • Go to the App Store or Google Play and download and install the FREE Layar app to your smartphone or tablet.

  • Scan images that are tagged with the Stampin’ Up! Interactive icon to unlock videos.

 Supported devices:

The Layar app will work on:
  •  iPhone 3GS and higher and iPad 2 and higher; requires iOS 5.1 or higher 
  •  Android devices running v2.2 or later

Things to know: 

  • Different mobile devices will work differently with the Layar app. Some are faster than others, some will take more steps to load the videos, etc.

  • You need to hold your mobile device far enough from the page that the image is completely in the device’s screen before the video will load.
  • Hold your device over the page until the video loads. Be patient—the video might take a while to load, depending on your device.  Stampin Up! just recently reduced the video load time, by replacing the augmented reality videos with shorter versions, so this should help.  You can still see the longer full versions of the videos by going to:  

  • Most devices will start playing a video automatically, but some will have a play icon that you need to tap to start the video. And some won’t show a play icon but will still require you to tap the screen on your device to start the video. So if a video doesn’t start playing automatically, tap the play icon or screen of your device. (If you’re using a Samsung Galaxy phone, you’ll need to tap the box that appears on the screen to start the video.)
  • If you don’t want to hold your device over the page for the duration of the video, just tap the video and then pull it away from the page—the video will keep playing.

From the video, you can go directly to the online store so they can buy a product immediately, and you can also share your favorite products on social media.

Friday, August 9, 2013

Artisan Award Winners 2013-2014 - Meet the Design Team


Stampin' Up! is thrilled to introduce their fabulous 2013–2014 Artisan Design Team!  Congratulations ladies!

Over the next year these ten amazing gals will share projects on their personal blogs—and will occasionally contribute to Stampin’ Up!’s corporate blog. 

You will also see their creations every month on Stampin’ Up!’s Facebook page. Be sure to follow the work of these talented demonstrators! They are an amazing group with lots of inspiring ideas, projects, and techniques to share!  

Here are the links to their wonderful and amazingly creative blogs.  I've also added their links to my side bar for quick reference through out the coming year.  

Connie Collins www.constantlystamping.com

Cathy Caines http://www.inthecatcave.com


Alana Wharf www.sleeplessstamper.com


Jeanna Bohanon www.stamptimesomewhere.com


Cindy Schuster www.nutmegcreations.blogspot.com


Becky Cowley www.scrapjunkie-becky.blogspot.com


Jennifer Timko http://stampinonthefly.com


Mercedes Weber www.mercedesweber.blogspot.com


Erica Cerwin http://www.pinkbuckaroodesigns.blogspot.com


Jane Lee http://janeleescards.blogspot.com

Late Night Stampers Fall Treasure Hunt - Coming Soon

Calling all Canadian stampers!!!!  Just a note to let you know that something exciting is in the works and will be coming this way soon!  If you're a Canadian stamper and want to participate in a fun and exciting blog hop then keep this site in mind. 

I don't have all the details right now, but I can tell you that it's the Late Night Stampers Fall Treasure Hunt blog hop and it's coming soon and it's going to be exciting.  

So, make sure you come back and check out my LNS Treasure Hunt site at the top of this page.  Can't wait! 

Wednesday, August 7, 2013

Paper Pumpkin Promo - PUMPKINDEAL

Through August 31, 2013, new Paper Pumpkin subscribers can use the promo code PUMPKINDEAL to join Paper Pumpkin for only $12.50 a month for the first two months!  

That's right you can sign up for half  price and get two months at $12.50 per month plus applicable tax (shipping is included in the price).  After that time the price for future monthly kits will go back to the regular price of $24.95 (plus applicable tax).


Who Should Take Advantage of this Offer?  
  • If you're looking for a new hobby or some creative escape and don't want to commit to classes or large outlays of cash for products, then this promo is for you!
  • If you've never stamped before or played with paper and want to try it out in your own time, on your own terms before committing to clubs or classes then, this promo is for you! 
  • If you want the pleasure of opening a kit that's sent directly to your door then this promo is for you!
  • If you like surprises, and trying the unexpected then this promo is for you!
  How Can I Assist You?
  • Choose me as your demonstrator and I will assist you by offering videos and instructions on Paper Pumpkin kit assembly, and tips on using the left over products from the package for other fun projects.
  • Choose me as your demonstrator and I'll be here to answer your questions and guide you if you should run into any obstacles. 
  • Choose me as your demonstrator and you'll have access to my 24/7 Online Shopping line and receive preferred pricing on all catalogue purchases.
  • As a bonus for you, you'll automatically be added to my mailing list to receive the Annual Catalogue and Idea Book as well as seasonal catalogues and promotions materials.

The Fine Print:  
  • This Paper Pumpkin Promo is for new subscribers only.
  • Promotion applies only to the first two months of a new subscription. After receiving two month's worth, the price for each month's kit will go to the regular price: $24.95 
  • Sign up for your Paper Pumpkin by August 10th to receive your first box in the mail around the 15th.  If you sign up after the 10th, you won't get your first box until September.  
  • Everyone receives the "Welcome Kit" as their first Paper Pumpkin package and it includes one clear mount block.
How to Sign Up:

1.  Visit mypaperpumpkin.com to join.

2.  Select "1" as the quantity for kits

3.  Click on  "Add Promo Code" and then enter the promo code PUMPKINDEAL in the "Promo Code" field which is located just below the kit quantity.  

4.  Mark or select me as your demonstrator - Penny Hanuszak

5.  Finish with your payment information and click "Submit." 

6.  You will receive a confirmation email and a request to set up a password. You can do that at any time.

7.  You must join by Saturday, August 31, 2013; 11:50 PM (MT).

Monday, August 5, 2013

Convention Goodies

It's hard to believe that just two weeks ago I was at Convention, but time just keeps on rolling. We've been lucky with the sun shining and a bit cooler temperatures leading into the BC Days long weekend.  While I've been really busy and still recuperating from my chest cold, I thought I would show you the last of my swap items and some of the freebies we received for attending Convention.
First of all check out this bunch of awesome new stamp sets.  I brought back six new ones and I love them all!  Oh yeah and see those rolls of Washi Tape?  You guessed it, they were freebies too!  I'm planning on making some great gift items for Halloween and Christmas with those! 
 
Here's my big prize that I received on my second day from Prize Patrol.  Drum Roll please............. Its the brand new Label Thinlit Dies.  Whoo Hoo!!  I was just so excited and couldn't wait to get home and try them out.  Fabulous!


We got a free Paper Pumpkin box with all its wonderful goodies at the Paper Pumpkin Demo station!  How cool was that?   If you havent' seen all the goodies you get in Paper Pumpkin come over and visit me, as I've got the Welcome Kit (everyone gets that one for their first month) and then I have May, June and July kits!   If you want to introduce someone to stamping this is the way to go.  Fast, fun and easy! Check out my Paper Pumpkin button for this month's promo.  You'll be glad you did. 


 Lots of goodies in this kit, including, designer paper, ink spot, stamps, labels and tags, binder rings, album cover and back, buttons and more.

We also received this awesome Tag A Bag Gift Bags set for free.  It's featured on pages 158-159 of the catalogue.  It's pretty cool what you can do with these bags, for example we even learned a way to transform the bags from flat to shaped to hold more goodies. 
This bundle includes both the the Gift Bags and Tag a Bag Accessory Kit.  Save 15% by getting it as a bundle.
Undefined is the brand new stamp set that Stampin' Up! released the beginning of this month.  Undefined is meant for the inner artists in everyone.  If you want to have fun and design your own rubber stamp, you can do it with this set. It comes with 4 stamps and blocks and carving tools.  

Unfortunately we ran out of time at Convention so I can't show you my block yet, but I'm going to give it a whirl at home and see what I come up with.  Should be fun!

Another freebie we got is the Simply Created Real Red Goody Gear.  In this awesome kit you get 10 die cut Kraft tags, 10 White Die cut banners, 10 die cut stickers, 10 pieces of Bermuda Bay Baker's Twine, 10 cellophane bags 3 x 5 size.  All these products will allow you to take your goodie giving to a whole new level. With this Simply Created kit you'll never give away a naked goody bag again! Stampin' Up very generously included the Oh Goodie stamp set in our packages!  Love them!

 MAKE N' TAKES

Tag a Bag Gift Bag - this is the technique I told you about.  So easy and what a change up!


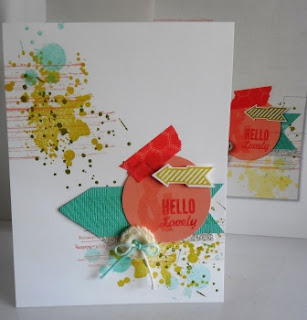
Grunge and Hello Lovely stamp sets were used to create the gorgeous backdrop for this card and matching envelope.  Who knew you could achieve such great results with splatters and skids!  


Note cards and matching gift bag set - loved, loved, loved it!  You Make Me Happy Set,


MDS II and Hexagon punch card and envelope demonstration.

Goodies:

Lousy picture, but these are the fabulous silver and white back packs we received full of goodies!  They are awesome!
Okay Now For Some Last Minute Trades and Goodies I received:

Goodie Bag gift from Diane Ison of Richmond BC.  Isn't it just the greatest!

Gorgeous Gift Tag from Anna Marie of Los Angeles California.  This is just the cutest tag and so well designed! 
Woot! Woot!  Card Candy from Laura H. Zaraza of Lake Geneva, WI.  Laura had us dancing in the aisles when we met her in the lunch room on Saturday.  She traded her card candy for our cards and we were thrilled.  In fact we're going to have a card candy get together and will probably toast to Laura's good health...........that's how thrilled we were to get her art work!  Thanks Laura, appreciated!

Gorgeous little purse made with the Purse Die from Serena Marsh, Burnaby BC
Cute little treat included in our gorgeous swap bags for the New Card Catalogue Swap.

We received a gorgeous paper shopping bag for our swapping in the New Card Catalogue Swap and it was beautifully decorated by Lori and gals with this Statement of the Heart!  Loved it!

Lovely fun little earrings that are made from the new Simply Pressed Clay.  Swapped these for a card with the wonderful Jennifer Buchanan of Bremerton Washington.  Thanks Jen these were awesome!

Here we are living it up on Saturday night at the Convention with some of the Stampin' Up male staff!  Thanks Debby Evoy for making us hit the boogy boards! 


Sunday, August 4, 2013

Convention Swap Posts: Day Five

Sorry I've been dragging my heels on getting this next set of swap cards posted, but I've been dealing with an upper respiratory tract infection, that hit me shortly after returning from convention.  And quite frankly it knocked the wind out of my sails.  I've been very dragged out and tired, so resting a lot and not getting much accomplished.  I keep persevering a bit each day though and I'm starting to see light at the end of the tunnel.  

In other words, I'm almost getting to the bottom of the swaps I'd like to share with you.  I hope you're still with me and enjoying the tour.  I know I've discovered a lot by really looking at how these cards were made.  So here we go with card number Forty Six:
Card Forty-six:  Marie Costanza created this cute card using the new Giggle Greetings set on pg 29 of the catalogue.   This cute 4-stamp set has a funny greeting for several occasions.  Marie has made her card base from Whisper White card stock and layered it with Pacific Point DSP.  Gorgeous paper.  She has stamped the little dog in basic black ink and coloured it with markers.  It's been popped up on dimensionals and added to a piece of Pacific Point card stock that's been punched out with the 2 1/2" Circle punch.  For finishing touches she added a set of google eyes (which are retired) and a bow made with the 1/4" Stitched Grosgrain Ribbon in Basic Gray. Great card!

Card Forty-Seven:  Love this "hero" card in in it's bold Night of Navy, Real Red, Whisper White and Burnt Brown Sugar, stars theme.  It was created by Monica Bradford.  The stamp set used is "Simply Stars" on page 124 of the catalogue.  There are only 4 stars in this set but she has been able to effectively stamp them on her background so that it looks like a field of them.  The other really nice touches that Monica has added were the two banners in Real Red and Night of Navy.  They were cut out with the Hearts a Flutter Framelit Dies on page 187.  She's also cut out and added one star in  Silver Glimmer Paper and mounted it with dimensionals.  The "brave" sentiment which is stamped on Whisper White and punched out with the decorative label punch comes from the "Words of Courage" stamp set on page 42.  Great card Monica, thanks for sharing!   
Card Forty-Eight:  Bertina Maloy created this stunning card using the Beautifully Baroque Embossing Folder and a tag from the Chalk Talk stamp set on page 12 of the catalogue. Her card base is Basic Black card stock followed by a layer of Basic Gray.  To achieve the beautiful backround effect on the next card layer she did a Faux Patina technique starting with Whisper White Card Stock then inking up her embossing folder with Smokey Slate and Wisteria Wonder Inks.  Very effective!  The Chalk Talk tag was cut from basic black card stock using the Chalk Talk Framelits. Did you know you can purchase the Chalk Talk stamp set and matching framelits as a bundle and save 15% of their original price?  Click here for details - it comes in wood or clear mount.  Bertina embossed the tag with silver embossing powder, but she wasn't finished yet.  To complete the tag she stamped the sentiment "For You" (also from Chalk Talk) in Basic Black ink onto Wisteria Wonder, punched it out with the 1/14" circle punch and then glued it to the center of the tag. She added Crystal Effects for a glossy finish.  Two basic rhinestones and a piece of White Taffeta ribbon complete this card.  Well done Bertina!

Card Forty-Nine:  My next New Catalogue Swap Card comes from Gale Hansen of Fort Deposit, MD.  She has created a unique and fun baby card with the Sweetest Gift stamp set on page 57 of the catalogue.  She added  Gingham Garden DSP to Whisper White card stock as the base for her card.  Her next layer actually opens as the card.  To create this fun layer she cut a piece of Melon Mambo card stock into a strip measuring 3 1/4" x 8 and then scoring it at the center.  It was adhered to the card base with the fold sitting at the center top of the card. She punched out a large scallop circle with the 2 3/8" Scallop Circle Punch from the top flap of this card and stamped the sentiment "thank you for the sweet gift" in melon mambo ink.   A 3 x 4" piece of Whisper White card stock was cut for the inside. Gale has done an absolutely amazing job of colouring and stamping this inner card piece and also the stork that's adhered to the outside.  She's sponged the most perfect clouds and added the sentiment "congratulations to you and your new little one" to this piece.  To complete the card she's added a white taffeta ribbon and bow.  These next pictures will give a bit more insight into this wonderful card any new parent would be thrilled to receive.  Gale you're simply amazing!   


Card Fifty: This next card, an original design by Tricia Miller was created for the New Catalogue Card Swap using the Sweetly Framed Hostess Stamp set shown on page 205 of the catalogue.  If you've ever wondered what you can do with "itty bitty" stamps like the ones in this set, Tricia's card is a great example.  Tricia used Whisper White card stock for her card base followed by a 3 3/4" x 5" piece of Strawberry Slush card stock.  For the top layer she embossed a 3 1/4" x 4 1/2" piece of Whisper White with the Modern Mosaic Embossing Folder.   Starting in the second row of the embossed tiles, she has stamped the heart image in Strawberry Slush ink on every second row.  The sentiment was also stamped in Strawberry Slush and then punched out with the Decorative Label punch and then added to the card with dimensionals.  The finishing touch on the label was the addition of the tiniest of the Basic Pearl Jewels.  Awesome Tricia, luv your clean and simple card!
Card Fifty-One My next card by Mary Lonneman of Benson, MN features multiple layers that have been stamped with the Morning Meadow Hostess Stamp set on page 203 of the catalogue.  Mary's card base is in Very Vanilla card stock followed by a layer of Coastal Cabana that's been embossed with a non-Stampin' Up! embossing folder.  Mary has layered up the card using the Deco Labels, Label Collection and Apothecary Accents framelits.  Each piece was stamped with an element from the Morning Meadow stamp set.  Basic Rhinestone Jewels were added to the Thank You label and for the little bird which was punched out with the Bird Builder Punch.  Thanks Mary for a great card!
Card Fifty-Two:   Gail Deans from Gaylor MI created this exciting layered card which is as lovely on the inside as it is on the outer layer.  Beautiful!  First of all the vibrant bold colors she has mixed just give you a lift.  The card base is in Gumball Green followed by a layer of Pacific Point that's been texturized with the Square Lattice Embossing Folder.  I love how she's added her leaves and butterflies on the face of the card using the Little Leaves Sizzlits and Beautiful Wings Embosslits, this was a nice touch and ties in with the center flower.  She cut a large circle from the card's top layers using the 2 1/2" Circle Punch revealing the awesome layered flower on the inside. The Five Way Flower single stamp was the ideal choice for this card.  She's stamped the flower in Pumpkin Pie and Melon Mambo inks on Whisper White card stock several times to create the four flower layers, and then used an assortment of co-ordinating punches to easily cut out her layers.  The co-ordinating punches for this set are - the 2 3/8", 1 3/4", 1 1/4" and 7/8"  Scallop Circle punches.  You can also cut out the very center with the Itty Bitty Shapers Punch. Each layer of the flower is stacked using dimensionals and the final layer has a Pacific Point brad in the center. A banner in Pacific Point was stamped in Whisper White ink with a "thinking of you" sentiment.   Thanks Gail for a terrific and inspiring card!  
 

 This picture shows the inside of the card and the sentiment.


Card Fifty-Three: Julie Link's masculine gate fold card is truly inspiring. She starts with a Basic Black card base that measures 4" x 11".  This piece was scored at 2 6/8" and 5 1/2". A 2/12" x 4" piece of Basic Gray card stock was embossed first with the Square Lattice Embossing Folder and then again with the Honeycomb Embossing Folder for the front fold of the card.  She repeated this process for the inside of the card using a  5 1/4" x 4" piece Basic Gray. Before adhering this layer she added three  1/8" Mini Silver Brads to the bottom right hand side of the card.  The moose image from the Walk in the Wild Stamp set was stamped in Basic Black onto Smokey Slate card stock and then cut out with a 2 1/2" circle punch.  Her next layers in Basic Black and Gray and a matching Smokey Slate layer on the inside of the card were cut out with the Window Frames Collection framelits.  Wow a simple but absolutely stunning card.  Thanks again Julie!


 This picture shows the card when it is flattened out. 

Card Fifty-Four: This next card front I received in a hallway trade with Cheryl Welch from Toledo Illinois.  Cheryl used a piece of Daffodil Delight for her card base and topped it with a Tea Lacy Paper Doily that was sponged with Daffodil Delight ink.  A 3 1/4" x 4 1/4" layer of Night of Navy card stock that was embossed with the Flower Garden Embossing Folder was then added.  Cheryl stamped the butterfly images from  the Backyard Basics Stamp set on page 79 in Night of Navy onto three different fine patterned pieces from the Gingham Garden Designer Paper series.  She cut out the butterflies using the Backyard Basics Framelits, which are offered as a bundle with a 15% discount.  The sentiment dream from the "Loving Thoughts " stamp set and the scroll frame from Four Frames were stamped on Naturals Ivory Card Stock in Night of Navy ink and then this piece was punched out with the Decorative Label punch.  A small Basic Pearl jewel was added to the center top of the sentiment for a nice finishing touch.  Thanks Cheryl this is a great card.
Card Fifty-Five: Rene Brown, Heritage Stampers Williamsburg VA created this next simple card using the Kind & Cozy stamp set on page 82 of the catalogue.  This set makes you think of grandma's house and warm apple pie and is a perfect match-up with the Gingham Garden DSP and the Gingham Jumbo Wheel!  Rene started with a base of Whisper White cut 4 1/4 x 11 and folded at the top.  A layer of Night of Navy measuring 4 1/4" x 5 1/4 follows.  The next layer of Whisper White was embossed with the Stripes Embossing folder.  The large circle image was stamped in Night of Navy and punched out with a 2 1/2" Circle Punch.  The thinking of you sentiment was stamped on a piece of Whisper White in Pear Pizzazz and Primrose Petals ink and then cut out with the Decorative Labels punch and layered on the large circle with dimensionals.  A small bow in 3/8" Stitched Satin Ribbon in Primrose Petals completes this lovely card.  Thanks Rene, and so nice running into you again at Convention and having an opportunity to share. 

Card Fifty-Six:  I fell in love with this "blessing" card by Andrea Lee from Sachse, Texas.  She writes on the back of her card "Enabling you to bless others through paper crafting.  I hope this sample will help you to be a blessing to others with your notes of kindness."  Wow, how delightful!  This card truly is a blessing!  It was created using stamped images from the Gingham Wheel, Flower Shop, Polka Dot Pieces and Remembering Your Birthday Stamp sets.  The bottom card layer is in  Basic Black that's been embossed on the card front portion with the Perfect Polka Dots embossing folder.  A strip created with the Gingham Wheel in Basic Black was then adhered along with a crisp Whisper White scallop edge that was embossed with the Delicate Designs embossing folder.  This great combination of layers was pulled together with a piece of the 3/8" Strawberry Slush Ruffle Stretch Ribbon.  To complete the front of the card three flowers from the Flower Shop Stamp set were stamped in Strawberry Slush ink and then punched out with the coordinating Pansy Punch.  The beautiful leaves were punched out of Gumball Green card stock using the Little Leaves Sizzlits.

As if the outside of this card wasn't gorgeous enough, check out the inside.  I told you.  It's equally stunning as the cover!  For the liner Andrea cut a piece of Whisper White card stock to 3 3/4" x 5 1/4"  and stamped the flowers from the Flower Shop stamp set in Strawberry Slush and the leaves from the Polka Dot Pieces stamp set in Gumball Green.  Perfect!  The verse stamped in Basic Black ink is just right for this card.  Andrea many thanks for blessing us with this beautiful card!  Loving it!

Card Fifty-Seven: Kayla Foster the creator of my next featured card which really inspired me with its soft colour combination and clean and simple look. The card base is a 4 1/4 x 11" piece of Whisper White card stock that's been stamped close to the bottom and top of the card face with the line image stamp from Gorgeous Grunge.  What a great choice for a contrast stamp. For her main image and sentiment stamps Kayla chose the "Too Kind" stamp set on page 71. This seven piece stamp set is classified as two-step because it has stamps that can be stamped over top of each other to give depth.  In this card Kayla used Crisp Cantaloupe and Calypso Coral for her light and dark flower colors and Wild Wasabi for the stems. She stamped the images on a 2 1/2" x 2 1/2" square of Whisper White card stock and then mounted this square on a 3 1/2 x 3 1/2" piece of Crisp Cantaloupe that has been embossed with the Perfect Polka Dots Embossing folder. The top and bottom ends of this larger square have a perfect row of scallops in Calypso Coral card stock.  The scallops were punched out with the Scallop Edge Border Punch.  Before mounting the large square to the card face with dimensionals, a 1/4" Stitched Grosgrain Ribbon in Wild Wasabi was tied on this piece. The sentiment was stamped in Calypso Coral onto Whisper White and then punched out with a 1 3/4" circle punch.  This piece was added to a scallop circle in punched out in Calypso Coral. A small basic pearl adorns this sentiment.  I can't thank you enough Kayla for your great card!  Love it!

Card Fifty-EightThis card will appeal to all you vintage lovers out there.  The stamping on this card made by Marga Martinez,  was done with the Shopping Around Jumbo Wheel shown on page 98.  She used Soft Suded card stock for her card base.  To create the first layer she stamped across the bottom of the Very Vanilla card stock in Soft Suede ink with the Jumbo Wheel and then embossed it with the Beautifully Baroque Embossing Folder.  Marga cut out a tag in Crumb Cake using the Chalk Talk Framelits and then added a smaller tag in Soft Suede that was also embossed with the same embossing folder.  To this piece she added a 1 1/2" by 1 1/2" piece of Very Vanilla card stock that was stamped with the Suffragettes image in Soft Suede.  Another nice touch is the small rosette, created with the Buttons and Blossoms Simply Pressed Clay Molds and Pressed Clay.  If you haven't tired this yet, it's a must do!  Marga coloured the blossom in Crumb Cake ink.  The beautiful bow was tied with a piece of 3/8" Soft Suede Taffeta Ribbon.

Card Fifty-Nine: Here's a sweet little birthday wishes card made by Bobbi Kincel.  Bobbi created a card base with a single piece of Pistachio Pudding card stock that measures 4 1/4 x 5 1/2, and then took a 5" x 7 1/2" piece of Naturals Ivory card stock scored it at the center and mounted it on the Pistachio Pudding base.  Prior to mounting this piece to the base she stamped the grid from the Off the Grid background stamp in Crumb Cake ink and added the little fly image from the Postage Collection Hostess set. Then Bobbi got extra creative by adding a super shabby chic frame and banner complete with ruffled ribbon to this fun card front.  The frame shape was embossed with the oval shaped embossing folder from Designer Frames.  The oval shape in the center coordinates with the Extra Large Oval Punch, and you guessed it, Bobbi used this punch to remove the center card stock, and tore around the outer rim of the oval to achieve a shabby chic look.  The oval was sponged with Pistachio Pudding ink and a small piece of Strawberry Slush 3/8" Stretch Ruffle Trim was added to the top edge of the oval along with a tiny flower punched out with the Itty Bitty punch - how cute! The dressed up frame was then mounted to the card front with dimensionals.  For the banner piece Bobbi stamped the happy birthday sentiment from the Simply Sketched Hostess set onto Natural Ivory cardstock and mounted it on Strawberry Slush card stock. The banner points are cut so perfectly on both pieces that I'm assuming she used a square punch to dothis.  There's also a small piece of the ruffled ribbon attached to the end of the banner to tie everything together.    And that's it folks another perfectly delightful card!  Thanks Bobbi for sharing.  I know I'm going to be CASing this one.  

Card Sixty: This beautiful and serene Trefoil Cross Sympathy Card has the perfect pairing of Pear Pizzazz, Elegant Eggplant and Whisper White card stocks and inks.  It was created by Germaine C. Meilach, from Rotonda Florida.  It was this Germaine's first trip to Convention and I had been hoping to run into her after making contact on Late Night Stampers, however as luck would have it we were strangers in passing.  By that I mean we actually managed to trade swap cards in the New Card Catalogue Swap, but in the rush and excitement of swapping didn't actually connect.  Too bad.    Germaine stamped the Trefoil cross in Versa Mark and then in Elegant Eggplant ink before setting the image with Clear Embossing Powder.  It has a beautiful glossy look.  For her background she chose the swirl design from Everything Eleanor and her sentiment comes from the Thoughts and Prayers stamp on page 92.  Germaine also added a strip of the new Pear Pizzazz Chevron Stripe Ribbon which is becoming so popular.  Beautiful card Germaine.  Thanks so much!
Card Sixty-One:  The final card in this post is a "KISS" (keep it simple stamping) card made by Sandi Hurford.  What I like about this card is that it is not the standard A2 birthday card size.  Instead, Sandi chose to do her swap cards on Stampin' Up! Notecards and points out what a great value these note cards are. There are twenty 5 x 3 1/2" Whisper White cards per package with matching 5 1/8" x 3 5/8" envelopes for just $7.50 and they mail at no extra charge.  Great tip Sandi and great card!  
The stamp set that Sandi used is "Sketched Birthday" eight-piece set on page 13 of the catalogue. This set which is available in English and Spanish, also coordinates with the 1 3/4" Scallop Circle Punch, Apothecary Accent and Bitty Banner Framelits.  I really like the way Sandi singled out different elements of the set like the hat, balloon and cake for her card front.  These are stamped in Staz On Black ink on Whisper White and she punched out the images with a  1 1/4" circle punch before mounting them with dimensionals on pieces of Basic Black that were punched out with the 1 3/8" Circle punch. I also like the way she didn't center each punched image, rather she captured them from an angle and then added a little piece of bling to each piece.  There is a basic rhinestone on the candle, a basic pearl on the hat and dabs of dazzling details on the balloon.  Finally I think the Honeycomb embossed card front is the perfect backdrop for these cute little images as it continues that clean crisp look. 
The inside of Sandi's card is nicely finished as well.  She's mounted the center circles from the Happy Birthday Cupcake image onto a basic black scalloped circle and added a basic rhinestone to the cupcake!  Voila!  Well done Sandi and thanks for sharing your talents. 


Masculine Birthday - Adventurous Sky FMS#

Welcome back and thanks for visiting my blog.  Today I have another masculine birthday card to share with you that features a soon to be rel...