Thursday, February 29, 2024

Cascading Folds Fancy Fold Cards

Have you ever received a handmade card from a fellow stamper that leaves you speechless and wanting to craft?  That's what happened when I opened this beautiful birthday card made by my friend Debby Evoy. Honestly when I pulled it from its fancy envelope,  I just stood there checking it out for at least 5 minutes. It was the prettiest card I'd received and I didn't want to put it down.  

What impressed me so much about this card?  Well, what didn't!  I loved the double tone cardstock layers and mix for the branches. And, I was really taken with the Perennial Lavender designer series paper layers. The focal point florals, tiny butterflies, amethyst gems (my birthstone) and lovely draped folds captured and held my attention. Honestly, opening this special fancy fold card was truly a WOW, WOW, WOW moment for this cardmaker. Thanks Deb for making my day special! 


Prior to Debby's card arriving I had a couple of cards in the works, that were  inspired by posts on Youtube and Pinterest. This fancy fold card style comes in a variety of names.  It's most commonly referred to on social media as a Cascading Pleat or Three Panel Fold Card.  There are also a variety of sizes and orientations.  One thing all of these cards have in common despite their different names and sizes, is they have easy to follow directions and there are many beautiful samples to inspire you. 

I reviewed a lot of different posts and samples before I made my cards, but my favourites were those demonstrated by Lesly Kilby of the UK, Tami White, Dawn Griffith, and Susan Camfield (Suestampfield).  Sizes and measurements on each of their posts.   

Here Are My Cards:  
I was making a get well card for a very sick friend and wanted something special.  Because I wanted to send some positive vibes I chose the Sunny Days 12 x 12 Designer Series Paper and the Brighter Skies stamp set to achieve this. 

My moods are highly influenced by colour so I wanted to project a soft and soothing background for my get well card.  The colour mix of Pool Party, Shaded Spruce, Smokey Slate and Whisper White in the Sunny Days dsp provided that  soothing feel. Also raindrops, clouds, and rainbow designs when mixed together were very cheery. 

This is a back view of the card base showing a better view of the cascading pleats. I scored and cut the card base, all the mats and DSP layers and did the sentiment stamping before I started assembling the card.  It came together very quickly.


This picture shows the front panel, that began with a piece of cloud covered dsp followed by a mat of Pool Party cardstock. The rain drops on the whisper white mat were stamped in Smokey Slate.  The raindrop stamp and the sentiment are both from the Bright Skies #162787 stamp set. I finished this panel by adding 5 pool party opaque faceted gems and although you can't see it I used Wink of Stella to add some shine to the raindrops. 

For the second or middle panel I adhered a piece of raindrop dsp.  When I planned the layers for this card I decided to stamp this adorable bunny from the "Playing in the Rain stamp set. This character has just the right amount of positivity and cheer to make my "feel good" get well card.  The image was coloured with Petal Pink, Smokey Slate and Pool Party Stampin' Up! blends 

The Playing In The Rain Stamp Set #160542 coordinates beautifully with the Bright Skies #162787 stamp set and dies #162793.  It's available in the current Annual Catalogue on page 60. 

This cool rainbow dsp was adhered to the inside panel of  the card.  added a smaller mat to the center so that the dsp would be the spotlight on this panel.  The "get well wishes" stamp is from the retired Petite Pairs stamp set which retired years ago and the umbrella is from the Playing in the Rain stamp set.  

HERE'S MY SECOND CARD SAMPLE: 

My second Cascading Pleat card is for a friend's masculine milestone birthday. He loves carpentry and Mr. Fix It stuff, so I know he'll love this one.  

This card was made in the landscape or horizontal orientation mode.  Although the card is assembled in the same way as my first card, the measurements are quite different and I had to make adjustments to the PDF instructions I was following.  

The tools were fussy cut from the free Sale-a-bration 12 x 12 designer called Trusty Toolbox. I used some dies from the Trusty Tools bundle on page 56 of the January Mini Catalogue.  I love the pegboard background die and the toolbox.  Both are easy to cut and or assemble.   

Another great stamp set I used from the Sale-A-Bration flyer was called Heartfelt Hellos.  I can't tell you how many cards I've made using the Enjoy Your Day sentiment over the past two months and I'll be sad to see it retired at the end of February. In fact I wish this one would carry over into the next catalogue season. 

The birthday sentiment and cake stamps on the middle panel are from the Hey Chuck stamp featured on page 49 of the Annual Catalogue.  Both were stamped in Smokey Slate ink, on the Whisper White banner.  I used the Nested Essentials Die set to die cut the banner for this focal point as well as some silver foil nuts and a screw from the Trusty Tools dies.  


Well that's it for today and I hope you enjoyed both of my versions of the Cascading Pleat card. I'll be making and giving away more of this style of card in future because it was so much fun to make.  All you need to make this card is a good mix of dsp and coordinating cardstock.

I hope you'll give this fancy fold a try, you're sure to find it easy to make.  I suggest you watch any of the crafters videos on YouTube first so you can get the full cutting instructions and see how the cascading fold is created.  

Let me know how whether you've tried to make a Cascading Pleat card or would like  to try it out.  I love to receive your comments and hear or see what you're creating.  Cheers and have a good week.   

HAPPY STAMPING!
PENNY TOKENS STAMPIN' SPOT

Penny Hanuszak, CDN Independent Stampin' Up! Demo since 2006

Shop My  24/7 Online Store 


Sunday, February 25, 2024

More Sweet Thoughts Memories And More

Following yesterday's FMS challenge post, I wanted to share some other cards I've made using the Sweet Thoughts Memories And More pack.  


It's so easy to make quick and simple cards using the Memories and More packs, because only a few additional supplies such as a paper trimmer, scissors, adhesive, some sentiment stamps and ink are needed.  You can add coordinating cardstock for layers and card bases, to extend the number of cards you can make.  

HERE ARE SOME OF MY CARD PROJECTS: 


Birthday Card:

This birthday card literally took me less than 15 minutes to put together, using the stickers in the kit and some standard sized basic whisper white card bases.  

Note:  I'm not a fan of the large sized envelopes and card bases (4 1/4" x 6 1/4") in the pack.  They are simply too big.  To remedy this I just cut the  cardbases in half and then cut those half pieces down to 4" x 5 1/4" mats.  The leftover scraps can be thrown away or used on the insides of the cards for decoration.   I also cut the envelopes apart so I can use the beautiful designed paper as layers on my cards.  The flap can be glued over the flap on a standard card envelope (Stampin' Up!).

Note:  When cutting the card base in half, do not cut on the fold line, move the card stock so the card lines up at the 4" on either side of the fold line.  

This is a single layer card without mats.  I started with a standard Whisper White A2 card base measuring 8 1/2" x 5 12" and scored at 4 1/4".  Next I adhered a 3" x 5 1/2 inch strip of the Calypso Coral card base in the center front of the card.  The two daisy strips from the sticker collection were placed on either side of the front panel.  The paint brush, sentiments and flowers are also from the sticker collection.  I randomly placed some pearlized white sequins to finish the card.    

Thank You Cards:


If you follow my blog, you'll know that I am a real fan of monochromatic designs, so this card was very easy to assemble. I cut a Pretty Peacock card base in half and then cut 5 1/4 x 4" mats from each one. I cut the two side strips which measure 1" x 5 1/4" from one of these mats. The 3 x 5 1/4" center panel was cut from one of the larger cards. I cut Stitched layering circles from Lost Lagoon and Whisper White for the focal point. The "thanks" sentiment and flower stamps are from Stampin' Ups! Artistic Impressions stamp set. The focal point was attached with dimensionals and some sequins were added to finish the card front.


For this second thank you card I die cut the scalloped edge mat using the largest die in the Scalloped Contour die set from a Calypso Coral card base.  I cut a mat from Lost Lagoon cardstock and then layered it with the floral 3 x 5 card.  I added some Lost Lagoon (retired) satin ribbon around the center of this layer before attaching it with dimensionals to the scalloped layer.  I stamped thanks in Pretty Peacock ink on a scrap of whisper white and then layered it on a scrap of the Flirty  Flamingo card base.  A few coordinating opaque Calypso Coral gems were added to finish the card off.  These gems were FREE from Sale-A-Bration.  


My third thank you card once again uses mats from the card bases. The floral strip was cut from one of the larger cards.  I basically just cut off the wording.  The butterflies are cut from  one of the 3 x 5" cards.  


The final card took probably 3 minutes to make.  I cut a 4" x 5 1/4" mat from Lost Lagoon and layered it with one of the larger cards that I had cut down to 3 3/4" x 5".  I added some of the pearlized sequins to give it some glam.  Easy Peasy!  
Note:  The Lost Lagoon Stitched Circles that were used in two of the cards were cut from the Lost Lagoon mats before they were adhered to the card bases so there is no waste. 

Well that's it for today's cards.  I hope you'll drop me a comment and let me know if you've tried out any of the Memory and More card kits that Stampin' Up! features, and or any comments on my cards.  I'd love to hear from you.  Enjoy! 


HAPPY STAMPING!
PENNY TOKENS STAMPIN' SPOT

Penny Hanuszak, CDN Independent Stampin' Up! Demo since 2006


Only 4 more days to take advantage of my
February Hostess Code don't miss out! Click here to see
how to apply the code to your order.  

Click here to visit My 24/7 Website: 

Sale-A-Bration 2024 is coming to an end. 
Last day to shop February 29, 2024 


Saturday, February 24, 2024

Sweet Thoughts Memories & More #FMS624

I have a new sketch challenge from Freshly Made Sketches  that I want to share with you today.  I'm not overly fond of the sketch, but others might find it appealing.  Here's the sketch by Kim:

Click here for the Challenge Information

Here's My Card: 


My card this week is made with the Sweet Thoughts Memories & More cards and envelopes (162931) and the Sweet Thoughts Memories and More Card pack (162930) ephemera which consists of sticker sheets, 4 x 6 cards and 50 double sided 3 x 4 cards.  


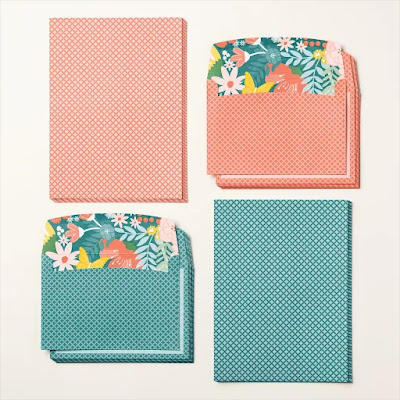
The Sweet Thoughts Memories & More Cards & Envelopes (162931) pack provides such an economical and fun way to make cards.  The kit comes with 20 cards and envelopes - 10 each of Calypso Coral and Pretty Peacock, that are a bit larger than your standard A2 card base.  And the coordinating envelopes have gorgeous floral flaps that blend Calypso Coral, Crushed Curry, Garden Green, Pecan Pie and Pretty Peacock.  

Having card bases and coordinating envelopes on hand, really cuts down on prep time when you want to craft.  With a little maneuvering you can actually double the amount of cards you can make from this kit by cutting the envelopes and the card bases down in size and using coordinating card bases from the colours offered.  What fun!  


And, mixing in the Sweet Thoughts and Memories & More Card Pack (162930) makes it even easier to create with.  This kit includes fifty 3 x 4 and 4 x 6 coordinating cards that you can use for layering, backgrounds or focal points, as well as 6 pages of stickers including some rose gold foil pieces.  

Both of these products are featured on page 44 of the January to April Mini catalogue.  

Well I hope you've enjoyed my post this week, and if you've never tried out a memories and more kit from any of Stampin' Ups! catalogues you may want to give them a try.  You can create so many great projects!  

Happy Stamping!
Penny Tokens Stampin' Spot 

Penny Hanuszak, CDN Independent Stampin' Up! Demo since 2006
  

Friday, February 16, 2024

Lovely Lavender All Occasion Card #FMS623

Here is the latest sketch challenge FMS623 from Freshly Made Sketches designed  by Linda.

FMS623

Here is My Card: 

I've been meaning to create some all occasion cards or other projects with my January 2024 Paper Pumpkin (PP) kit but my mojo just wasn't working enough to actually get started.  So, when I came across this week's Freshly Made Sketch challenge that was all I needed to get inspired.  I loved the fact that I could use any shape I wanted to create the focal point, I wasn't limited to something oval. 

My card design evolved from both the sketch and the little postage square focal point that had been hanging around on my desk for a week or two.  It was perfect for tucking some of the leaves and flower images from the Paper Pumpkin kit behind.  

It started with a standard A2 size Whisper White cardstock base, followed by a 5 3/8" x 4 1/8" piece of Blackberry Bliss.

I cut one of the PP card bases in half for the dsp mat and then cut the 4" x 5 1/4" mat on an angle to form half of the card front layer. I used a second 4" x 5 1/4" Whisper White card stock piece for the bottom half of the front mat. Before layering the two pieces of the mat, I embossed the full white piece with the Layered Florals 3D embossing folder call. The dimension this embossing folder brings to the mat is so wonderful, I simply love the effect!

I added a 1/4 strip of Blackberry Bliss cardstock on an angle across the join line and snipped off the overlap.  
The focal point began with the Perennial Postage square die cut from a scrap of Blackberry Bliss cardstock.  The lavender flowers and leaf sprigs from the PP kit were glued to the back of this piece. The square of Whisper White, also a scrap was die cut with a retired Simple Shapes die cut, and the sentiment was stamped in Highland Heather ink. 


Once the focal point was adhered with dimensionals across the center of the card I added some of the beautiful Purple Fine Shimmer gems which I got with the Perennial Lavender Suite Collection on page 23 of the Mini Catalogue.  

Supplies:
Here is a list of all the supplies used to make this card. 

Stamp Sets:  Lovely Lavender January 2024 Paper Pumpkin 

Cardstock:  

  • Whisper White 8 1/2" x 5 1/2" for base scored at 4 1/4"
  • 2 Whisper White 4" x 5 1/4" mats for the front panel and inside and a 2" x 2" scrap for the sentiment square.
  • 1 Blackberry Bliss mat 4 1/8" x 5 3/8" for card front and a 1/4" strip, and a 2 x 2" scrap for the focal mat.
Paper Pumpkin January 2024 Kit:
  • One card base piece trimmed to 4" x 5 1/4" and then cut on an angle for the front mat.
  • Three lavender floral pieces and one sprig of leaves in Lost Lagoon.
Accessories:
  • Purple Fine Shimmer Gems
  • Layered Florals 3D Embossing Folder
I hoped you enjoyed my submission to FMS623 and will check out the other submissions  Between the designers and the participants there is a bevy of card ideas.  Better yet, if you're following or thinking of following my blog why not share what you made with this sketch.  That would be fun!  
Happy Stamping!
Penny Tokens' Stampin' Spot


Penny Hanuszak, CDN Independent Stampin' Up! Demo

Click here to Shop in my 24/7 Online Store: 


Sale-a-bration Ends February 29th, 2024 ... Don't miss out 


Don't Forget to Add My February Hostess Code: 


Tuesday, February 13, 2024

Sending Love with Most Adored DSP

I've had a lot of fun this past week making Valentine's Day cards to send to friends and family.  For these cards I used a fancy fold called a side flap or latch card design.  I used a mixture of old and new stamps with hearts and valentine sayings as well as embossing folders.  

This is a very easy card to make and starts with a 5 1/2" x 8 1/2" card base that's scored at 4 1/4".  On the right hand side of the card front trim off 1" so you have a view of the interior of the card.  Cut a 4" x 5 1/4" piece of Whisper White or any light neutral for the mat on the inside of the card.  

For my cards I used designer series papers from the Most Adored paper pack that's available for FREE during Stampin' Ups! Sale-a-bration.  

For the front panel on the card cut a piece that measures 3" x 5 1/4" and for the inside edge of the card cut a coordinating piece that measures 1" x 5 1/8".  TIP:  if you're planning on making several of these cards at one time then cut two different pattern pieces of few pieces of DSP into 3" x 12" strips, and then cut these to 3" x 5 1/4". Cut a third strip from these strips at 5 1/4" intervals for your front panel.   You're left with a 6" x 12" piece that you can cut the 1 " x 5 1/8" strips from then just mix and match patterns. 

The latch mechanism is held in place by the focal point design so you need to cut your latch to fit between the dimensionals that hold the focal point in place.  For my latch I chose to use the 2nd and 3rd largest dies from the Nested Essentials dies (#161597 pg 165 AC).  The largest die cut is on coloured cardstock and I scored it right at the center of the die from top to bottom and then moved the cutter blade over about a 1/2 " and cut the remaining cardstock off.   Burnish the fold line with your bone folder and add glue to the backside of the fold.  Line up the fold along the side edge of the base and glue down.  Once this is done you can add the inside mat and decorate.  

Supplies: 

Stamp Sets: Perennial Postage (new), Artistically Inked #154542 (Retired),
Kangaroo & Company #154502 (Retired), Love Cats (160410 Retired), Blooming Love (140640 Retired), Heartfelt Hellos (Love You More - #162964), Hearts a Flutter (#129252 Retired), 
Dies: Nested Essentials, Give it a Whirl (Small & Large Heart), Kangaroo & Company, Hearts a Flutter 
Punches:  Large Heart (Retired) 
Embossing Folders:  Layered Florals 3-D #162935 Jan-Apr Mini 
Ink: Real Red and Momento Black Ink. Flirty Flamingo
Designer Paper:  Most Adorned DSP 
Cardstock: Real Red, Whisper White, Flirty Flamingo, Petal Pink
Embellishments:  Flirty Flamingo and Pink Sequins, Red Rhinestone Basic Jewels (retired). 

Here are some other cards I made: 
The little hearts are from the retired Kangaroo & Company stamp set and the Hi there Valentine is from Love Cats stamp set.  the hearts are popped up on dimensionals.  Some soft pink pearlized sequins provide a bit of glam.  


I absolutely adore this little black cat which is from the retired Love Cats stamp set.  I couldn't resist using it for several of my focal points.  

In this photo you can barely see it, but I actually embossed the white part of the flap with the Falling Hearts embossing folder (retired).  The Big Hugs sentiment is from the Perennial Postage  stamp set.


This is the only one of my cards I chose to use some of the reverse side of the Most Adored DSP.  The gold and white is beautiful, but I really like it combined with Real Red to give it some punch.  The gorgeous little envelope and bubbly hearts are from the Kangaroo & Company stamp set (retired).


The Layered Florals 3D embossing folder came in handy for adding texture to these hearts.  I couldn't believe what a beautiful  impression this folder gives.  I plan to experiment with it in the coming weeks using blends.  


I hope you like my Valentine Day card sampling and it gives you some inspiration to try a different fancy fold, or make some valentine cards to share with friends and family.  I'd love to hear from you.

HAPPY STAMPING!
PENNY TOKENS STAMPIN' SPOT

Penny Hanuszak, CDN Independent Stampin' Up! Demo


Last Free Shipping of the Year - December 9, 10 11, 2024

Heads up, it's time for the last FREE SHIPPING promo of the year! From December 9–11, you can shop and save on all qualifying orders of...