Showing posts with label tutorial. Show all posts

Saturday, July 25, 2015

Small Gift Box Tutorial Using Gift Box Punch Board

It seems everyone really liked the small gift box I posted in the Wacky Watercooler July Blog Hop post this past weekend, so as promised here are the instructions on how I made it. 

I can't take all the credit for this tutorial however, as my friend Sandy showed me how to make my first box with the Gift Bag Punch board.  Her example was based on a video by a UK demo named  Linda Parker.  Linda's version is made with 12" x 12" card stock and she shows some really cute samples on her video to give you an idea of how versatile this punch can be. 

What You Need to Make It:
  • 8 1/2 x 11 Card Stock for box base
  • Coordinating DSP
  • Simply Scored Score Board
  • Gift Bag Punch Board
  • Trimmer
  • Bow Builder Punch 
  • Adhesive - Sticky Strip or Tom Bow Glue and Glue Dots
Assembly:
1.  Cut the card base to measure 6 3/8 x 10 7/8".


2.  Use your Simply Scored score board to score at:
  • on the short side score at 1 3/8" and at 5", turn
  • on the long side score at 1 3/8", 3 1/4", 6 1/8" and 8"
3. Using the Gift Bag Punch Board:
If you haven't used the Gift Bag Punch Board yet, here is Stampin' Ups! introductory video which demonstrates how to use the punch and the various elements of it. It will help you understand how this wonderful tool works.
 

In this view you can see that I have punched out on the score lines and at the edges of the card stock on both sides.
  • On the long side of card stock line up the 1 3/8" score line with the starting line on the gift bag punch board and punch.  Move the card stock to the next score line (3 1/4") and punch, move to the next score line (6 1/8") and punch, and then move to the last score line (8") and punch. 
  • Line up the very right edge of the card stock on the start line and punch. 
  • Flip the card stock and repeat the process in the previous step.  
4.  Use your bone folder to burnish all the score lines.

5.  Put glue strips on the tabs or use Tom Bow glue as indicated in this photo and then assemble box. Make sure that the sides are even and square before you press down on the sticky strip to secure it.  This last step is essential for getting your box to sit squarely. 

 6.  Once the box is assembled you'll want to decorate it.  I've listed the card stock and DSP sizes below for layering mats and dsp.  You could eliminate either of these steps dependent on the look you are going for. 


Decorating the Front, Back and Sides of the Box:  
I like to decorate my boxes with card stock mats layered with a coordinating designer series paper. The photos below show where the mats would be added to the box. 


Cut Card Stock Panel mats as follows:
  • 1" x 3 1/4" cut one for front lid panel
  • 1 1/2" x 3 1/4" cut one for top lid panel
  • 2 1/2" x 3 1/4" cut two for front and back panels
  • 1 3/8" x 2 5/8" cut two for bottom side panel 
  • 1 1/8" x 1 3/8" cut two for side top lid 
Cut DSP panel mats as follows:
  • 7/8 x 3 1/8" cut one for front lid panel
  • 1 3/8" x 3 1/8" cut one for top lid panel
  • 2 1/4" x 3 " cut two for front and back panels 
  • 1 2/8 x 2 1/2" cut two for bottom side panel
  • 1" x 1 1/4" cut two for side top lid
Use Tom Bow adhesive to glue the mats together then glue to the box. 

For Banner on Lid:
The Banner Triple Punch gives you triple the banner options in one punch. You can make banners in three widths--1", 1-1/2", and 2"--in any length. Just slide the paper in, punch, and get perfectly notched banners (or gift tags, bookmarks, belly bands) every time.  Here I've used it to make the banner on the lid of the box:

1.  To make the banner: 
  • Cut a 2" x 4 1/4" piece of card stock and punch out banner shape
  • Cut a 1 1/2" x 4" piece of coordinating dsp and punch out banner shape
  • If you want a third banner cut a 1" x 3 3/4" piece of card stock and punch out same as above.
2.  Adhere the 2 or 3 banners together with sticky strip.  Line up the back edge of the banners with the back edge of the box lid and gently press the front edge of the banner over the front end of the lid.  Turn the banner over and using the Simply Scored score board make a crease where you see the fold line. On my box the crease line was approximately 2".  
Here you can see the three banners that were stacked and adhered to the top of the lid with sticky strip.  The part that extends over the top to the front of the box lid was glued down with a small piece of sticky strip to hold it in place. 

This is what the box lid looks like from the inside once the banner has been added.
 3.  If you want to secure the box lid to the box base you can add a Velcro sticky back fastener.  This is optional.  See photo for placement.

Here's My Finished Gift Box:
I didn't particularly care for the plain card stock banner on the top of the box and so I added some cherries to it, to match the smaller ones in the Cherry on Top Designer Series paper used for the panels.  The large cherries were from a stamp image in the Button Buddies (retired) stamp set.  I fussy cut them out and glued them on with Tom Bow glue.  

I added a small  Watermelon Wonder bow that was punched out with the Bow Builder punch.  It's assembled with glue dots and was adhered to the front of the lid banner.


More Samples:

Here are some additional samples of gift boxes and bags that I've made over the past few weeks, with the help of my friend.  A big hats off to Sandy Stoyanowski who first showed me how to use the Gift Bag Punch and then loaned it to me for my Open House and subsequent classes, while mine has been on back order. Can't thank you enough Sandy! 


This little cutie is made with the same dimensions but I didn't layer the card stock and DSP panels, I only adhered DSP. This box base is Island Indigo card stock and the beautiful paper is from the Bohemian DSP collection.

The card base for this box is Crisp Cantaloupe (retired In Colour 2015).  The panels are made with Strawberry Slush card stock and All Abloom Designer Series Paper (retired).  The bow was cut out of Pistachio Pudding DSP from the All Abloom Collection.
Well that's it for today.  I'll have some other gift bags and boxes to show you once I have my very own Gift Bag Punch Board and can play with it at my leisure.  I think this is one of the best tools that I've used in a while not only because it was so useful, but because it was a lot of fun.  

Before I go I'd just like to add that I think it's important if you're going to make bags and boxes that you keep templates that you can use for reference.  I have several now and it makes life so  easier when you don't have to re-create the wheel every time or look for videos and tutorials on line. Here's the template I made for this box and it has all the measurements all in one glance.
If you enjoyed this tutorial or had difficulty with it please let me know, I'd love to hear about your experiences with the Gift Bag Punch Board and this little gift box.  Any tips you can share are also appreciated.

Happy Stamping!
Penny Tokens

Sunday, June 28, 2015

Peek-A-Boo Flip Top Card

On May 28th and June 18th I posted some cards that used a technique called the "Peek-A-Boo Flip"  or "Fold Over Window" card and I promised to give you  some information on how to create them. Sorry that it took so long and I missed a couple of deadlines. 

As mentioned in my Wacky Watercooler Blog Hop post, I found the original design, a graduation card, on Glenda Caulkin's blog.  She had designed a card for her nephew and did a great video showing how she did it. 

I also came across a Sympathy Card created by Dawn Olchefske's called A Fold Over Window Card.  Dawn's video is also an excellent source for information on measuring correctly. 

Okay, so what did I do for my cards?  Well, here's a birthday card I made featuring the Celebrate Today stamp set:


Supplies: 
Stamp Set:  Celebrate Today
Ink: Watermelon Wonder (New In Colour Ink - 2015-2016 Annual Catalogue)
Card Stock: Bermuda Bay, 
DSP:  New - Cherry on Top DSP 2015-2016 Annual Catalogue 
Accessories:  Trimmer, Embossing Folder, Big Shot, Balloon Framelit Dies (coordinates with the  Celebrate Today stamp set or can be used on it's own), sponge daubers, Mono Adhesive,

Assembly:

1.  To begin, make all your paper cuts as follows:
  • 1 piece of 3 1/4" x 11"co-ordinating card stock for flip panel, score at 5 1/2"
  • 1 piece of 4 1/4" x 5 7/16" co-ordinating card stock for the card base 
  • 1 piece of 3 x 5 7/16" Whisper White card stock for the center panel
  • 2 strips of DSP or cardstock measuring 1/2" by 5 7/16" for the decorative panels.
2. Decorate the front of the 3 1/4" x 11 flip panel in your style by:
  • stamping or embossing the flip panel to fit your design
  • using a die cut or punch to cut a piece for the window or peek a boo opening. 
3.  To assemble the inside of the card:
  • Stamp images and/or sentiment on the inside panel.
  • Glue the Whisper White panel to the center of the card base.  Tip: I line up the card base and center panel using grid paper, when I can see that it's even on both sides I adhere the white panel
  • I use Tom Bow glue to adhere the two decorative strips along the edges of the white center panel.  Make sure that these pieces line up at the top and are butted up tightly against center panel. Once you've adhered these pieces, flip the card base over and trim away any overlapping edges along the top and bottom of the card base.
  • To finish the front of the card, center the flip panel, against the front side of the card base.  Again I'd recommend using the grid or a ruler to make sure the flip piece is evenly lined up on both sides of the card base.  Next I add Tom Bow glue to the back of the panel and re-center the piece being careful not to get glue on anything. Once you're satisfied with the placement lay the card down and press so the back of the flip panel attaches to the back of the card base.    When you use Tom Bow glue, you still have an opportunity to reposition the card piece if it isn't quite centered.  
This Peek-a-Boo Flip Top fancy fold can be used for any occasion.  Your imagination and creativity are the only limits for making this very versatile, inexpensive and fun card.  Here are some other cards I've made using this technique:

Sympathy Card:
I wanted a simple and clean looking Sympathy Card that didn't involve a lot of layers. For this card, I stamped the cross hatch image in Smokey Slate and the flower from the "You've Got This" stamp set in Elegant Eggplant on the flip panel of this card.  

The opening was die cut using the small label from the now retired Thinlets Card Labels die set. The inside sentiment is from the Petite Pairs stamp set.  I chose Smokey Slate for the card base cut the two decorative strips from Elegant Eggplant that was embossed with the Lovely Lace embossing folder.


It's a little hard to see but I took the fine tip of my Elegant Eggplant marker and outlined the center parts of the flowers to make them standout a bit more.  It worked beautifully and there's just a hint of a darker shade of Eggplant which was perfect.

I repeated the flower image on the inside of the card but I stamped off before adding the image so that it was a bit softer.  

Graduation Card: 
Once again, here's the graduation card I made for my niece who recently graduated. I pretty much CASED this card from Glenda Caulkin's, as noted above.  

I did the card base in Night of Navy card stock, and the two decorative panels were cut from Gold Foil sheets.  Love that stuff!  

The "Celebrate Today" Photopolymer stamp set was a perfect choice for this joyous occasion.  I love the versatility of the images and sentiments in this set. Tip: if you're searching for this set in the catalogue and can't find it, that's because it's filed under "Everyday Occasions" rather than birthdays, because it's one of those sets that's just so much more.  

I embossed the Happy Graduation sentiment and balloon tail with Gold Embossing powder.  The front of the flip panel is dry embossed with the Lucky Stars Embossing Folder.  Metallic Gold thread was used for the bow on the balloon base. 


Christmas Card:  
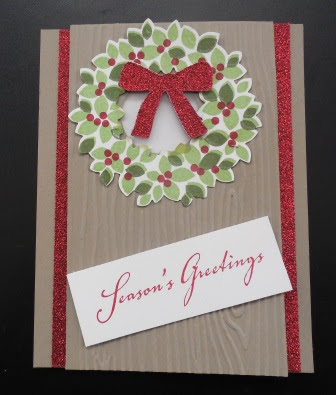
Here's an early Christmas card made with this same technique.  This card is going to be one of my Christmas in july Stamp-a-Stack cards because it's so quick and easy to assemble. 

I used Tip Top Taupe one of the new In Colours for the card base and flip panel piece.  I dry embossed the Flip Panel with the Woodgrain Embossing Folder and cut out the hole with a 1 3/8" circle punch.  

The wreath is from the Wondrous Wreath stamp set and it was cut out with the coordinating Wonderful Wreath framelit dies.  I'm so happy that both of these products were carried over from the Holiday Occasions Catalogue.  

I love all the accessories that come with the Wonderful Wreath framelit dies including the little bow?  It's the perfect size.  I cut the decorative panel pieces and two bows from Red Glimmer paper .  I glued the bows together so that the glimmer paper is showing on both sides, before I attached it to the wreath with glue dots.  

While you can't see it in this photo, I've added a window transparency sheet behind the wreath so it looks like it's hanging over a real door window.  I cut out the window sheet with a 1 3/8" circle punch and adhered it to the back of the wreath.  I didn't want all the leaves showing through the transparency so I re-cut the Tip Top Taupe 1 3/8" circle negative with a 1 1/4" circle punch and attached it behind the wreath.  You can see it in the second picture below.


You can see the second bow and the inner circle I made with Tip Top Taupe, to hide the unfinished back of the wreath.  


Well that's it for this post.  I hope I've shown you how much fun and how versatile this  Peek-a-Boo or Fold Over Window card can be, and I hope my instructions as well as the video links were easy to follow.  Look forward to hearing your comments.

HAPPY STAMPING!
PENNY TOKENS 

Thursday, February 26, 2015

Wacky Watercooler Spring Fever 2015 Blog Hop


I was absolutely thrilled when Heidi Weaver asked me to participate in the Spring Fever Wacky Watercooler Blog Hop this month.  This is one of those really fun blog hops where the design participants always come up with awesome projects relating to a stamping theme.    This hop celebrates Sale-a-bration and the Spring Occasions catalogues.

Whether you linked to me from Christine Giuda's Dancin Stamps blogspot or this is your first stop on the Spring Fever Wacky Watercooler Blog Hop, I hope you'll enjoy what I have in store for you. This is a triple project post, so make sure you keep scrolling down!  

Oh and just remember our blog hop is hopping in a circle so grab some refreshments and continue hopping until you return to your starting point. It's quite a  journey and I'm sure you're going to find plenty of inspiration along the way. I'd love it if you left a comment to let me know that you've stopped by, and how you liked my projects, and I hope you'll come back to visit me again. 

In case you have to leave or get lost, here's a list of the blogs participating in this hop:
My Favorite Past Project:
I was thrilled to learn that Kath Rick's blog "All That Scrap" was assigned to me for the favorite past project part of the blog hop.   

Let me tell you, choosing a card to CASE (Copy And Share Everything) from Kath's blog was definitely a hard choice for me as there are just so many exciting posts. Kath's card making creativity has long been an inspiration for me, and I sincerely enjoy visiting her blog and checking out her many challenge and technique posts.   I hope you'll drop by and check it out too.  You won't regret it.  

Here's the card I chose for my "past favourite".  
Card created by Kath Ricks of All That Scraps Blog Spot - February 13, 2014
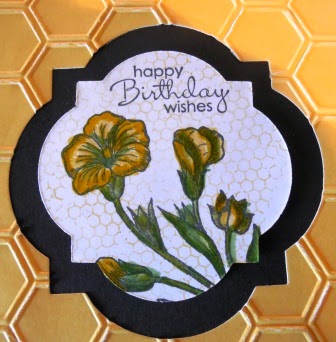
Here's my version of Kath's Birthday Card:
I liked the Watercolour DSP Kath used for her background and the blend of white, yellow and black layers. I also liked how the floral image was showcased on the black background left by the die cut.  I decided to copy the colour scheme but changed up my layers, dies and stamp sets for my rendition. I hope you like my version and will leave me a comment on it.
I'm a big fan of the Butterfly Basics stamp set in the Occasions Spring Catalogue, so when it came to designing this card I didn't have to think very hard about which stamp set I'd use.  The floral image is fabulous whether it's stamped in it's entirety or shown as only a partial image and I think it's one of those stamps that looks good coloured or just stamped in black ink.  I would have liked to have used Blendabilities on this image however I think it looks okay coloured with Stampin' Up! markers.  Let me know what you think.   

I chose to play up the black and white frame on Kath's card by adding an additional two layers below the designer paper layer.  Note:  Before adhering the first black and white card stock layers, I cut a die image from the centers to reduce their overall weight on the card.  Because my image was larger than the one Kath used I opted to use the Window Frames Collection Framelits to cut the opening in my dsp layer before embossing it with the Honeycomb Textured Impressions Embossing Folder.  Note:  DSP becomes really fragile to handle once it's embossed, so I didn't want to risk tearing it.  

This is the inside of the card and the Whisper White panel measures 5 1/4" x 4".  I stamped the Honeycomb from the Basic Butterfly stamp set across the center of the page and then layered the sentiment from the same set on top of it.  Two  1/4" strips of Basic Black and DSP were layered across the bottom. 


Here you can see some of the detail and colouring of the stamped image.  


Supplies Used:
Stamps:  Butterfly Basics and Petite Pairs 
Inks: Black Memento Ink, Hello Honey
Markers:  So Saffron, Starfruit, Crushed Currie, Old Olive, Wild Wasabi and Pear Pizzazz
Card stock:  Whisper White, Basic Black 
DSP: 
Accessories: Window Framelits, Paper Trimmer, Big Shot, Honeycomb Embossing Folder, Adhesive
Butterfly Basics Stamp Set page 26 of the Occasions Catalogue

MY SECOND PROJECT:
I'm totally in love with the stamps and products in this year's Sale-A-Bration and Occasions Spring catalogues.  My favorite stamps are the Lotus Blossom and Basic Butterfly because of their soft feminine images and the ease with which you can combine them.

For my second project, I decided to make a Center Stair Step Card featuring both these stamp sets.  If you've never tried a stair step card before, now's your chance.  I hope my instructions and photos will help you along.  In my opinion, stair step cards have such a wow factor when they come out of the envelope, that makes them fun to give!   
Here's my Card:
Supplies:
Stamp Sets:  Lotus Blossom, Basic Butterfly, Petite Pairs and Gorgeous Grunge
Card Stock:  Basic Black, Whisper White and Calypso Coral
DSP:  Stacked With Love 
Ink:  Tuxedo Memento Black Ink, Cantaloupe Crisp, Old Olive 
Accessories:  Trimmer, Score Pal, Bone Folder, Basic Butterfly Framelits,
Basic Pearls, Old Olive 1/8" Taffeta Ribbon, dimensionals, glue dots, and adhesive strips.

How Did I Do It:
Although you may think this is a difficult card to make, fear not, because it's super easy.  This card requires only a few cuts and scores and then you're off to decorating it, so just follow my steps:
1.  Cut your Basic Black card base to measure 5 1/2" x 11".  
2.  Using your trimmer place your card stock facing the right side and at the 1" mark, move the cutting blade down to the 6 1/2" mark on the ruler.  

3.  Flip the card stock over and repeat this cut on the other side.  These are the only two cuts you need to make on this card stock. 
4.  Starting with the card stock facing the top of your trimmer, score from the outside edge of the card stock to the beginning of the cut at the 1" mark then move over to the other side of the card and repeat.
5.  Move the scoring blade down to 2" and score to the cut line and again on the other side of the card.
6.  Move the scoring blade down to 5 1/2" mark and score but this time move to the inside of the cut lines and score just the center part of the card.  This will be the fold line for the front of the card.  
7. Move the scoring blade down to the 6 1/2 " mark and score from the outside edge of the card stock to the score line and repeat on the other side.
The score lines are the dashes at 1", 2", 5 1/2" and 6 1/2". 
 Note if you're using a Scoring Tool to do the scoring, complete all the scores at 1", 2", 6 1/2" and then remove card stock, flip it and repeat for the other side of the card stock and then score only the center at the 5 1/2" mark.  To fold score lines, start at the 1" score and do a mountain fold.  At the 2" score line do a valley fold and at the 5 1/2 and 6 1/2" score lines do a mountain fold. Reinforce folds with bone folder. 
The 1", 5 1/2" and 6 1/2" score lines are folded as mountain folds and the 2" is a valley fold.
8. Decorate the side, front and bottom panels with Stacked with Love Designer Series Paper and Cranberry Crisp card stock. Here are the measurements for the panels:
Black card base before the panels are adhered. 
Side Panels:
Cut two pieces of Cranberry Crisp measuring 4 1/4" x 3/4".  Cut two pieces of DSP measuring 4" x 5/8", adhere to side panels. 

Bottom Panel:
Cut one piece of Cranberry Crisp card stock to measure 5 1/4" x 3/4" and a piece of Stacked with Love DSP to measure 5" x 5/8".

Center Panel:
Cut a piece of Cranberry Crisp cardstock to measure 3 1/4" x 4 1/4".  Cut a piece of Stacked with Love DSP to measure 3 x 4".  *Cut a piece of Basic Black cardstock to measure 3 3/4" x 2 3/4" and a piece of Cantaloupe Crisp to measure 3 5/8" x 2 5/8".  The Whisper White panel is 2 1/2' x 3 1/2".  

Adhere all the card stock and DSP pieces to the panels, except for  the ones marked with an asterisk (*) above.  They will be added with dimensionals, once the stamping is done. 
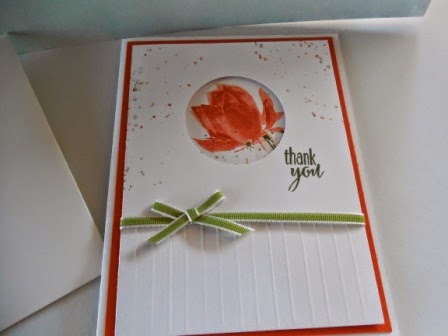
9.  Stamp the Lotus Blossom stamp image in Cantaloupe Crisp on the Whisper White panel. the stems are stamped in Old Olive and I added some splatter with the Gorgeous Grunge splatter stamp in Old Olive and Cantaloupe Crisp.  Stamp the "Happy Birthday Wishes" in Olive Green.  Stamp the small butterfly from the Butterfly Basics stamp set in the upper corner. 


10.  Tie a piece of Old Olive 1/8" Taffeta Ribbon around the card panel and add a bow.  Adhere to Cantaloupe Crisp and Basic Black panels noted above and then mount on center card panel with dimensionals. 

11.  Die cut two of the medium sized butterflies with the Butterfly Framelit Dies and adhere with glue dots to the bottom right hand side of the card.  I used Basic Pearls on the center of the butterfly.  

Can be bought as an individual die set or as part of a bundle.  See page 26 of the Occasions Catalogue.

12.  For the card inside I cut a piece of Whisper White card stock to measure 5 14" x 4" and adhered it to the inside.  I stamped Happy Birthday from a no name set and some more of the Lotus Blossoms to finish the card.  


Additional Project:
I am also going to show you some of the other card sets that I've made with these stamp sets and hope you will enjoy them too.  

This card set was made with Tangelo Twist and Hello Honey inks. 


Matching envelopes which I made with my Envelope Maker.  

I made four of this card style and they featured mixed sayings - "Happy Birthday", "Thank You", "Get Better Soon" and "With Sympathy".  I used Tangello Twist and Mossey Meadow Inks. 

The inside view and matching envelope.


Loved the addition of the Gorgeous Grunge Splatter!  It really adds a watercolour effect to these card fronts. 

This one is quite unique in that I had been stamping over top of a piece of Whisper white card stock on my piercing mat, and at the end of all the stamping I was left with a collage of images.  I couldn't let it go to waste so cut the card stock down to card front size and used it.  I quite liked this "art work". 

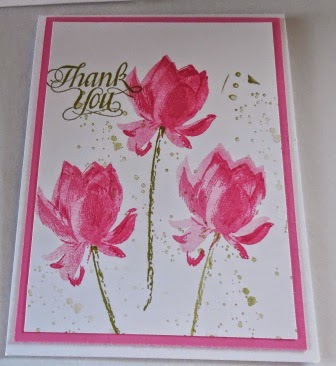
The following sets of cards were down in Old Olive and Strawberry Slush inks and cardstocks.  


All of the thank you cards had a similar inside. 


Well that's it for me for today.  But I'll be back again with some more projects later this week, so I hope you'll come back. Thanks again for visiting and for your feedback.  Much appreciated. 

The next person on our Wacky Watercooler blog hop is Heidi Weaver and I know she'll have something awesome to share with you.  

Click here to go to Heidi Weaver's blog: 

Click here to go to Christine Giuda's blog: to go to 

Click here to go the Wacky Watercooler Blog 

Happy Stamping!
Penny Tokens

Rock Star Masculine Birthday Card

We finally have some good weather and have spent the week tidying up in the garden and the garage.  Visits to the recycling plant to get rid...