Showing posts with label Watercooler Wednesday. Show all posts

Wednesday, May 31, 2017

Watercooler Wednesday #121 - Anything Goes - Always An Adventure

It's hard to believe but we've reached the end of May and it's time for our WWC121 Anything Goes challenge.  Are you up for it?   

For all the challenge details and to share your project, visit the Watercooler Wednesday Challenge.   We'd love to have you join us.  You have until 5:00pm Pacific Time on Monday, June 5th  to link your project.

Here's My Card: 
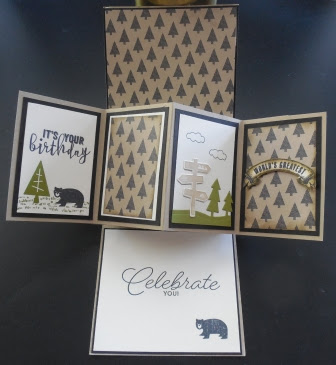
Now that the weather is finally improving and summer is just around the corner, I was inspired to make a Pop N' Twist birthday card for a guy friend showcasing the great outdoors.   He's an avid camper, so this card should make him smile.

Supplies:
Stamp Sets:  Always An Adventure(R), Balloon Adventures (R), Guy Greetings and Birthday Blast (R).
Card Stock:  Very Vanilla, Basic Black, Chocolate Chip, Old Olive, Crumb Cake, Whisper White and 2 sheets of DSP from the Warmth and Cheer DSP Pack
Inks:  Old Olive, Crumb Cake and Momento Tuxedo Black
Accessories:  Acrylic Blocks, Big Shot, Paper Trimmer, Outdoor Adventures Framelits, Stamp-a-ma-jig, Bunch of Banners and Stitched Shapes Thinlet Dies, Tom Bow Glue, Dimensionals, Black Rhinestones, Bone Folder and Detail Scissors.
I've been procrastinating about buying the Always an Adventure stamp set and coordinating Outdoor Adventure Framelits before they retired at the end of this month. Fortunately my sister loaned me her set to make this project and I've made up my mind to get it.  I think I was sold when I cut out the mountains.  What fun!

How It Came Together:
Note: When I construct a Pop N' Twist card I make all the foundation pieces out of the same colour of card stock.  For this card I cut the following from Very Vanilla card stock:
  • Card Base - 4 1/4" x 11" and scored at 5 1/2"
  • Pop N' Twist Hinge - 3 1/2" x 8" scored at 1 3/4" for the center.  On the long side measure down from the top to 2 1/4" and mark with a pencil.  Turn and measure from the bottom up 2 1/4" and mark with a pencil.  Do this on both long of the hinge.  Take a ruler and link up lines in an X.  Use the lines as a guideline and use your trimmer to score along the X lines.
  • Accordion Fold Piece - 3 1/2 x 10 scored at 2 1/2", 5" and 7 1/2" 
  • Belly Band 3/4" x 10" scored at 2" and 6 4/8"
Card Front:
Layer 1:  4" x 5 1/4" Basic Black card stock.  Before adhering to the card base die cut the 3 5/8" circle from this piece and set aside.

Layer 2:  Cut a piece of DSP to measure 3 3/4" x 5" and adhere to 1st layer.

Layer 3:  Adhere the Basic Black circle to the upper top of the DSP.  Cut a 3 1/4" circle from Crumb Cake with the Circle Framelits. To create the scene die cut the mountains from Chocolate Chip, the Peaks from Crumb Cake, the Clouds from Whisper White, the stand of trees from Old Olive, a black bear stamped with Tuxedo Black ink on Whisper White, and a tent stamped in Crumb Cake on Very Vanilla. Layer these pieces onto the Crumb Cake circle.  The mountains, peaks, and clouds are all glued flat with Tom Bow Glue and the trees, tent, and bear are popped up with Dimensionals.  Attach the Crumb Cake circle to the black circle with Dimensionals.

Belly Band:  Crease the folds and adhere at the back with a piece of sticky strip.  Stamp "The Best is Yet to Come" in Momento Tuxedo Black ink in the center front.  Cut out a banner from Basic Black using the Bunch of Banner dies and center over sentiment.  I added 3 small black rhinestones beneath the words.  

Inside of Card:

1.  For the top of the card cut a 3 5/8" x 4 1/8" piece of Basic Black card stock and a 3 1/2 x 4" piece of DSP and glue to the card base.
 
2.  For the bottom of the card cut a 3 5/8" x 4 1/8" piece of Basic Black and a 3 1/2 x 4" piece of Very Vanilla.  Glue to the bottom of the card base. Stamp the sentiment "Celebrate You" from the Birthday Blast stamp set and the bear in Tuxedo Black ink on the Very Vanilla layer.
 
3.  Cut 4 3 1/4 x 2 1/4" pieces of Basic Black card stock for the Accordion Fold piece. Cut 2 Very Vanilla and 2 DSP pieces to measure 2" x 3" and glue to the Basic Black layers. 
Stamp the "It's Your Birthday" sentiment on the top of the Very Vanilla layer in Tuxedo Black ink.  I stamped the grass from Thoughtful Branches and the Tree from Always an Adventure in Old Olive ink. The bear was stamped in Tuxedo Black ink.  Adhere these layers together and attach to the first fold in the Accordion Fold piece.  For the second section layer the basic black card stock and dsp to the accordion fold piece.    Note I somehow added a layer of Very Vanilla in this section, just ignore that in the picture. 

For the second half of the Accordion Fold Piece create this scene on the first panel by:  Cut out another section of trees from Old Olive card stock and adhere across the bottom of the Very Vanilla panel.  Stamp the Road Sign in Crumb Cake on Very Vanilla card stock and fussy cut out the image.  Adhere to the Very Vanilla panel with Dimensionals.  Stamp two clouds in the sky in Tuxedo Black ink.  For the fourth panel layer basic black panel and DSP panel.  Stamp the sentiment "World's Greatest" from the Guy Greeting stamp set in Tuxedo Black ink on Very Vanilla and fussy cut.  Attach with Dimensionals.  Note:  I sponged all of the DSP pieces with Crumb Cake ink before adhering to the basic black panels. 
Well there you have it for today.  I really enjoy creating these Pop N' Twist cards. Pulling all the elements together is so much fun.  I hope you enjoyed this one as much as I did and would be happy if you could leave me a comment. It makes my day.  In the meantime....

Happy Stamping! 
Penny Tokens Stampin' Spot  


Wednesday, April 26, 2017

Watercooler Wednesday Challenge #116 - Kath's Masculine "Anything Goes" Challenge

This week's Watercooler Wednesday challenge #WWC116 is a Masculine "Anything Goes" theme hosted by Kath.   

If you're like me, you're probably always on the lookout for ideas and samples of masculine cards.  This is  especially true with Father's Day looming in the months to come and so many male birthdays on my calendar.

So, my card for this challenge features one of the more masculine stamp sets from Stampin' Up! called "The Wilderness Awaits"I'm sad to say this set is retiring the end of May 2017, and I wanted to give it a last hurrah!  What better way than to combine it with one of my favourite fancy fold techniques. 

Here's My Card:

This card, called a "Twist and Pop" is one of the more favourite fancy fold cards this year. I've found that making one of these cards is like pulling together a special story and they're such a challenge.  I love making these so much that I'm planning on featuring this card style in my upcoming "Father's Day" Masculine card class, so stay tuned for details. What fun! 


Supplies:

Stamp Sets: The Wilderness Awaits #139365*, Here's to Cheers #142101*, Badges and Banners #141610, Avant-Garden (SAB 2017 (R), Gorgeous Grunge #130517*, Stylized Birthday #141828
Card Stock:  Very Vanilla, Tip Top Taupe, Early Espresso
Ink:  Early Espresso, Tip Top Taupe, Crumb Cake 
Accessories:  Trimmer, Big Shot, Woodland Embossing Folder #139673, Brayer, Stitched Framelits - Ovals and Circles*(R),  Stitched Shapes Framelits #145372, Banner Punch, 1 1/4" Circle Punch, Large Oval Punch (R).
Note:  All Supplies Marked with (*) are retiring at the end of May 2017 or as long as supplies last. (R) refers to accessories that were previously retired.


For the inside top card panel, I repeated the Woodland Embossing folder layer but used the debossed side to add some interest. I cut a layer of Very Vanilla card stock with the Stitched Shapes Oval Framelits for the "Happy Birthday" sentiment. 
The sentiment was stamped with the Stylized Birthday single stamp. I'm a big fan of this large bold font and find it really works well on masculine cards. 
To finish off I stamped some of the Gorgeous Grunge splotches randomly in Tip Top Taupe on the sentiment and added some more Gold Metallic Star Embellishments. I cut a larger oval of Early Espresso card stock with last years retired Ovals Framelits and mounted this with Dimensionals.

 
Because the card stock is relatively heavy on this card and I want to hold the twist part inside until the card is fully opened, I've added a belly band to give it some stability.  I cut a piece of Very Vanilla with the smallest Stitched Shapes Oval and stamped the "for you" sentiment from the Wilderness Awaits stamp set, leaves from Avant-Garden and splotches from Gorgeous Grunge.  The two small metallic stars give it a bit of pizazz on the card front.  Note:  the Early Espresso oval was cut using the old original large oval punch. It worked perfectly for this layer. 
I really like the four panels inside of the Twist and Pop Card.  You can use them to tell a story with your stamps and sentiments or add photos..... pretty much anything you want to decorate and personalize the card.  The bottom panel was left plain except for the small leaf stamp in the bottom corner.
The Elk's image from the Wilderness Awaits stamp set was repeated for this panel and some splotches from Gorgeous Grunge were added.

This panel was stamped with the Badges and Banner stamp set and the image was cut out with the coordinating Banner Punch

This panel was stamped with the Here's to Cheer's stamp set  and Gorgeous Grunge.
This is a mirror image of the Elk from The Wilderness Awaits that was stamped on acetate and then transferred to the Very Vanilla panel.  It isn't as dark as I would have liked it, but the image came through pretty clear.  The "No. 1" is such a cute little stamp and is from the Badges and Banners.  It was cut out with a 1 1/4" circle punch.
Well that's it for today's card challenge.  I hope I've inspired you with today's card and you'll take the time to leave me a comment.  Let me know if you've ever tried this fancy fold before.  It can be tricky, but with practice and proper positioning it is a terrific card style.  I plan on making a lot of these Twist and Pop cards in the coming weeks.

If you haven't participated in our Watercooler Wednesday challenges before I hope you'll give it a try.  Our challenges are posted on Wednesdays and are open until the following Monday.  If you haven't already checked out the Design Team artists I hope you will, they've posted some amazing samples this week.

Happy Stamping!
Penny Tokens Stampin' Spot

Wednesday, April 12, 2017

Watercooler Wednesday #114 - Penny's Color Challenge

It's time once again for a Watercooler Wednesday challenge and this week I'm hosting.  Color challenges are one of the most inspiring challenges for me.  I always find them a fun way to explore different combinations of color.

When I came across this image and beautiful quote I knew I had the perfect color combo for this weeks challenge.  These three amazing colors are:  Calypso Coral, Pool Party and Island Indigo.  Feel free to use a neutral(s) of your choice.   

I hope you'll love this combo as much as I do and you're inspired to link up a creation of your own. The rules and the Linksky are at the bottom of the Watercooler Wednesday challenge WWC114 and it's open until 5:00pm MT on Monday April 17th, 2017. 

Here's My Card: 

What fun I had creating this card with a stamp set called Perfect Mix.  You can find this set on page 35 of the Stampin' Up! Spring Occasions Catalogue which expires on March 31st, 2017.  This set was aptly named as it's simply the "perfect mix" of kitchen images and sentiments.  There's no limit to the different types of cards you can make with this set.
Right now this fantastic 9 piece rubber stamp set is on the retiring list for only $17.95 while supplies last.   

Supplies:
Stamp Set:  Perfect Mix #142930, Touches of Texture #141934
Ink:  Pool Party, Island Indigo, Calypso Coral, Momento Tuxedo Black
Card Stock:  Pool Party, Island Indigo, Calypso Coral and Whisper White 
DSP: Regals Collection Designer Series Pack #138436

Accessories:  Paper Trimmer, Big Shot, Stitched Shapes Framelits, Tom Bow Glue, Dimensionals, Aqua Painter
Assembly: 1.  The Pool Party card base measures 8 1/2" x 5 1/2" and is scored at 4 1/4".
2.  The layer of Calypso Coral measures 5" x 4"
3.  The Island Indigo layer measures 3 3/4" x 4 3/4"
4.  The Island Indigo DSP layer measures 3 1/2" x 4 1/2" 
5.  Adhere layer 2, 3 and 4 to the card base 6.  Numbering the Stitched Shape Circle Framelits from 1-4 from the outside ring cut out: one #1 Island Indigo, two #3 medium Whisper White and one #3 Calypso Coral, one #3 in Whisper White and one #4 in Calypso coral.  These circles will be adhered to the front and the inside of the card.   

Stitched Shapes Framelits includes 4 or each size of Ovals, Circles and Squares.  The stitched outlines give such a professional edge to the images.
7.  To complete the front of the card:
 
  • Glue the large Island Indigo Circle to the upper left corner of the dsp
  • Glue the medium sized Calypso Coral circle towards the bottom right corner
  • Stamp the measuring spoon image in Tuxedo black ink in the bottom center of the medium sized Whisper White circle.  Stamp the sentiment "no one measures up to you" in Tuxedo Black ink right above the spoons.
  • Color the spoons with a Calypso Coral Marker or with the Aqua Painter.  
  • Stamp two of the oven mitt images on Pool Party with Tuxedo Black ink. Fussy cut both images and adhere to the Calypso Coral Circle with Dimensionals and between each other to create depth. Repeat this process for the other set of oven mitts.
I came up with the pattern for these mitts while I was working on another project.  I stamped these on a left over scrap.  The stamp set used for the background was Touches of Texture. and the stamping was done with the same three ink colours.  
8.  Add a few random sequins attached with glue dots and you're done with the front of the card.

9.  To finish the inside of the card cut a 4" x 5 1/4" Whisper White card stock panel and adhere to the card base. 
 
10.  Stamp the sentiment "Baking makes Life Sweeter" with Tuxedo Black ink on the center of the smaller Whisper White circle and adhere to card panel.  Slide small Calypso Coral circle under bottom corner before completely gluing this circle down.

11.  Stamp the mixing bowl in Tuxedo Black ink and colour with Calypso Coral, Island Indigo and Pool Party markers or Aqua Pen on the last Whisper White circle.  Adhere with Dimensionals.  Although you can't see it I've added Wink of Stella to the bowl contents.  To finish add a few sequins and you're done!    


So that's my color challenge for this week.  I hope you've enjoyed my project as well as the ones created by the rest of the Watercooler Wednesday Design TeamI'd love to hear what you think of this card and whether you like this stamp set.

Click Here to Shop Online
 April Hostess Code - G6EFBVU4
USE THIS CODE FOR ALL ON LINE ORDERS IN APRIL AND YOU COULD WIN A PORTION OF THE HOSTESS REWARDS - SEE HOSTESS TAB FOR DETAILS.  
 

Retiring Products Available until May 31st, or while supplies last.  Once they're gone, they're really gone.  Click here to view: 

Happy Stamping!
Penny Tokens Stampin Spot


Masculine Birthday - Adventurous Sky FMS#

Welcome back and thanks for visiting my blog.  Today I have another masculine birthday card to share with you that features a soon to be rel...